It is funny how you always need to consider the knock on impact of one job on another job further up the line.
So sorting out my doors is now linked to the work required to get a better fit between the body shell & frame.
And issues with the body shell fit are also linked to my dashboard, which in turn, is linked to my electrics…
Dash Board Ideas:
Previous 'mock up' work showed that the 'wrap around' dash would need a lot of work before it would fit nicely.


Despite this, my original plan was to mount most of my donor's original dials & gauges into this dash panel.
Although I was considering mounting the choke level on a metal bracket to make it more solid to pull against.
( With similar considerations for fitting the hazard light switch and the trip milometer reset switch. )
So I'd knocked up another simple spread sheet to play around with some possible layouts (not to scale).
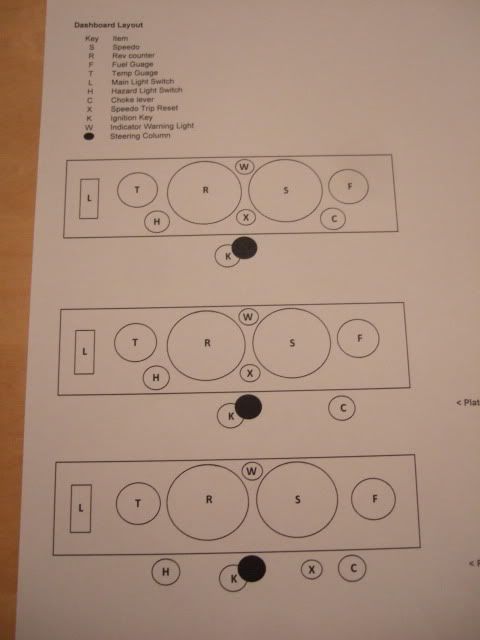
This was all pretty standard stuff, although I did swap the choke lever to the right of the steering column.
( I found it a pain start trying to start the car with both ignition key & choke on the left side of the column. )
I'd also taken on board
Mister Towed's tip about moving the light switch towards the middle of the car.
But then
Nike 55 put this photo on
Mr T's build (relating to side mirrors) and I had a big re-think.
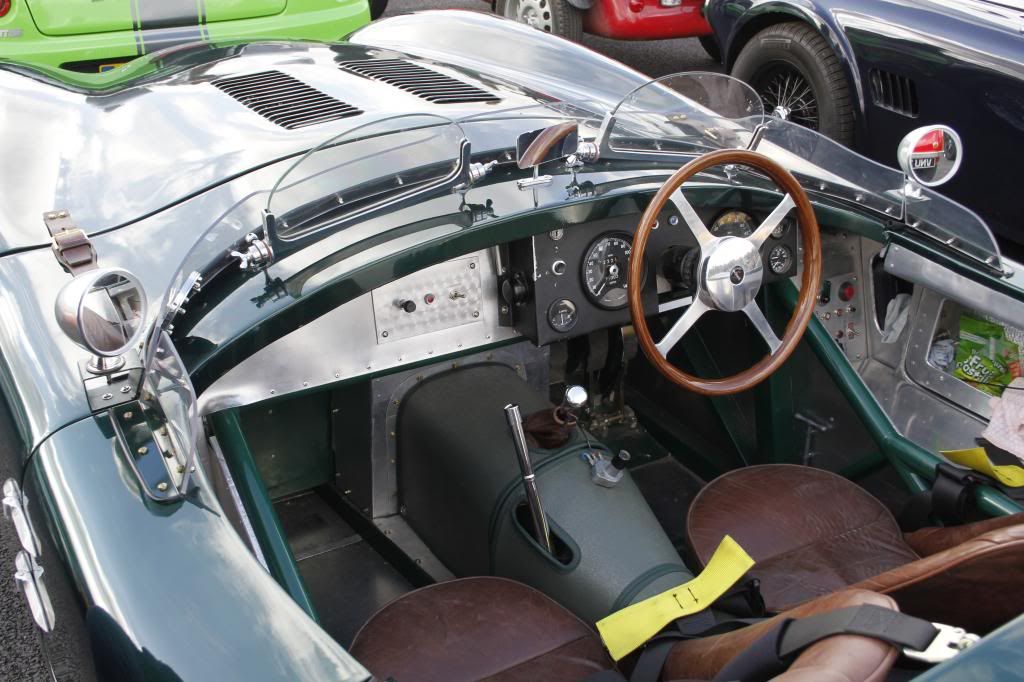
I think this approach would be easier to build below the existing dash board "lip" in the body shell.
Note: I mean the box section for the dials, etc. not the alloy finish (even though that does look great).
I have also decided to add a simple battery cut off switch to the dash as part of my security measures.
Although I plan to fit this on the passenger side of the dash to reduce the length of battery cable needed.

But before I can mock up a 'life size' dash on cardboard, there are other inter-connected areas to deal with.
I can't test fit the steering column (to arrange the dials around) until I modify the frame to accommodate it.
And I can't modify the frame until I've learnt how to weld and had some time to practise.
The final part of the dash puzzle is the position of the driver's seat, which in turn is linked to the floor pans.
If I make the seat runners work, then the seat will be higher than if I have to bolt it straight to the floor.
Pulling It All Together:
I know the above reads like some sort of never ending jigsaw puzzle that just wont fit together properly.
But I hope all of these long winded decisions will eventually make the final construction phase a bit easier.
AndyP57 has put a lot of effort into soring out my missing / damaged parts, which will also be a big help.

I abandoned any finishing deadlines a while back and that has actually taken a lot of pressure off me.
After all, this is effectively my spare time hobby, not my full time job, working around family commitments.
And that is before I start ranting & raving about my own dumb idea to build this outside & battle the weather.
But a key stage of my build is now approaching when I will be in a position to start modifying the frame.
I will post my framework "To Do" list separately, and thankfully they are all little jobs, just a lot of them.
Until next time, take care, Paul.
 Replies:
Gentlemen
Replies:
Gentlemen - Thanks for all the feedback and links, I work through then at the weekend.
Unfortunately, I can't remember what sort of welder my mate has.
Hopefully I'll have a better idea of what I will be doing next week.