|
|
| Tribute Automotive Builds Discuss your Tribute kit build |

14th April 2015, 18:04
|
 |
Senior Member
|
|
Join Date: Feb 2012
Location: Wembley, London
Posts: 5,056
|
|
Gaz - I look forward to seeing how your SWB build turns out, as you did a great job with your Sammio. 
Good luck, Paul. 
|
24th April 2015, 18:35
|
|
Senior Member
|
|
Join Date: Jan 2012
Location: Warrington
Posts: 383
|
|
Quote:
Originally Posted by Paul L

Gaz - I look forward to seeing how your SWB build turns out, as you did a great job with your Sammio.
Good luck, Paul.
|
Thanks Paul, hopefully I can't take some of what I learned from the Sammio build and put it in to this. |
24th April 2015, 18:54
|
|
Senior Member
|
|
Join Date: Jan 2012
Location: Warrington
Posts: 383
|
|
Well, a weeks holiday passed by very quickly and Im now back and really looking forward to getting this build under way. Ive just spent a few hours stripping the remaining unneeded parts from the donor and putting a coat of paint onto the frame. I intended taking some pictures but it started to pour down so I rushed to get everything back into my small very cramped garage that now contains the donor, all parts removed and the kit waiting to be fitted plus two sets of wheels and the dryer that she who must be obeyed won't let me remove.
I have realised that I have made one mistake already though. I sold my Z3 bonnet which was collected whilst I was on holiday and have realised that I forgot to remove the bonnet catches which I needed. Bugger! I will trawl through eBay tonight to try to find another pair but only got £18 for my bonnet anyway so can't see myself making any money from it. Note to others building / planning to build their own, remove these
 |
25th April 2015, 08:45
|
|
Senior Member
|
|
Join Date: Jan 2012
Location: Falkirk, Scotland
Posts: 100
|
|
You need to get this finished pronto mate....then drive it up to see me! Very keen to see one in the flesh. You can bring my jacket with you.
|
25th April 2015, 11:29
|
|
Senior Member
|
|
Join Date: Nov 2011
Posts: 3,558
|
|
When you do put the catches back in make sure you copperslip them and grease the mechanism properly so nothing jams. Absolute git to release otherwise
http://www.madabout-kitcars.com/foru...ghlight=bonnet |
25th April 2015, 14:25
|
 |
Senior Member
|
|
Join Date: May 2011
Location: Somerset
Posts: 1,671
|
|
Sounds like an interesting next build, good luck!
<cough>more photos</cough>  |
25th April 2015, 14:54
|
 |
Senior Member
|
|
Join Date: May 2014
Location: Oxon
Posts: 1,118
|
|
Quote:
Originally Posted by WorldClassAccident
|
+1 on that.
Needed two of us to open the bonnet today so copper grease has been applied !!! |
28th April 2015, 17:53
|
|
Senior Member
|
|
Join Date: Nov 2014
Posts: 125
|
|
 even better
get rid of the torx bolts and replace them with M6, so you can put a spanner on it when the bonnet gets jammed or a cable breaks...
|
28th April 2015, 18:00
|
|
Senior Member
|
|
Join Date: Nov 2011
Posts: 3,558
|
|
The bonnet catches/bolts have a slot in them that you can just fit a long screw driver into. The trouble is that the only way to get to them is from underneath between the bumper and the radiator. A right git to do.
The torq bolts don't get touched as you can't get to them and I suspect normal bolts would be as bad unless you used a long socket extender bar
|
28th April 2015, 19:53
|
|
Senior Member
|
|
Join Date: Nov 2014
Posts: 125
|
|
I can tell you that on both a cobra and 250swb kit its better to use m6 bolts.
While fiddling a perfect fot for the bonnet you might end up pushing it in its lock, then finding out that pulling the cable doesn't unlock the lot...
Then you are very happy if you used normal bolts cause they can be unscrewed via the grill opening
|
28th April 2015, 21:00
|
|
Senior Member
|
|
Join Date: Jan 2012
Location: Warrington
Posts: 383
|
|
Thanks for the tip mobilerobbie, sounds like a sensible idea.
|
29th April 2015, 07:25
|
|
Senior Member
|
|
Join Date: Nov 2011
Posts: 3,558
|
|
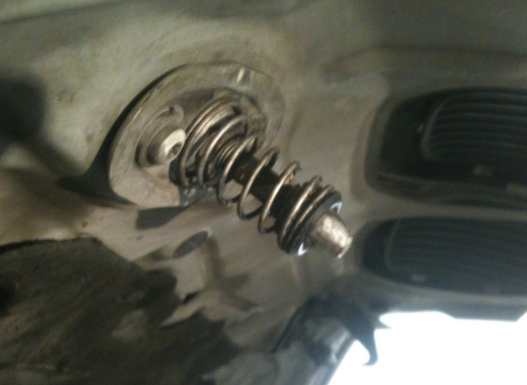
Okay, that explains it - for those kits you are probably right.
The Z300S doesn't allow access through the front grill so you have to reach up from underneath.
All you can see from below is the end of the pin in the catch so that is what you can turn. Without the access through the grille you can't get to the top bolts.
Viewed from underneath the car:
 |
8th May 2015, 09:41
|
|
Senior Member
|
|
Join Date: Jan 2012
Location: Warrington
Posts: 383
|
|
Having been busy at work lately I haven't had a great deal of opportunity to work on the car however after managing to find enough time to get to Stoneleigh on Sunday I was inspired enough by Tributes cars to get home early and have a few hours working on my own SWB and was surprised how quickly it all went together. In just 2 hours I went from having a stripped out donor to this
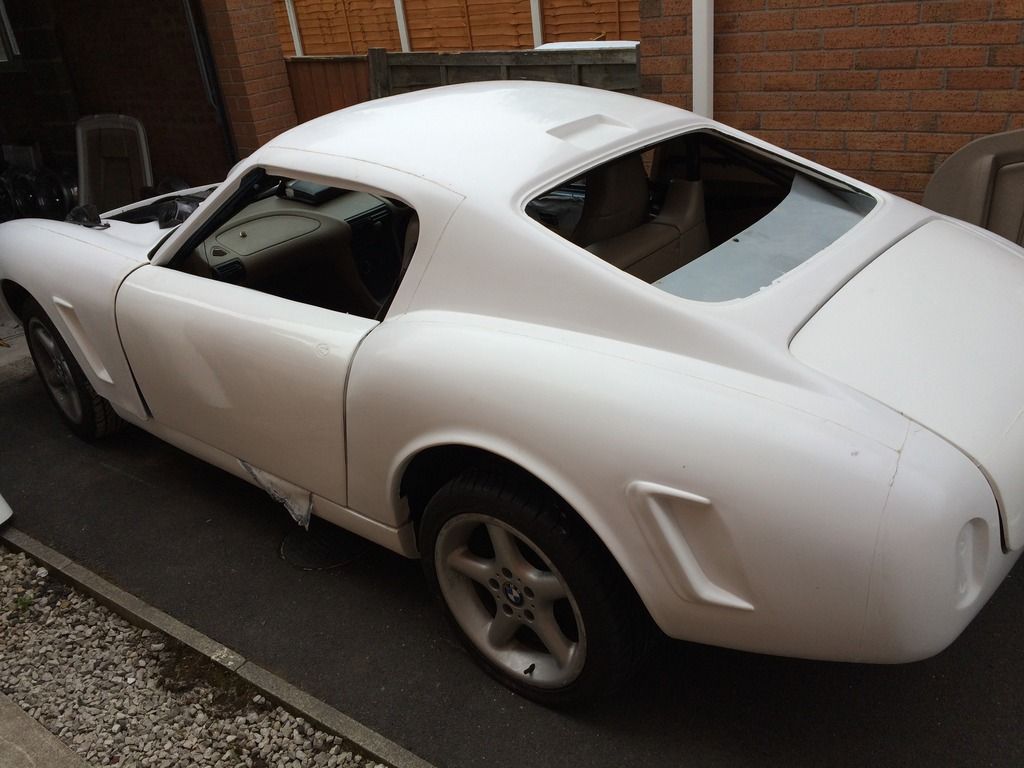
The bonnet and doors are not fixed in place but the sills are bolted on and body is roughly in place although not yet bonded for reasons that will become clear later.
I have had a steady stream of deliveries this week, all parts that I need to progress the car and I have made some decisions of what I would like to do and in what order. The big one being that Im going to leave the stock BMW interior in place for now so that I can speed up the build and get it on the road for the summer. I will then replace it with something more period in the winter along with making any changes that Im sure I will want to make once I have lived with it for 6 months or so. For now Im planning to paint the inside of fibreglass roof with truck bed paint as it is extremely hard wearing and will offer a little protection as well as give it a nice textured feel/look that I have seen on many SWB dashboards.
I have managed to get myself free for much of the weekend so all being well I should be able to make some progress now. I would like to try my wheels out for size however when coming to remove my old wheels I found lock nuts on them and I don't have the key. Bugger! Looks like I'm going to have some fun trying to remove them!

|
8th May 2015, 10:12
|
|
Senior Member
|
|
Join Date: Nov 2011
Posts: 3,558
|
|
Post a photo of the lock nut. I might have a matching socket in my shed
|
8th May 2015, 12:18
|
|
Senior Member
|
|
Join Date: Apr 2014
Location: Midlands
Posts: 405
|
|
Failing that a quick trip to your local independent and they'll remove that with a snazzy device. I had a garage replace my tires and over tighten the locking nuts so it couldn't be removed and destroyed the head - my mate at the garage said no problem and 30mins later and a cup of tea they removed all 4 nuts.
I have to say that I like it in white too, amazing how well put together that kit is as a package, a tip of the hat to the Tribute guys. I look forward to your weekend update pictures!
Last edited by jones; 8th May 2015 at 12:20..
Reason: typo
|
8th May 2015, 12:37
|
|
Senior Member
|
|
Join Date: Apr 2013
Location: Alicante Spain
Posts: 880
|
|
You can buy the sets off ebay to remove locking nuts. Its just like a socket that goes over the top with teeth in that grips as you undo them
|
8th May 2015, 12:40
|
|
Senior Member
|
|
Join Date: Nov 2011
Posts: 3,558
|
|
There is always the more traditional big hammer and sacrificial socket piece. Check YouTube for examples
|
8th May 2015, 14:14
|
 |
Senior Member
|
|
Join Date: Jan 2014
Location: Egham, Surrey
Posts: 1,780
|
|
I pushed some plasticine into the locking wheel nut. This gave a good impression that I was able to take to the BMW dealer to match.They keep a box of all the locking wheel nut keys.
|
8th May 2015, 15:14
|
|
Senior Member
|
|
Join Date: Jun 2011
Location: birchington, kent
Posts: 1,769
|
|
I had a 3D scanner to hand, so i scanned it and had a duplicate made.
|
8th May 2015, 15:26
|
|
Senior Member
|
|
Join Date: Jan 2012
Location: Warrington
Posts: 383
|
|
After taking a closer look it seems that only one of my wheels has a locking nut on (a BMW type with 15 splines) and so I think that I will try to remove it myself. My plan is to drill a hole in the centre and hammer in a large Torx that is slightly too big for the hole before applying some pressure. If that does not work I can buy the correct fitting on eBay for £10, I'm just too tight to pay it before trying to get it off myself.
|
|
Currently Active Users Viewing This Thread: 1 (0 members and 1 guests)
|
|
|
| Thread Tools |
|
|
| Display Modes |
 Linear Mode Linear Mode
|
 Posting Rules
|
You may not post new threads
You may not post replies
You may not post attachments
You may not edit your posts
HTML code is Off
|
|
|
All times are GMT +0. The time now is 20:51.
|


