|
|
| Vintage and Classic Roadster Kit Car Builds For Vintage and Classic era kit cars. Post your build reports, problems and progress here |

6th September 2012, 16:35
|
 |
Senior Member
Enthusiast
|
|
Join Date: Sep 2004
Posts: 1,891
|
|
 MartinClan's Pembleton build
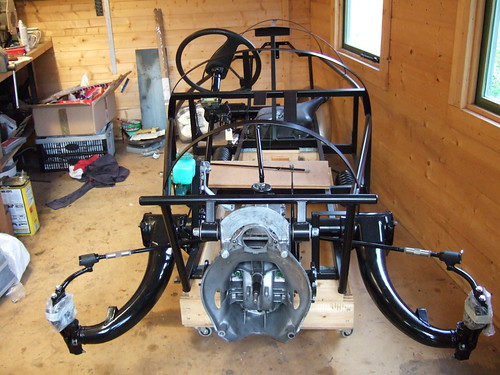
Last year, having completed my Marlin Sportster a few years previously, I started to get itchy fingers again. This time I have chosen to build a Pembleton which is a very vintage looking 3 wheeler using Citreon 2CV mechanics.
I chose the Pembleton because:
a. I like its looks
b. Being a 3 wheeler it is classed as a heavy trike and only has to pass the MSVA test which is both less onerous and cheaper than the IVA.
c. Should be (relatively) cheap to build and run.
So I have started with this:
 Dscf1369
 by Robin J Martin, on Flickr
And should hopefully end up with something like this:
 silverfish
 by Robin J Martin, on Flickr
The plan is to post updates regularly (or whenever I remember) so watch this space....
Robin |
6th September 2012, 17:13
|
 |
Senior Member
Big Cheese
|
|
Join Date: Sep 2002
Posts: 1,080
|
|
Nice choice, another quality kit, will look forward to the updates.
John
|
6th September 2012, 19:50
|
 |
Senior Member
Enthusiast
|
|
Join Date: Mar 2005
Posts: 3,075
|
|
That is a beautiful example!!
I especially like the brass headlamp bowls and wing mirror. Superb!
(For a moment there, I thought you had already finished  ) |
7th September 2012, 07:21
|
|
Senior Member
Enthusiast
|
|
Join Date: Sep 2004
Posts: 1,891
|
|
Quote:
Originally Posted by peterux

That is a beautiful example!!
|
It's generally considered to be one of the best examples. Most Pembleton owners name their cars - this one is called Silverfish.
It's a standard to aim for. Not sure if my skills are quite up to it however - we shall see! There are more pictures of this and other completed cars on the Pembleton website http://www.pembleton.co.uk/Home.html
Robin |
7th September 2012, 07:59
|
|
Senior Member
Enthusiast
|
|
Join Date: Jan 2007
Posts: 932
|
|
Quote:
Originally Posted by MartinClan
It's generally considered to be one of the best examples. Most Pembleton owners name their cars - this one is called Silverfish.
It's a standard to aim for. Not sure if my skills are quite up to it however - we shall see! There are more pictures of this and other completed cars on the Pembleton website http://www.pembleton.co.uk/Home.html
Robin |
Robin
How do the open engines get through MSVA is it much less stringent than IVA?
Mike |
7th September 2012, 08:15
|
|
Senior Member
Enthusiast
|
|
Join Date: Sep 2004
Posts: 1,891
|
|
Quote:
Originally Posted by Mike
How do the open engines get through MSVA is it much less stringent than IVA?
Mike
|
There seems to be two schools of thought.
Apparently there is an exemption for the cooling fins of air cooled engines so with some carefull positioning/covering of all the ancilliaries so they are not contactable you can get away with this.
But recently most builders seem to have fabricated a simple mesh guard that covers the whole kit and caboudle. Bit of a sledgehammer approach. Rust seems to attack them fairly quickly after the test and they tend to fall off....
I wonder what they do for the new Morgan 3 wheeler?
Robin |
11th September 2012, 21:24
|
 |
Senior Member
Enthusiast
|
|
Join Date: Feb 2005
Location: Hampshire
Posts: 2,496
|
|
Awesome stuff, looks nice  |
16th September 2012, 17:10
|
|
Senior Member
Enthusiast
|
|
Join Date: Feb 2005
Location: Hampshire
Posts: 2,496
|
|
vrooomm, burble, burble, vrooooom  |
16th September 2012, 21:07
|
|
Senior Member
Enthusiast
|
|
Join Date: Mar 2005
Posts: 3,075
|
|
Hmmmm... an exoskeleton three wheeler!  |
16th October 2012, 12:44
|
|
Senior Member
Enthusiast
|
|
Join Date: Sep 2004
Posts: 1,891
|
|
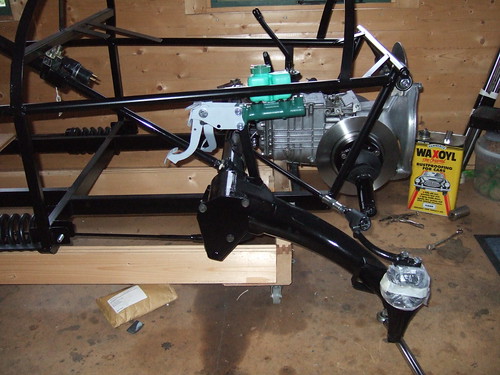
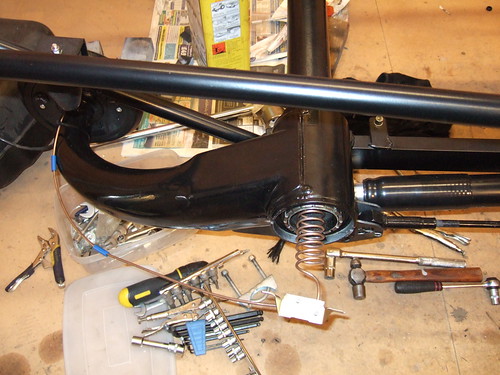
Gearslide (gearstick?) arrangement. I replaced the 'orrible standard rubber connection between the lever in the box and the gearslide with a rose joint.
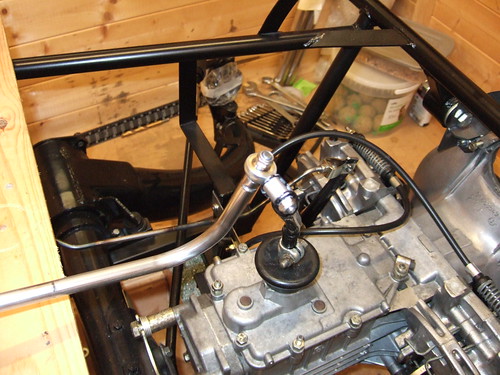 DSCF1679
 by Robin J Martin, on Flickr
Front of gearslide will evenetually be supported by bulkhead but for now it's a block of wood! Interestingly the 2CV gearbox is a dogleg. First opposite reverse, 2nd opposite 3rd and 4th opposite nothing!
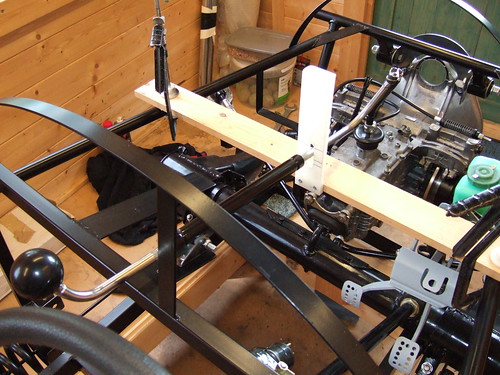 DSCF1672
 by Robin J Martin, on Flickr
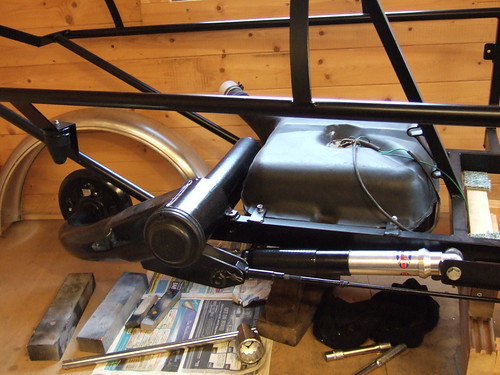
Umbrella style handbrake. I had to make the link as the standard 2CV link is too short.
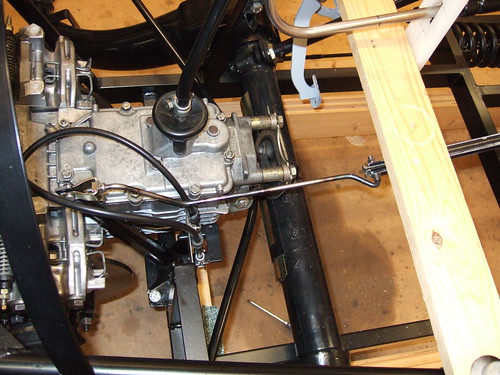 DSCF1680
 by Robin J Martin, on Flickr
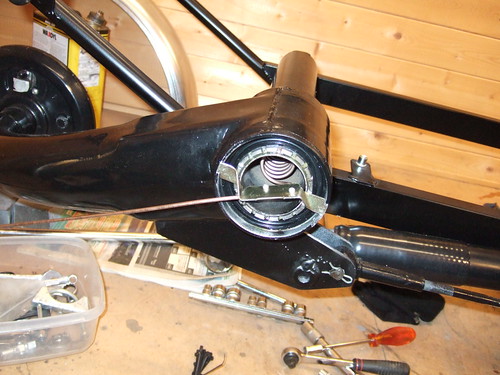
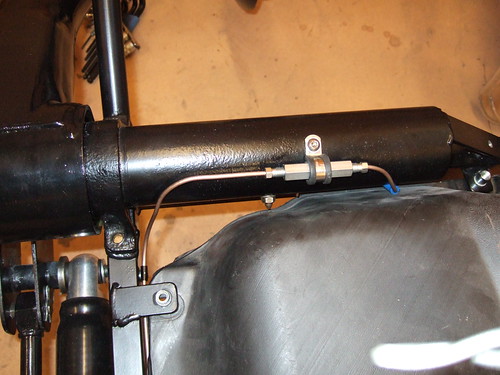
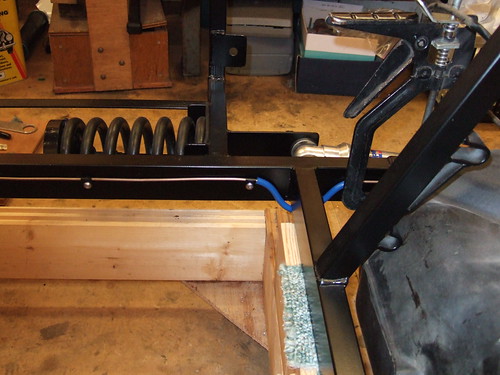
Various pictures of the brake line instalation. There isn't a single flexi in the whole system thanks to Citreon's ingenuity.
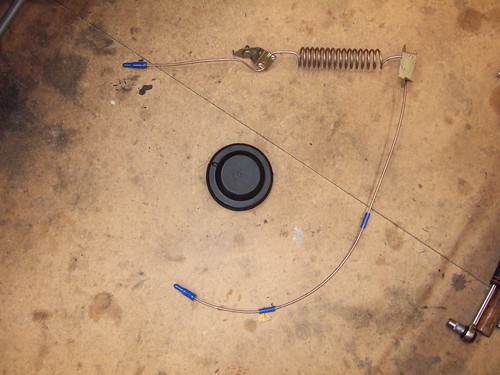 DSCF1678
 by Robin J Martin, on Flickr
 DSCF1682
 by Robin J Martin, on Flickr
 DSCF1683
 by Robin J Martin, on Flickr
 DSCF1684
 by Robin J Martin, on Flickr
 DSCF1686
 by Robin J Martin, on Flickr
 DSCF1685
 by Robin J Martin, on Flickr
More pictures here www.flickr.com/photos/robinmartin |
16th October 2012, 19:48
|
|
Senior Member
Enthusiast
|
|
Join Date: Mar 2005
Posts: 3,075
|
|
I love those 'coil sprung' brake lines, they are such an elegant design.
Less connections and nothing to perish. (But no ethanol for you!!)
Did you re-make the new ones yourself?
|
18th October 2012, 08:00
|
|
Senior Member
Enthusiast
|
|
Join Date: Sep 2004
Posts: 1,891
|
|
Quote:
Originally Posted by peterux
Did you re-make the new ones yourself?
|
Unfortunately not. Citreon use a different method of terminating the brake pipes (now there's a surprise). They have a bulge about 1cm from the end of the pipe (instead of a flare on the end) and a little rubber tube that slips over the end of the pipe that actually makes the seal. You can buy a special Citreon brake flaring kit but is is £££££. Forunately a company called Bonapart (really!) make a brake pipe kit specially for the Pembleton with the correct length pipes. Well - almost correct, I had to be a bit inventive in one case.
Robin |
25th January 2013, 23:33
|
|
Senior Member
Enthusiast
|
|
Join Date: Feb 2005
Location: Hampshire
Posts: 2,496
|
|
cool, I like that engine Looks like it belongs in the front of a WW1 fighter |
28th January 2013, 15:50
|
|
Senior Member
|
|
Join Date: Dec 2010
Posts: 287
|
|
Oh so beautiful
|
7th February 2013, 12:23
|
|
Senior Member
Enthusiast
|
|
Join Date: Sep 2004
Posts: 1,891
|
|
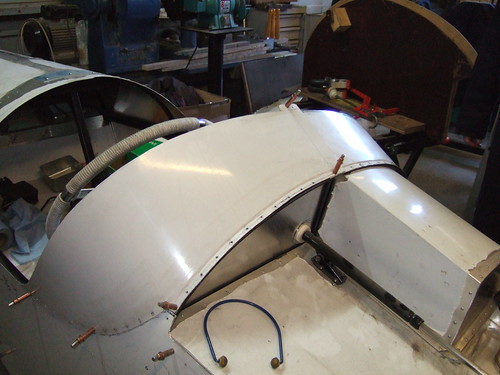
Workshop Weekend
Last weekend I went to a workshop weekend hosted by Duncan Grimmond. Duncan is a professional sheet metal artisan ( http://www.zinccounters.co.uk/) and also a fellow Pembleton enthusiast. Once or twice a year he is kind enough to open up his workshop so that Pembleton builders can access his huge range of metal forming tools - folders, shrinkers, stretchers..... The main job I wanted to do was to form the flange on the floor which is curved and so potentially tricky. Duncan made it look easy....
 DSCF1713
 by Robin J Martin, on Flickr
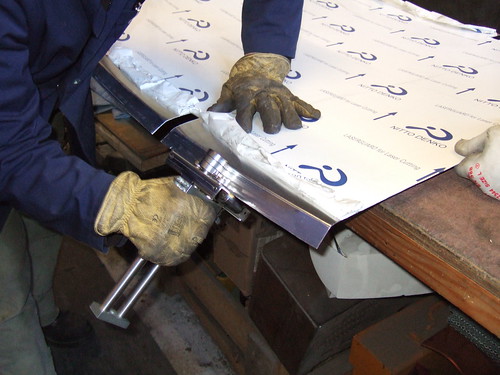 DSCF1717
 by Robin J Martin, on Flickr
While we were there I managed to get a few shots of Duncan's second Pembleton which is currently under construction.
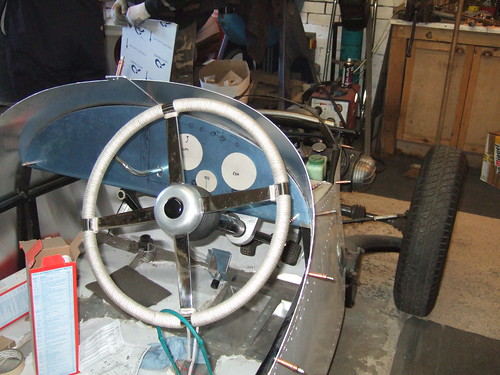 DSCF1718
 by Robin J Martin, on Flickr
 DSCF1720
 by Robin J Martin, on Flickr
A standard to aim for! A few more pictures on my Flikr pages.
Robin |
25th February 2013, 19:14
|
|
Senior Member
Enthusiast
|
|
Join Date: Sep 2004
Posts: 1,891
|
|
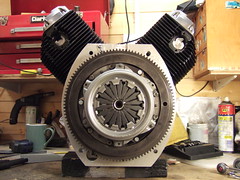
And its in....
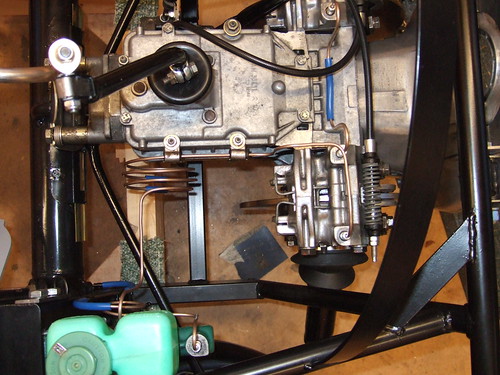
Engine fitted at last. Everything went according to plan (well more or less). So I know have an Italian engine mated to a French gearbox using a British adapter. Cool.
A few pictures...
Completed engine from the front. The original ignition was fired from a pickup on the Guzzi flywheel. But of course I am now using the 2CV flywheel. Proiblem solved by using an old school analog electronic igntion from Lucas. The pickup goes on the end of the camshaft.
 DSCF1727
 by Robin J Martin, on Flickr
And from the other end.
 DSCF1729
 by Robin J Martin, on Flickr
It fits!
 DSCF1731
 by Robin J Martin, on Flickr
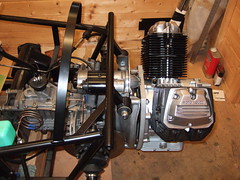 DSCF1732
 by Robin J Martin, on Flickr
Lower mounting nut just fits between three cooling fins (middle one removed)
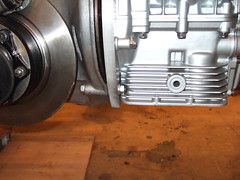 DSCF1736
 by Robin J Martin, on Flickr
Next step - to get it started - but still a way to go yet....
Robin |
10th March 2013, 17:06
|
|
Senior Member
Enthusiast
|
|
Join Date: Sep 2004
Posts: 1,891
|
|
I have been working towards getting the engine running. Lots of little jobs to do first.
New bracket for clutch cable. The original one that was welded to the chassis meant the clutch cable was poorly aligned and right at the end of the adjustment.
 DSCF1741
 by Robin J Martin, on Flickr
Carbs trial fitted with air filter from Ebay. Not the best of solutions but it will do to start. Neck for air filter clears chassis by at least 1mm!
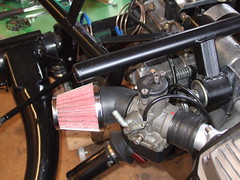 DSCF1738
 by Robin J Martin, on Flickr
Old school electronic ignition (Lucas Rita) with coils underneath. The Guzzi employs a lost spark system which means two coils.
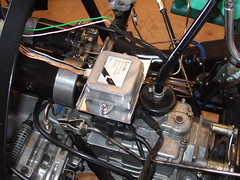 DSCF1739
 by Robin J Martin, on Flickr
Robin |
30th May 2013, 22:05
|
|
Senior Member
Enthusiast
|
|
Join Date: Feb 2005
Location: Hampshire
Posts: 2,496
|
|
I really like the engine |
8th July 2013, 12:30
|
|
Senior Member
Enthusiast
|
|
Join Date: Sep 2004
Posts: 1,891
|
|
I spent the last few weeks making a metal folder. It had to be done without welding (as I can't) and cheaply. Here is the result
 DSCF1787
 by Robin J Martin, on Flickr
And in action
 DSCF1793
 by Robin J Martin, on Flickr
I only need to make half a dozen folds or so but didn't fancy the suggested blocks of timber approach. Tried to find a straight piece of timber recently?
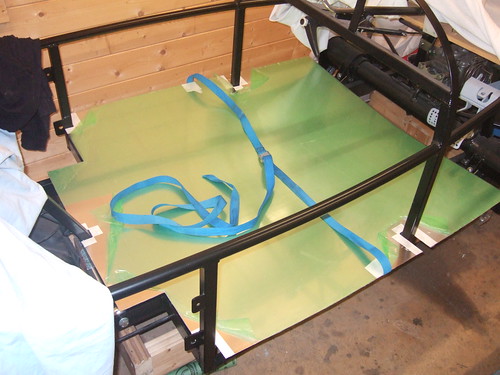
The first part to be folded was the rear floor. Seems to fit OK....
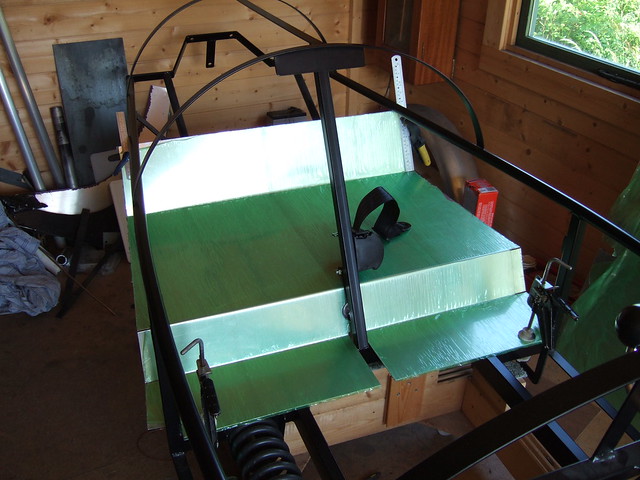 DSCF1794
 by Robin J Martin, on Flickr
I had to also do my first but of "skilled?" metalwork to make a small dip so the bulkhead could fit snugly without fouling the seat-belt mount.
 DSCF1795
 by Robin J Martin, on Flickr
Cheers, Robin |
|
Currently Active Users Viewing This Thread: 1 (0 members and 1 guests)
|
|
|
| Thread Tools |
|
|
| Display Modes |
 Hybrid Mode Hybrid Mode
|
 Posting Rules
|
You may not post new threads
You may not post replies
You may not post attachments
You may not edit your posts
HTML code is Off
|
|
|
All times are GMT +0. The time now is 12:49.
|