|
|
| Tribute Automotive Builds Discuss your Tribute kit build |

1st January 2013, 00:43
|
 |
Senior Member
|
|
Join Date: Nov 2011
Location: Emsworth
Posts: 810
|
|

Quote:
Originally Posted by Tribute Automotive

Hi Grahame and Nick
My intention when designing the MX250 kit was to reuse as many parts from the base MX5 as possible to save the customer money, but the limitations of the repositioned hinges has become apparent. They will work, as seen on our demo cars, but I will freely admit that the bonnet hinges give only limited access (about 45 degrees of opening) to the engine bay. The revised option of using modified boot hinges on the bonnet has been written on our production board in the workshop for about 3 months now, you know how other things take over!!
This is the plan, or rather a section through the bonnet/slam panel:

They will require pockets to be cut out of the GRP return inside the engine bay.
They will bolt to the slam panel where it narrows, as shown here:

The hinges will require modifiying and I will be offering them on an exchange basis as part of the kit. I will post up some pictures after we are back in the workshop on 2nd January. |
Thanks Chris. I will be interested to see what you come up with, however a trip to the scrap pile for some steel turned up a set of cantilevers from a reclining chair foot stool! They give a huge amount of lift. I will probably make. Ones to my wooden pattern as they are very simple, plus they should lift the front of the bonnet up and over the rad filler cap so it can be filled from the front.

|
1st January 2013, 17:41
|
 |
Senior Member
|
|
Join Date: Oct 2010
Posts: 1,622
|
|
Quote:
Originally Posted by grayone
Hi guys nice to see lots of chat about hinges,I might try Chris's new design ,been in the garage all day I couldn't get enough pressure from my small compressor to shultz the underside so started cutting the vents/lights etc . It looks a tight fit behind the head light will they fit or do I have to cut metal away? also has any body tired 8j 16s et20 with 205 or 215 60 16 on the front? I think it'll be heavy parking but will they fit? 9j 16 et20 225 or 235 60 s on the rear,what do you think? sorry for all the questions but Im on a time schedule
|
Hi Grahame
Our red car was running the following size wheels:
7.5J x 16 et 20 Front (no spacers)
9J x 16 et 15 Rear (with 25mm spacers)
215/40/16 Tyres all round.
As shown here:

So, your 8J x 16 et20(mm) fronts will be only 12.5mm closer to the arch lip and the rears will have 5mm more clearance (inset) to the rear arch.
For tyre info the following website is brilliant:
http://www.kouki.co.uk/utilities/vis...ize-calculator
If you enter your tyre sizes into the fields you can compare sizes.
Our Mk2 demo car, shown below, ran 215/40/17 tyres (603.8mm diameter) which rubbed slightly on full travel. It also required bubbled arches on the front due to Zero offset on the alloys.

Reference the fit on the rear of the headlights, we trim the rear off the bowls and re-seal. You could "clearance" the metalwork.
Last edited by Tribute Automotive; 1st January 2013 at 17:44..
|
1st January 2013, 18:34
|
|
Senior Member
|
|
Join Date: Jul 2012
Posts: 576
|
|
You could have mentioned that sooner, thats why I had trouble aligning the front, body now re trimmed and lights to re wire, this is not a game of poker, you don't need to keep your cards so close to your chest, anyway hot air gunned my rear today a few bubbles to fill but gald for the info before a spray.
Quote:
Originally Posted by Tribute Automotive
Hi Grahame
Our red car was running the following size wheels:
7.5J x 16 et 20 Front (no spacers)
9J x 16 et 15 Rear (with 25mm spacers)
215/40/16 Tyres all round.
As shown here:
So, your 8J x 16 et20(mm) fronts will be only 12.5mm closer to the arch lip and the rears will have 5mm more clearance (inset) to the rear arch.
For tyre info the following website is brilliant:
http://www.kouki.co.uk/utilities/vis...ize-calculator
If you enter your tyre sizes into the fields you can compare sizes.
Our Mk2 demo car, shown below, ran 215/40/17 tyres (603.8mm diameter) which rubbed slightly on full travel. It also required bubbled arches on the front due to Zero offset on the alloys.
Reference the fit on the rear of the headlights, we trim the rear off the bowls and re-seal. You could "clearance" the metalwork. |
|
1st January 2013, 19:35
|
|
Senior Member
|
|
Join Date: Oct 2010
Posts: 1,622
|
|
Hi Tony, I have PM'd you.  |
3rd January 2013, 22:07
|
|
Senior Member
|
|
Join Date: Oct 2010
Posts: 1,622
|
|
Quote:
Originally Posted by grayone
Hi guys nice to see lots of chat about hinges,I might try Chris's new design....
|
Nearly there with the hinges. Please excuse the dreadful photo's, it when dark all of a sudden....


Only tacked in place to try them out, still need a little more work to provide the best possible clearance as the bonnet opens and clears the lip at the front of the engine bay. |
4th January 2013, 13:48
|
|
Senior Member
|
|
Join Date: Nov 2011
Location: Emsworth
Posts: 810
|
|
Pics look fine to me.
At least you can chop the body away to provide a cross section and mount the pivot as high as poss. As the front lip of the bonnet rises not only up but also is bowed fwd I came to the conclusion that hinging at those positions would mean the bonnet always touched as you can't get the hinge high enough. Im happy to be proved wrong! Now have few hrs on my hinges, unless I get customered!
I dont want to cut the body as I want to gutter the rainwater away clear of the internals of the car.
Made these.......
[IMG] 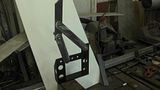 [/IMG]
Last edited by seanick; 4th January 2013 at 19:16..
Reason: Made hinges!
|
4th January 2013, 22:22
|
|
Member
|
|
Join Date: Dec 2012
Posts: 75
|
|
Hi all had a full day in the garage front end bonded on all lights indicators vents and mesh cut ,got some good braces to hold the front valance from b&q 98p each bargain,should get the rear end bonded this weekend, still looking for wheels & tyres
|
4th January 2013, 22:34
|
|
Senior Member
|
|
Join Date: Oct 2010
Posts: 1,622
|
|
|
7th January 2013, 22:31
|
|
Member
|
|
Join Date: Dec 2012
Posts: 75
|
|
Hi all 4 weeks to go, I've had 2 good day on the build body is bonded on headlining is in, all lights & vents cutout rear lights mounted , started to chop strand the joins,finally bought my wheels Dare rs 15" 7&8s with chrome spinners should look nice,next quest is the tyres & spacers
|
8th January 2013, 11:27
|
|
Member
|
|
Join Date: Dec 2012
Posts: 75
|
|
Hi all I finally got around to taking a few pics not very good quality it looks like a snow storm fillier dust, but I have no idea how to upload them
|
8th January 2013, 13:20
|
|
Senior Member
|
|
Join Date: Nov 2011
Location: Emsworth
Posts: 810
|
|
There is a thread in the Sammie forum about pics, but in nutshell,
Upload them to photobucket from your laptop, or if taken with a phone download the photo bucket App first, then upload to Photobucket. Smith on your wifi for this!
When you have them in p bucket, click on a pic and next to
it you will find and image code.
Click on that to copy it.
Back to your browser and your madabout page.
Click on the picture symbol on the top line....
Paste the image code into that box, either by control V on a pc or press and hold on an android phone, to raise the optins, then paste. Add your words, and post away.
|
8th January 2013, 15:25
|
 |
Senior Member
|
|
Join Date: Mar 2012
Posts: 294
|
|
Or :-
Quote:
Originally Posted by tlrtone
I just figured it too...
Click on this icon in advanced reply...
Attachment 492
Upload your image in the pop up window that appears.
Then you need to go back to your reply box and click the icon again
Attachment 493
Then click the image filename and it will put the image in the post with ATTACH tags.
hope that helps! |
|
13th January 2013, 18:09
|
|
Senior Member
|
|
Join Date: Oct 2010
Posts: 1,622
|
|
I called in to see Grahame at Southampton on the way back from picking the Mistral shell on Saturday, he's getting on really well. All the panels are bonded on and first filling done.

Love his back light choice.

And his wheels are great too (shown minus the centre caps).
 |
14th January 2013, 08:27
|
|
Member
|
|
Join Date: Dec 2012
Posts: 75
|
|
Hi Chris thanks for the help on Saturday,I fitted the bonnet pins & started on the boot release ,as well as more sanding & filling ,much more easy now I have bought ab orbital sander,you left your tape & a few nuts n bolts here.I see yor pics came out better than mine.
|
14th January 2013, 09:15
|
|
Senior Member
|
|
Join Date: Jun 2011
Location: birchington, kent
Posts: 1,769
|
|
What are the rear lights from?
|
14th January 2013, 19:38
|
 |
Senior Member
|
|
Join Date: Feb 2012
Location: Wembley, London
Posts: 5,056
|
|
Quote:
Originally Posted by garyh
What are the rear lights from?
|
Can't speak for grayone, but I remember seeing something similar in SVC when doing my own research...
http://www.s-v-c.co.uk/product/1252-...icator--pair-/
Hope that helps, Paul.
PS
Sorry grayone I should have said nice lights & wheels.  |
15th January 2013, 07:15
|
|
Member
|
|
Join Date: Dec 2012
Posts: 75
|
|
Hi Paul l your right thier the same and in the UK
|
20th January 2013, 12:58
|
|
Member
|
|
Join Date: Dec 2012
Posts: 75
|
|
Paint Time
Hi all well its been 4 weeks since Chris & Dan delivered my kit ,Im now ready for paint ,the compressor is being delivered this afternoon, should get the underside painted monday then start on the high build 2k primer on the body,just going with the original mazda red for ease,2 weeks to my flight back but im thinking of having another month here for some driving weather permitting.oh yeah went with mini boot hinges in the end
|
21st January 2013, 20:20
|
|
Senior Member
|
|
Join Date: Oct 2010
Posts: 1,622
|
|
Great going! It will be good to see another finished car hitting the street, snowy or not. Send me some more pictures and I will post them up  |
21st January 2013, 21:52
|
|
Senior Member
|
|
Join Date: Nov 2011
Location: Emsworth
Posts: 810
|
|
Good going Graham! I wish I was on mine full time......
I look forward to seeing it with some colour on.
The mini hinges will look great, but I will probably try to find a far more difficult way of doing it first, before....using mini hinges!!
|
|
Currently Active Users Viewing This Thread: 1 (0 members and 1 guests)
|
|
|
 Posting Rules
|
You may not post new threads
You may not post replies
You may not post attachments
You may not edit your posts
HTML code is Off
|
|
|
All times are GMT +0. The time now is 13:15.
|


 Linear Mode

