|
|
| Marlin Sportster, Cabrio, Berlinetta and Roadster builds Enthused or Confused about your vintage Marlin build? Ask away here or show off your build. |

2nd December 2013, 19:11
|
|
Senior Member
|
|
Join Date: Aug 2013
Posts: 130
|
|
 marlin door fitting help
hey guys, i have had my marlin sportster kit for around 3 weeks now, and i am well in the swing of building. a little about me and my car first! My name is craig and im 25, i work as a mechanical technician on a nuclear powerstation in southwest england, the marlin is my second kit car, my first was a GBSC ZERO i started when i was 20, and passed IVA in 2012, i sold that kit at a huge loss to fund building a marlin sportster!
my car is based on the e39 5 series rear axle sub-frame assembly, with e 36 front struts and i plan on fitting the s50b32 3.2 evo engine, which i believe i will be amount a hand full of people to have used this engine!
currently i have have the majority of the front suspension fitted, the rear subframe, pedal box and fuel tank fitted. i started playing around with the doors today as i am currently waiting on other parts and i cant seem to make things fit too well so i was hoping to get some advice before i go cutting panels and making mistakes!
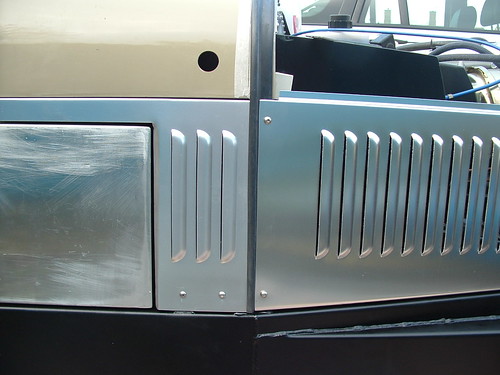
basically i have followed the marlin manual and used 3mm plywood as a spacer on the bottom sill of the door, but it is the drivers side A panel louvred cover that does not line up so well.
the passenger side seems ok :
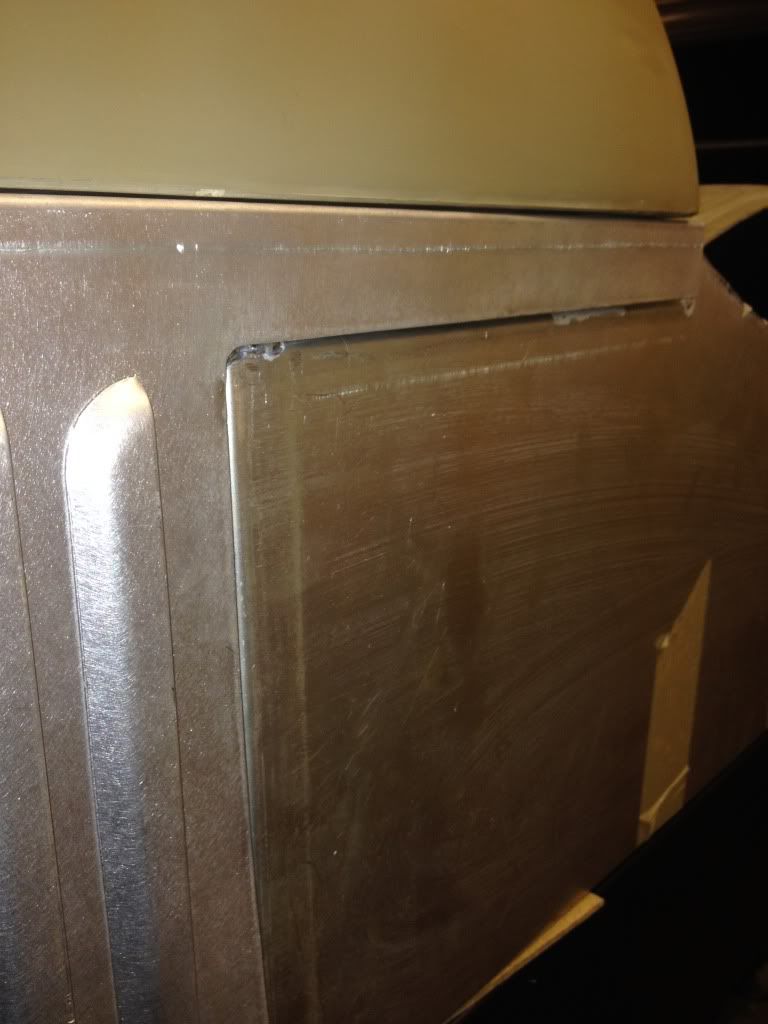
the top gap between the door and the lower edge of the A panel cover is fairly consistant and i can trim the panel to achieve a parallel gap of around 3mm either side.
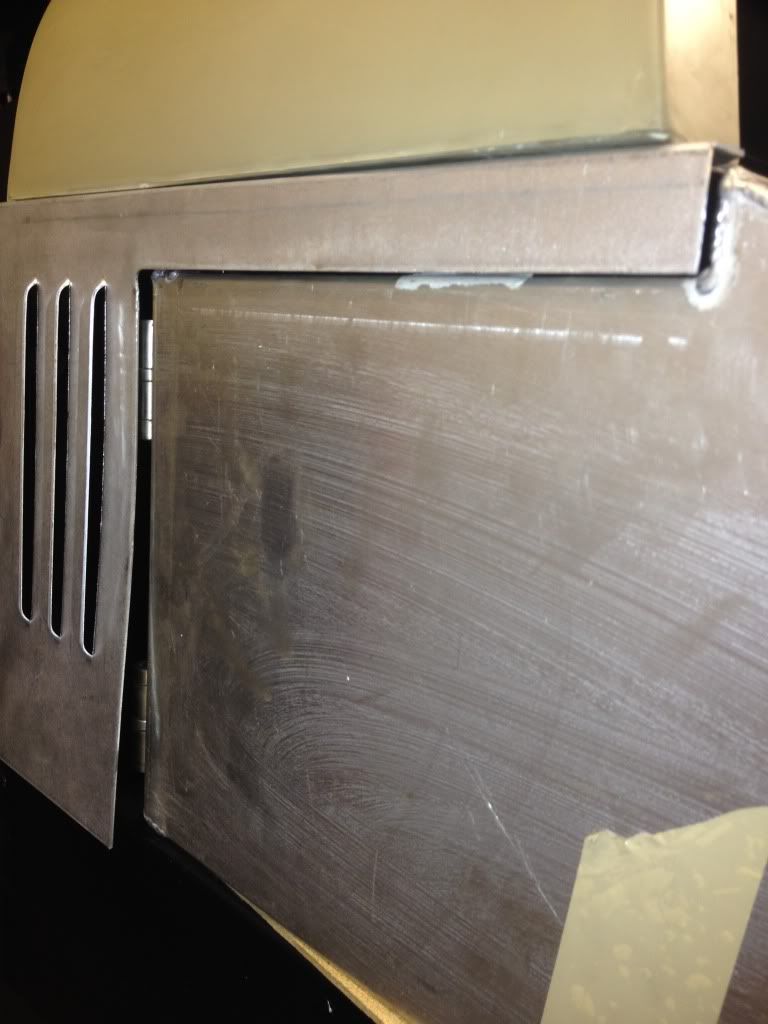
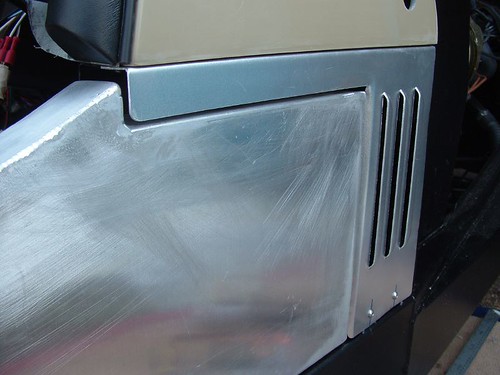
however on the drivers side its a different story
as you can see the front corner of the door fits ok, but the gap gets progessivley bigger the further back towards the door you go:
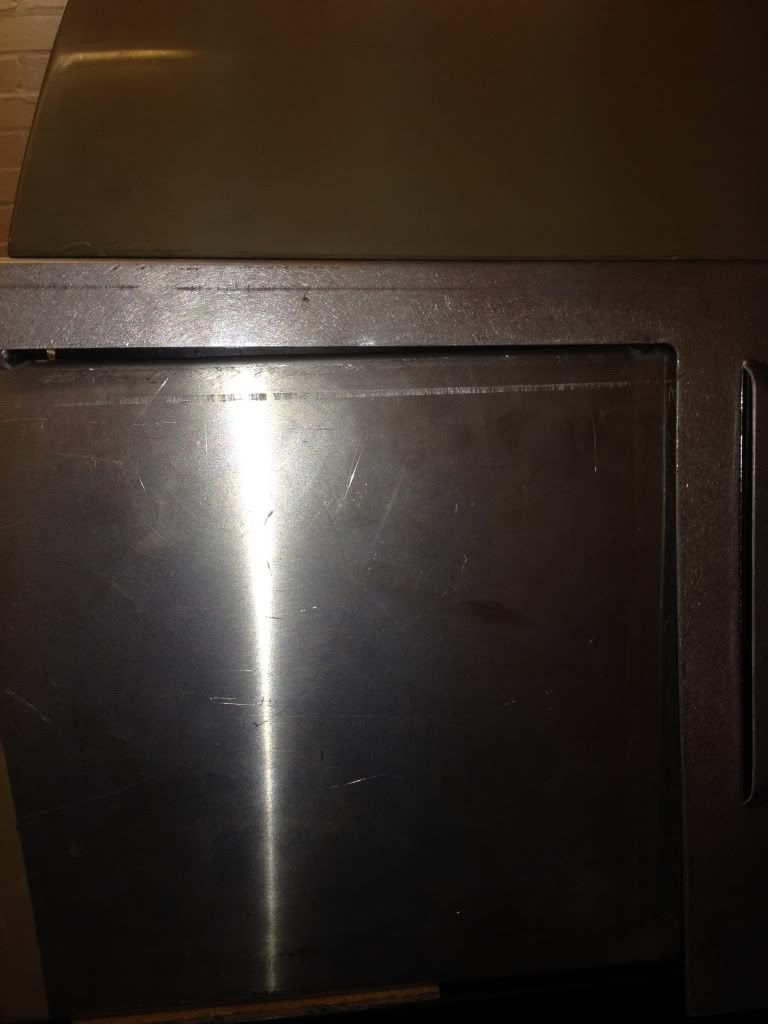
however i am able to pull the scuttle down by hand to achieve the gap:
http://s223.photobucket.com/user/mcr...tml?sort=3&o=7
its almost like the rail the scuttle sits on is slightly twisted.
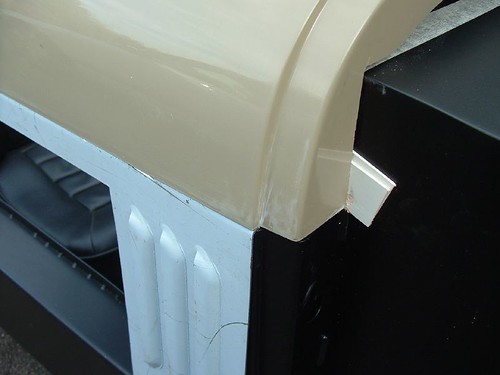
i can also achieve the correct gap by tilting the door up at the striker pin end, however this then leaves a massive gap between the bottom of the door and chassis sill :
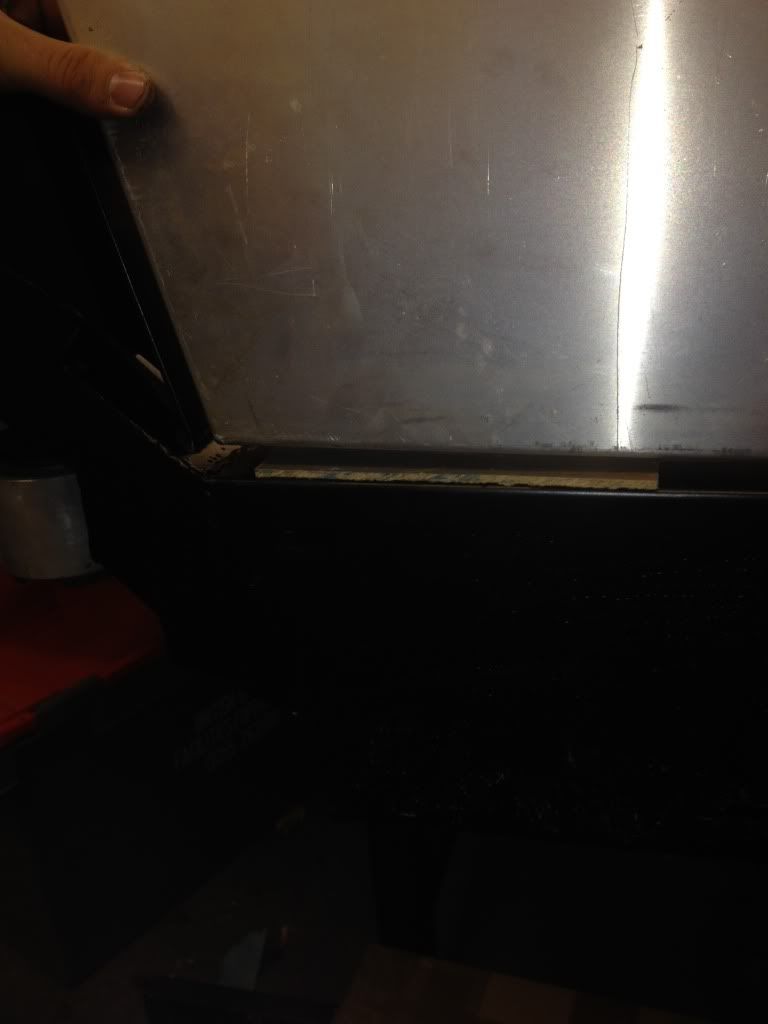
all the hinges are welded onto the doors, and the chassis has the holes drilled already to accept the hinges, although the holes do allow a lot of ajustment.
i tried adding a few washers under the front scuttle securing nut to effectivley push the back of the scuttle down further which brought the gaps much more even, but then left a big gap on the front scuttle to the bulk head!
does any one have any advice onthis?

|
2nd December 2013, 20:11
|
 |
Senior Member
Enthusiast
|
|
Join Date: Sep 2004
Posts: 1,891
|
|
Fitting the doors is not easy. A few points I can remember.
1. You need to fit the rear tub first.
2. You need to make a return on the trailing edge of the A post cover panel
3. You need to fit the dash top also. In fact, as I remember, fitting the doors is one of the last jobs although tempting to do if you are waiting for other bits.
I am sure that there are a couple of threads on this forum about the subject if you do a search.
cheers, Robin
|
2nd December 2013, 20:13
|
|
Senior Member
|
|
Join Date: Aug 2013
Posts: 130
|
|
Fair enough... The manual said it should be the first of the jobs to do on the bodywork, when you say dash top what do you mean?
|
3rd December 2013, 07:26
|
|
Senior Member
Enthusiast
|
|
Join Date: Sep 2004
Posts: 1,891
|
|
Quote:
Originally Posted by mcramsay

Fair enough... The manual said it should be the first of the jobs to do on the bodywork, when you say dash top what do you mean?
|
I suppose scuttle top would be a better name. Most of the builders of my era (completed 5 years ago) found that we had to pack this out to "stretch" it slightly in order that it lined up with the A panels.
As I suggested - search the forum. There was much discussion about panel fit (including plenty of pictures), and in particular the doors.
One other thing I remember is that my doors were badly distorted (twisted) as were those of several other builders. This had to be fixed before they could be fitted (large blocks of wood handy here). Patrick's were so bad that, as I recall, in straitening them he broke one of the welds and they had to be re-welded.
All good fun :-)
Cheers, Robin
PS - You are always welcome to come and look at mine to see the final fit. |
3rd December 2013, 08:44
|
|
Senior Member
Enthusiast
|
|
Join Date: Jan 2007
Posts: 932
|
|
Quote:
Originally Posted by mcramsay
Fair enough... The manual said it should be the first of the jobs to do on the bodywork, when you say dash top what do you mean?
|
Although mine is a Cabrio, the priniples are likely to be the same, and I was told to start with the panels at the front and work backwards, ie:
Nose Cone first
Bonnet side panels
A frame
Doors
Rear tub last.
For the Cabrio this made a lot of sense since its nose cone can not be adjusted rearwards due to the way it is attached to the chassis - it has a rear facing vertical flange which attaches to a forward facing vertical chassis flange. This can be turned into a poitive since it ensures a consistent/repeatable datum to work from, and allows you to position the other panels from it to create consistent /repeatable vertical gaps - (this is more important than you may realise as the panels tend to be fitted and removed several times during the build - and probably for painting at the end, so a repeatable re-fit is very important).
My doors were not good. The drivers door could be twisted back into a better shape. The passenger door required cutting and re-welding to get the panel fits to a level that I was happy with.
Mike
|
3rd December 2013, 18:55
|
 |
Senior Member
Enthusiast
|
|
Join Date: Mar 2005
Posts: 3,077
|
|
Hi and welcome to this forum! 
It sounds like you are making good progress.
Like Robin, I finished mine about 5 years ago so things might have changed a bit since then and being such a low volume kit I'm not sure if any two chassis are the same.
If you've not found them already, my bodywork build pictures can be found here...
http://www.flickr.com/photos/peters-...7600024149736/
As Mike says, the build datum point is the front edge of the scuttle and everything is aligned forward and rearward of this point. It's important to get the doors aligned to the chassis (as you are doing with the spacers) and the rear tub front edge. I needed to put 3-5 mm thick spacers between the door hinges and the chassis but this might have changed now.
It does take a bit of fettering to get everything aligned correctly.
But if yours fits fine one side but not the other, then you'll need to take some measurements to see which part is not right. You might be able to 'adjust' the scuttle mounting with a big heavy hammer if your measurements confirm this is the problem.
The 'A' post cover is only cosmetic so can be trimmed to fit nicely.
As mentioned by Robin above, I turned back the trailing edge of mine to stiffen them and make a nice gap with the doors. (A tip I learnt from the guy that used to build the Marlin factory build cars).
all the best, Peter
Last edited by peterux; 3rd December 2013 at 19:06..
Reason: correction
|
3rd December 2013, 20:56
|
|
Senior Member
|
|
Join Date: Aug 2013
Posts: 130
|
|
thanks for the replies, marlin have fitted the nosecone for me, so i should now have a good datum point to work back from, luckily i only live 45 mins from the factory, so im off to see mark and Kevin for some advice and to pick up a few bits an bobs. hopefully as of friday night everything should be much more clear!
|
4th December 2013, 07:26
|
|
Senior Member
Enthusiast
|
|
Join Date: Sep 2004
Posts: 1,891
|
|
Quote:
Originally Posted by mcramsay
thanks for the replies, marlin have fitted the nosecone for me, so i should now have a good datum point to work back from
|
I may have just been unlucky but my nose cone was also pre-fitted and it wasn't very square. Suggest you check it carefully before you proceed!
Robin |
4th December 2013, 18:15
|
 |
Senior Member
|
|
Join Date: Jan 2011
Location: South Wales
Posts: 378
|
|
I've just been through the door and rear tub fitting so I understand your pain. I'm about to do the scuttle and A panels and have exactly the same problem with the A panel but on the passenger side. This is with the thin strip on the panel that extends rearward over the door not being a good fit if rested on top of the chassis with a similarly widening shut line running down the vertical gap with the front of the door. I've decided that the important thing is the horizontal lines are all straight and even so I'll pack up under the rear of the A panel to get it straight all round and the scuttle will sit slightly higher at the rear. you won't notice this once all the trim is on where as a trimmed A panel with non parallel lines will really draw the eye. The vertical line at the bonnet can be trimmed and the seal over it will cover any mistakes
On the door fitting I can offer the following advice:
- the chassis mounting steel is way too thin so some reinforcement is needed. I used 5mm steel angle bolted to the side of the chassis in front of the mounting holes (in the bit the A panel covers over) and then strips of thin ali between the hinges and the chassis mount holes to get the bottom of the door straight. I gave up on using a reference piece of hardboard under the door and went for the eyeball approach.
- fit your door latches before hanging the door. They add much needed weight and will help you get the bottom shut line right. I even thought of putting some extra ballast in there to help.
- The doors do have a bow in them but this is ok, I think it's actually part of the design (not if it's as bad as some have had). I tried to straighten mine and also cracked a weld but not enough to worry about.
- the bow in the door means that the bottoms are also lower on the inside edge than outer. As long as the rear bottom inner corner doesn't strike the chassis when the door is in it's closed position (but no further in) you'll be ok as the striker pin will stop it moving further
- file back the welds on the doors before trying to fit or you'll not know what true clearances you have to work with.
my photos on bodywork are here
http://www.flickr.com/photos/5806804...7629422476140/
I'll watch your progress closely as at the rate I'm going, you're about to overtake me on the body work.
|
4th December 2013, 18:37
|
|
Senior Member
|
|
Join Date: Aug 2013
Posts: 130
|
|
Some pretty good advice there mate, thanks for that! I will be looking over your pictures in great detail! I think I will be stopping the bodywork until I get the mechanicals done, to be honest I think Ii need to get the rear tub fitted and then look at the doors afterwards!
|
4th December 2013, 20:11
|
|
Senior Member
|
|
Join Date: Aug 2013
Posts: 130
|
|
as a quick test i put some washers inbetween front (nearest the engine bay) mounting stud for the fibreglass sucttle and the rail that the scuttle bolts to, this in effect tipped the scuttle up slightly and pushed the back (towards the driver) end down, this squared up the gap pretty nicely, however it then did leave with with a gap at the front of the scuttle as it was not sat down flush. will this part have trim covering it?
|
4th December 2013, 21:44
|
|
Senior Member
Enthusiast
|
|
Join Date: Mar 2005
Posts: 3,077
|
|
Quote:
Originally Posted by mcramsay
as a quick test i put some washers in between front (nearest the engine bay) mounting stud for the fiberglass scuttle and the rail that the scuttle bolts to, this in effect tipped the scuttle up slightly and pushed the back (towards the driver) end down, this squared up the gap pretty nicely, however it then did leave with with a gap at the front of the scuttle as it was not sat down flush. will this part have trim covering it?
|
That suggests your drivers side rail is bent upwards towards the rear of the car.
Measure it carefully to see if it's parallel with the chassis sill.
Maybe somebody lifted the chassis at this point (during powdercoating?) and bent it upwards. Talk to Mark but I expect he will tell you to hit it with a big hammer to get it level. Packing out the front edge of the scuttle will just mask the problem rather than cure it.
Apart from maybe the scuttle, it's best not fit any body parts until you've got all the mechanicals, brake lines, fuel pipes and wiring loom installed or it'll just get in your way, especially the doors! (but when you do, there are rear tub fitting tips on my Flickr site)
|
4th December 2013, 21:55
|
|
Senior Member
Enthusiast
|
|
Join Date: Mar 2005
Posts: 3,077
|
|
Quote:
Originally Posted by MartinClan
I suppose scuttle top would be a better name. Most of the builders of my era (completed 5 years ago) found that we had to pack this out to "stretch" it slightly in order that it lined up with the A panels.
Cheers, Robin
PS - You are always welcome to come and look at mine to see the final fit.
|
Here's picture on how to 'stretch' the scuttle before fixing in place...
 |
5th December 2013, 20:55
|
|
Senior Member
|
|
Join Date: Jan 2011
Location: South Wales
Posts: 378
|
|
I just checked against the chassis rail
Nearside - rear is 2mm lower than 15cm further forward (28.7mm vs 28.9mm)
Offside - rear is 2mm higher than 15cm further forward (29.2mm vs 29mm)
This doesn't sound like much but is enough to make the vertical shut lines noticably uneven.
I think Peter is right and a bit of hammering will help but as it's on a folded piece of steel, it will only get it so far.
I have an added complication in that my chassis never had the upright welded in bolts to mount the scuttle down on so I'm going to have to mount my A panels not quite as Marlin intended by having fixing screws top and bottom. I'll have no way to bolt the scuttle down tight otherwise.
|
6th December 2013, 19:20
|
|
Senior Member
|
|
Join Date: Aug 2013
Posts: 130
|
|
i had a little trip to the marlin factory today, and mark talked me through the process of how the doors are fitted, how the a panel will fit and how the tub fits. basically as outlined before:
mark says the doors should be fitted first, before the tub, as there are 3 datum lines that you can set the door up to, once the door is positioned with parallel gaps, the tub can then be fitted and placed into the position that you want it to be leaving enough room between the edge of the tub and rear face of the door.
mark also wanted me to post up on this thread that Marlin manufacture the doors with a bow in then, they pack out one side of the aluminium before welding, this allows the door to slightly twist and bow. Marks advice is that under no circumstances should the door be straightened out.
also the complete order of fitting the body work is as follows:
door,
rear tub,
a panels
bonnet side panels
and then finally the bonnet.
|
6th December 2013, 22:57
|
|
Senior Member
|
|
Join Date: Jun 2010
Location: Reading
Posts: 229
|
|
Quote:
Originally Posted by mcramsay
mark also wanted me to post up on this thread that Marlin manufacture the doors with a bow in then, they pack out one side of the aluminium before welding, this allows the door to slightly twist and bow. Marks advice is that under no circumstances should the door be straightened out.
also the complete order of fitting the body work is as follows:
door,
rear tub,
a panels
bonnet side panels
and then finally the bonnet.
|
Interesting.
Was Mark able to explain why the doors should be able to twist and bow. The door jam is a vertical component as is the tub at its meeting with the door. The line of the door top is un-constrained. I'm not sure I understand why the door needs twist and bow in it.
The advice given by the contributors to this forum is invaluable. Their experience of building a Sportster at home in their own garages / workshops with primarily standard garage tools was vital to the success of my build. From my experience, the Mk1 eyeball, good judgement and the help from the guys here is the route to success. Mark's way is not always the right way or the best way.
|
7th December 2013, 08:01
|
|
Senior Member
Enthusiast
|
|
Join Date: Jan 2007
Posts: 932
|
|
Quote:
Originally Posted by NigelB
Interesting.
Was Mark able to explain why the doors should be able to twist and bow. The door jam is a vertical component as is the tub at its meeting with the door. The line of the door top is un-constrained. I'm not sure I understand why the door needs twist and bow in it.
The advice given by the contributors to this forum is invaluable. Their experience of building a Sportster at home in their own garages / workshops with primarily standard garage tools was vital to the success of my build. From my experience, the Mk1 eyeball, good judgement and the help from the guys here is the route to success. Mark's way is not always the right way or the best way.
|
I'm with Nigel on this one.
Some of Mark's "engineering" practices leave a lot to be desired: as do Terry's commercial practices. I get the impression that many of their responses are given to justify poor quality workmanship, and prevent come back costs.
As Nigel says - draw on the hard won experience of other builders, and then back your own judgement and instinct.
|
7th December 2013, 18:44
|
|
Senior Member
|
|
Join Date: Aug 2013
Posts: 130
|
|
I don't mean to open a can of worms with this one, nor am I discounting the knowledge of any of the builders on the forum, basically I spoke to mark about it yesterday and he then called me on my way home and asked me if I couple post up that straightening out the doors should not be done, Kevin the bloke that makes the panels said that his life would be hell of a lot easier if the doors could be welded flat, but they have a jig that purposely puts a now of around 10mm in the door, marks reason for this is that the doors fit and loom better.
|
9th December 2013, 19:44
|
|
Senior Member
Enthusiast
|
|
Join Date: Mar 2005
Posts: 3,077
|
|
Quote:
Originally Posted by mcramsay
I don't mean to open a can of worms with this one, nor am I discounting the knowledge of any of the builders on the forum, basically I spoke to mark about it yesterday and he then called me on my way home and asked me if I could post up that straightening out the doors should not be done, Kevin the bloke that makes the panels said that his life would be a hell of a lot easier if the doors could be welded flat, but they have a jig that purposely puts a bow of around 10mm in the door, marks reason for this is that the doors fit and look better.
|
I'm pretty sure my doors were flat? I fitted them as received from Marlin without any modification.
Check out the reflections in the door in this photo of the Sportster I built....

(click on picture for full size)
OK, just a blatant excuse to post another picture  |
9th December 2013, 20:42
|
|
Senior Member
|
|
Join Date: Jan 2011
Location: South Wales
Posts: 378
|
|
That would also explain why I can't get my doors to sit as close to the outer edge of the tub as you. Mine look much more like those of other recent builders such as Nigel which would make sense if they've been curved for the last few years.
I wouldn't worry about it if they both curve by the same amount (as mine do) though it does mean you need a slightly large gap underneath to accomodate the dip down on the rear inner corner.
I fitted my nearside A panel on Sunday and can confirm that a couple of whacks with a lump hammer did bring the steel above the door into parallel with the chassis rail . The front edge of the panel is not quite vertical by a few mm at the bottom but it will be covered by the bonnet seal so doesn't matter. I did attempt to fold the trailing edge in but this ended in too much twisting around the louvres so I just trimmed with tin snips. I may pop some edging on for IVA in case it counts as an exposed sharp edge. I've also thought of just making a fresh one with new ali as I don't really see the point of the louvres there anyway.
|
|
Currently Active Users Viewing This Thread: 1 (0 members and 1 guests)
|
|
|
 Posting Rules
|
You may not post new threads
You may not post replies
You may not post attachments
You may not edit your posts
HTML code is Off
|
|
|
All times are GMT +0. The time now is 22:22.
|


 Linear Mode

