|
|
| Miglia Builds and discussion Miglia bodied builds |

20th December 2014, 18:43
|
 |
Senior Member
Enthusiast
|
|
Join Date: Dec 2006
Posts: 1,130
|
|
Quote:
Originally Posted by Paul L

Spooky!
I was also playing with my grill today, and it too is an alternative to the beer grate one I ordered that never made it out of the Poole Triangle. 

|
It just so happens that today I found a source of material to re-manufacture the old style "beer crate" grills, which I am going to use on my A1 Alpha.
As the A1 Alpha's bonnet is very similar (oops) to the Sammio range there's no reason why the new grills can't be retro fitted to the original Spyder/Pilot, Cordite/Navigator and even the Miglia's 
The big difference is this time the grills will be made of aluminium rather than the original steel, which obviously makes them much lighter but being aluminium the grill could be polished giving the "chrome" effect  |
22nd December 2014, 13:56
|
 |
Senior Member
|
|
Join Date: May 2011
Location: Somerset
Posts: 1,671
|
|
In between family-duties, it's been a LONG weekend undercoating the main tub and SWMBO captured it perfectly in what shes calls the "Breaking Somerset" photo
 |
22nd December 2014, 14:23
|
 |
Senior Member
|
|
Join Date: Jul 2011
Posts: 5,328
|
|
Quote:
Originally Posted by davecymru
In between family-duties, it's been a LONG weekend undercoating the main tub and SWMBO captured it perfectly in what shes calls the "Breaking Somerset" photo
|

I am the one who knocks... |
23rd December 2014, 08:30
|
 |
Senior Member
|
|
Join Date: Feb 2012
Location: Wembley, London
Posts: 5,056
|
|
Dave - Great news that you are already starting the painting process. 
Good luck, Paul,
|
29th December 2014, 16:50
|
|
Senior Member
|
|
Join Date: May 2011
Location: Somerset
Posts: 1,671
|
|

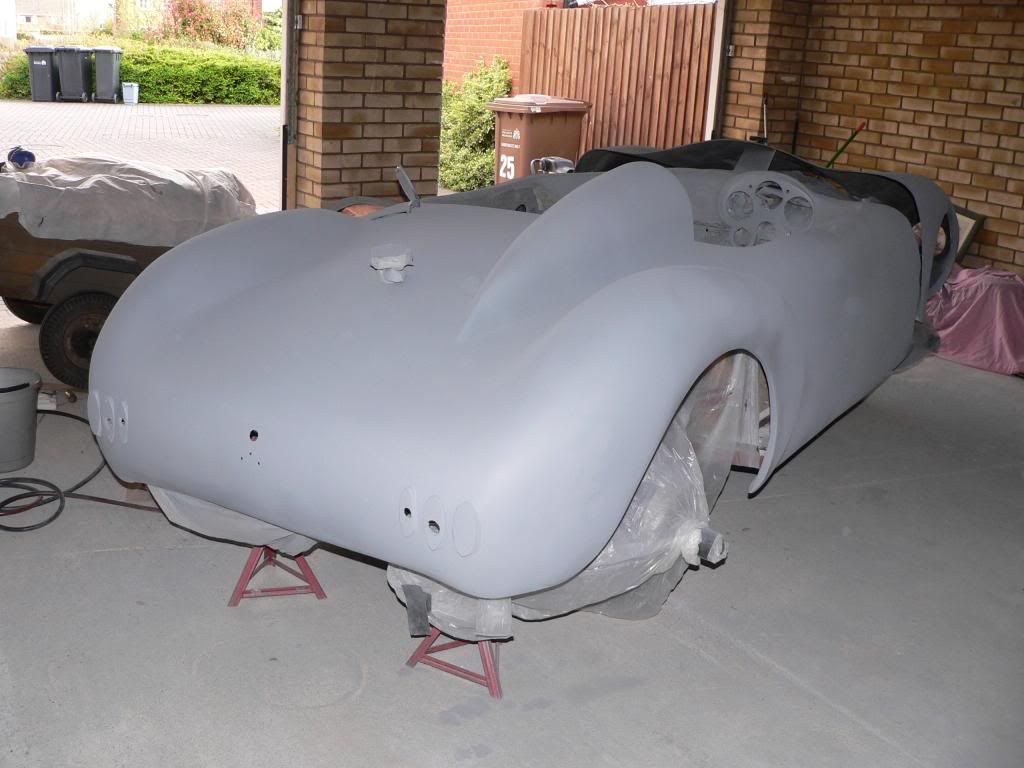
I've been a bit quiet on here of late, but the build is progressing.
Just a bit slowly due to the endless rounds of filling / priming / sanding / filling / priming /sanding / <repeat as necessary>
Then today I finally got to the "FFS that'll do" stage!
I've said it before, but having gone through this process myself I can see why a professional paint job costs too much due to the time and care put into it!
So a few layers of high build primer have been applied and as many faults as I could spot in my cramped ikkle garage have been rectified in between layers.

Then today after I finally snapped I applied the first of the top coats to the main tub! And also started priming the bonnet.

It's certainly very Red.....
Sadly don't let that mirror finish fool you, as it was all still wet at that point, but it did give me a glimpse of things to come (fingers crossed!)
I thought it worth sharing that as I'm spraying in quite a constricted and cluttered space (needs must) I've founds that raising the car up on Axle stands has really helped with the spraying and also helps getting a better overall picture of things as I progress
So as I'm likely to be tied up over the next few days i'll wish you all a good new year and I look fwd to the Miglia/Sammio/Ribble/Tribute fun continuing in 2015.
Dave

|
30th December 2014, 09:17
|
 |
Senior Member
|
|
Join Date: Dec 2013
Posts: 839
|
|
You are certainly making good progress Dave, are you using cellulose or two pack?
|
30th December 2014, 10:13
|
|
Senior Member
|
|
Join Date: Feb 2012
Location: Wembley, London
Posts: 5,056
|
|
Quote:
Originally Posted by davecymru
... endless rounds of filling / priming / sanding / filling / priming /sanding / <repeat as necessary> ...
|
Dave - I've only started to scratch the surface of the work involved prepping for paint, but I can already see why it gives you nightmares/flashbacks!
Still, it is great to see the car in red.
Overall, this really has been a very fast build, which is a credit to both you and the kit.
Good luck, Paul. |
31st December 2014, 09:18
|
|
Senior Member
|
|
Join Date: Jul 2011
Posts: 5,328
|
|
Nice colour DC, I hope it stays shiny for you.
Very good point about raising the car up on axle stands to make spraying easier. That's exactly what I did, mainly as it just seemed sensible to keep the body as far off the (dusty) floor as possible -
Keep up the good work and see you on the road soon! |
2nd January 2015, 17:19
|
|
Senior Member
|
|
Join Date: May 2011
Location: Somerset
Posts: 1,671
|
|
Ohhh plastic dustsheets, posh!
I just bought my bi-yearly copy of the Sunday Times as I find that provides enough masking materials and firelight paper to last a good few months
Progress update...
Painting, flatting, painting, flatting, correcting, painting...
Main tub just about done, started putting topcoat on bonnet. Will do doors last as I still suspect they'll be a faff!
In case its of any interest I've been using grey high build primer, then 180 grit wet-n-dry to shape and flat that and a final sand with 400 grit, before...
Then Cellulose top coat, with the light use of wet, 400 grit in between layers.
Then I have 1200 grit for the final fattening before I dig out the polish.
Fingers crossed the final coat on the body has no more drips as I want to start the flattening on that tomorrow!
Will get some pics then as well. |
4th January 2015, 13:34
|
|
Senior Member
|
|
Join Date: May 2011
Location: Somerset
Posts: 1,671
|
|
The main flatting with 1200 grit is now just about done and I've moved onto the cutting compound.
It's HARD work, so I've been finding other little jobs to do in-n-around it to keep my spirits up.
One of the first things I wanted to do was get the fuel filler refitted so that no gunk ended up in the tank.

Happy with that, I started to assemble the grill. I've still got the end pieces to fit, but I'm v.happy with the look of it so far.

Then I decided to start unwrapping and cleaning.

Forum members who've been on here since the start of the Sammio section will be glad to know that I've got a few bits of overspray! |
4th January 2015, 13:57
|
|
Senior Member
|
|
Join Date: May 2011
Location: Somerset
Posts: 1,671
|
|
Today has been cleaning, tidying and reassembling the steering.
The 2 areas of the Miglia build that originally unsettled me were:
1) Stretching the gear lever.
Well, I worked around that by opting for the angled Spitfire lever, so no cutting and welding required.
2) Altering the steering column.
Again, I was worried about cutting-n-welding the column, so I had a think about other options and as the result of looking at what a few others on here have done, coupled with an idea from a Herald owner (who advised me of the design of the collapsible Triumph column!) I settled upon a solution that needs no cutting or welding at all!!!
My Solution
The collapsible design of the original Vitesse column is achieved by the top section being hollow and the bottom section fitting inside it, with a cut-out in the top section and a flat filed in the bottom section, all held together with a chunky great clamp!
That design allows the column to collapse in case of a head-on collision by the inner shaft sliding up inside the outer one.
But as far as we're concerned, it also means that if we un-do that clamp we can 'shrink' the length of the column by simply sliding the lower shaft further into the upper one!
So once disassembled and the new length decided upon with a bit of trial and error I filed a new 'flat' on the inner shaft in it's new location:

And reassembled it with the original clamp.

Bobs your uncle, shortened without any cutting or welding
So while (as some of you will have figured out) that top section is no longer collapsible, it is now connected to the rack with an intermediary shaft (splined steering shaft from Car Builder Solutions!), and 2 new Steering Column UJ's to link them all together. Which is an accepted alternative column design if I did have to follow IVA guidelines! So a nice result and some peace of mind to boot
Here's it all is fitted in place, along with the pillow-block bearing on the bulkhead which makes for a very nice feel through the wheel!

Happy!
Last edited by davecymru; 4th January 2015 at 14:02..
|
4th January 2015, 14:28
|
|
Senior Member
|
|
Join Date: Feb 2012
Location: Wembley, London
Posts: 5,056
|
|
Dave - Nice result on the steering column.
It is really coming together now and your DIY grille looks very professional too.
Good luck, Paul.
|
4th January 2015, 18:21
|
|
Senior Member
|
|
Join Date: Jun 2011
Location: birchington, kent
Posts: 1,769
|
|
Very tidy.
|
11th January 2015, 17:03
|
|
Senior Member
|
|
Join Date: May 2011
Location: Somerset
Posts: 1,671
|
|
This week has been all about the bodywork.
After talking to one of the guys at work who is into "detailing" (posh car cleaning!!  ) I decided to modify the approach I took last time, to see if I could get a more professional finish this time around.
So...
Here's an example of how things generally look after painting, with a good 3 or 4 coats of colour:

To this I then do a rub down with 1200 grit wet-n-dry (used wet).
Then that is followed by a once over with Halfords Rubbing compound (also used wet)
That makes things look like this:

This in itself looks nice and is very flat, but it's hazy.
So after doing all of the bodywork on the Sammio by hand, and not wanting to go through all of that faff again! I was looking at investing in an electric polisher when I stumbled across this power drill adapter for £4.99 in Halfords!!

That coupled with a Hard (White) flatting pad, a soft (Black) polishing pad at £4.99 each and things came to considerably less than some of the admittedly very nice Random Orbit polishers I'd been day dreaming over!
A quick scan of my cleaning shelf threw up a bottle of Meguires Ultimate compound for the final flatting. and a huge bottle of Autoglym for the final polishing.

And with a lot of hard work, this is the sort of result I am now getting!!

TBH this is a whole leap ahead of the paint finish I achieved on the Sammio!
It's also surprising how quickly I get through power drill batteries, so I'm taking things a small area at a time and also refitting things as I go (while batteries recharge!)
|
11th January 2015, 19:21
|
|
Senior Member
|
|
Join Date: Feb 2012
Location: Wembley, London
Posts: 5,056
|
|
Dave - Thanks for all the painting / finishing tips, as it does look very shiny.
It must be nice to putting things like the screens back on for the final time.
Good luck, Paul.
|
13th January 2015, 20:33
|
|
Senior Member
|
|
Join Date: May 2011
Location: Somerset
Posts: 1,671
|
|
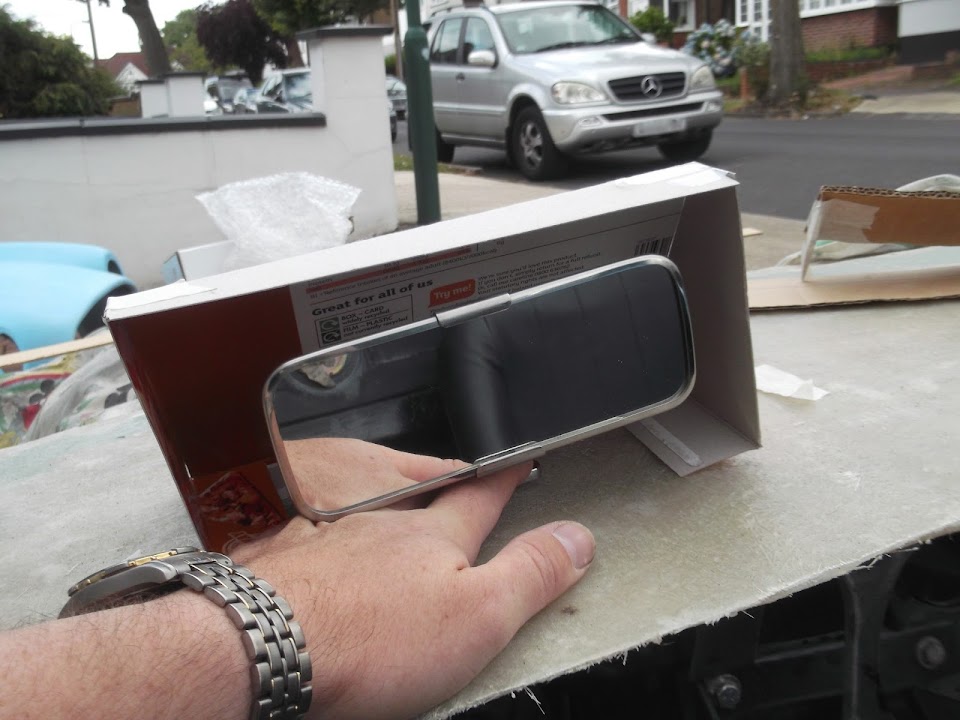
The current spate of bad weather got me thinking about weather proofing.
Well..... about wind-proofing my rear view mirror at the very least!
I'd seen the dual screen approach that some are going for in order to stop the wind blowing the mirror about and while I like that look, I had also seen all manner of chunky looking ad-hoc wind-shields on 50's/60's racing cars and seeing as I'm going for that sort of look at the moment I decided to take that route.
So first step was get all Blue Peter and to mock some options up in cardboard and sticky-backed-plastic

Then when I had something I was happy with I flattened that out.

Then transferred it to aluminium and bent that to shape. At this stage I REALLY wished I had a bigger garage and a nice workbench! But I was happy with what I could do.

Then mounting holes were drilled, the top corners riveted together and everything given a good few coats of etch primer.

Then after a few layers of Red and a bit of polishing it was bolted in place, with a thin foam gasket between it and the car although i'll put a bit of silicon around it to seal the gaps that you can see on the corners in the pics.

It's not "perfect", but it'll do the job and it certainly gives the "look" I was after!
I also decided to keep it grey undercoat inside as I quite like the look!

It's worth pointing out the slight colour difference between that and the rest of the car. Despite this having a good 3 and a bit coats of colour the difference is due to the etch-primer being a darker grey than the high-build primer used on the shell. Interesting but in a nerdy way
|
13th January 2015, 21:39
|
|
Senior Member
|
|
Join Date: Dec 2013
Posts: 839
|
|
Nice work davecyrmu your build is flying along now and the paint finish is excellent. The tip about different under coat colour's is one to remember, the local paint suppliers to me have advised i use a white colour high build which i was going to use on the body only but think i will use it any parts with the same top coat colour, thanks for that one.
Not long till your car will be on the road and may be a video of it running, look forward to your next update.
|
14th January 2015, 15:18
|
|
Senior Member
|
|
Join Date: Feb 2012
Location: Wembley, London
Posts: 5,056
|
|
Dave - If it wasn't was watching Blue Peter as a kid, I'd have no idea how to build my car.
My first thought for a rear view mirror shield was very similar to yours.

I think the use of rivets along the top edges really gives it that "pit lane adjustment" look.
Good luck, Paul.
Last edited by Paul L; 14th January 2015 at 19:53..
Reason: Typo
|
19th January 2015, 09:30
|
|
Senior Member
|
|
Join Date: May 2011
Location: Somerset
Posts: 1,671
|
|
Cheers matey, TBH i'm quite liking the rivets everywhere look, and i've done a few things this weekend that make it look even more 50's racer - more to come on that later in the week
BTW, I've just been catching up on posts and i noticed that when i post updates i tend to be..... focused... on what I'm writing and i don't always reply to questions or even say thank you to people for all of your nice comments, suggestions and general pish-taking.
Sorry, me bad 
So thank you all, as your feedback, no matter whether good or bad is always appreciated, even if i don't always say so! |
27th January 2015, 21:16
|
|
Senior Member
|
|
Join Date: May 2011
Location: Somerset
Posts: 1,671
|
|
"a little and often" is how I've approached this build, but atm the weather is sapping my ability to do more than an hr here,n,there!
That said, the grill is done.
The bonnet is half polished and about to go on once I've fixed a minor gasket issue with the carbs.
The doors are nearly ready for topcoat and the door cards have been fabricated and are nearly done.
The electrics are just about finished being refitted, although the fuel and temp gauges seem to be playing up.
And while in Lidl the other day they had these powder extinguishers on offer for a price I couldn't ignore and I'm tempted to fit it here to add to the race car look? still not 100% sure yet tho..
 |
|
Currently Active Users Viewing This Thread: 1 (0 members and 1 guests)
|
|
|
| Thread Tools |
|
|
| Display Modes |
 Linear Mode Linear Mode
|
 Posting Rules
|
You may not post new threads
You may not post replies
You may not post attachments
You may not edit your posts
HTML code is Off
|
|
|
All times are GMT +0. The time now is 10:01.
|


