|
|
| Marlin Sportster, Cabrio, Berlinetta and Roadster builds Enthused or Confused about your vintage Marlin build? Ask away here or show off your build. |

21st October 2007, 18:43
|
 |
Senior Member
Enthusiast
|
|
Join Date: Sep 2004
Posts: 1,891
|
|
 Bent Door
I have been fitting the doors the last couple of weekends. Not the easiest of jobs made worse by having to chop the original striker plates off the chassis as they were in the wrong place  I fitted the drivers door - all OK. But the passenger door is twisted by about 8mm. The question is can I straighten it myself  - or do I need to send it back to Marlin (Bit of a bugger if I have to as I have spent quite some time grinding down the welds, fitting the catch etc.)
Any suggestions gratefully received!! 
Robin
PS - About to send (yet another) order to Namrick for some odds and ends. What size screws and how many have people been using for the bonnet hinge? |
21st October 2007, 20:26
|
 |
Senior Member
Enthusiast
|
|
Join Date: Mar 2005
Posts: 3,075
|
|
Robin,
I could be wrong in your case, but I found the warping of my doors seemed to be on purpose to fit the rear tub. I did have to open up the holes in the chassis where the hinge bolts go so that I could move the top and bottom of the door in and out. By doing this, along with spacers between the chassis and the door hinge I was able to line up the door with the rear tub. You need to fit the rear tub before you fit the striker plates. Once it was all lined up, I then fitted the striker plates and cut the striker pin holes.(Pictures on my Flickr site)
I think Patrick will comment, because I think he straightened one of his doors and then bent it back again to fit.
Peter
|
21st October 2007, 20:32
|
 |
Senior Member
Enthusiast
|
|
Join Date: Feb 2005
Location: Hampshire
Posts: 2,496
|
|
When I got my doors I had one straight one and one banana shaped one. I thought the banana shaped one was wrong so I sent it back to be straighten up.
Turned out they both need to be banana shaped due to the shape of the tub. Bending is relatively easy. Place the door diagonally over the edge of a table and just put your weight on either corner (carefully, and small movements at a time).
The inside does need some straightening up and there is a small chance you might split a weld. I stored mine out with a metal work hammer.
|
31st October 2007, 12:45
|
|
Senior Member
Enthusiast
|
|
Join Date: Sep 2004
Posts: 1,891
|
|
Quote:
Originally Posted by Patrick

When I got my doors I had one straight one and one banana shaped one.
|
There's a surprise - exactly like mine. Mark told me that the doors were supposed to be twisted so as to fit the rear tub and advised tweaking them gently if they didn't fit. He told me to do it a little at a time and each time to gently tap the inside back into shape (Bulges at the seams)
Don't understand how they managed to produce one door with the correct twist and the other without though.
Robin |
5th December 2012, 20:42
|
 |
Senior Member
|
|
Join Date: Jan 2011
Location: South Wales
Posts: 378
|
|
dragging up a bit of an old one here.
I just had a go at rough fitting one of my doors to discover a bend inwards at the rear top and immediately assumed I was going to have to send them back. Luckly from the various threads on this topic it seems this is correct and that as both doors have identical bends, I'm ok.
However.... What I'm finding is that the bottom of the door is also following the twist so that the inside edge is lower than the outside at the rear. To get a 3mm gap under the outside edge means the inside catches on the side rail. I'll have to raise the door another few mm to make it shut cleanly and then I'll have a massive shut line along the bottom.
Any solutions to this that don't involve cutting, flattening out the bottom edge and getting it re-welded? I haven't cleaned up the welds yet so that will help a bit bit from what I can see, not enough.
Last edited by morris; 5th December 2012 at 20:55..
|
6th December 2012, 12:27
|
|
Senior Member
Enthusiast
|
|
Join Date: Mar 2005
Posts: 3,075
|
|
Quote:
Originally Posted by morris
dragging up a bit of an old one here.
I just had a go at rough fitting one of my doors to discover a bend inwards at the rear top and immediately assumed I was going to have to send them back. Luckly from the various threads on this topic it seems this is correct and that as both doors have identical bends, I'm ok.
However.... What I'm finding is that the bottom of the door is also following the twist so that the inside edge is lower than the outside at the rear. To get a 3mm gap under the outside edge means the inside catches on the side rail. I'll have to raise the door another few mm to make it shut cleanly and then I'll have a massive shut line along the bottom.
Any solutions to this that don't involve cutting, flattening out the bottom edge and getting it re-welded? I haven't cleaned up the welds yet so that will help a bit bit from what I can see, not enough.
|
I don't recall my doors having this problem? I would flatten the welds on the bottom of the door before making any other changes. And you want to align the outside surface of the door with the outside chassis sill. There is a nice thick door seal that fills the gap on the inside between the door and the inner sill.
I used strips of ordinary hardboard to get my gaps right.
I'm not sure if that helps??
...peter

|
6th December 2012, 17:51
|
|
Senior Member
|
|
Join Date: Jan 2011
Location: South Wales
Posts: 378
|
|
I'll try sorting the weld out first, you can see the problem in this shot
The fact the hinges hang a bit loose and the steel at the hanging end being a bit thin doesn't help either. I may find that if I put some reinforcement on the back of the part of the chassis the door bolts to, it will sit a little higher |
6th December 2012, 18:56
|
|
Senior Member
Enthusiast
|
|
Join Date: Sep 2004
Posts: 1,891
|
|
Is it just the inside rear corner that is fouling? If so it would be fairly simple to lightly dress it using a small flat headed hammer. As I remember I had to do something similar with mine. Once it is painted, and the fact it is on the inside, it won't show.
The doors are probably the most tricky part to get right and you will probably have to make a compromise. But ally is quite forgiving as long as you don't keep working it - in which case it will work harden and may have to be annealed.
Robin
|
6th December 2012, 19:22
|
|
Senior Member
|
|
Join Date: Jan 2011
Location: South Wales
Posts: 378
|
|
it starts to foul around 10cm from the back of the door but I think most of it will be sorted by getting things right down the hinge end.
Guess I'll be adding metal working hammers to my tools shopping list!
thanks for the advice. I'm not going to worry about it too much until I've done some more pressing stuff like the wiring as with the doors on I'll just be making access a lot more awkward in the garage
|
6th December 2012, 19:24
|
|
Senior Member
Enthusiast
|
|
Join Date: Jan 2007
Posts: 932
|
|
Shut Lines
Hi Ian
I found the shut lines have to be wider than you might choose - 5-6mm, not 3-4mm.
I also found when hanging the doors, the best way to set them up was to put the required spacers under the front of the door and then tighten up the top hinge only: then adjust the bottom hinge until you get the space you want under the rear of the door. This way the door did not sag after setting.
But trying to get three parallel lines : with the front side panel, the chassis rail, and the rear tub, is certainly challenging! You end up having to adjust the tub angle to try to line it up with the rear door - very frustrating!
I ended up cutting and carving my doors to get them to follow the lines of the rest of the car - it is harder on a Cabrio, as we have to line up with the windscreen frame surround at the top which has its own angle relative to the horizontal part of the door, as well!
|
6th December 2012, 20:55
|
|
Senior Member
|
|
Join Date: Jan 2011
Location: South Wales
Posts: 378
|
|
I'm I actually approaching this in the wrong order? I had thought
- doors squared up off the chassis
- rear tub with the measurment from the number plate & light recess for the bumpers and then drop and trim to get the right angle off the rear of the doors
- A panels set against the chassis and front of doors
- scuttle off the a panels
- nose cone
- bonnet side panels
- bonnet top
- wings
or is there no correct way? I was hoping the tub and doors would give a good overall datum for the rest of the car
|
6th December 2012, 21:16
|
|
Senior Member
Enthusiast
|
|
Join Date: Jan 2007
Posts: 932
|
|
I'm not sure there is a right or wrong way!
For the Cabrio, the manual advises fitting the nose cone, and then work backwards fitting the side panels, the A panels, then hang the doors, then offer the tub up to them, which struck me as a reasonable way to approach it.
The problem I would have had with starting at the back is how to determine where the tub will attach in 3 dimensional space? There does not seem to be a natural starting point. Working from the front, the nose cone has a fixed plane to attach it to on the chassis on the Cabrio, so seems to make a better starting point. I do not know how the Sportster nose cone attaches, so this may not be so simple on the Sportster?
|
6th December 2012, 22:05
|
|
Senior Member
Enthusiast
|
|
Join Date: Mar 2005
Posts: 3,075
|
|
Quote:
Originally Posted by morris
I'm I actually approaching this in the wrong order? I had thought
- doors squared up off the chassis
- rear tub with the measurment from the number plate & light recess for the bumpers and then drop and trim to get the right angle off the rear of the doors
- A panels set against the chassis and front of doors
- scuttle off the a panels
- nose cone
- bonnet side panels
- bonnet top
- wings
or is there no correct way? I was hoping the tub and doors would give a good overall datum for the rest of the car
|
IIRC on the e30 based chassis,(of course, the chassis has evolved so it might be different now) the datum point is the front edge of the 'A' panels.
These should be aligned to the scuttle so that you get a nice straight line of rubber seal across the front edge of the scuttle and down the A panel.
You then build forwards and backwards from that line.
The front edge of doors should be aligned to the A panels with a suitable gap and mounted parallel with the chassis sill.
The rear tub is then lowered by taking material off the front edges until it is parallel with the door rear edge.
Much easier to show someone but difficult to describe in writing.
...peter
|
7th December 2012, 12:56
|
|
Senior Member
Enthusiast
|
|
Join Date: Feb 2005
Location: Hampshire
Posts: 2,496
|
|
I didn't follow a set path with body fitting, it was very long process that eventually came together - I'm sure if you asked everyone then everyone will have done it differently 
I tried the measuring tape but gave up pretty quickly - it may have measured square but certainly didn't look it. I found the tub needs to be 'on' to do the doors right - at least fitted and temporarily in place about correct. I cut back the mount area were the door catches go so there was room to move. With the tub in place I fit the doors and got them about right - then get the tub bolted up with the plates for the door pin catches mounted. I then 'fine tuned' the door fitments by bending, hammering or filing as needed. I put the scuttle panels in after fitting the doors. |
12th December 2012, 19:38
|
|
Senior Member
Enthusiast
|
|
Join Date: Jan 2007
Posts: 932
|
|
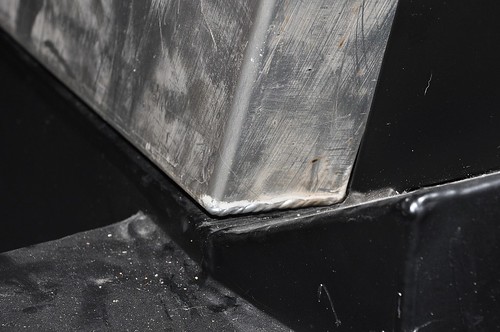
At least with a Sportster you do not have to line up the upper half of the door with the windscreen- the top of my door was probably 10mm out, when the bottom/centre was flush.
[IMG] 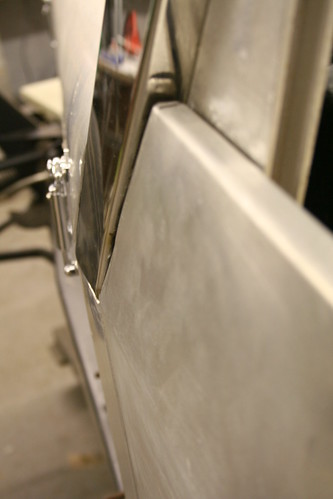 [url=http://www.flickr.com/photos/mikes_bmw_marlin_cabrio/5313949662/]
Nearside Door Prior To Reworking
I cut my door open, used a couple of wooden splints to pull it in to the shape I wanted:
[IMG] 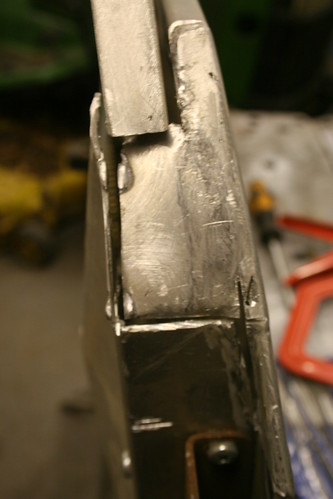
Nearside door cut to rework panel lines by Mike's Marlin BMW Cabrio, on Flickr[/IMG]
And then re-welded it: Its not perfect, but it is much closer than it was before!, and the shut line are parallel in all three planes.
[IMG] 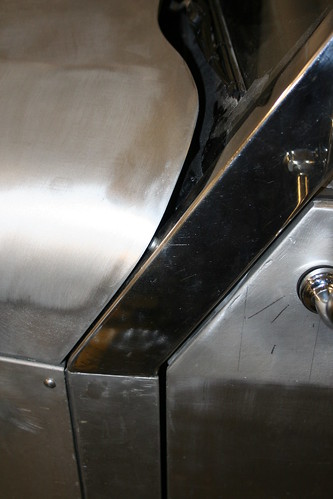
Shut Lines by
Mike's Marlin BMW Cabrio, on Flickr[/IMG] |
|
Currently Active Users Viewing This Thread: 1 (0 members and 1 guests)
|
|
|
| Thread Tools |
|
|
| Display Modes |
 Linear Mode Linear Mode
|
 Posting Rules
|
You may not post new threads
You may not post replies
You may not post attachments
You may not edit your posts
HTML code is Off
|
|
|
All times are GMT +0. The time now is 06:46.
|


