|
|
| Sammio Builds and discussions Sammio bodied car builds and specials |

11th January 2015, 03:26
|
|
Senior Member
|
|
Join Date: Apr 2012
Posts: 1,163
|
|
Paul, keep the updates coming as I am following from the beach!
|
11th January 2015, 16:44
|
 |
Senior Member
|
|
Join Date: Feb 2012
Location: Wembley, London
Posts: 5,056
|
|

Swifty - Cheers & I'm really enjoying seeing how you are sorting out your own bonnet.  Mac
Mac - Whilst it wasn't as cold as yesterday, it is still a long way off beach weather here. 
- - - - - - - - - - - - - - - - - - - - - - - - - - - - - - - -
Close Enough:
My first priority today was to take my youngest daughter to see the final Hobbit film at the cinema.
My second priority was to see if I could make any more progress with re-joining the driver's wing to the bonnet.
I'm afraid a length of wood was as high tech as it got.

But that was still enough to confirm I needed to edge the driver's side up a fraction.
I lost count of the number of times I fiddled about with the initial brackets I had fitted.
However, just like yesterday, there comes a point when you just have to stick a stake in the ground and get on with it.
So I made some "bendy" brackets out of one of my metal "formers".

This allowed me to beef up the support around the nose.

Then I used my normal fibreglass brackets to stitch the rest of the bonnet together.

Thankfully the wood confirmed that everything was still "about" right.

This is the view with the bonnet open.

Which also allowed me to photograph the headlight holes from the inside.
Passenger Side:
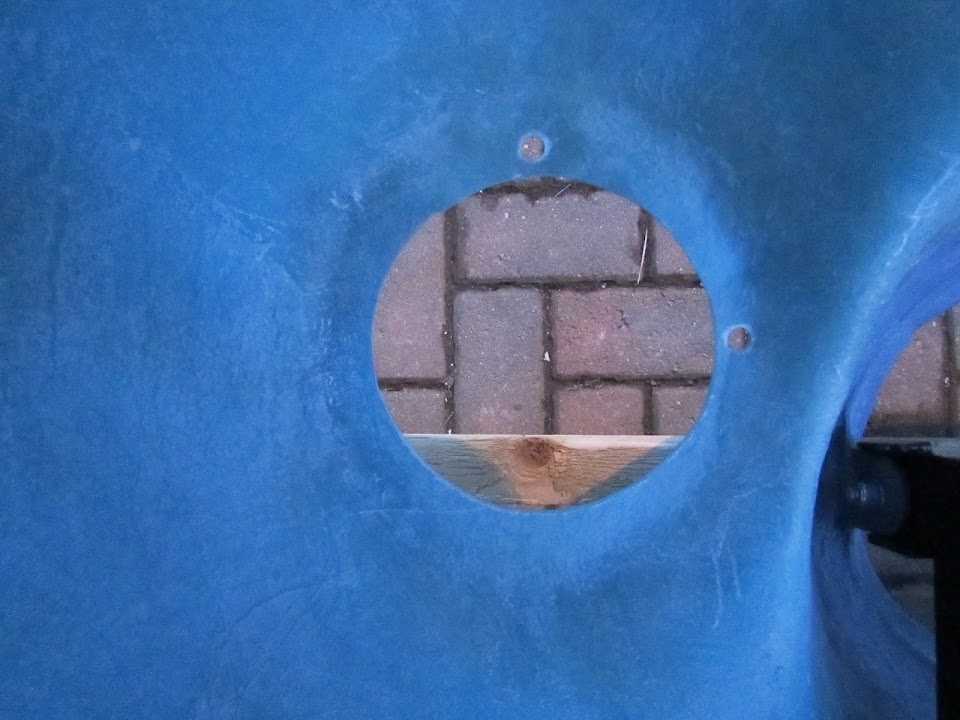
Driver's Side:

That is certainly close enough for me and the overall "Hillbilly" standard of this project.
Although the next real challenge is to build a "ridge" between the nose and headlight like this.

In the "thin air" that occupies that space on the driver's side.
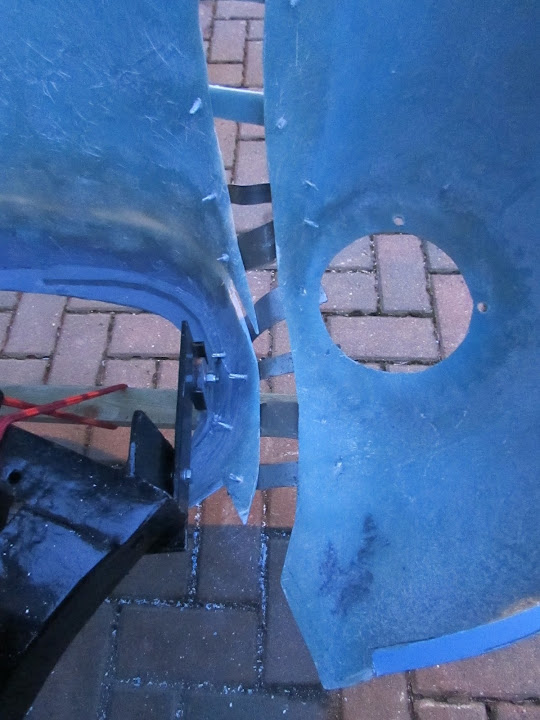
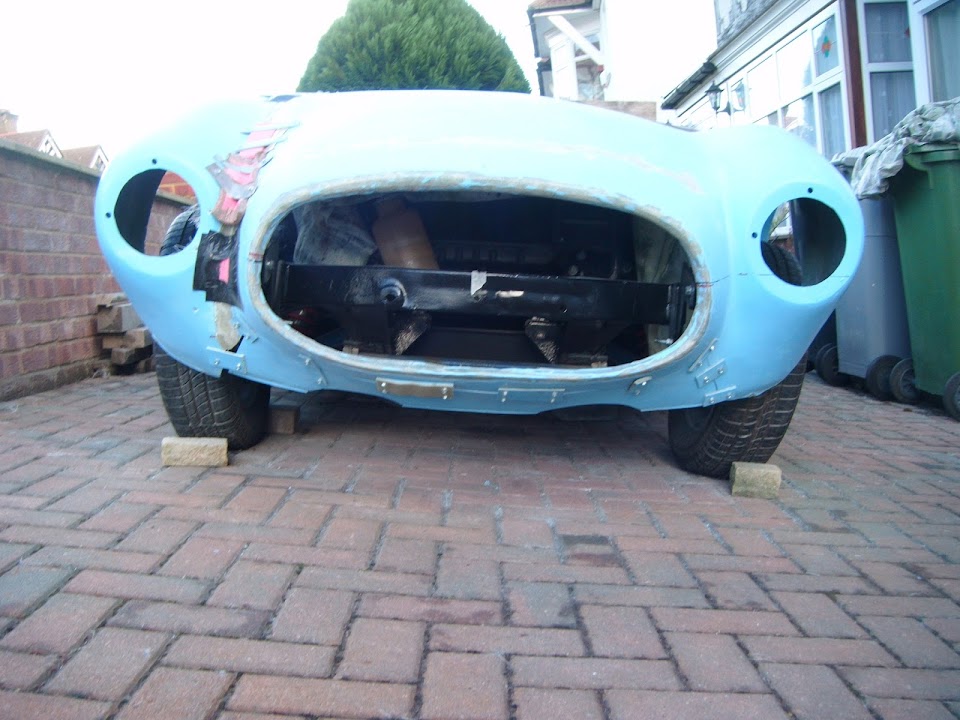
But for now, this is the view across the front.

And this is the view from the front with the wood removed.
Note:
My gap looks a bit different to Mac & Swifty's due to the fact my bulkhead is a different shape.
I might have a look at the area under the grille opening before I start "healing the wound".
Until next time, take care, Paul. 
Last edited by Paul L; 11th January 2015 at 17:05..
Reason: Typo
|
12th January 2015, 15:23
|
|
Senior Member
|
|
Join Date: Feb 2012
Location: Wembley, London
Posts: 5,056
|
|
It Is All Relative...
No progress today due to the wind and rain. 
However, I did spend some time looking closely at yesterday's bonnet photos, checking if everything looked straight.
The headlight adjustment holes on the driver's wing are now rotated anti-clockwise a little compared to the passenger side.
Which was the result of my various attempts to get a "best fit" position when the two sides aren't mirror images to begin with.
Obviously I wouldn't have drilled the holes when I did if I knew of the wholesale butchery that I would end up doing. 
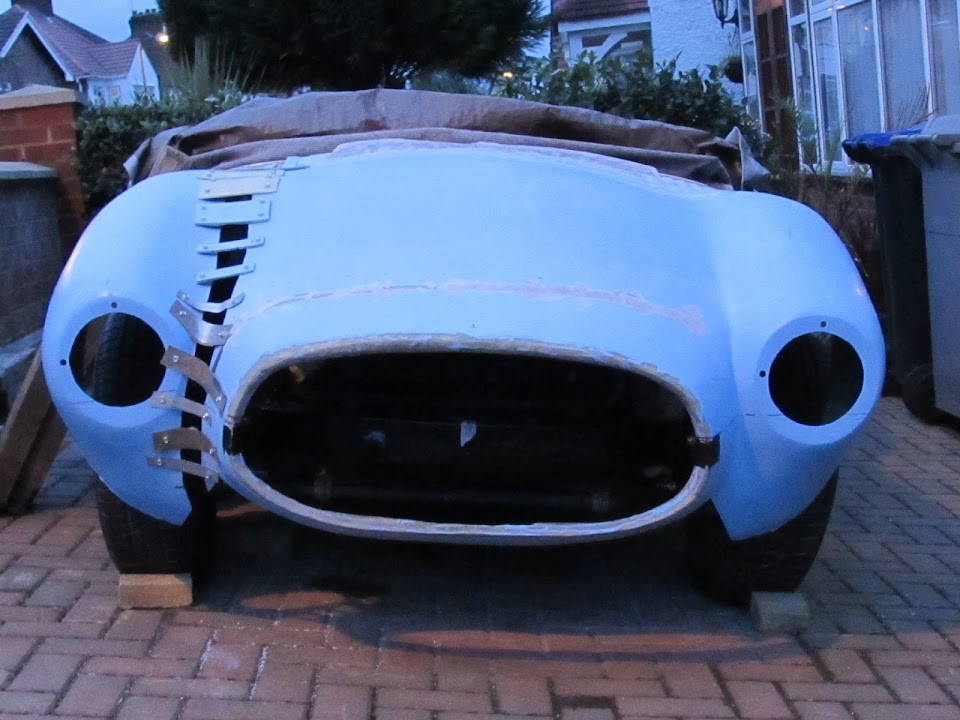
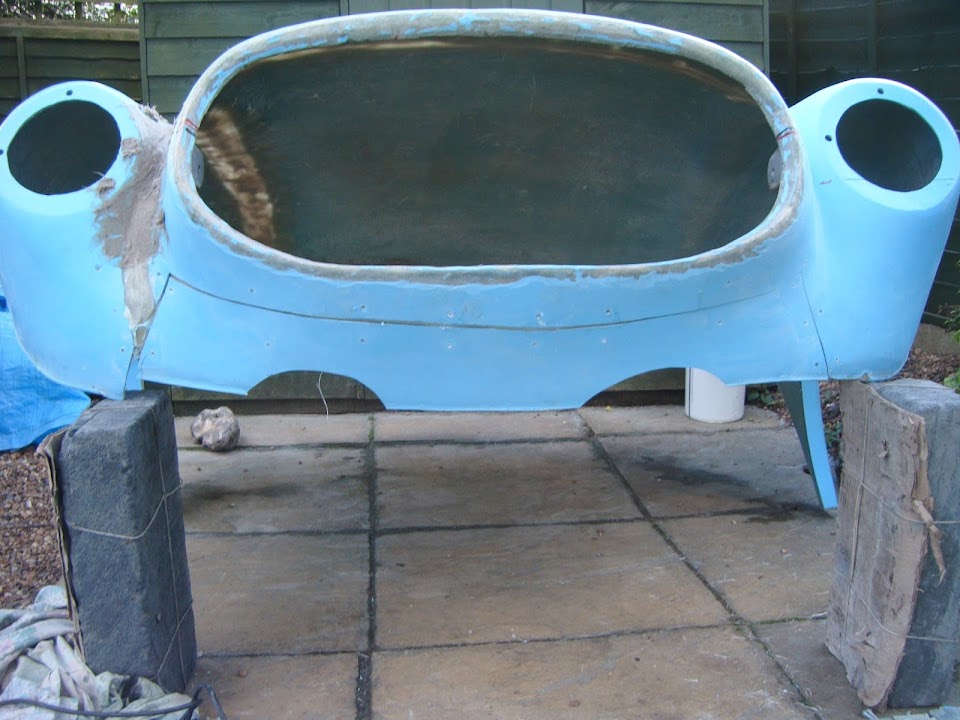
Still, I also managed to dig up this old "before" photo and that has cheered me up a bit.

Even by eye, you can see the big differences between either side of the nose cone, plus the driver's side is definitely higher.
You can also see the differences in the lower valance that Swifty fixed on his bonnet the other day.
This is actually very reassuring as I was beginning to fear I had made a real mess of re-joining the bonnet.
Instead I can stand by my theory that whilst it may not be perfect, it will definitely be an improvement.
- - - - - - - - - - - - - - - - - - - - - - - - - - - - - - - -
Edit:
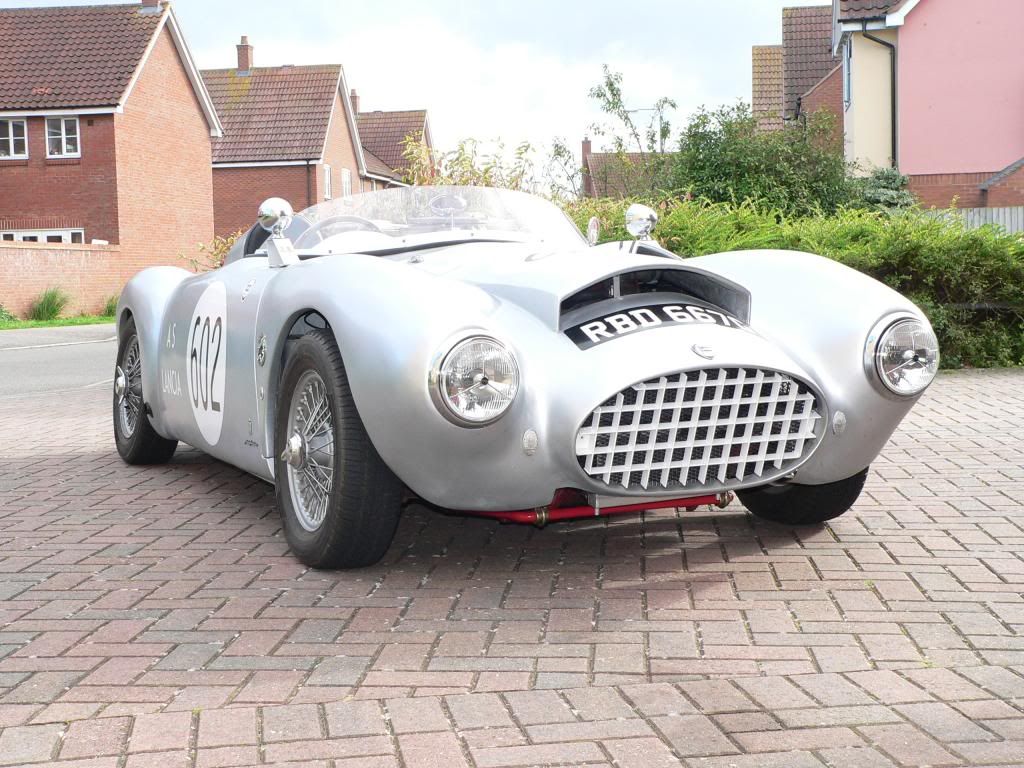
I've just dug out a copy of Mister Towed's front end for a comparison to the original Spyder which looks much better.
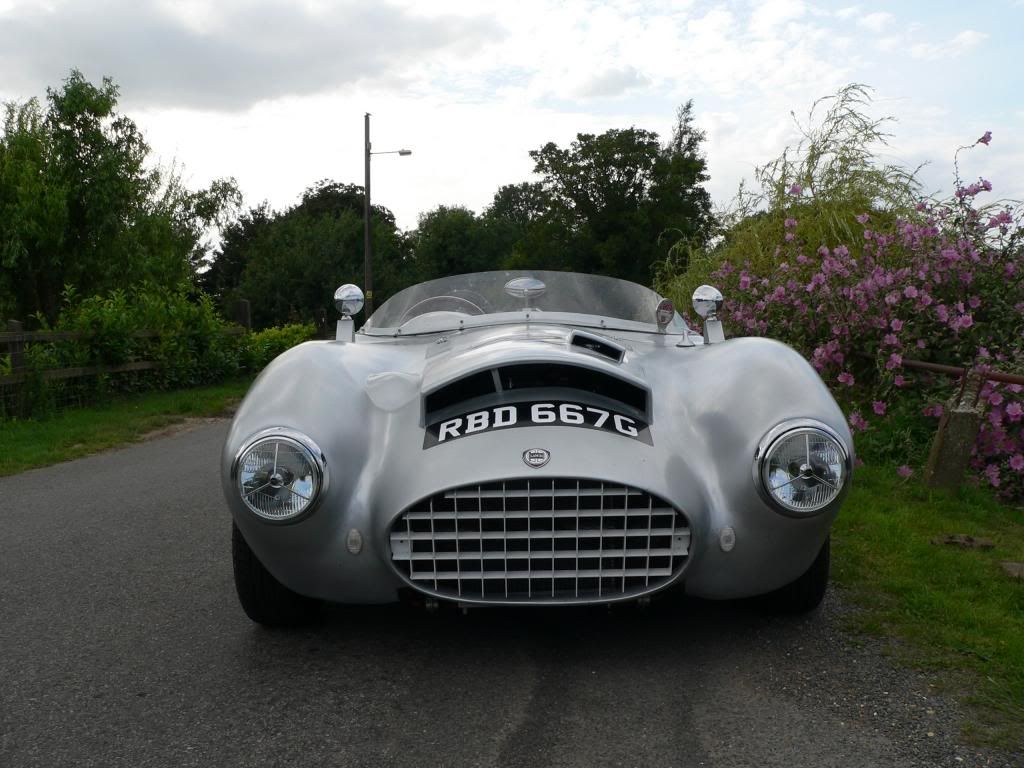
I must say I do love this car and it is a great incentive for me to keep chipping away at mine.
- - - - - - - - - - - - - - - - - - - - - - - - - - - - - - - -
Mac's Beach Viewing:
I know Mac likes to see something car related while enjoying the sunshine.
I saw this link on "Rods 'n' Sods" today for a product placement advert in the style of a hot rod building show.
If you like seeing car builders with great skills using lots of great "toys", you may enjoy this.
https://www.youtube.com/watch?v=Wteqp_tGKyg
- - - - - - - - - - - - - - - - - - - - - - - - - - - - - - - -
Until next time, take care, Paul.
Last edited by Paul L; 12th January 2015 at 15:31..
Reason: Adding photo of Mr T's bonnet
|
12th January 2015, 15:56
|
|
Senior Member
|
|
Join Date: Apr 2012
Posts: 1,163
|
|
cheers just watching it now before bed!
|
12th January 2015, 18:05
|
|
Senior Member
|
|
Join Date: May 2013
Posts: 2,161
|
|
Really great work Paul!
Looking at your stitched wing, its amazing how far out the original actually was! Looking at the "before" pic also really shows how cock-eyed it was. Keep up the great stuff.
|
13th January 2015, 13:48
|
|
Senior Member
|
|
Join Date: Feb 2012
Location: Wembley, London
Posts: 5,056
|
|
Mac - Hope you liked it.
Scottie - In fairness, my gap is wider than both Mac & Swifty's due to my home made scuttle profile.
Having said that, the original set up would still not cover both wheels at the same time & is definitely "cock-eyed".
- - - - - - - - - - - - - - - - - - - - - - - - - - - - - - - -
Slowly, But Surely - Part 1
When the rain finally stopped I could remove the covers completely to see the bonnet in line with the rest of the body shell.
The passenger side looks pretty good to me, with the bulges over the wheels being roughly in line.

The driver's side doesn't look quite as good by comparison, but it is certainly thereabouts.

By standing on some steps I could get a better "overall" photo.

Which simply reminds me not to worry about these things too much, as very little else lines up, or matches.
However, despite this, the car should still make a "head turning" first impression when finished.
- - - - - - - - - - - - - - - - - - - - - - - - - - - - - - - -
I wanted to start fibre glassing the gap in the bonnet, before I removed it and carried it to the back garden.
As the last thing I want to do is twist the bonnet while carrying it and then "set it" in the wrong shape.
It took a bit of beard scratching & a failed attempt to use modelling mesh before I worked out how to form my mould.
I needed to build a ridge between the headlight area and the bonnet nose and thankfully the yoga mat came to the rescue.

Note:
I did "tuck in" the foam at the bottom edge before I started.
As before, I used up some of my matting "scraps" as well as fresh fibreglass sheets.

I hope this will give me a solid base to work with, so I can do any final shaping required from the front.
The forecast promised rain at some point today, so I covered up the back of the car and left the first round of 'glassing to set.

The eagle eyed amongst you will notice I have not started work on the lower valance at this point.
As I figured it would make my life easier if I had something solid to fix the lower section to before I tried to 'glass it in.
- - - - - - - - - - - - - - - - - - - - - - - - - - - - - - - -
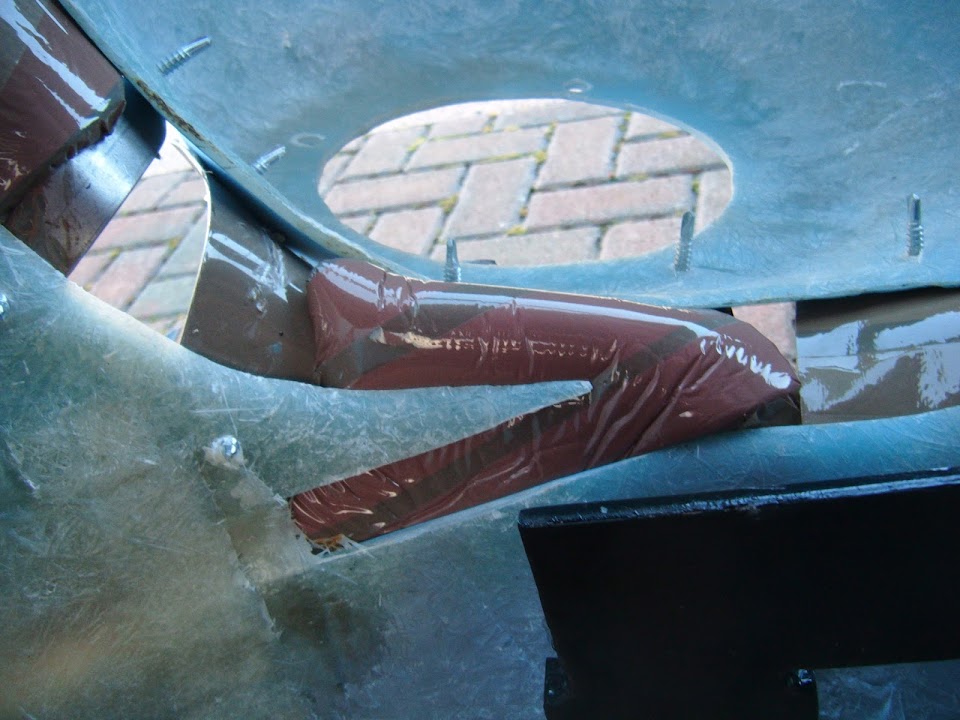
The next area I wanted to prepare a mould for was the "dip" where the wing meets the bonnet.
Once again the yoga mat was called into service to provide the basis of a curve.

I also used some parcel tape covered card to complete the job.
Which looks a complete mess on the other side.

It is pretty flat towards the back edge of the bonnet, so that was easy to prepare for.

However, at this point the temperature had dropped noticeably and the dark clouds were gathering overhead.

I really have learnt not to push my luck with the weather when fibre glassing, so I've covered up instead.

The good news was that the first round of fibreglass work was set pretty solid by now.
End of Part 1...

|
13th January 2015, 13:49
|
|
Senior Member
|
|
Join Date: Feb 2012
Location: Wembley, London
Posts: 5,056
|
|
Slowly, But Surely - Part 2
But the really good news was that I was safely inside when a biblical storm arrived.
Lashing rain, thunder & lightening, followed by hailstones! 
Although I couldn't get a photo that would really do it justice, but here what my workshop ended up looking like.

Once the storm had passed I went out to sweep the hail off the covers.
Then made the most of it to get the second round of fibre glassing completed.
The "dip".

The rear.

Now I have "healed" a large section of the gap, it should be OK to move the bonnet when this has set solidly.

But I will leave it where it is for now and just cover it up again for tonight.
Until next time, take care, Paul.
|
14th January 2015, 15:07
|
|
Senior Member
|
|
Join Date: Feb 2012
Location: Wembley, London
Posts: 5,056
|
|
Brass Monkeys - Part 1
I started by removing a selection of my "rag tag" fixing brackets & moulds.

Despite doing this kind of repair work for a while now, I still enjoy the fact that is actually works!
Then I countersunk the screw holes from above & ground the areas around the screw holes from underneath, plus any stray bits of matting.
Which gave me the chance to see if the bonnet shape was at least heading in the right direction.

I'm happy that the yoga mat did provide the basis of a "dip" between the wing & the bonnet.

I am also well on the way to having something to work with where the headlight meets the hose.


Obviously I wasn't expecting the bonnet to be "good to go" at this stage.
Especially given all the work Swifty had to do to re-shaped his nose (below).

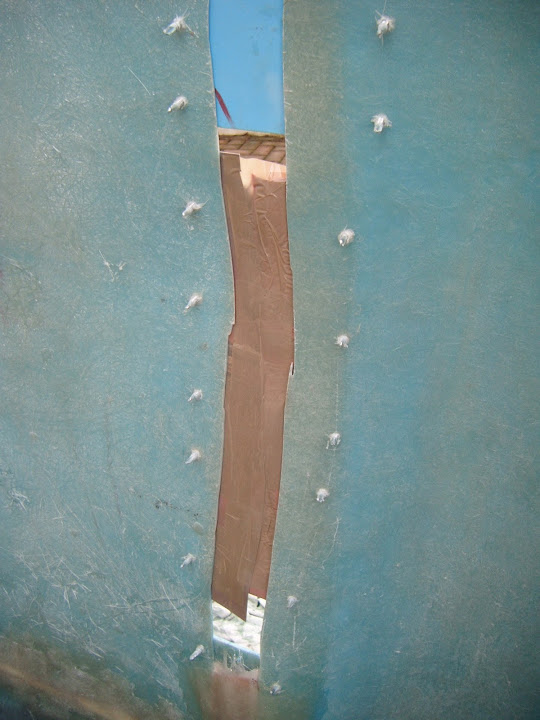
So the next step was to prepare the remaining gaps, which as usual doesn't look very promising from this side.


But at least it looks a bit more respectable on the side that matters.


At this point I had to come back indoors to warm up a bit, as I was losing the feeling in my fingers!
- - - - - - - - - - - - - - - - - - - - - - - - - - - - - - - -
The cold was one thing, but the wind was a real pain in the butt.
I used a wheelie bin to act as a wind break to give my working area some shelter.

The first round of fibreglass matting (& scraps) covered the nose/headlight area.

The second round covered the last couple of gaps and the screw holes from below.

Seeing WCA's "Rocking Chair" next door made me smile, as this has been my seat while doing this work.

So now the bonnet is completed re-joined apart from the rear edge which needs to be re-profiled and extended.

Once again, I was glad of the excuse to leave that to set for a while and come back indoors.
End of Part 1...
|
14th January 2015, 15:12
|
|
Senior Member
|
|
Join Date: Feb 2012
Location: Wembley, London
Posts: 5,056
|
|
Brass Monkeys - Part 2
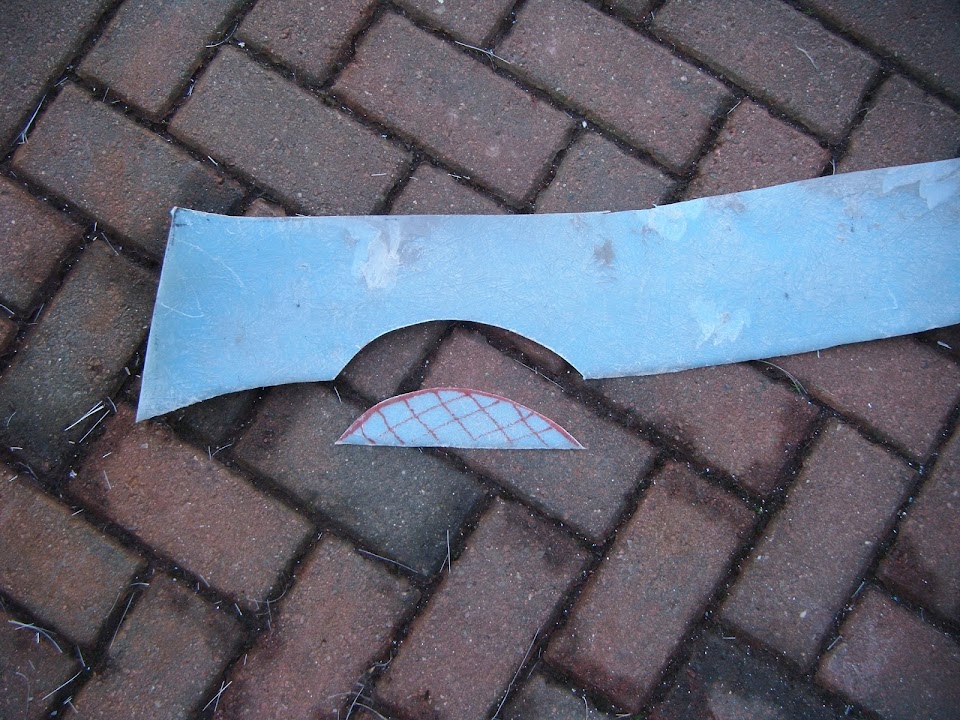
My next job was to have a look at how I might be able to restore the lower valance.
This was the section I previously cut out.

So I made a cardboard template to match it and used that to work out where it would foul the chassis.


With templates for both sides done, I could mark up the original piece and cut a couple of sections out.

This is not a great photo, but I also had to grind the bottom edge of the driver's side hinge for clearance.

Then I fixed some brackets to the bottom section, so I start at the passenger side and work my way along.

After fixing a few more brackets along the edge the lower valance was back in positon.
Obviously there is a mismatch at the driver's end, due to the bonnet chop & nose job.
Which leaves me with two areas to sort out:
- I need to "even up" the bottom edge to give me a nice "sweep" from one side to the other.
- I also need to work out what to do with the chassis cut out sections.
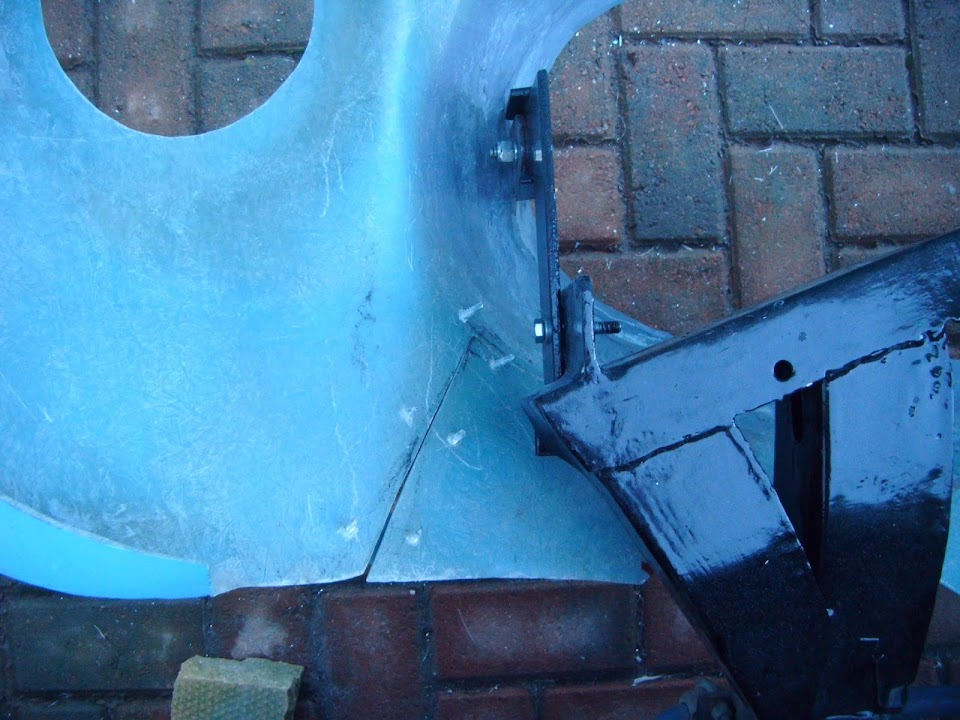
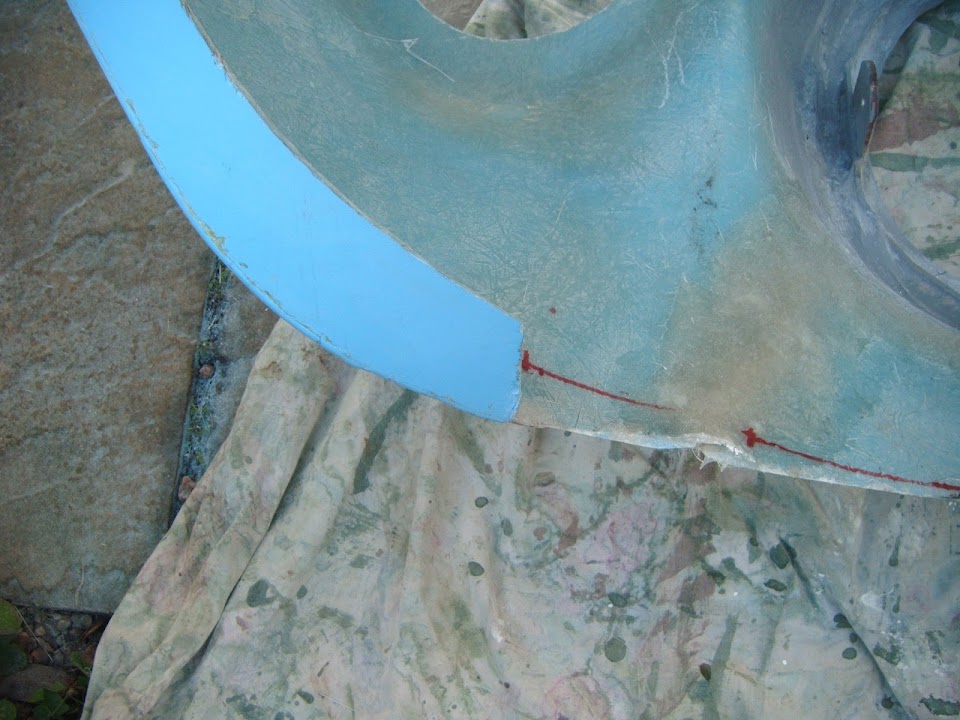
Here are the cut outs in action, although the angle of the first photo doesn't help.
( The red dashes actually line up with the masking tape mark on the chassis. )


The good news is that they do their job and allow the bonnet to open without hitting the chassis.

So once today's bonnet healing work had set, I can remove the bonnet and start on the lower valance.
- - - - - - - - - - - - - - - - - - - - - - - - - - - - - - - -
The final job of the day was to add some extra protection from the weather to the bonnet.
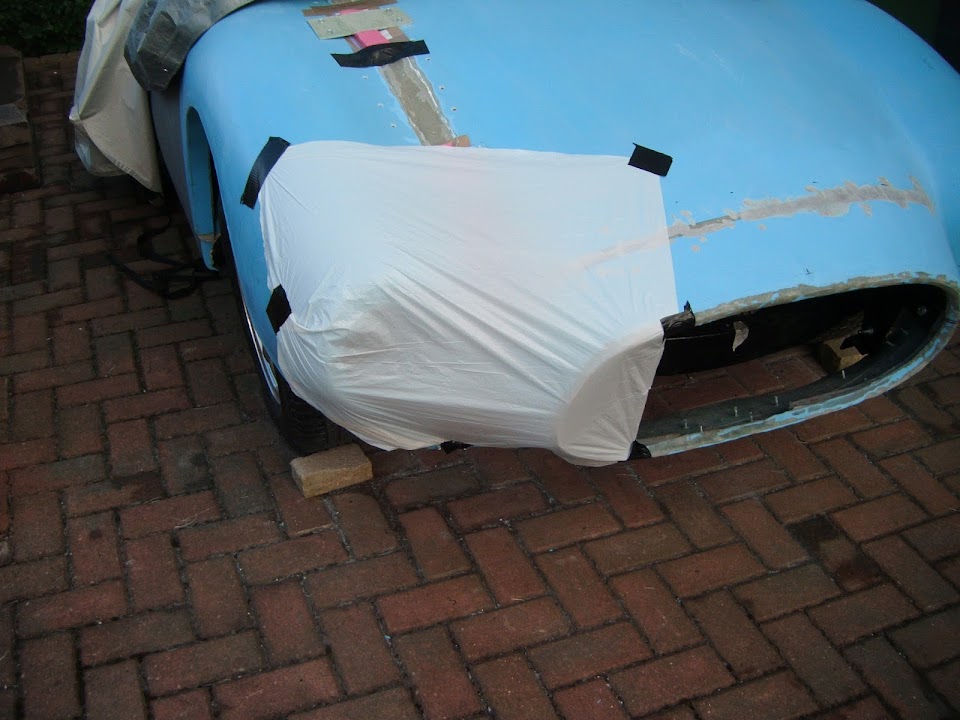
As my tarpaulin only covers this much and will simply direct the rain into today's fibreglass work.
( The car cover that goes over the top is really for decoration, as it is so porous.  )

As the forecast is for a pretty wild night.
- - - - - - - - - - - - - - - - - - - - - - - - - - - - - - - -
Overall, it is clearly complete madness to be building a car outside at this time of year.
However, I did manage to take a couple of decent strides forward, so it was well worth it.
Until next time, take care, Paul.
PS
Yesterday's Storm:
If I thought my "workshop" got a hammering, apparently there was a mini tornado in Harrow.
This is the damage it caused to a garage that is less than two miles from here!


|
15th January 2015, 15:42
|
|
Senior Member
|
|
Join Date: Feb 2012
Location: Wembley, London
Posts: 5,056
|
|
Bonnet Plans & Progress:
Last night I was looking at photos of Mr T's car, while thinking about what to do with my chassis cut outs.
Then, in another "I couldn't see the wood for the trees" moment, this photo really jumped out at me.
So I went back to this "Three Amigos" photo...
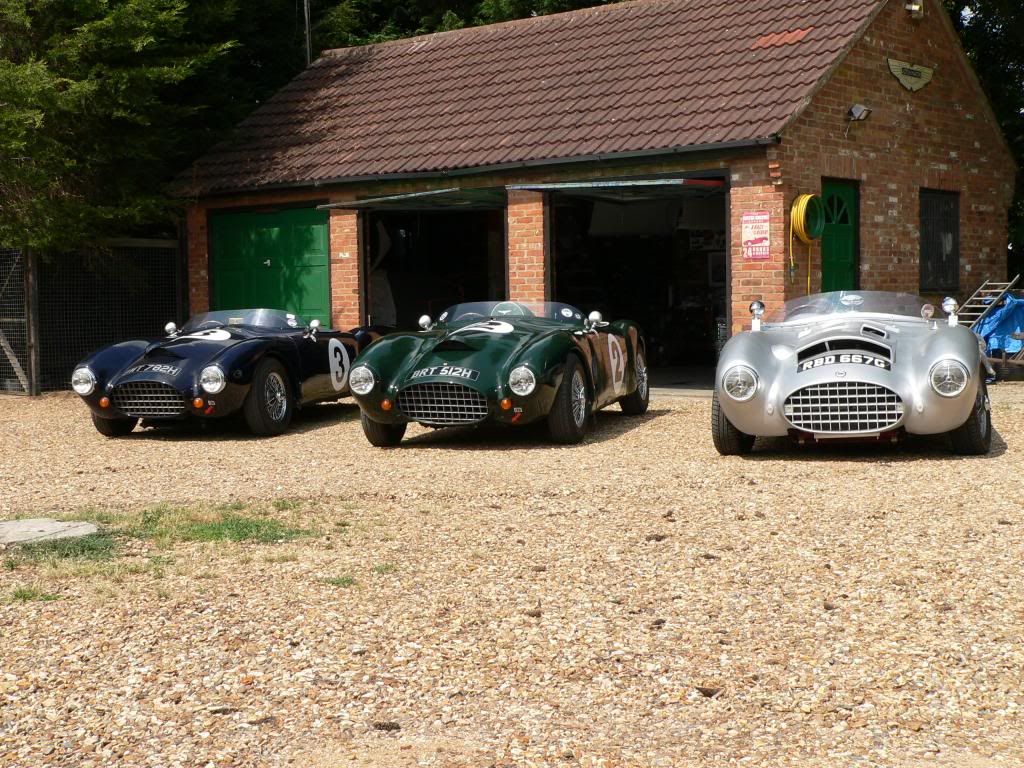
Which clearly shows Mr T's lower valance with what looks like a "cut out" that looks completely normal.
So in the spirit of KISS, I will not try to add bulges or anything else to my cut outs.
I still intend to "even out" the whole lower valance area in a similar way to Swifty.

But I plan to change the profile of the bottom edge into a series of gentle curves either side of the cut outs.
As I think it is the sharp angles where the curved cuts meet the original straight edge that look odd when viewed from the front.
So I marked up where the lower valance meets the chassis to help me re-shape the edge later on.

Hopefully a more "organic" edge will not stand out, especially when painted BRG, which should blend in with the shadows. 
Part of my problem is that I am taking photos while lying on the ground, which is hardly a "normal" view.
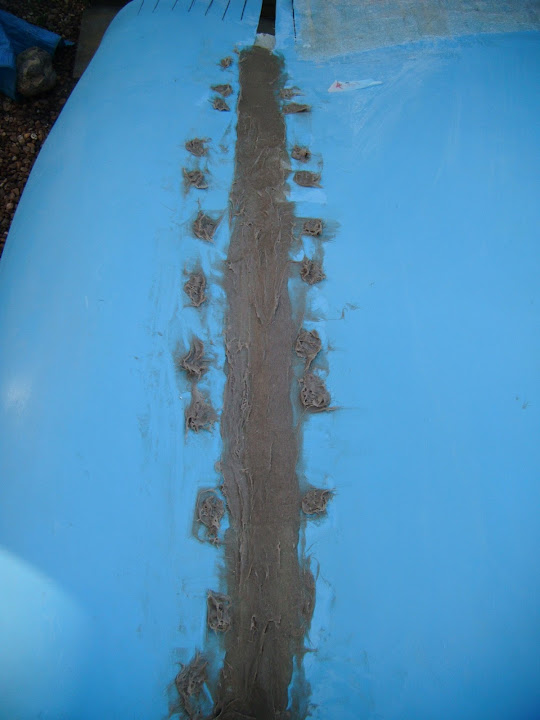
So this morning I removed all the brackets and formers from the main cut through the bonnet & took a "standing up" view photo.

So in normal circumstances you can't even see the lower valance!
I took a few other photos and am confident that by the time I have finished the filler work it will look OK.


Which ties back to something DaveCymru posted the other day about the look of a 50s racing car.
I am not trying to build a perfect replica of anything (although AC Cobra is still the most popular suggestion of people passing by ).
As long as I can finish the build and get it on the road I will be happy.
There was another area I wanted to check and that was the depth of my lower valance.
It currently runs across from the bottom edge of the wing, which is why it would foul the chassis.
Then I unbolted the bonnet so I could work on it and take a better photo of the inside.

Now when I compare that to a photo of Mac's bonnet...

It would appear that his bottom edge "steps in" a bit compared to the bottom of the wing, which must help his bonnet opening clearances.
Given that Mac & Swifty have different bonnet hinge arrangements, it is hard to get a true "like for like" comparison.
I then very carefully carried the bonnet through the house to the back garden, as it is now bigger & heavier than before.
Where I added the first round of fibreglass matting to re-join the lower valance back to the bonnet.

I also covered the last few screw holes from the brackets I removed earlier.

Another piece of this bonnet jigsaw will be the final shape of the front wheel arches.
Currently the profiles of the two return edges are different.


But I will not worry about that until I work out what I am doing with the arches themselves.
End of Part 1...
|
15th January 2015, 15:44
|
|
Senior Member
|
|
Join Date: Feb 2012
Location: Wembley, London
Posts: 5,056
|
|
Bonnet Work - Part 2:
I left the first round of fibreglass to set for a while before returning to the bonnet.
Then I turned it over, making sure there was no weight on the lower valance.

I then countersunk the remaining screw holes, & roughed up all the fibreglass & gel coat around the join.
Unfortunately, just as I had finished that work I felt a drop of rain.
So I quickly protected the fresh fibreglass work.

Before covering the rest of the bonnet & retreating back inside.

- - - - - - - - - - - - - - - - - - - - - - - - - - - - - - - -
Once the rain clouds were gone I headed back out, just in time to see this flying overhead.

Then I mixed up some fibreglass filler & made a start.

While that was setting I propped the bonnet up so I could get access to remove the lower valance brackets.
Then I crawled inside the bonnet to grind the area around the back of the screw holes.

This was quite a tight space to work in, but I got a round of fibreglass matting over the screw holes.
I also put an extra strip along the length of the join while I was at it.

I left that to start setting before eventually coming back out for the final job of the day.
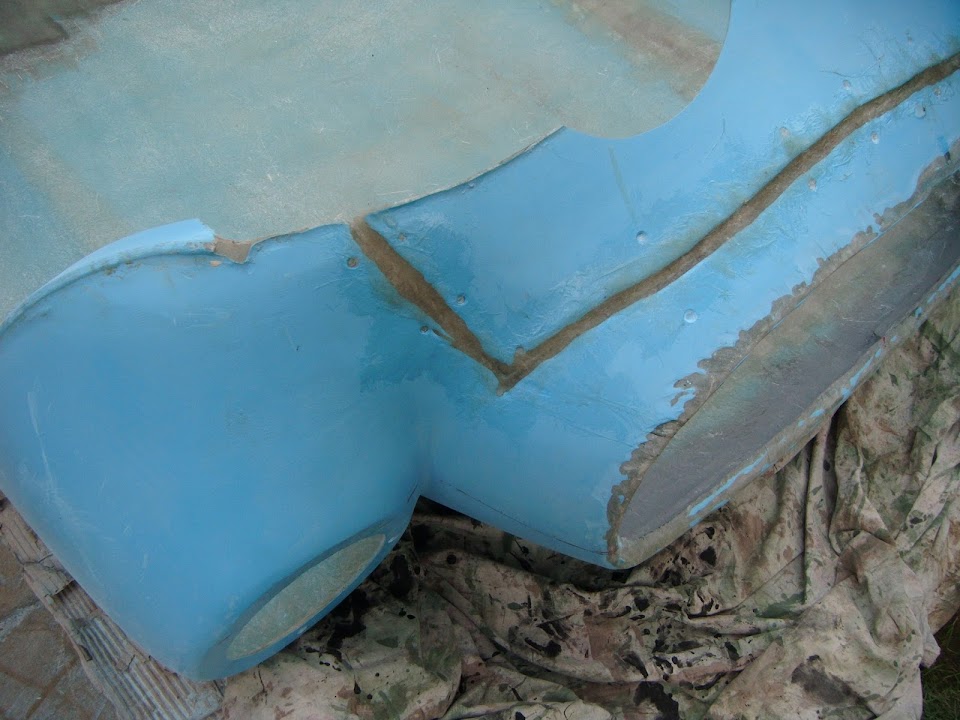
Which was to sand back the filler.

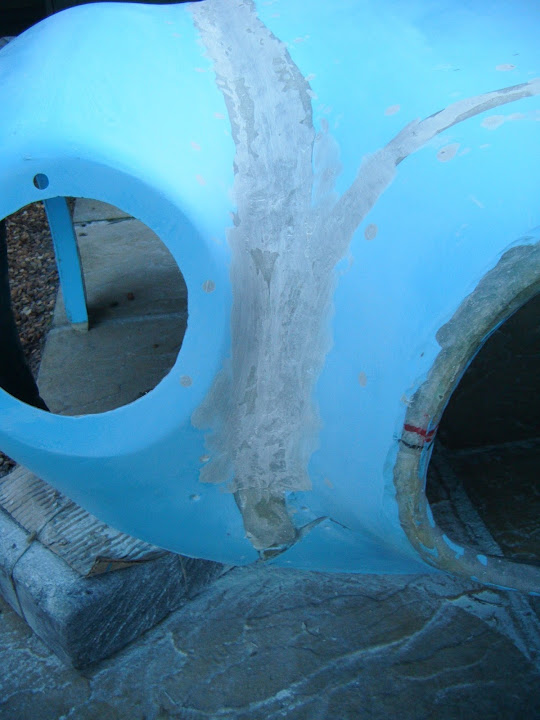
I've left it a bit rough between the headlight and the nose cone, as I need to build this area up a bit more.
( I wanted to get the headlight area sorted out first, then I can bring the nose out to meet it. )
There is a definite dip between the bonnet and the wing.

Although, obviously, this dip is definitely not a mirror image of the other side.

But I'll be happy as long as I can set a smooth transition across the repaired area.
It was too late to start any more work, so I packed up and called it a day.
So until next time, take care, Paul.
|
15th January 2015, 16:45
|
 |
Senior Member
|
|
Join Date: Jul 2011
Posts: 5,328
|
|
Paul, looking at your bonnet from dead ahead, if it were mine I'd put a long, narrow and relatively low air scoop over the nearside dip. That would effectively disguise the difference between the two sides and provide a ram air effect for your carburettors.
You're right about my front valance, I cut most of the material away from underneath the grille to clear the chassis rails and radiator when you open the bonnet. You can only see it when you squat down to take photos, standing up it's completely obscured from view by the bonnet.
Keep up the good work. |
15th January 2015, 17:37
|
 |
Senior Member
Enthusiast
|
|
Join Date: Dec 2006
Posts: 1,130
|
|
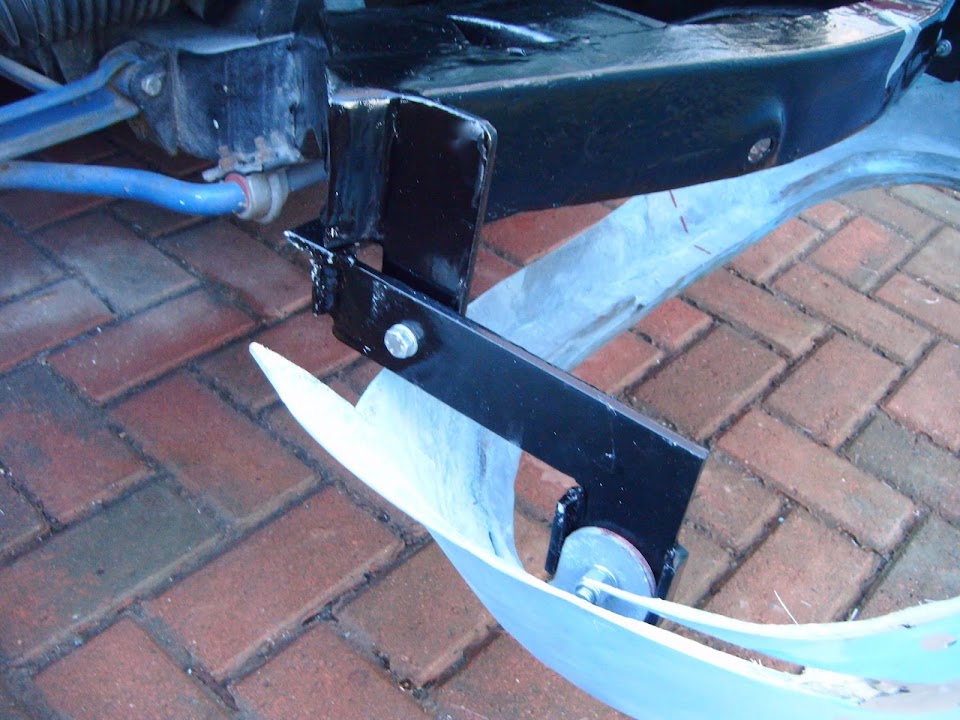
this past wekk it's all been about bonnet so I'll show you a neat trick for an opening bonnet strap.
It's the first thing people notice when the bonnet opens.


All done with an old seat belt, best of all it reels up all by it's self when the bonnet is shut 
I think it's one of my better ideas  |
15th January 2015, 18:54
|
 |
Senior Member
|
|
Join Date: Dec 2013
Posts: 839
|
|
Paul may be you can have a lower valance by not opening your bonnet as far, i've checked both the photo of my bonnet open and gone out side to check it again and it does give enough room for future maintenance so may be the answer is to move the stops in slightly or weld an extra stop in place. Which ever way you go i think it wise to make a bracket to prevent the bonnet closing under windy conditions while working on the engine.
IMG_4073.jpg IMG_5021.jpg
Even the original spitfire bonnet did not open fully upright. You can see roughly the angle of my bonnet which stays up under its own weight.
Just though i would add this to the equation and your bonnet shape is getting there.
|
16th January 2015, 10:14
|
|
Senior Member
|
|
Join Date: Feb 2012
Location: Wembley, London
Posts: 5,056
|
|
Mister Towed - I like the idea of a ram air scoop for the carbs.
But I can live with some "quirky" bonnet curves, as they in keeping with the rest of the car.
Jokes aside, I hope the yellow band around the bonnet nose will draw your eye away from everything else.
I've taken a lot of positives from your "on the road" experiences, especially what people never notice.
By the time I've put a nice shape on the lower valance edge, I hope it will look "factory".
Micky1Mo - Your use of a seat belt is a great example of thinking outside of the box!
Swifty - Thanks for taking the trouble to check your own bonnet and post the Spitfire photo.
I've just looked through my own photos and don't have a single one showing the original bonnet angle.
My current idea is to actually extend the section of the lower valance between the two cut outs a bit.
So that it can be shaped into a nice curve as part of my "wavy" bottom edge.
Finally, thanks for the brilliant safety / hinge locking tip.
I will try to make something that will slot in between the horizontal & vertical sections.
- - - - - - - - - - - - - - - - - - - - - - - - - - - - - - - -
Battening Down The Hatches:
I had a race against time this morning to get a bit more done on the car before the weather closed in.
( Based on the forecast it will be Monday before I will get another chance to play outside. )
My first job was to tidy up the Summer House (again ).
Then I ground out the "sunny side" of the lower valance join.

I used the last of my fibreglass matting scraps & some bits I'd chopped up earlier to make "home brew" filler.

This really is as messy as fibreglass work gets, but at least the gap was filled in a bit.

Hopefully by the time I've finished tidying up this mess & added some filler, you will not be able to see the join.
My biggest worry about the weather was the predicted frost overnight.
( Although if we actually get snow as well, that is hardly going to help. )
I have decided to protect the fibreglass work on the bonnet as much as I can.
So now you see it...

And now you don't...

Obviously I will need to "air" the Summer House when the bonnet finally comes out.
As I remember Mr T's vidid description of fibreglass work leaving him smelling like a canoe factory.
Even if the weather stops play for a few days, I am really happy with the progress I've made this week.
As just 7 days ago, the bonnet still looked like this.

So until next time, take care, Paul.
|
16th January 2015, 11:07
|
|
Senior Member
|
|
Join Date: Mar 2012
Posts: 1,152
|
|
"Summer House" or "Sammio House"? Great progress, Paul, keep it up. I can't believe that there won't be another update until Monday.
|
16th January 2015, 12:21
|
 |
Senior Member
|
|
Join Date: Dec 2011
Location: Devon
Posts: 550
|
|
Well done Paul, a positive move forward with the bonnet. You must be really chuffed to get the fit and look you have bearing in mind what you started with. I am amazed you have soldiered on with the weather as it is. Have a beer (or hot chocolate!) you have earned it.
|
16th January 2015, 14:02
|
 |
Senior Member
|
|
Join Date: May 2011
Location: Somerset
Posts: 1,671
|
|
That is looking really good matey!
Like Towed, i ended up really trimming the bottom edge of the bonnet on my Sammio so that it could open as much as i wanted and TBH on-the-road you never noticed it. So i think you'll be fine.
|
17th January 2015, 13:41
|
|
Senior Member
|
|
Join Date: Feb 2012
Location: Wembley, London
Posts: 5,056
|
|
Oxford - Looks like you will not have to wait until Monday for an update after all.
Froggyman - Thanks, the bonnet is definitely heading in the right direction.
Dave - Cheers, it is reassuring to know that others have also chopped their lower valance.
- - - - - - - - - - - - - - - - - - - - - - - - - - - - - - - -
Nice Out:
The really bad weather forecast for yesterday never arrived, but it was certainly very cold overnight.
( So well worth the effort of tucking the bonnet in for the night. )
Similarly, there was nothing more than a light flurry of snow today.
So once that had cleared, I wandered down to the "Sammio House" as Oxford has re-named it.
After turning the bonnet around I could get better access to the lower valance.
Unfortunately, I had to open all the doors & windows to clear the last of the resin fumes, so I wasn't technically working "indoors".
With curves all over the places, the "straight" lines I drew don't look great in the photos.
But I was still able to mark up a black "cutting" line for the area that sits in between the chassis rails.

So far, so good, but extending this line to meet the wings will take a bit of fibreglass "extension" work.
A bit like the rear of the car, if the curves are different then things will not line up perfectly.
To be honest there is not a "significant" difference, so I have no intention of re-working the bottom of the wings.
Instead, I will simply draw a best fit line and get on with it.
On the driver's side I just need to build up the area around the join a little.

But on the passenger side I need to build up the whole section from the chassis cut out to the wing.

Hopefully, if I go back to this previous photo, the lines above will make some sense.
So on the left of the photo is the driver's side and the "point" resting on the block will be removed.
Whereas, on the passenger side, it should switch from a slightly concave curve to a slightly convex one.
Given the feedback that you don't really notice this area, that will do and be close enough.
- - - - - - - - - - - - - - - - - - - - - - - - - - - - - - - -
I had to wait until the afternoon to allow the temperature to rise a bit before I could set to work.
In the end, I did just "tweak" the passenger side wing, so I could achieve a more gentle curve heading towards the chassis cut out.

After a quick tidy up of the edges with my grinder, I clamped two formers into place.


Before adding some fibreglass matting over the top.


Hopefully this photo gives you some idea of where the "wavy" bottom edge will end up.
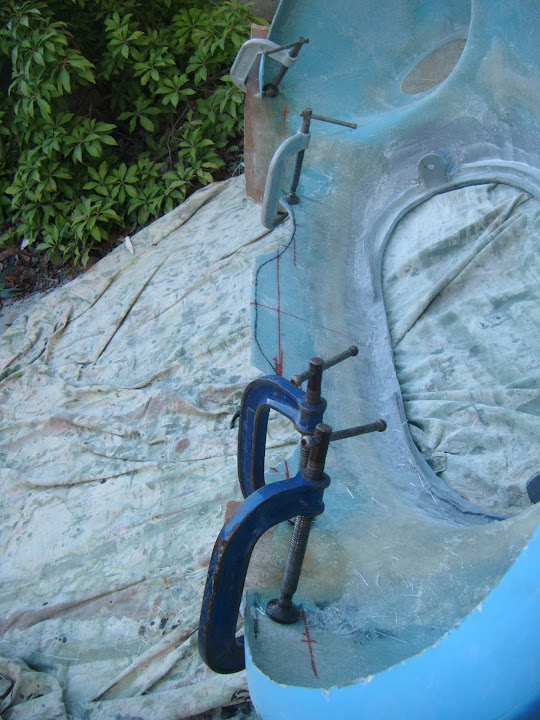
Note:
Once the edge has been cut, I will add extra matting along the edge to re-enforce it / help it hold it's shape.
The position of the clamps meant there was no way I could re-position the bonnet to do any filler work in another area.
So that is it for today, although I will put the bonnet back in the Summer House later on to protect it over night.
Given I didn't expect to do any work until Monday, I'm happy to treat these little jobs as a nice bonus.
So until next time, take care, Paul.
|
17th January 2015, 16:12
|
|
Senior Member
|
|
Join Date: Feb 2012
Location: Wembley, London
Posts: 5,056
|
|
Extra Time:
While there wasn't enough daylight left to start any filler work, I did do a little bit more...
I made a cardboard template to replicate the 3D shape of the passenger headlight area.


Which, when reversed, gives me a guide line for the filler work required to build up the bonnet nose.


This will not give me a perfect copy of the shape, but it should be a half decent approximation.
By now the fibreglass work had set hard enough for me to remove the formers.


Then I quickly ran my grinder over the "sunny side" of the lower valance join & these new extension areas.

That way if the weather is OK in the morning I can slap some filler on without waking the neighbours with my grinder.
Right, that is definitely it for today, cheers, Paul.
|
|
Currently Active Users Viewing This Thread: 2 (0 members and 2 guests)
|
|
|
 Posting Rules
|
You may not post new threads
You may not post replies
You may not post attachments
You may not edit your posts
HTML code is Off
|
|
|
All times are GMT +0. The time now is 09:56.
|


 Linear Mode

