|
|
| Sammio Builds and discussions Sammio bodied car builds and specials |

14th June 2016, 12:29
|
 |
Senior Member
|
|
Join Date: Dec 2013
Posts: 839
|
|
Its looking good Paul, when i reached stages like you have i felt as if i was getting some were, you can see rssults for all the hard work done, keep on plugging away matey.
|
14th June 2016, 14:55
|
|
Senior Member
|
|
Join Date: Mar 2015
Posts: 395
|
|
That's a heck of a lot of bodywork going into the car it will be a stunner when finished.
|
14th June 2016, 20:37
|
 |
Senior Member
|
|
Join Date: Feb 2012
Location: Wembley, London
Posts: 5,056
|
|

Swifty: - Cheers. 
The front arch work has been very tricky to do, but it is finally coming together nicely.
I remember calling your car "menacing" when it reached this stage.

So I am pleased that I've managed to maintain a vague family resemblance.
- - - - - - - - - - - - - - - - - - - - - - - - - - - - - - -
Deggsy - Welcome to my build thread.
This old photo is a perfect example of my point on your build thread about the rain channels…
Even if my boot area is watertight, there is still a gaping hole in the middle of the car. 
- - - - - - - - - - - - - - - - - - - - - - - - - - - - - - -
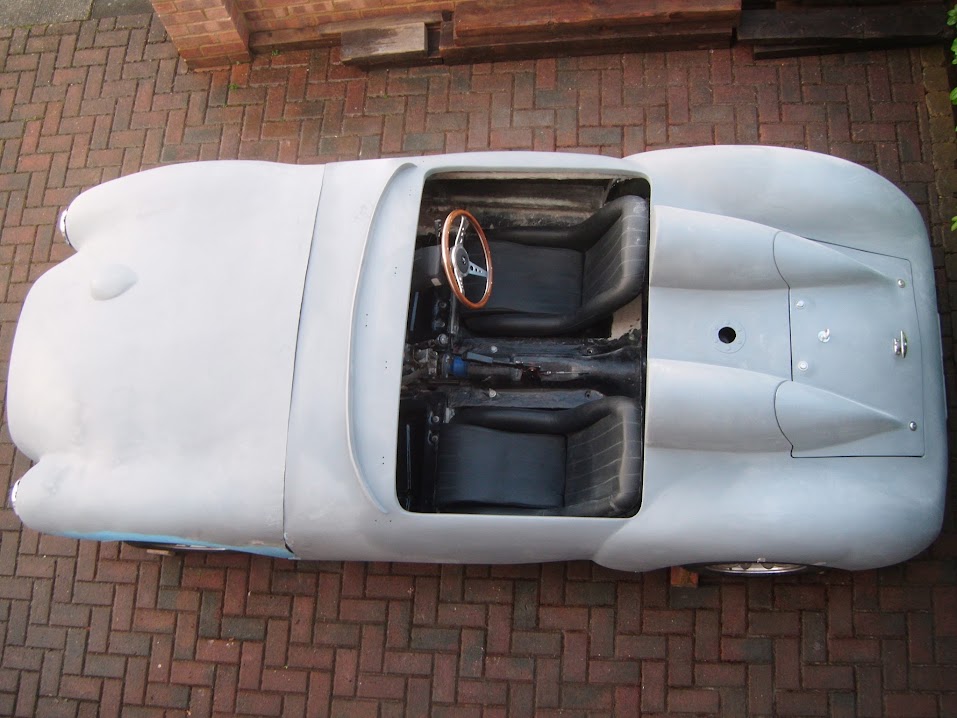
Better Late Than Never:
I was just chilling out after dinner, when I noticed that it was actually quite nice outside.
I'm always allowed to excuse myself from family time if they decide to watch Coronation Street, so I nipped outside.
Mixed up some fibreglass filler for the bottom corner of the bonnet.

Plus the corner of the scuttle.

The bonnet will sit a little higher when the rubber seal is fitted, so this is getting there.

I also applied some 'normal' filler to the leading edge of the arch.

By now it was 9pm and the nicest it had been all day.

Unfortunately, the filler is taking a bit longer than normal to set, so it currently looks like this.

But it should be hard enough now for me to head back outside to put the covers on.
I'll start the sanding process tomorrow (weather permitting).
Until then, take care, Paul. 

|
14th June 2016, 20:54
|
 |
Senior Member
|
|
Join Date: Dec 2011
Location: Devon
Posts: 550
|
|
The bonnet to body style and fit looks superb and a big improvement on the original flimsy design. You must be so proud to take the covers off now! After all the work you have put into this body why not take a mould and go into production.Lol.
|
14th June 2016, 21:04
|
|
Senior Member
|
|
Join Date: Apr 2014
Location: Midlands
Posts: 405
|
|
It's coming on well Paul, it really looks good that bonnet to body join.
|
15th June 2016, 13:24
|
|
Senior Member
|
|
Join Date: Feb 2012
Location: Wembley, London
Posts: 5,056
|
|
Froggyman & Jones - Thanks chaps.
Even though it has been a lot of hard work, I do like the way this arch re-shaping work has turned out.
I also love the fact this is a genuine "one off" design, so there will be no moulds/Swordfish production line.
Obviously, this unique car has "borrowed" lots of ideas from other builds. 
- - - - - - - - - - - - - - - - - - - - - - - - - - - - - - -
Weather Permitting - Part 1:
Based on the morning's forecast, the sunshine would last until 10am before the rain came.
So I was outside sanding yesterday's filler just before 8am.


As the leading edge was now done, I just had to get some etch primer on.

There was a feeling of deep joy as all the construction "wounds" just melted away.
Well, some of them disappeared, but others remained.
In fact, I can't actually sort out the mess on the return lip until I jack the car back up & remove the wheel.


So I slapped on some normal filler instead.

Once that was set, it was sanded down.


At this point it was reaching 11am and it looked like the rain that was promised was finally about to arrive.

So I packed up for the day and then headed to the Sainsburys, just as the rain was starting.
End of Part 1…
|
15th June 2016, 13:26
|
|
Senior Member
|
|
Join Date: Feb 2012
Location: Wembley, London
Posts: 5,056
|
|
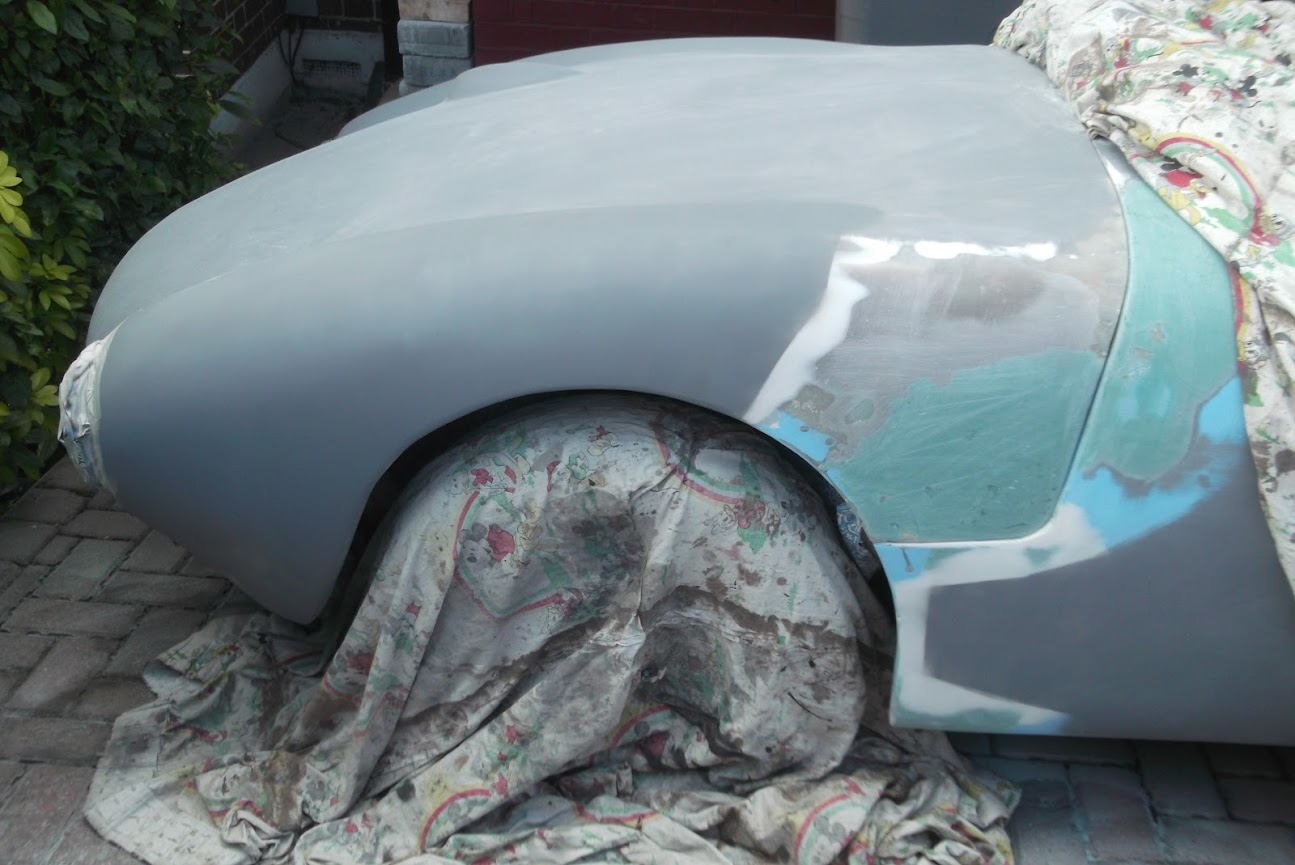
Weather Permitting - Part 2:
However, to my surprise, as I left Sainsburys, there was blazing sunshine outside.
So when I got back I took a chance and got some more etch primer on.


Note:
I need to finish sanding the horizontal panel, before I can paint that whole section.
Then I cut off some small sections of the bonnet seal, just to temporarily hold things in place.

Next I got the car out of the way so I could clean the drive (again).


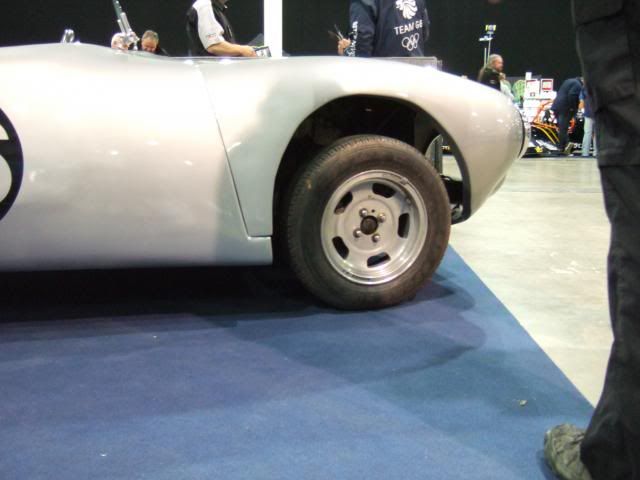
But before I put the car back into position there was just enough time for a photo shoot.
It actually seems like a very long time again when this "Before" photo was taken.

I've still not reached the 100% "After" stage yet, but this view is still a great boost to morale.

Note:
I've only taken the body work to a "good enough for an MOT" standard for now.
( All the final gaps & alignment issues will be dealt before paint. )
Unfortunately, by now the sky looked like this and I really thought I'd pushed my luck with the weather too far this time. 

But, thankfully, I had all the covers back on before the next round of rain arrived.

Overall, I wasn't expecting to get much done today, so this has been a great result.
Until next time, take care, Paul.
|
15th June 2016, 13:36
|
|
Senior Member
|
|
Join Date: Dec 2013
Posts: 169
|
|
I probably missed this somewhere down the line, but what are you using to shape the filler? You appear to use quite a lot, and when I use it I have the devil's own job getting it smooth again, having tried surforms, sandpaper, files etc. So would be interested in your methods.
Thanks
Marc
|
15th June 2016, 13:57
|
|
Senior Member
|
|
Join Date: Feb 2012
Location: Wembley, London
Posts: 5,056
|
|
Marc F - It was Mac/Viatron who recommended this set of sanding blocks (+ a long board) to me.

Only the small block seen below has a straight edge, all the others have different curves on them.

Having searched this thread to find the photo, it seems I've been using them for almost 2 years now! 
The other tip Mac gave me was to start the sanding as soon as the filler has set hard enough (if possible).
For this front arch work, I generally start with 80 grit on the long board to get the big undulations under control.
As I tend to mix too much filler & use too much hardener, so rarely get the chance to smooth it all out after applying.
Hope that helps, Paul.
|
15th June 2016, 14:02
|
|
Senior Member
|
|
Join Date: Dec 2013
Posts: 169
|
|
Yep, starting whilst still "just set" is always a good idea - before it goes like concrete, but after it has stopped being sticky. I found the surform good at taking off the silly sized lumps, but had to be careful not to go too far otherwise it would carve grooves below the desired surface.
I like the look of that kit, and am impressed you are entirely hand powered with these blocks.
I will have to take a look for these blocks on line. I assume they are plastic by the colour/shape. Is the paper (with Velcro fixing I assume) readily available?
|
15th June 2016, 16:56
|
|
Senior Member
|
|
Join Date: Dec 2013
Posts: 839
|
|
Paul the front arch is a massive improvement, like it.
|
15th June 2016, 17:04
|
 |
Senior Member
|
|
Join Date: Jun 2011
Posts: 935
|
|
Great work Paul its looking very straight now.
watch this when the weather isn't being co operative.
https://youtu.be/bKmkQbDGd6Y
1/ it will inspire you for the final few jobs
2/ It has some lovely details, I think you will like the screen arrangement on the C type |
15th June 2016, 17:12
|
|
Senior Member
|
|
Join Date: Feb 2012
Location: Wembley, London
Posts: 5,056
|
|
Marc - Sorry for the delay in replying, I saw your message just as I was heading outside (see below).
Yes, the blocks are plastic and I pulled out one of the boxes of circular sandpaper so you can see what it looks like.

- - - - - - - - - - - - - - - - - - - - - - - - - - - - - - -
Swifty & Roadster - Thanks gentlemen.
- - - - - - - - - - - - - - - - - - - - - - - - - - - - - - -
Bonus Session - Part 1:
It was raining when I posted my previous update, but once again the rain cleared and the sun came out.
So I jacked the car up & removed the wheel.

Marked up a few areas for trimming:
The return lip of the bonnet on the trailing edge.

The return lip of the body shell side extension to tie in with the "in fill" panel I will be adding.

The bottom edge of the bottom corner of the side extension.

And finally, the return lip of the bonnet on the leading edge.

Next I cut out the small panel.

And trimmed all the other areas.


End of Part 1…
|
15th June 2016, 17:14
|
|
Senior Member
|
|
Join Date: Feb 2012
Location: Wembley, London
Posts: 5,056
|
|
Bonus Session - Part 2:
Then I mixed up some bonding paste to hold the panel in place.


I will also add some fibreglass matting along the inside of the panel at some point.
By now the sky was darkening once again, so I didn't want to start anything else.

It just starting to spit rain while I was outside talking to one of my "regulars".
So the covers went back on and that is definitely it for the night now.
Cheers, Paul.
|
15th June 2016, 20:43
|
|
Senior Member
|
|
Join Date: May 2015
Posts: 162
|
|
Your latest changes have made a massive difference to the car: it looks so much more purposeful with a sensible gap between the wheel and arch. Kudos to you.
|
16th June 2016, 05:53
|
|
Senior Member
|
|
Join Date: Feb 2012
Location: Wembley, London
Posts: 5,056
|
|
Triumph Special - Welcome to my build thread.
Thanks for your kind words, but I must confess that the HUGE improvement to the way the car looks has caught me by surprise a little.
Because, daft as it sounds, I kind of forgot that reducing the "air" gap around the tyre was increasing the area of bonnet/body shell around that air gap.
Despite the fact I was bridging big gaps & adding fibreglass "in fill" pieces, I was always looking at the bottom edge of the arch compared to the template.


It was only as the filler work was progressing that the new "chunky look" bonnet/body shell started to really catch my eye.
And seeing the etch primer go on yesterday really made the improvements stand out.
Hopefully the last bit of filler work will finish the job off nicely.
Cheers, Paul.
|
16th June 2016, 06:16
|
 |
Senior Member
|
|
Join Date: Sep 2011
Posts: 1,446
|
|
Looking good Paul the car always looked a bit odd before with the high front arches but your mods balance it all out and the now you have sorted the bonnet opening/ closing edge behind the wheel it really completes it ....
|
16th June 2016, 13:16
|
|
Senior Member
|
|
Join Date: Jun 2015
Posts: 1,401
|
|
Your perseverance has paid dividends, great work looks fantastic!
|
16th June 2016, 13:16
|
|
Senior Member
|
|
Join Date: Dec 2013
Posts: 169
|
|
No problem - I can see you are busy :-)
I am such a long way off body prep that it almost seems silly asking, but in fact as spare funds become available I will start to pick up these sort of things, so it is nice to aim for stuff that has been tried and tested by others to stop me wasting time.
And what caught my I was how much texture you leave - I have always wasted time smoothing off whilst wet, but looking at your approach I reckon is working better, quicker, more efficiently. So that is a good idea to run with.
Thanks
Marc
|
16th June 2016, 17:12
|
|
Senior Member
|
|
Join Date: Feb 2012
Location: Wembley, London
Posts: 5,056
|
|
RedRatBike - Cheers.
The fact I am using 13" wheels exaggerated the issues with the front wheel arch.
Although, thankfully, my body shell and bonnet mods had already improved things compared to the Ribble Demonstrator.
( Which was also running 13" wheels. )
- - - - - - - - - - - - - - - - - - - - - - - - - - - - - - -
Molleur - Thanks.
- - - - - - - - - - - - - - - - - - - - - - - - - - - - - - -
Marc - No worries, Mac was kind enough to steer me in the right direction, so I'm happy to help.
If I was better at applying filler I would probably aim to spend a bit of time smoothing it out, but it seems to set very quickly on me.
But, as you say, even if there is some excess filler, it is not the end of the world and some elbow grease soon removes it.
The only exception would be the fixing panel screw holes which I've found to "stick" better if I shove a lot of extra filler into/around the hole.
( See one of the photos above. )
- - - - - - - - - - - - - - - - - - - - - - - - - - - - - - -
Thursday:
It was grim/raining for most of the day, but around 4pm there was a brief burst of sunlight...
So I sanded down the excess bonding paste from this panel.

I also made a start on tidying up the bonding paste on the plywood panels underneath the car.

Put some fibreglass filler on the return lip of the body shell extension.

And put some normal filler on the return lip of the bonnet.

At which point I felt a drop of rain and looked up to see this.

Managed to get the bonnet down and everything packed away whilst it was just spitting.

So, thankfully, the covers were safely on before the real rain started.
( And I just heard a rumble of thunder while I am typing this post. )
Clearly, not much, but something is always better than nothing.
Until next time, take care, Paul.
PS
My roll of "Builders' Band" arrived today and, if things go well, I'll be starting the driver's side arch at the weekend. 

|
|
Currently Active Users Viewing This Thread: 7 (0 members and 7 guests)
|
|
|
| Thread Tools |
|
|
| Display Modes |
 Linear Mode Linear Mode
|
 Posting Rules
|
You may not post new threads
You may not post replies
You may not post attachments
You may not edit your posts
HTML code is Off
|
|
|
All times are GMT +0. The time now is 09:47.
|


