|
|
| Sammio Builds and discussions Sammio bodied car builds and specials |

19th May 2016, 08:40
|
 |
Senior Member
|
|
Join Date: May 2009
Location: POOLE , DORSET
Posts: 2,200
|
|
Quote:
Originally Posted by paul l

then, unless a wheel arch actually rubs against a tyre, i will ignore the fact i have not been able to build a perfectly symmetrical car.
The truth is, the car gets such a great reaction these days, it is clear that most people either don't notice the "faults", or simply don't care.  |
thats exactly it ... |
19th May 2016, 18:14
|
 |
Senior Member
|
|
Join Date: Feb 2012
Location: Wembley, London
Posts: 5,056
|
|

Gary - 
- - - - - - - - - - - - - - - - - - - - - - - - - - - - - - -
The Rebuilding Starts…
I had a quick look at the bottom edge of what is left of the bonnet.

I will be chopping a section of this off and re-joining it as it currently sticks out a bit too much.

Note:
Obviously, this whole corner needs to be finished off, but the arch work comes first.
Anyway, before I started worrying about cutting up more of the bonnet, I wanted fix some of the other panels in place first.
The problem is there are just too many different angles to take into account to do this all in one go.
So I decided to fix part of the trailing edge first.

Along with the start of the leading edge too.

Note:
The return lip will be given a major trim when I have finished joining the arch back together.
Then I decided to join the three top edge sections together away from the car.

One short (100ml) fibreglassing session later and all three sections were done and the top edge is now acting as a single piece.

Getting access to the other panels with the wheel still in position was a pain, but it should hold for now.
As I just need these sections to be stable so I can bolt the next pieces to them, without everything wobbling.
Sorry, there was no way to get a decent photo of the "dark side" of the panel where the matting was added.
I should have a bit of extra car time available tomorrow, so hopefully I can keep the momentum going.
Until then, take care, Paul.

|
20th May 2016, 05:53
|
|
Senior Member
|
|
Join Date: Feb 2012
Location: Wembley, London
Posts: 5,056
|
|
Quote:
Originally Posted by Roadster
|
Roadster - Apologies for not thanking you for posting this link yesterday.
There was a seriously impressive line up of cars in that clip. |
20th May 2016, 19:07
|
|
Senior Member
|
|
Join Date: Feb 2012
Location: Wembley, London
Posts: 5,056
|
|
Slowly, Slowly, Buildy, Archy…
Yesterday I was in a bit of a "Catch 22" situation as I tried to work out the best way forward:
- It is hard to access the rear of the arch panels with the wheel in place.
- But if I jack up the car to remove the wheel I will lose my reference point for the template.
Thankfully, today I finally remembered that the whole bonnet actually flips up. 
So I started the day by fixing the first section into position along the top edge of the arch.
( Complete with parcel tape covered card sealing the gaps. )

Now the leading edge is quite tricky to get right as it starts inside the wheel arch and then flares out.
So, for now, I just fixed the second section in place like so.

Not sure if this side on photo makes it any easier to see the angles involved.

Which left the arch looking like this.

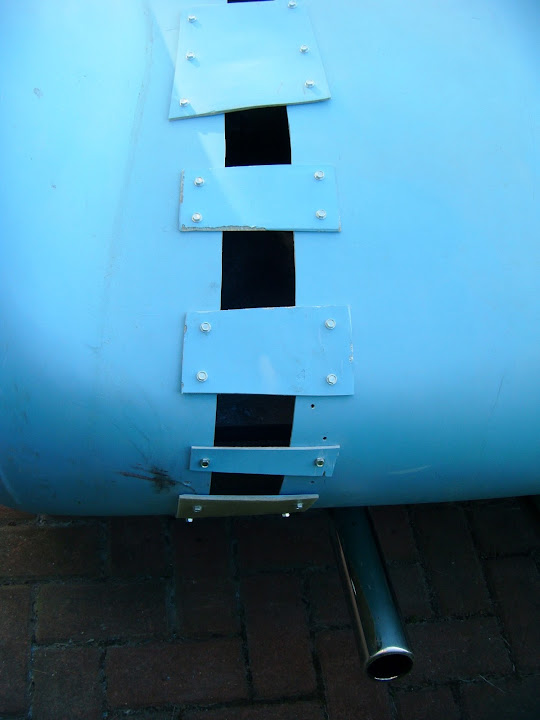
Then I very carefully opened the bonnet and added some extra brackets along the return lip.

This is how the gap looks on the inside.

And this is what it looked like after I had added a few layers of matting.

That was all I had time to do in the morning.
End of Part 1…
|
20th May 2016, 19:08
|
|
Senior Member
|
|
Join Date: Feb 2012
Location: Wembley, London
Posts: 5,056
|
|
Friday Afternoon:
Thankfully, by the time I could go outside and do some more car work, the matting was set nicely.
So I removed most of the brackets.

Cleaned up any stray matting around the screw holes.
( Sorry the photo is blurred. )

The final piece for this section came from a different part of the arch and isn't a great fit. 

So there will be some grinding required on the 'sunny side' when I start healing the wounds.
Still, with that section in place, I could add more tape over the screw holes and get ready for the next batch of 'glassing.

As I said before, this return lip will be trimmed back when the arch is complete.

And this is what the inside of the arch look like now.

I know it takes longer doing this in small steps, but there is no point in rushing things at this stage.
End of Part 2…
|
20th May 2016, 19:09
|
|
Senior Member
|
|
Join Date: Feb 2012
Location: Wembley, London
Posts: 5,056
|
|
Friday Evening:
Rather than start another round of fibreglassing, I decided to tidy up the Summer House for the umpteenth time.


It then took me ages to find the box that had the small bag with all the fixings for the rear lights in.

By now the matting was set, so I could remove the clamp and lower the bonnet.
Just remember that the car is currently tilted, but there is definitely a wheel arch starting to emerge.

Then I covered up the front of the car and uncovered the back.

As I wanted to test my theory that fitting the rear lights should be straight forward as I do have access here.

Access was pretty good, but using an adjustable spanner for the tiny nut was a pain.
( I've now ordered a proper spanner on Ebay. )

And I lost count of the number of times I dropped the allen key I used on the bolt heads.

Still, at least the first rear light is now fixed into position.

I plan to cut down all the remaining bolts before I fix any more lights into place.
I've also put the final paint of the inside of the boot into the "Post MOT" pile of jobs.
Overall, quite a productive day, so until next time, take care, Paul.
|
21st May 2016, 15:31
|
|
Senior Member
|
|
Join Date: Feb 2012
Location: Wembley, London
Posts: 5,056
|
|
Saturday - Part 1
I've split this update into two parts, which do not follow a strict time line.
Fibreglass Jigsaw:
Chris & Dan @ Tribute make this 'cutting and shutting' work look like child's play.
Whereas, I am finding this particular puzzle quite a challenge.
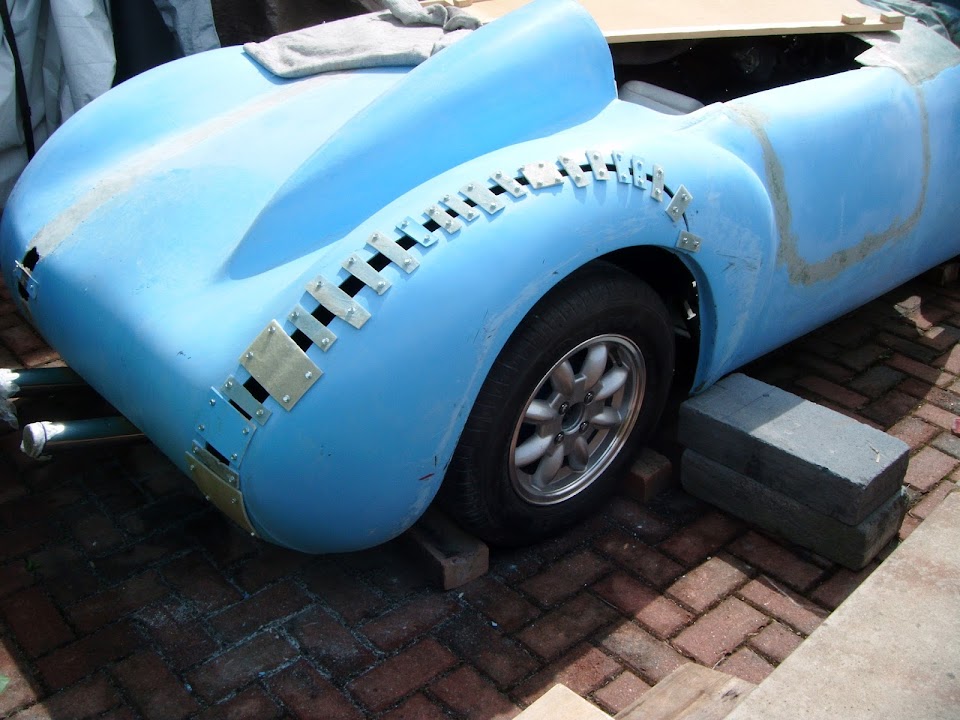
I started by biting the bullet and removing another big chunk of the bonnet. 

I then trimmed off the rough edge from the piece I had just removed.

Before spending a long time working out the best way to put the various pieces back together.
In the end I went for this arrangement.

Frankenstein would have been so proud.

The only problem was that this new shape wanted to "spring" outwards.
So I decided to add some external support before working on the inside join.
This involved leaning a section of wood on the arch.

Then adding fibreglass matting to the outside of the main join.

I also started to build up this corner of the scuttle, which has a "dip" in it.

End of Part 1…
|
21st May 2016, 15:32
|
|
Senior Member
|
|
Join Date: Feb 2012
Location: Wembley, London
Posts: 5,056
|
|
Saturday - Part 2
Rear Lighting:
This was the other area I was working on today.
I shortened the fixing bolts, but thankfully remembered the fibreglass is thicker on the passenger side.


The rest of the lights on the driver's side went in with no problems.

But the passenger side was a different story.
First the penny washer for the indicator wouldn't fit.

But a quick visit to the angle grinder soon took care of that.


Next, the holes for the stop/tail light in the body shell…

Didn't lie up with the hole in the unit itself.

This is because this was a replacement part for the original which had broken.
Quite by chance, I had stumbled across this rear light template when I was tidying up the Summer House yesterday.

So I used that to work out where to drill holes in the light.

Although I didn't get a chance to fit the light as by now it was raining.
End of Part 2…
|
21st May 2016, 15:34
|
|
Senior Member
|
|
Join Date: Feb 2012
Location: Wembley, London
Posts: 5,056
|
|
Saturday - Part 3
Normally, the FA Cup final brings sunshine to the Wembley area, but not today, as the sky was alway like this.

Which is why I didn't want to start fibreglassing on the inside of the front wheel arch just in case.
In fact, I had put the covers back on the front of the car while I was working on the rear lights.

But I'll finish this update with the "work in progress" photos, taken before the rain arrived.
Front Wheel Arch:

Rear End:

I think it is fair to say that one part of the car is closer to being finished than the other. 
The good news is that despite the fact that the front arch will have a lot of scars to heal, so did the back end when I chopped that up too.
In fact, I really love the way the back end of the car looks now.
Until next time, take care, Paul.
PS
Just incase you haven't seen the "Lady in Chewbacca mask" video clip, please have a watch, pure joy.  http://www.bbc.co.uk/news/blogs-trending-36348013

|
22nd May 2016, 16:36
|
|
Senior Member
|
|
Join Date: Feb 2012
Location: Wembley, London
Posts: 5,056
|
|
Limited Sunday Service - Part 1:
Woke up this morning feeling under the weather, but, with the sun shining outside, I was determined to get something done.
Unfortunately, I didn't order my next round of fibreglass supplies in time (now due to arrive tomorrow).
This meant that I was down to my last fews bit of fibreglass matting to joining the various wheel arch pieces together.

Still at least I was able to make a start.

Obviously, I need to add a few more layers of matting on this side, before I grind the joins out on the 'Sunny Side'.
As the real strength in the joins comes from the layers added on the outside of the arch.
At this point, it was still too early for power tools on a Sunday morning, so I left that to set.
When I came back out I did a quick test with a rubber seal for the bonnet.

After a bit of sanding along the bonnet edge, I had the making of a half decent join.

I will need to carefully widen this gap at some point, making sure I don't remove too much from the bonnet edge.
Next I ground down any fibreglass matting that had covered the fixing brackets.

Then I could remove all the brackets.

This piece doesn't look too bad from this angle.

But the return lip will need some serious grinding work.

I also ground down any stray matting from the fixing screws.

Before adding more tape to the outside of the arch.

So at least this is all prepared for the next round of fibreglassing when the matting arrives.
End of Part 1…
|
22nd May 2016, 16:37
|
|
Senior Member
|
|
Join Date: Feb 2012
Location: Wembley, London
Posts: 5,056
|
|
Limited Sunday Service - Part 2:
Yesterday I made a school boy error when I drilled the new fixing holes in the stop/tail light.
At the time, I didn't want to drill through the metal earthing strip, so I simply drilled a hole to the side of it.
What I had failed to take into account, was the position of the existing holes in the body shell.

Yes, this meant that the fixing holes for the lens would not line up with the indicator. 
To avoid a complete OCD melt down, I decided to drill an extra set of holes in the body shell.

Filling in the other holes will be another post MOT job.
Eventually, the rear lights on the passenger side were fitted.

And the back end was looking like this.

I just need to sort out my wonky number plate plinth and the rear end will be good to go.
- - - - - - - - - - - - - - - - - - - - - - - - - - - - - - -
That was all the car work I managed to do and I ended the day tidying up the grass verge in front of my house.

But by the time I had tidied everything up I was completely knackered.
The only good news was that as I sat down to type this update, it started lashing down outside.
Until next time, take care. Paul.
PS
I've got one more post to come, which compares my car to Mister Towed's.
|
22nd May 2016, 16:39
|
|
Senior Member
|
|
Join Date: Feb 2012
Location: Wembley, London
Posts: 5,056
|
|
Can't see the wood for the trees:
Mister Towed was working on his rear valance yesterday and posted this photo.
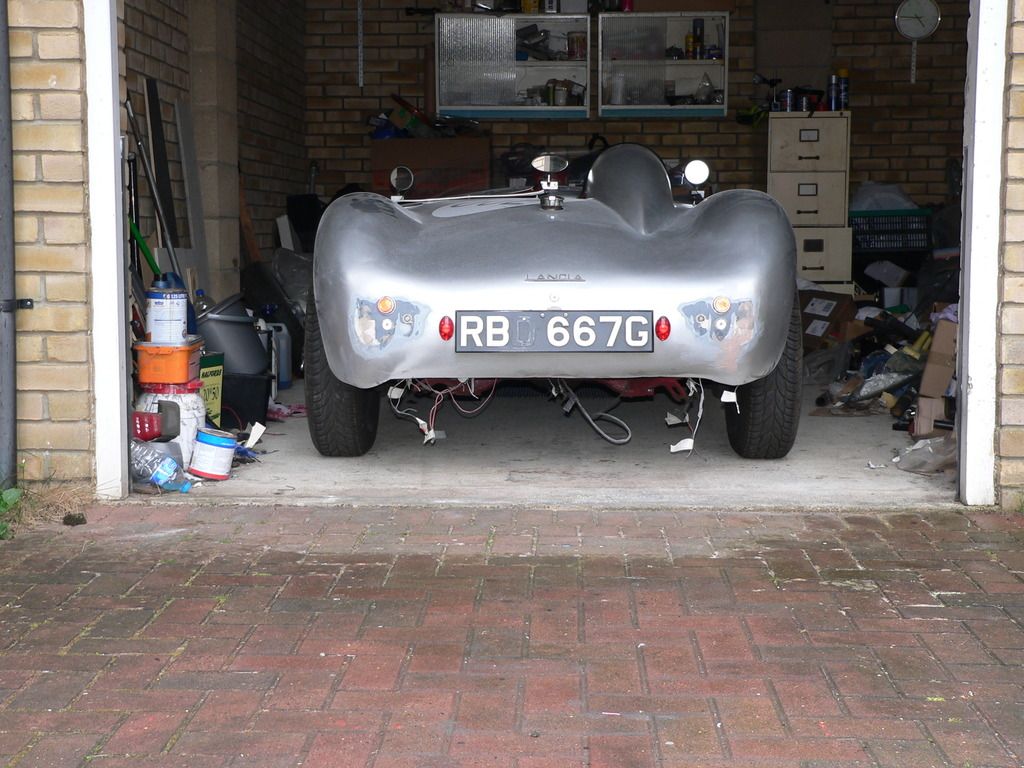
What struck me was how much higher his rear end looked compared to the photo of my rear end that I also posted yesterday.
( I know the angles of the photos are different. )
But Mr T was kind enough to measure the gap between the body shell and the ground and this is 30 cm in the middle.
( Psycho Pops measured his as being approx. 23cm, with the original Herald wheels fitted. )
Well, this morning I measured the same gap on mine (between the tail pipes) and it is just over 18cm.

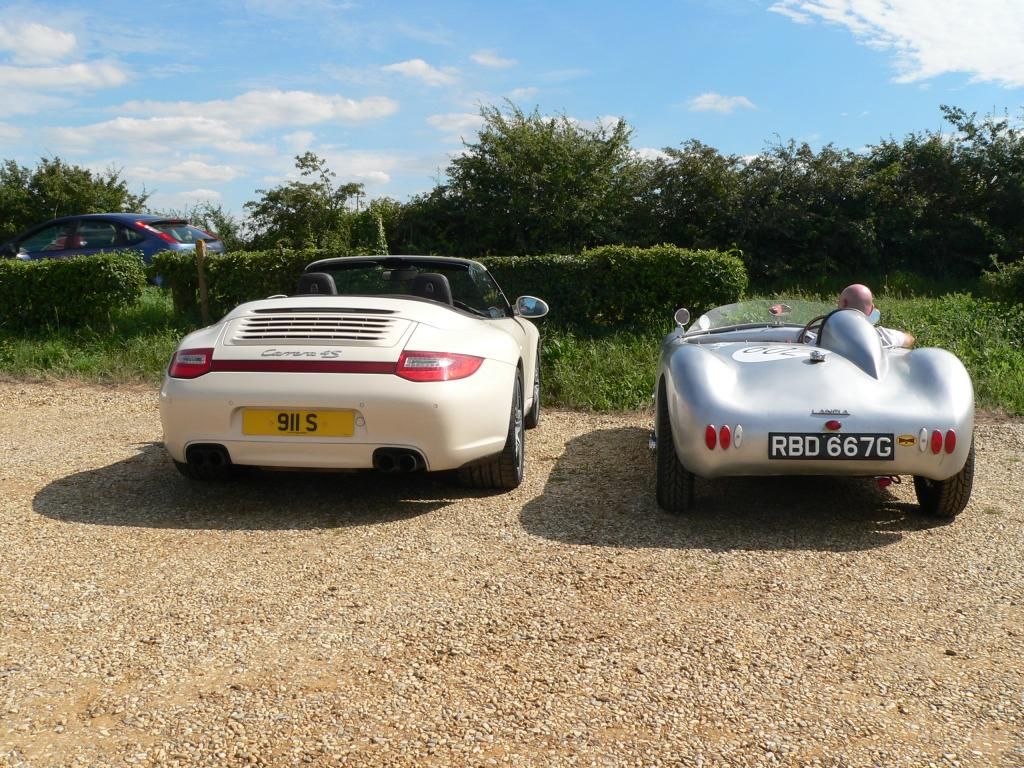
Now I have spend a lot of time looking through Mr T's threads and studying photos of his car.
But normally I am looking at a specific area to compare it to the area of my car I am currently working on, or thinking about.
So this great photo of his car next to the 911 was both an inspiration and a guide to the way the rear end sweeps in behind the rear wheels.
( Whereas, my Frankenstein Hillbilly approach has left me with a much 'wider than standard' rear end with less sweep. )
I've also looked at where the side of his body shell sits relative to the centre of the wheels.
( This is a recent photo of when his car was up on a ramp for some welding repairs. )
And here is a photo of my car as I tried to get my body shell to sit is a similar position after the surgery.
However, I don't think I really noticed the differences in height between the sides and rear of the body shell.
Which are clearly as plain as day (when you finally notice it ), like in this photo from Cadwell.
So now if you compare that to this photo of my car.
You can see the bottom edge of the body shell appears to be in a similar position relative to the wheel centres.
But my rear arch extends much further around the wheel, leading to a lower rear valance too.

I also took this photo earlier today, but remember that the driveway is tilting the passenger side body shell away from the ground.

The final difference comes from the fact that I have 13" wheels fitted, compared to Mr T's 14" ones.
So it is no wonder my car is much lower at the back compared to his.
|
23rd May 2016, 18:30
|
|
Senior Member
|
|
Join Date: Feb 2012
Location: Wembley, London
Posts: 5,056
|
|
Just A Little Bit:
Added the next round of fibreglass matting to the inside of the wheel arch.

While that was setting I spent a bit of time looking at where the body shell extension will go.
The horizontal edge of the Spitfire bulkhead has a very slight wobble to it.

So I figure a straight line around here will look OK.

Unfortunately, by now, the weather was rapidly turning against me.

So I didn't push my luck and packed up, I was just pulling the covers on when the rain started.
Then I was safely back inside when the hail stones arrived!
Until next time, take care, Paul.
PS
Neighbours.
Everybody needs good neighbours…
Here are a few recent tales that I forgot to include in my updates at the time:
Missing Car:
Over the years, my build has attracted a large number of "regulars" who pass by my "garage".
Apparently, the fact that the car suddenly "disappeared" seems to have been a cause of concern to some.
So they seem genuinely pleased to see it back in the driveway, still being worked on and not abandoned.
Saturday:
Three blokes from Eastern Europe were passing and one stopped for a chat about the car.
It started with the traditional "What is it?" question, but developed into a bit of a chin wag about cars.
In the end, his two mates walked off without him, as they were clearly not interested at all.
Like many others, he had often passed the car with the covers on and wondered what was underneath.
But independent enthusiasm about the car really boosts morale, especially given the state of the front wheel arch.
Sunday:
My oldest "regular" stopped for a chat and said he really hoped he would be still be alive to see it finished!
He turns 90 in a couple of weeks and still wants to be taken for a spin around the block when I'm on the road.
Talk about putting me under pressure, as I thought even the possibility of a Sammio BBQ was a tough target to aim for!
Last edited by Paul L; 23rd May 2016 at 20:16..
Reason: Typo
|
24th May 2016, 06:45
|
|
Senior Member
|
|
Join Date: May 2013
Posts: 2,161
|
|
Paul, I don't seem to spend so much time on the net these days, but when I do, it always amazes me to see what your latest escapades are!
Let me say, and I'm sure everyone else will agree with me here,
That you are absolutely bloody amazing!!!
You have TOTALLY re-designed and made that car your own!
You will have a very very special car at the end of your build.
Although you may not realise it you are also an absolute expert at fibre-glass work, albeit a bit unorthodox at times!
Carry on the good work Paul, I salute you.
Scottie
|
24th May 2016, 13:13
|
|
Senior Member
|
|
Join Date: Feb 2012
Location: Wembley, London
Posts: 5,056
|
|
Scottie - Thanks, you are too kind sir.
Funnily enough, these days when I'm asked what it is (last guess was an MG), I simply say it is a Triumph Swordfish 1500.
I then go on to explain that they will not have heard of it, because it is the only one of its kind in the world.
This is both true and a lot easier to explain than it was a Sammio Cordite, which was re-named a Ribble Navigator, but I modified it.
Whilst I still don't think I am a fibreglass expert, I do accept my unorthodox approach has certainly had a lot of practise and does work.
Which means I can now keep the faith during the butchery phase, knowing it will turn out OK in the end. < Touch Wood >
I keep saying how much I love the way the rear of the car looks and that is because it was such a mess for so long:
Cutting the whole thing in half was a leap of faith.

So removing a chunk of the wing seemed mild by comparison.
I did enjoy using beer cans to make my tail pipe exits.
And this was me re-shaping one corner of the rear valance.

The extra hump I was given was for the driver's side, so it needed to be extended to fit on the passenger side.

Then the body shell had to be re-shaped to line up with the 2nd hump.

A new rear cockpit return lip was added.
Unfortunately, the memories are still too traumatic for me to revisit the HUGE amount of work involve in creating a boot from scratch.

So I am nothing short of stunned that the rear end looks as good as it does now.


There will be a normal build update later on today.
Cheers, Paul.
|
24th May 2016, 17:49
|
 |
Senior Member
|
|
Join Date: Sep 2011
Posts: 1,446
|
|
More like you enjoyed emptying the beer cans first ha ha
As everyone else has said the car is looking great it really is and I can't wait to see a photo or video of you driving it down the road in it...your face will be aching from the big grin you'll have spread across it
Think Wallace and gromit face ha ha
Now chop chop and get a move on.
|
24th May 2016, 18:52
|
|
Senior Member
|
|
Join Date: Feb 2012
Location: Wembley, London
Posts: 5,056
|
|
Mr T - Well, as they said in Bob's Country Bunker…
" We have both kinds of music here… country and western."
- - - - - - - - - - - - - - - - - - - - - - - - - - - - - - -
RedRatBike - Cheers & I can't wait to be driving the car on the road either.
I hope today's effort is 'chop chop' enough for you.
- - - - - - - - - - - - - - - - - - - - - - - - - - - - - - -
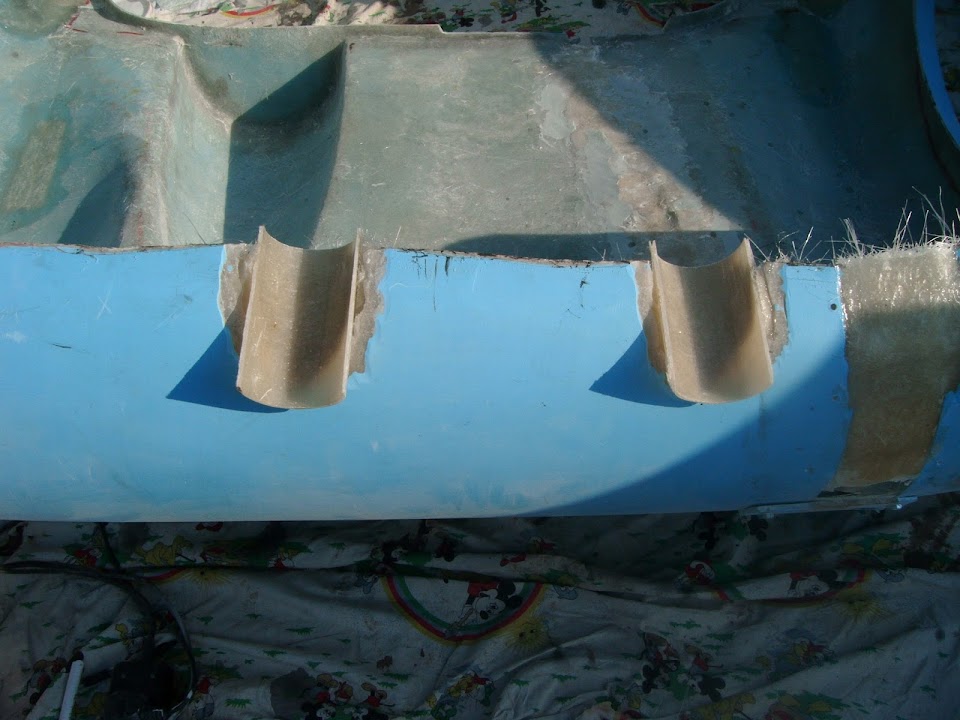
Tuesday - Part 1:
I had some unexpected free time at home today, so I tried to make the most of it.
The first thing I did was to change the angle of the body shell extension.

As I figured if the horizontal line turned out not to be quite horizontal it might look a bit odd.
Whereas, if it is clearly at an angle, they the angle will always be correct (if that makes sense).
Next, I decided to consolidate the existing front wheel arch work, before tackling the last pieces of the jigsaw puzzle.
So I started by roughly marking up and cutting out the return lip.

Note: I will be tidying up the edge at some point.

Doing this job now reduces the amount of grinding needed on the "mis-matched" pieces.


I often refer to this 'cutting & shutting' work as surgery and it does feel like a medical procedure.
The wound has been stitched together on the inside.
So now it was time to remove the "bandages".

Unfortunately, just like real surgery on TV, some times it is better to just turn away, rather than watch.
As the photo of the "open wounds" is certainly not pretty.

End of Part 1…
|
24th May 2016, 18:52
|
|
Senior Member
|
|
Join Date: Feb 2012
Location: Wembley, London
Posts: 5,056
|
|
Tuesday - Part 2:
Still, the key to a full recovery is cleaning out the "infected areas", so out came the angle grinder…
One major snow storm later and this is what the arch looked like, still rough, but all solid fibreglass.

But, by the time I added a lot of thin strips of fibreglass matting, things were certainly improving.


When that had set, I gave the area a rough sanding down and opened up the fixing screw holes.


I mixed up some fibreglass filler and forced it into the holes.

While that was setting I looked at the body shell extension.
I will use most of this piece, which lines up nicely with the template.

But not so nicely with the body shell itself.

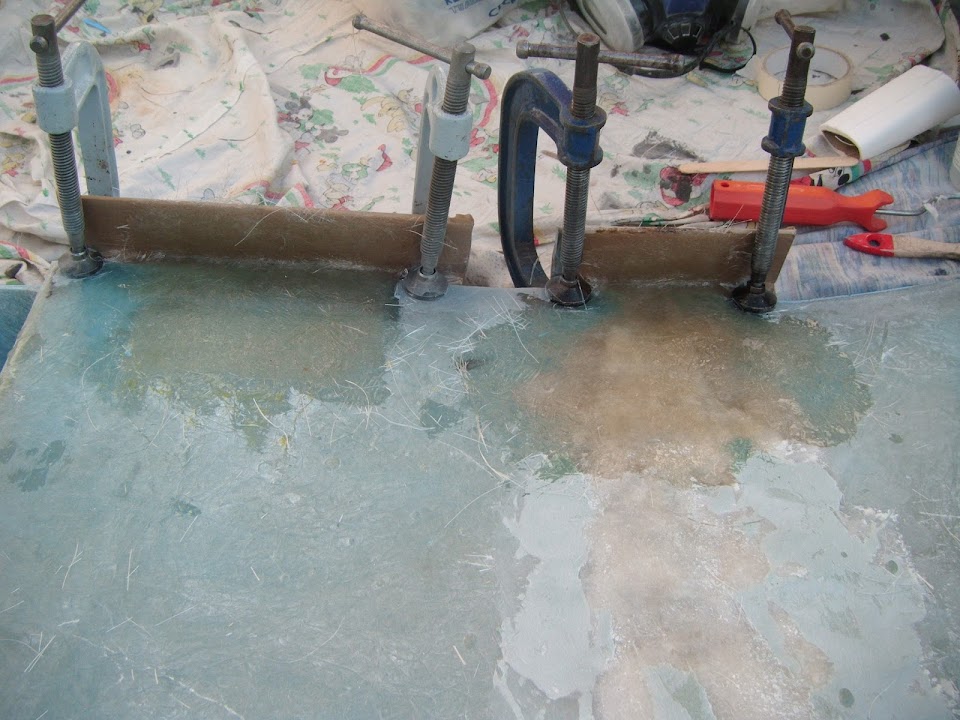
An extra pair of hands would have come in handy here, but the clamp helped.

But with the piece marked up, I could cut it to size.

End of Part 2…
|
24th May 2016, 18:53
|
|
Senior Member
|
|
Join Date: Feb 2012
Location: Wembley, London
Posts: 5,056
|
|
Tuesday - Part 3:
By now the filler had set hard enough to be sanded down.

And all the low spots will be getting some extra fibreglass matting at some point.

Next I offered up the off cut from the body shell extension piece.

A quick bit of trimming later and I had a better fit.

I was still left with a big gap at the rear edge of the bonnet.

So I cut a piece out of my "left overs" pile to fit.

Before fixing the two pieces into place like so.

So you can see I am slowly closing the gap from bonnet to body shell.

I know this is a painfully slow process, but I am getting there.

Last job for the night was to finish cleaning the drive.


That's all for today, so until next time, take care, Paul.
|
|
Currently Active Users Viewing This Thread: 1 (0 members and 1 guests)
|
|
|
 Posting Rules
|
You may not post new threads
You may not post replies
You may not post attachments
You may not edit your posts
HTML code is Off
|
|
|
All times are GMT +0. The time now is 20:36.
|


 Linear Mode

