|
|
| Tribute Automotive Builds Discuss your Tribute kit build |

31st March 2016, 18:51
|
 |
Senior Member
|
|
Join Date: Feb 2012
Location: Wembley, London
Posts: 5,056
|
|
Congratulations on getting the bonding done, it is a great milestone in the build. 
Good luck, Paul.  |
1st April 2016, 05:56
|
|
Member
|
|
Join Date: Aug 2014
Posts: 66
|
|
Looks great! Can't wait to see it done! What are your plans for the interior? And colour of the outside?
|
1st April 2016, 18:15
|
|
Senior Member
|
|
Join Date: Apr 2014
Location: Midlands
Posts: 405
|
|

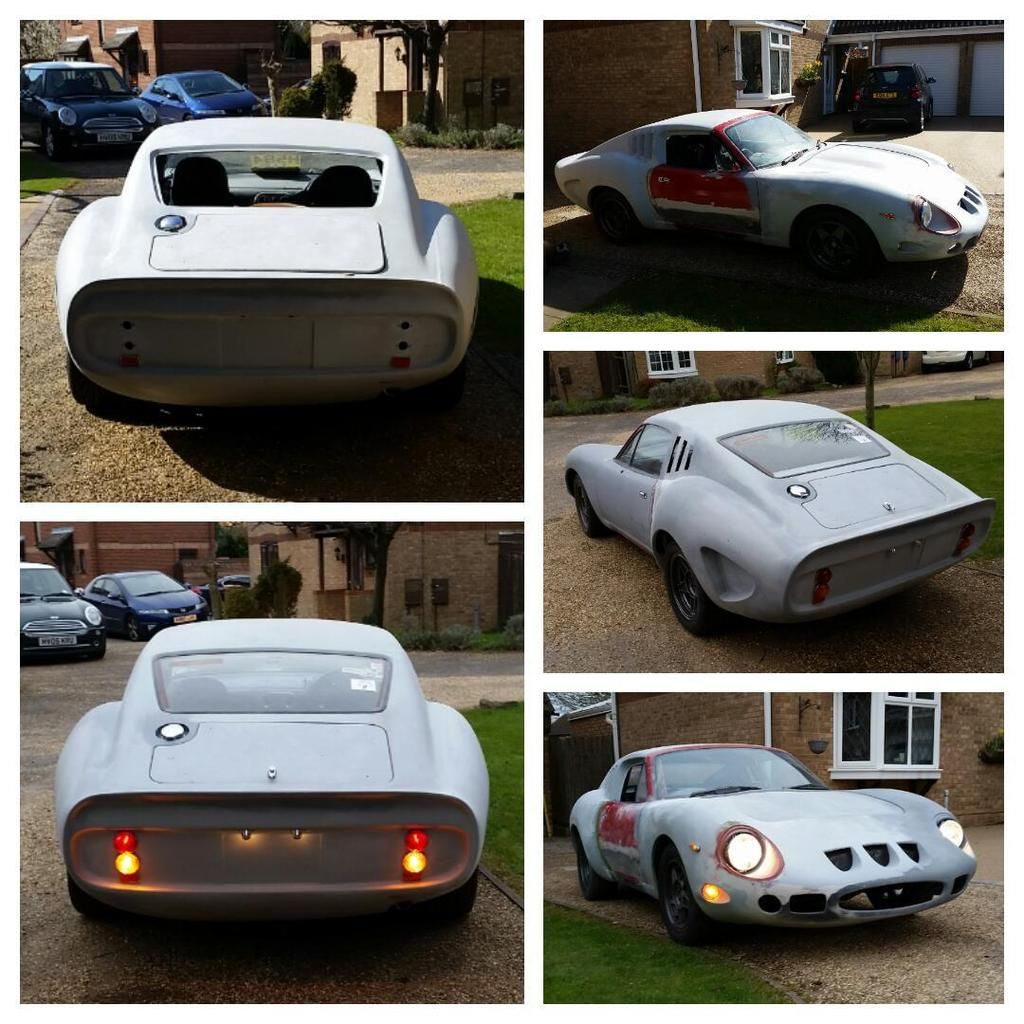
Drummajor, thanks the hard slog of sanding begins!
Thanks Paul, I am certainly relieved that it seems to have gone OK too I have given the car a really good tug and shake and not one creak  TynoPrime
, Many thanks and welcome to my thread. Regarding colour that's nice and easy its going to be a 'midnight' blue probably metallic too, I have toyed with the idea of having an off white stripe too which will be painted rather than vinyl so the jury's out on that one.
Regarding the interior I have many ideas and it will be simple but usable for long jaunts as I have intentions to visit friends who live on the continent and happen to require me to drive some amazing mountain roads... but first we'll see if I (read, my wife) can live with it for any distance at all.
I have just picked up a used albeit nearly new exhaust that I will hopefully fit over the weekend in between sanding sessions again weather and wife permitting. At this stage everything is about getting the car on the road and everything thereafter can be done over the spring/summer to identify any floors that need addressing before painting.

|
1st April 2016, 19:58
|
|
Senior Member
|
|
Join Date: May 2013
Posts: 748
|
|
Quote:
Originally Posted by jones

Drummajor, thanks the hard slog of sanding begins!
Thanks Paul, I am certainly relieved that it seems to have gone OK too I have given the car a really good tug and shake and not one creak
TynoPrime, Many thanks and welcome to my thread. Regarding colour that's nice and easy its going to be a 'midnight' blue probably metallic too, I have toyed with the idea of having an off white stripe too which will be painted rather than vinyl so the jury's out on that one.
Regarding the interior I have many ideas and it will be simple but usable for long jaunts as I have intentions to visit friends who live on the continent and happen to require me to drive some amazing mountain roads... but first we'll see if I (read, my wife) can live with it for any distance at all.
I have just picked up a used albeit nearly new exhaust that I will hopefully fit over the weekend in between sanding sessions again weather and wife permitting. At this stage everything is about getting the car on the road and everything thereafter can be done over the spring/summer to identify any floors that need addressing before painting.
|
Be very careful with seat choice, I am on my third set . Some seats look great but are not great on the bottom or long journeys.
|
1st April 2016, 23:02
|
 |
Senior Member
|
|
Join Date: Apr 2013
Location: Swansea
Posts: 803
|
|
Quote:
Originally Posted by Drummajor
Be very careful with seat choice, I am on my third set . Some seats look great but are not great on the bottom or long journeys.
|
Good advice there. Can you suggest which ones look right and are comfortable? |
2nd April 2016, 08:33
|
|
Senior Member
|
|
Join Date: May 2013
Posts: 748
|
|
Quote:
Originally Posted by y cymro
Good advice there. Can you suggest which ones look right and are comfortable?
|
Only advice I have is, measure, measure , measure .
I firstly got some really nice looking black with red stitch cobra seats.
Sat in them at stoneliegh all ok, but to fit them in the car they had to be bolted straight to the floor., as they sat too high in the car. Then after driving a realised my bum was too big.
Sold them.
Re fitted original seats
Then bought some more , wider seats. They looked the dogs, fitted them in the car ( a nightmare) I was too big!!! I was looking over the windscreen!!
So now back to original, re trimmed seats that fit and work perfectly.
Measure and try everything.
Ps I am 6ft 6 which was most of the problem |
2nd April 2016, 09:04
|
|
Senior Member
|
|
Join Date: Apr 2014
Location: Midlands
Posts: 405
|
|
Drummajor what style were the last ones? That gave up so much disappointment?
|
2nd April 2016, 10:36
|
|
Senior Member
|
|
Join Date: May 2013
Posts: 748
|
|
Quote:
Originally Posted by jones
Drummajor what style were the last ones? That gave up so much disappointment?
|
 |
2nd April 2016, 11:28
|
|
Senior Member
|
|
Join Date: Apr 2013
Location: Swansea
Posts: 803
|
|
Quote:
Originally Posted by Drummajor
|
Thanks for that. I have the those in my ebay watch list - I agree they do look good. May as well delete them! |
2nd April 2016, 12:24
|
 |
Senior Member
Enthusiast
|
|
Join Date: May 2014
Posts: 607
|
|
Perhaps we could lower you??
Im thinking a foot off below the knee would be a good place to start.
Bit of glue and sticky back plastic and job done.
|
2nd April 2016, 12:25
|
|
Senior Member
Enthusiast
|
|
Join Date: May 2014
Posts: 607
|
|
Quote:
Originally Posted by y cymro
Thanks for that. I have the those in my ebay watch list - I agree they do look good. May as well delete them!
|
I have these in my new shape shogun and they look the dogs. I know that does not help though. |
2nd April 2016, 17:03
|
|
Senior Member
|
|
Join Date: May 2013
Posts: 748
|
|
If you are smaller than me then they may be fine |
2nd April 2016, 18:04
|
|
Senior Member
|
|
Join Date: Nov 2011
Posts: 3,558
|
|
Anyone experience of re-stuffing the standard BMW seats to give more lateral support?
Other thought is to create some glass fibre seats by taking the BMW seat, adding padding where I want it, covering with plastic, a layer of glass fibre, another layer of plastic and then sitting on it to make a perfect fitting seat. After that you could mount it on the standard BMW runners and stick the heated seat elements under any covering you add.
Not sure how easy this would be but interested if anyone has ideas as I would like to lighten and lower my seats.
|
2nd April 2016, 19:34
|
|
Senior Member
|
|
Join Date: Apr 2014
Location: Midlands
Posts: 405
|
|
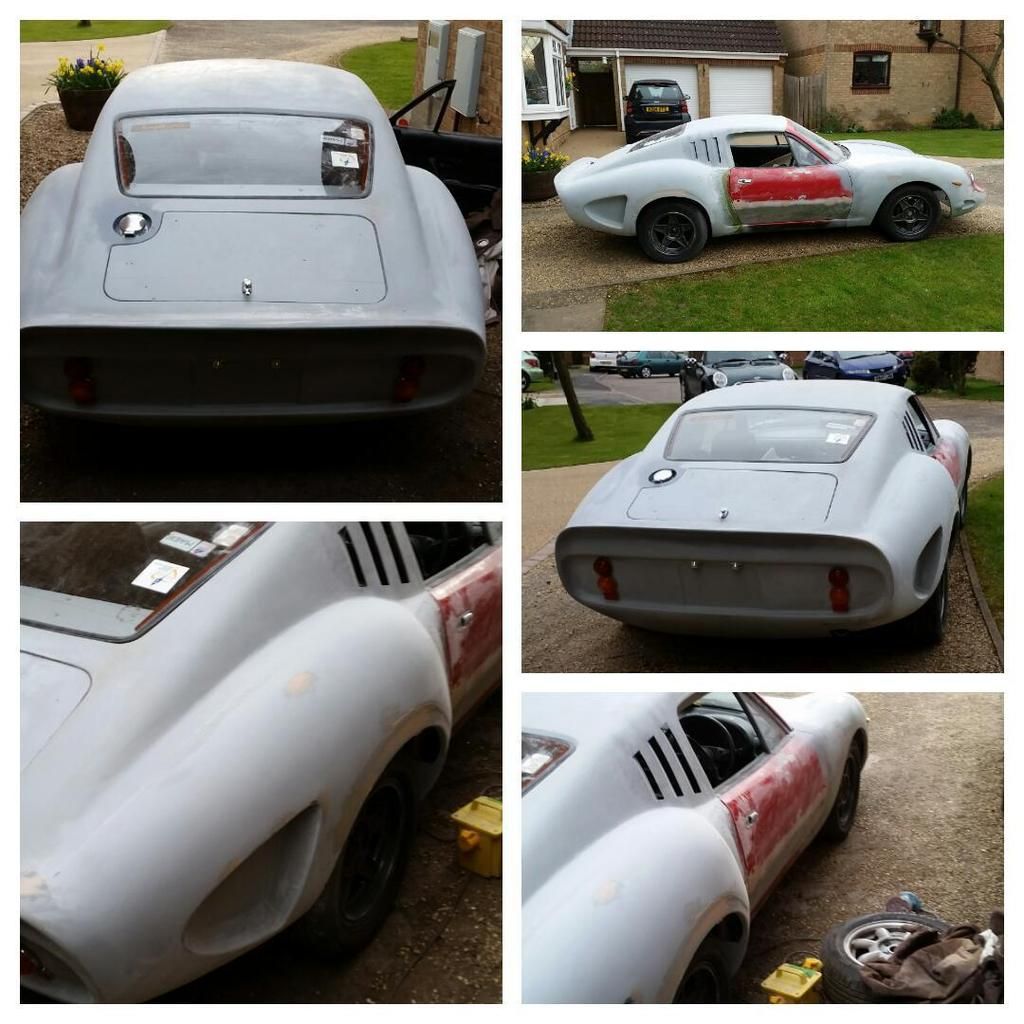
Spent the day flitting from one job to another, fitted the replacement exhaust which was a pain in the backside doing it! Whilst the car was jacked up I couldn't resist fitting the "new" wheels, the last time they were all fitted the front wasn't lowered yet so I was intrigued to see the overall look.
After that I refitted the interior A pillar and header rail panels, mainly to get them out of the way so I don't damage them. Following that I fitted the rear screen just mainly to minimise the amount of dust entering the car during the what will be quite a long task by the looks of it.
Then it was time to get started on the body work, started with sanding of the door swage line and it also required at the end of the day another fill in places. Got the first fill on the drivers side rear body join with fibre filler.
Whilst all that was going off I got the lights refitted too, good news later on I started the car to turn it around and all the lights still work. 
Last job to tackle was the boot lid lock, got it all measured out and cut the hole out and found the screws were too short to get through the lid fibreglass. Will have to buy some new screws tomorrow as only temporarily held on with the only screw I could find that would fit.
The compulsory pictures
|
2nd April 2016, 21:03
|
|
Senior Member
|
|
Join Date: May 2013
Posts: 748
|
|
Looking good |
2nd April 2016, 21:40
|
|
Senior Member
|
|
Join Date: Apr 2014
Location: Midlands
Posts: 405
|
|
Just another picture to show the wheels, no spacers fitted at the moment the front are good I like the rear BUT should I fit spacers or wait until the last point after paint to decide ?
 |
2nd April 2016, 21:42
|
 |
Senior Member
|
|
Join Date: Jun 2011
Posts: 935
|
|
I'd fit the spacers 15mm?
|
3rd April 2016, 06:11
|
|
Senior Member
|
|
Join Date: Feb 2012
Location: Wembley, London
Posts: 5,056
|
|
Jones – Looking good.
Even if you are still a long way from final paint, just getting the whole car in grey primer will make a big difference.
Good luck, Paul.
|
3rd April 2016, 07:42
|
|
Senior Member
|
|
Join Date: May 2013
Posts: 748
|
|
I drove mine around in primer for ages .
|
3rd April 2016, 19:18
|
|
Senior Member
|
|
Join Date: Apr 2014
Location: Midlands
Posts: 405
|
|
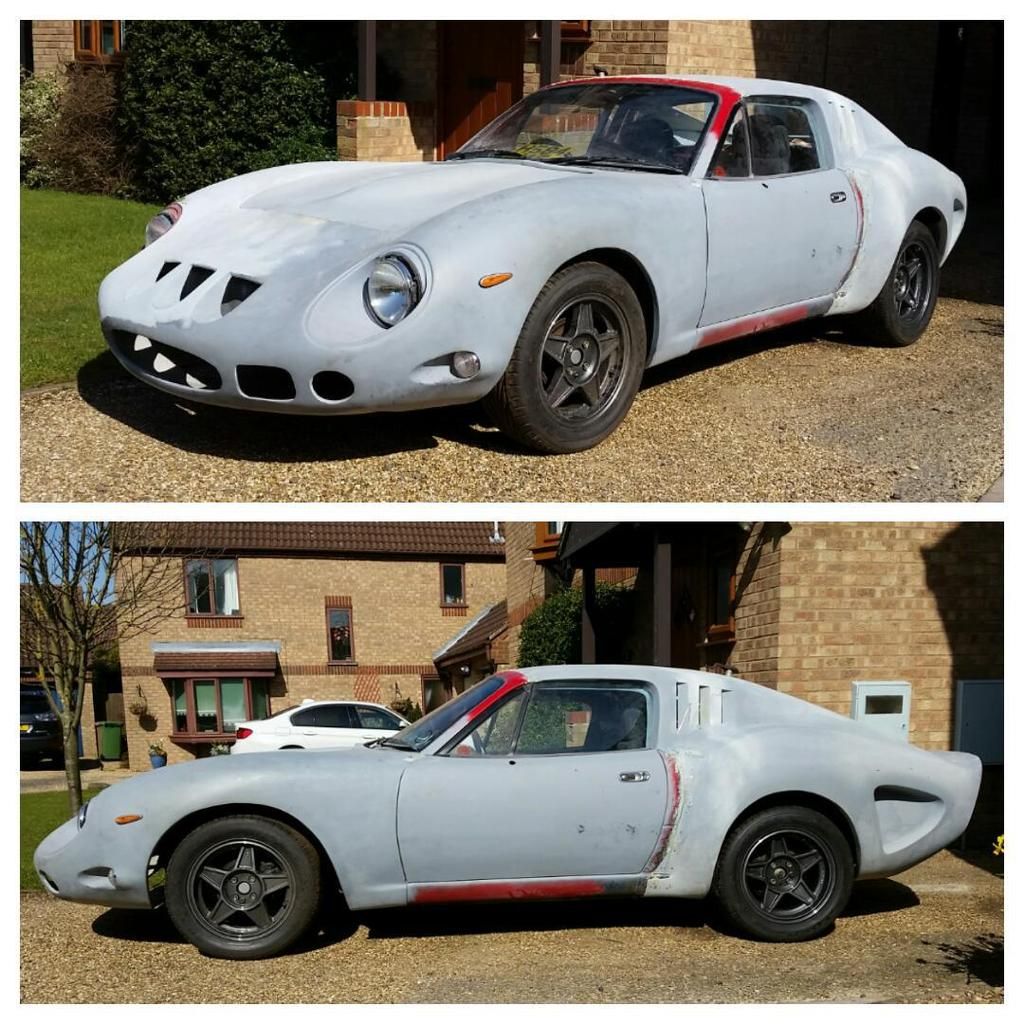
Thanks Roadster the jury is still out, if I do put spacers on they will be 25 or 30 mm on the rear.
Paul, thanks it has seemed to have accelerated a little now and I have some of my genuine enthusiasm back too. With regards to paint, yes I am far, so far away from that. That leads me to Drummajor, it is my intention to drive it quite a bit just in primer to ensure all is well and good before final paint.
Today I grabbed a few hours but due to the time of day I had to make due with keeping the noise to a minimum as it was still morning and we quite like our neighbours so I felt it best to leave the power tools until after 12 noon. Decided to refit some interior trim not because I think I am at that point but now the roof is on permanently I felt it would be safer for the trim to be fitted rather than lying around the very cramped garage. Fitted the rear side panel that to a while as had to trim out the space for the roll cage mounting point. I refitted the rear view mirror and the sun visors.
Next I sanded off the high points from the initial fill on the sides and finished off the door swage line. Laid down a some etch primer followed by a few coats of high zinc content primer on the lower half where I had taken down to bare metal. I followed that with a couple of coats of primer across the whole.
I mounted the new wing mirror too, a little bit more retro. just before I wrapped up I managed to get a quick skim layer of filler.
A few pics...

Last edited by jones; 3rd April 2016 at 21:20..
|
|
Currently Active Users Viewing This Thread: 1 (0 members and 1 guests)
|
|
|
| Thread Tools |
|
|
| Display Modes |
 Linear Mode Linear Mode
|
 Posting Rules
|
You may not post new threads
You may not post replies
You may not post attachments
You may not edit your posts
HTML code is Off
|
|
|
All times are GMT +0. The time now is 16:26.
|


