|
|
| Sammio Builds and discussions Sammio bodied car builds and specials |

24th June 2014, 18:18
|
|
Senior Member
|
|
Join Date: Apr 2012
Posts: 1,163
|
|
Paul,
Nice work keep at it mate your skills and confidence seem to be growing with gathering pace!
To be honest most of what I have done so far has been with hand tools, I have an air powered DA which I used on the top of the aluminium sides but for everything else a long board a several good sanding blocks will do you. Contrary to popular opinion air tools won't save you as much time or effort as you think when working with fibreglass. The other problem with electric da sanders is they tend to use a grinder chassis and are therefore quite heavy and unwealdly , is that a word?
If you don't have a good paint and suppliers place near you I'm happy to pick you up one of those £19.99 sets and a longboard and send them on for the cost of p&p
Let me know
Mac
|
24th June 2014, 22:55
|
|
Senior Member
|
|
Join Date: Apr 2014
Posts: 198
|
|
Bosch pex220 at b & q should be an OK sander for not much, any random orbit sander works like a DA the velcro pads are not cheap though and the bases don't last forever. I have a makita one that cost a lot and a Argos own that didn't they both do the same job the makiy is smaller and much more pleasant to use. Get yourself a good dust mask is my tip. My brother used to work in fibre glass and they always wore marigold type gloves and air fed masks while sanding. Have a look on eBay might get some cheaper Velcro sand pads. Ed.
|
25th June 2014, 07:19
|
 |
Senior Member
|
|
Join Date: Jul 2011
Posts: 5,328
|
|
Strongly agree with Oxford, that flat plinth across the bulkhead is going to look as if it's designed in once it's sanded and painted.
I used a B&D 'mouse' sander -
http://www.ebay.co.uk/itm/Black-amp-...p2054897.l4275
one of these wobbly jobbies -
http://www.ebay.co.uk/itm/Long-Bed-S...item2c81868947
and a whole bunch of these sponge blocks -
http://www.halfords.com/webapp/wcs/s...0151&langId=-1
I also bought a random orbital sander but it was pretty much useless as there isn't a flat panel on the body. The mouse was much more effective.
The wobbly thing worked really well on the rear wings and head fairing while the medium sponge blocks made flatting the high build primer a doddle and the fine ones were equally effective on the top coat before finishing with traditional wet 'n' dry paper.
The dust mask tip is good advice btw... |
25th June 2014, 07:35
|
|
Senior Member
|
|
Join Date: Mar 2012
Posts: 1,152
|
|
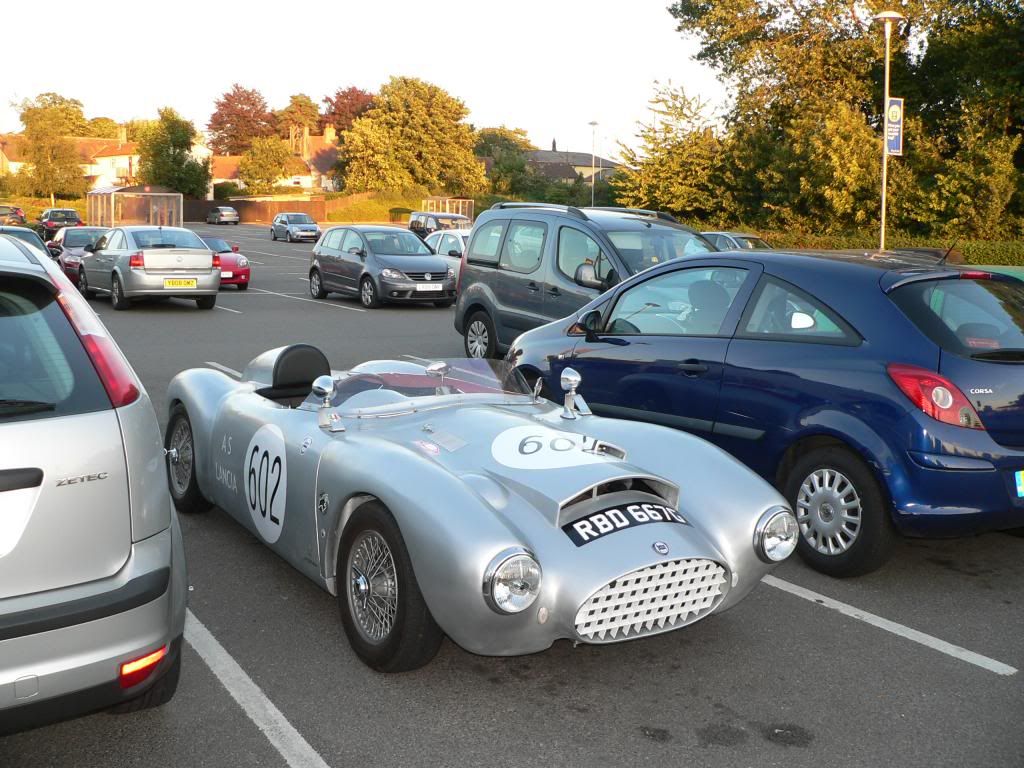
I'm sure we all have certain images (I'm talking abut cars) that keep us going when life in the garage is not going to plan. This is one of mine -
Nothing wrong with a flat-top scuttle. Lots more images of this at -
http://www.1952allard.com/slideshow.html |
25th June 2014, 16:19
|
 |
Senior Member
|
|
Join Date: Feb 2012
Location: Wembley, London
Posts: 5,056
|
|

Oxford - Whilst I need to keep the scuttle design simple in order for me to make it, it should hopefully look OK. 
I'm not sure I can get it to look as nice as the car in the link you supplied, but I'll give it a go.
Finally, I was actually re-reading your build thread the other day & seeing all the re-shaping work you did.
I do take comfort from the amount of 'cutting & shutting' other builders have done to their cars.
Mac - I still can't quite believe I am making something out of fibreglass myself. 
I did see your post about the new sanding block set you got the the other day.
I will send you a PM at the weekend after I have quickly checked something else first.
Ed - Thanks for the suggestions and I will look into the air feed mask too.
This is what I am using at the moment.
 Please Note:
This is not an excuse for others to start posting their "gimp selfies" again!  Mister Towed
 - Thanks, as I was worried about not following your advice to match the bulkhead with the bonnet.
The irony of all this is I picked the Cordite over the Spyder as it was supposed to require less body work. 
Cheers for the links as whilst I remember the flexible long board you got, I forgot about the sponges.
- - - - - - - - - - - - - - - - - - - - - - - - - - - - - - -
Measure Twice, Then Don't Cut At All - Part 1:
It's officially time for me to order some denim dungarees & a banjo, because I've gone native.
But let's start with the daily "un-peeling ceremony"...
As there was rain promised before I left yesterday afternoon, I covered the car with the clamps still in place.

Once the "shaped" cover is off, I can remove the heavy duty tarpaulin that actually keeps the water out.

Then the wooden "tonneau" cover that stops the covers sinking into the cockpit can go.

Finally, I can remove the "braces" that hold the bonnet in place & get that out of the way.

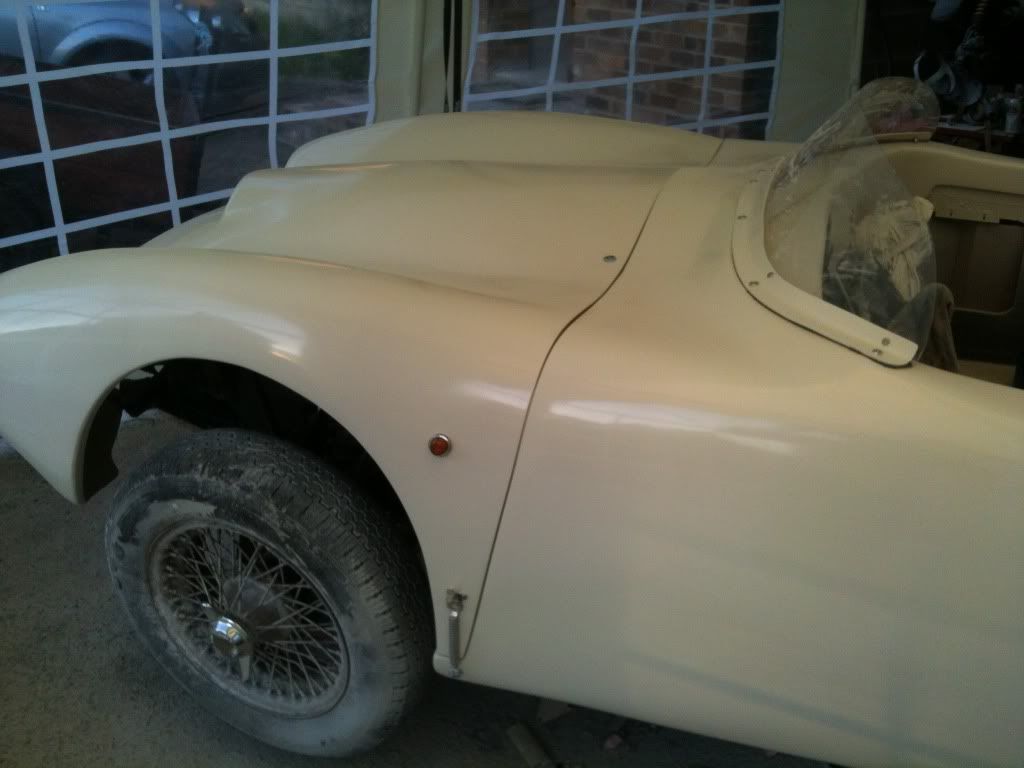
Then at last I can reveal what 2/3rds of my scuttle base looks like now.
Today's plan was to take a deep breath and "cut & shut" the passenger side of the body work.
I lined up the uPVC trunking with the "fixed" driver's side.
Then I measured the trunking to the back edge of the Spitfire bulkhead to give me a "straight" line.

And sure enough, the passenger side was around 2cm too long. 

So I marked up a reference line on the body shell, ready to mark a 2 cms "waste" section next to that.

However, at this point, I found myself trying to double check everything before I started cutting.
Normally, this approach would be a good thing, but on this build, it is like rubbing your tummy, while patting your head.
End of Part 1...

|
25th June 2014, 16:23
|
|
Senior Member
|
|
Join Date: Feb 2012
Location: Wembley, London
Posts: 5,056
|
|
Measure Twice, Then Don't Cut At All - Part 2:
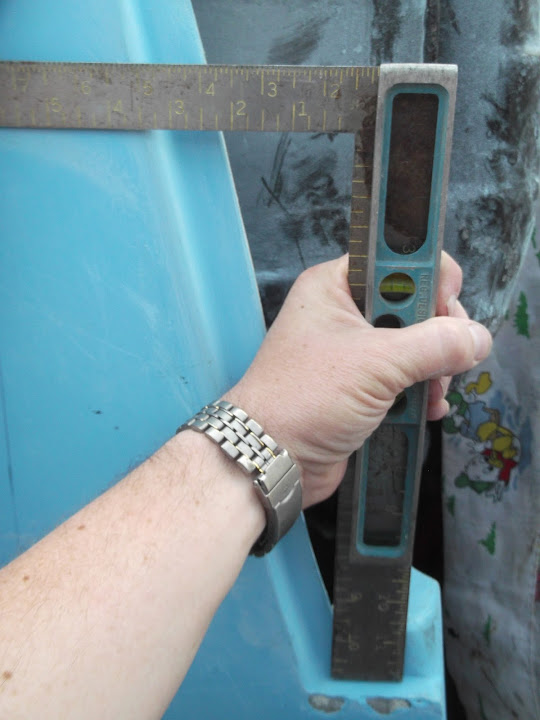
Where is all went wrong for me today was differences between both sides at the bottom of the body shell.
In this photo, one end of the set square is in line with the bulkhead chassis mounting plate on the driver's side.

Here is the set square in exactly the same position on the passenger side and the body work comes up short?

Part of this problem is due to the fact the bottom of the "L" shape bonnet lip is a difference length on either side.
But the real problem is that the angles of the main length of bonnet lip are different on both sides.
Driver:
Passenger:

Note:
I had to resort to adding a spirit level to the set square as my brain was slowing melting at this point.
So the today's key discovery is that if I move the passenger side backwards to fix the mis-alignment at the top of the bonnet lip...
I would actually be making the gap at the the bottom of the bonnet lip worse than it already is. 
Now I read the forum a lot and I'm sure another builder has mentioned this before, but I didn't really pick up on the issue.
The only good news is that this means it is pointless for me to "fix" the bonnet shut line at the top.
Unless I am going to attempt to rebuild the entire passenger side bonnet lip as a mirror of the driver's side.
( And let's be clear, I have got too much work to do as it is to even contemplate this. )
Therefore I am going to embrace my inner hillbilly and simply join the two sides together, as they are, like so...

This means the bonnet shut line will be at a slight (and thankfully it is only slight) angle running from one side to the other.
If I ever want to finish this build, I simply can't lose sleep over things like this anymore.
- - - - - - - - - - - - - - - - - - - - - - - - - - - - - - -
So after much measuring and beard scratching I was able to start work on the passenger side corner.
Unfortunately, I came across my first issue within minutes of starting.
There is a residual "lump" left where I cut the windscreen off on this side.
( Which was not a problem when the Cordite scuttle sat over the Spitfire bulkhead. )

Thankfully I am finally getting my head around working in "reverse" with fibreglass.
At this point I just need to ensure the base of the scuttle can sit on top of this without being pushed up.
Which actually means making a hill on the bulkhead to form a valley in the base of the scuttle.
So I simply cut an opening in the cardboard like so.

Then by adding some more cardboard on top of the lump I was left with this.

Then I cut back the edges of the body shell and removed the gel coat.

I also removed the metal strip I used for the bonnet lip on the driver's side and clamped it in place.

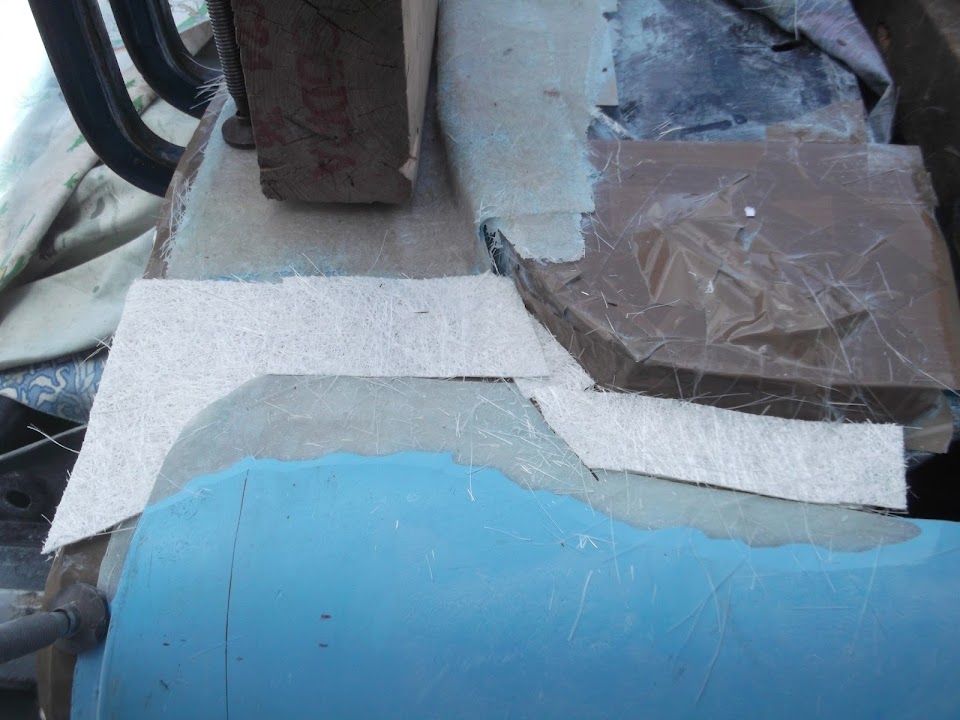
One thing I forgot to photo yesterday is the layers of matting I use to build up the gap in between the two sections of fibre glass.
Note:
Each layer overlaps in a different place / way in an effort to avoid building in weak spots along the edges.
I build up the front edges by laying up thin strips along the edge itself.
Followed by large strips that can be pressed in to match the contours of the edges.

I've found this much easier than trying to make a single edge "fold & stick".
This all of this is then covered with matting that reaches across the two ends of the body shell / scuttle like so.

Then extra sections of matting are added on top in a patchwork quilt style, again to avoid weak points.
Whilst I don't have a laminating table, I do have some newspaper on the ground.

This allows me to add resin to the "underside" of the matting before I lay it into place.
Then I simply brush / roller more resin on the "sunny side" to fix it into place.
Note:
This photo was taken before I added the catalyst and the fibre glassing "frenzy" begins.
As I always seem to be a tad over optimistic about how many small sections I can finish within the resin "pot life".
End of Part 2...
|
25th June 2014, 16:24
|
|
Senior Member
|
|
Join Date: Feb 2012
Location: Wembley, London
Posts: 5,056
|
|
Measure Twice, Then Don't Cut At All - Part 3:
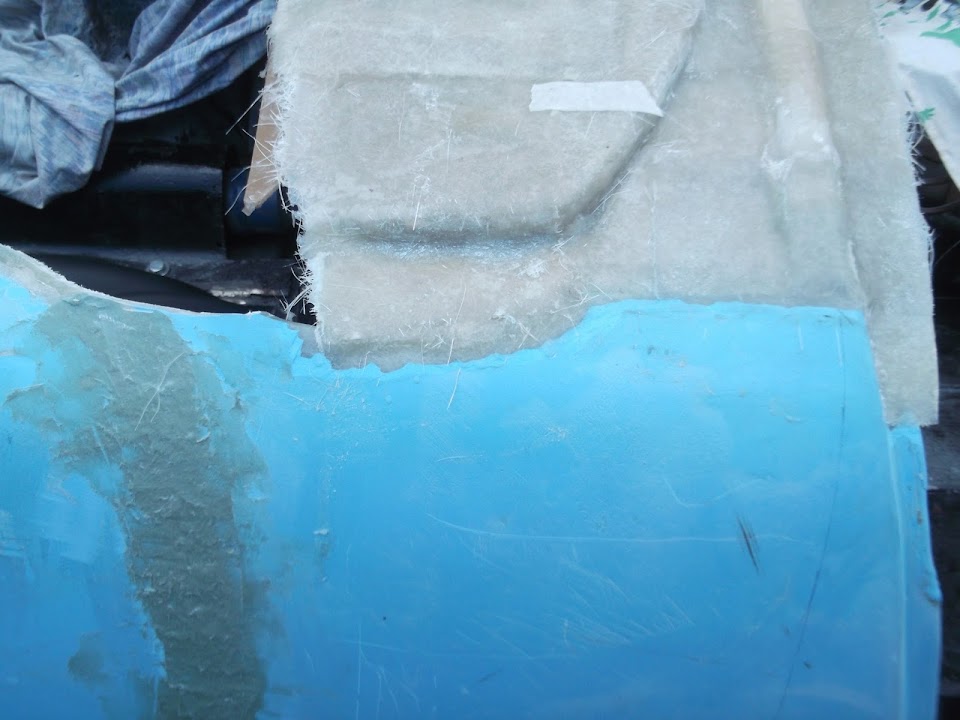
Anyway, after two fibre glassing sessions, the passenger join now looked like this.


Which means that my body shell is now "whole" again after all my previous scuttle butchery.
There is a "bump" in the body work on this side too, but it is not as high as the one on the driver's side.

All of this will be taken care of when I trim the cockpit sides and start to build up / shape the scuttle area.
I've now left everything to cure before I start the "covering up ceremony" for the night.
I think I will leave the clamps in place again, just to help hold the shape for a bit longer.
Until next time, take care, Paul. 
PS
I've been looking at lots of finished Sammio / Ribble photos recently.
As far as I can see, TlrTone is the only person who has fitted side repeaters.
He has wired his into the bonnet, whereas I was planning to stick mine into the body shell.
Given that I live / drive in London i think these are a useful addition, even if they do not appear to be a popular choice.
PPS
One thing I forgot to mention with my newspaper "laminating table" is be careful where you step.
I managed to tread in the resin soaked paper, then walk over a load of stray fibreglass matting strand.
Thus giving the soles of my trainers a white beard!
|
25th June 2014, 18:41
|
 |
Senior Member
|
|
Join Date: Dec 2013
Posts: 839
|
|
Quote:
I managed to tread in the resin soaked paper, then walk over a load of stray fibreglass matting strand.
Thus giving the soles of my trainers a white beard!
|
This made me laugh Paul, keep up the good work.
You look like you have taken to working with fiberglass like a duck to water and the cutting off of bits does look daunting, it makes you wonder how the original kits sold but hey its certainly is a challenge, keep it up. |
25th June 2014, 20:21
|
|
Senior Member
|
|
Join Date: May 2013
Posts: 2,161
|
|
Well done Paul, you are a brave soul!
ou've almost got as many clamps as me now!
Like they keep saying,you can't see both sides of the car at once!
My body shell has its quirks and faults like all the others I guess,
but as long as you can live with that yourself, most people will never ever notice.
Keep posting, you are really at an interesting stage!
|
26th June 2014, 15:32
|
|
Senior Member
|
|
Join Date: Feb 2012
Location: Wembley, London
Posts: 5,056
|
|
Swifty - It appears the original Spyder kits were actually in better shape than the Cordite.
The Cordite was supposed to have all the improvements that your new Navigator actually has.
Scottie - Cheers.
Quote:
Originally Posted by Scottie22

... most people will never ever notice ...
|
I think you have really hit the nail on the head there.
I am now re-naming this photo as the " Mister Towed Supermarket Car Park Test"...
He clearly has the most unusual / coolest car in the car park and that is what anyone else will notice first.
So hopefully my car will be "stand out" different first, and not 100% "straight and true" second.
- - - - - - - - - - - - - - - - - - - - - - - - - - - - - - -
One Step At A Time...
Well this is what my scuttle base looks like after yesterday's work has set.

Which gives me a vaguely curved bulkhead / bonnet shape.

I compared the trunking I have with a cross section on the original bonnet lip.

So I need to allow for the curve of the fibre glass and can add "sharp" edges with filler later on.
I have two lengths of trunking to play with so I marked up both ends of the body shell like this.

Although I had to cut a channel in one of my re-enforcing layers of matting on the passenger side.

I've decided to build a curve into the shut line like so.

My theory is a "wobbly" curve shouldn't stand out as clearly as a straight line at an angle.
Note:
I did trim the front edges of the fibreglass, but this is not the final shape.
I'm just getting very fed up of removing fibreglass splinters from the hands & arms.
I used some plasticine to bridge the gap from the end of the trunking to the edge of the body shell.
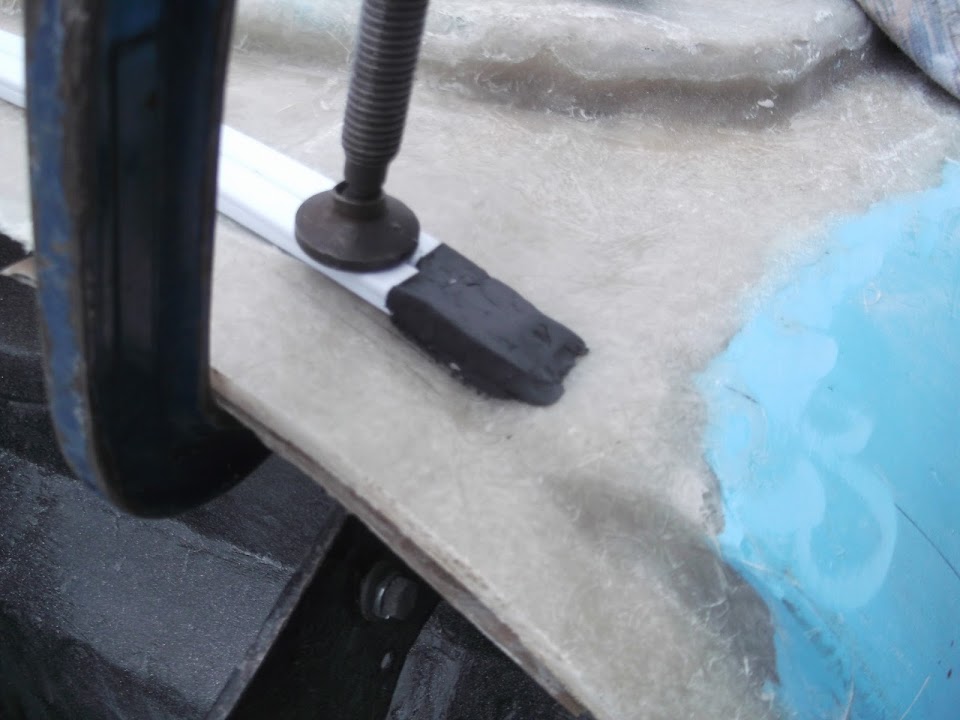
Although, as you can see I added clamps to either end just to be on the safe side, so I will do this section another day.
Then I cut a couple of layers to build up the area on the inside of the trunking.

Plus some big sections to fold over the trunking.

I must confess it was a real struggle to get the matting to lay nicely in the right position.
But eventually I had at least two layers of the bulk of the bonnet shut line.


With the edges on both sides still to do.

I should point out that the "overhead" photos involve me standing / balancing on the top of this wall...

...desperately trying to avoid falling off and getting a comedy injury.
Right I've got another appointment down the pub, so I've got to go.
Take care, Paul.
Last edited by Paul L; 28th June 2014 at 09:10..
Reason: typo
|
27th June 2014, 22:02
|
|
Senior Member
|
|
Join Date: Dec 2013
Location: thurcroft, Rotherham South Yorkshire
Posts: 196
|
|
keep up the good work. this is amazing how you are solving this problem from scratch, I am dreading bonding my body tub on, never mind major redesign work, so I take my hat off to you, well done.
|
28th June 2014, 17:09
|
|
Senior Member
|
|
Join Date: Feb 2012
Location: Wembley, London
Posts: 5,056
|
|
Thurcroft Flyer - Thanks for the positive comments.
The good news is that both the Miglia Speedster & Ribble Navigator have learnt lessons from the Cordite.
Both of those kits are miles better than this one and your bonding stage should be OK.
I recommend reading Mr T's build thread as he covers it in a good level of detail.
Actually, I've read his thread so often I know where that bit starts, so look for post #614 here:
http://www.madabout-kitcars.com/foru...t=3113&page=31
What surprised me was that the bonding was only on the bits that "touch".
( Well apart from his re-enforcing blob at the back of the cockpit. )
The real strength comes from fibre glassing everything together on the inside of the cockpit.
Which if you keep reading Mr T's build he will also cover in great detail.
- - - - - - - - - - - - - - - - - - - - - - - - - - - - - - -
Water - Inside And Out:
After a good run of making progress on my car, my luck finally ran out yesterday.
In fact it was just before 5am when my wife & I were woken by a noise from the en-suite bathroom.
By the time we worked out the noise was from a burst pipe, the water was already spreading.
I had to run down two flights of stairs (we sleep in the loft) to reach the mains water stop cock.
By the time I got back up stairs there was water in the bathroom, bedroom & the "box" bedroom below.
( Which would normally be empty, but my wife's god-daughter was staying with us. )
The water had leaked downstairs through the light fitting, so the fuse box had also tripped.
So there were more trips up & down the stairs for my torch, extra towels & newspaper to mop up the flooding.
I even needed a trip to the summer house for some tools as I tried to shut off the value to the burst pipe.
Unfortunately, the value didn't fully seal the pipe, so we had another small leak when I turned the water back on. 
Thankfully we know a good, local plumber who had it all sorted out by early afternoon.
But by then I needed a lie down, as I was all over the place following the hectic start to my day.
The Good News - We were there when it happened & dealt with it within minutes (that felt a lot longer).
I dread to think the amount of damage that could have been caused by this if we were out / on holiday.  Plumber's Top Tip
 - Don't forget that your heating will still work if you turn the mains stop cock off.
So you can have the heating "ticking over" while you are on holiday, without the risk of major flooding on your return.
I can guarantee that we will follow this advice in the future, as this was a major scare.
- - - - - - - - - - - - - - - - - - - - - - - - - - - - - - -
All of this puts today's "rain stops car work" into perspective.
Hopefully, I might get a chance to do some more work tomorrow.
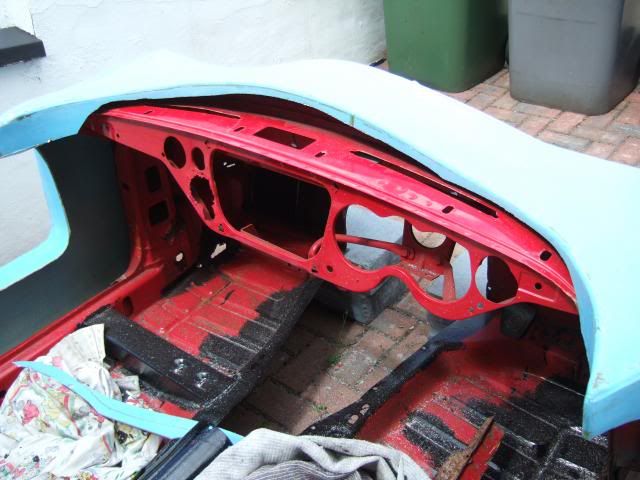
I have put a bit more thought into the scuttle design as I need something to cover the "gap" at the top of the dash.

I've always liked this photo, so may just put a simple, short, edge on the cockpit side of the scuttle.
This should tie everything together nicely and cover the rear edge of the Spitfire bulkhead into the bargain.
I am also following the work Mac is doing on his Navigator build and need to make something like this too.

This will need to cover the corners of the Spitfire bulkhead and "blend" this area together.
I'm also re-considering the "lump" in the bulkhead that I simply built my fibreglass mould around.
I plan to have a closer look at what "smooth" shape I can get over the rear section of Spitfire bulkhead.
If that "lump" is in the way, when I am going to "cut & shut" it flat & re-do part of that corner.
Although, ideally, the lump will form the high point of the scuttle in this area, in which case I can save myself some work.
Clearly I am making this all up as I go along, so I have to expect a bit of trial and error.
- - - - - - - - - - - - - - - - - - - - - - - - - - - - - - -
One thing I forgot to post the other day was a very quick test with some of the plywood I got for the sides of the cockpit.
( This section was left over from the time I built my first battery box. )

If they were mounted to the internal framework, the top edges of the cockpit would be almost than 4" / 10cm wider than the ply at the top.

This means there is more than enough room to trim back the cockpit sides even further than I'd roughly laid out here.

I still need to do a bit more playing around with this.
One of my current thoughts is to put an extra strip of ply (no more than 2 inches deep) under the cockpit edge.
Hopefully this "double layer" would provide some extra support for climbing in and out of the car.
I know there are a lot of people who are against the use of wood, but if this was good enough for Mr T, then its good enough for me.
Well, that and the fact I have already bought a load of plywood for the cockpit and it seems a shame to waste it.
- - - - - - - - - - - - - - - - - - - - - - - - - - - - - - -
Until next time, take care, Paul.
|
29th June 2014, 16:58
|
|
Senior Member
|
|
Join Date: Feb 2012
Location: Wembley, London
Posts: 5,056
|
|
Scuttle Sunday - Part 1:
Managed to get quite a bit done today, so here goes...
I tidied up the edges of the fibreglass next to the final corners to be covered.

Then cut out some matting to build this section up to match the rest.


I ended up adding some extra matting strips along the top before the corners ended up looking like this.


There is still a bit of work required to get a smooth join, but I need to grind back some more of the gel coat first.
At this point it was too early on a Sunday to switch on my angle grinder!
- - - - - - - - - - - - - - - - - - - - - - - - - - - - - - -
I had half an idea to build up the inside sections behind the trunking like this.


But when the time came. I abandoned this and just added the shaped layer of matting instead.

Instead I think I will have a go at making the chopped matting filler than other builders have used.
I already have a bag full of the stuff to use up.

This is a result of me storing the matting vertically and putting a series of "creases" at the bottom.

Well, the box was left in the garden shed for over a year before I even took it out to look at it.
- - - - - - - - - - - - - - - - - - - - - - - - - - - - - - -
Then came another round of destruction...
I removed the cross brace from the body shell as the "partial" scuttle is already strong enough to support the body shell.


Then I cut the "lumps" off both sides of the body shell.


Then I took my lump hammer to the "lump" on the passenger side of the bulkhead.
Before:

After:

I will come back and tidy this up with filler another day.
While the lump hammer was out, I gave the driver's side a couple of blows for luck.

But the destruction didn't end there...
|
29th June 2014, 17:00
|
|
Senior Member
|
|
Join Date: Feb 2012
Location: Wembley, London
Posts: 5,056
|
|
Scuttle Sunday - Part 2:
I also decided to trim "just a little" off the ends of the Spitfire bulkhead.


This should make it easier to "blend in" the body shell when I finally get to that stage.
Again, I will come back and tidy up the "wound" with filler another day.
While this destruction was going on, I had moved the body shell out of the way.

Obviously, I am really pleased that the work I have done so far holds everything in place.
- - - - - - - - - - - - - - - - - - - - - - - - - - - - - - -
Then it was time for some construction, which started by recycling the templates I'd used before.


The new template then sat at the back of the bulkhead like so.

The edge inside the cockpit is "oversize", so I can trim it back later on.
Then with the body shell back in place, it looked like this.

Although I did cut away the corner of fibreglass that I had previously shaped around the lump in the bulkhead.

I will come back to tackle this whole corner separately.
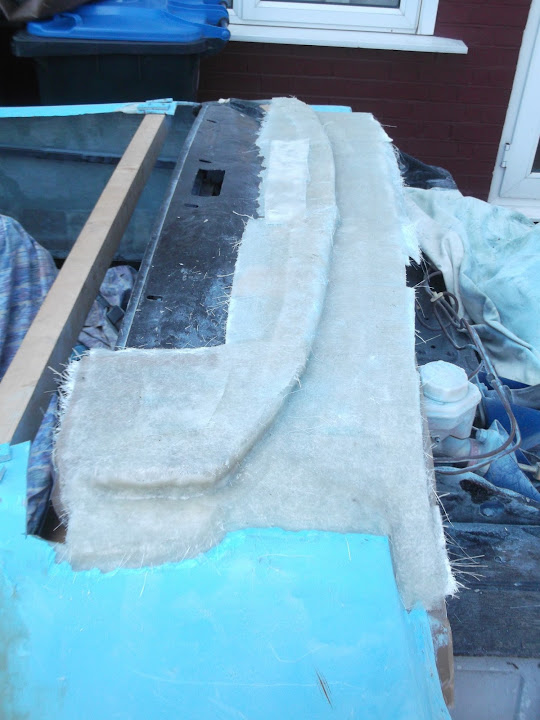
As it took five frantic fibre glassing sessions (given the pot life) to get the rest of the scuttle looking like this.

Obviously, the scuttle follows the curve of the Spitfire bulkhead, which is nice.
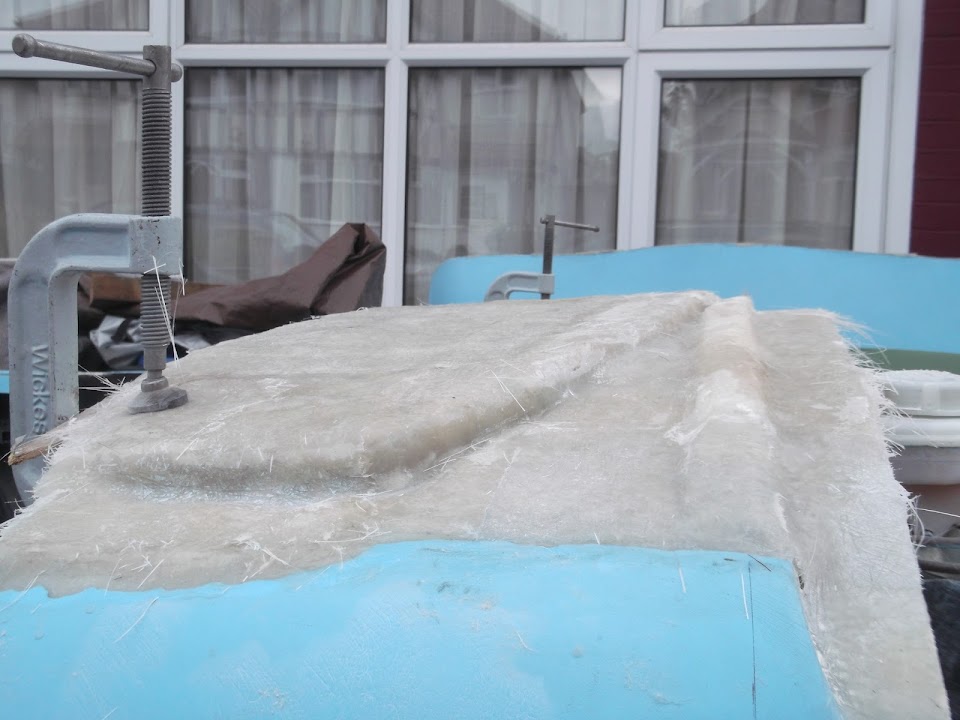
You can just about see the build up of the three layers of matting I laid today in this photo.

I actually quite like the "sun visor" look of the scuttle extending over the Spitfire dash like this.

But I need to work out how the outside corners will work, before I commit to a final design.
( i.e. With the lip, as per the cockpit in yesterday's post, or without a lip, like above. )
Overall, given that my first attempt at using fibreglass was just 40 days ago, I am making good progress.
Clearly, I still have a lot of work to do before the final scuttle shape will be easy to see.
My daughters' school is closed tomorrow for training, so I don't think I will get much done.
So until next time, take care, Paul.
Last edited by Paul L; 29th June 2014 at 17:23..
|
30th June 2014, 08:28
|
|
Senior Member
|
|
Join Date: Jul 2011
Posts: 5,328
|
|
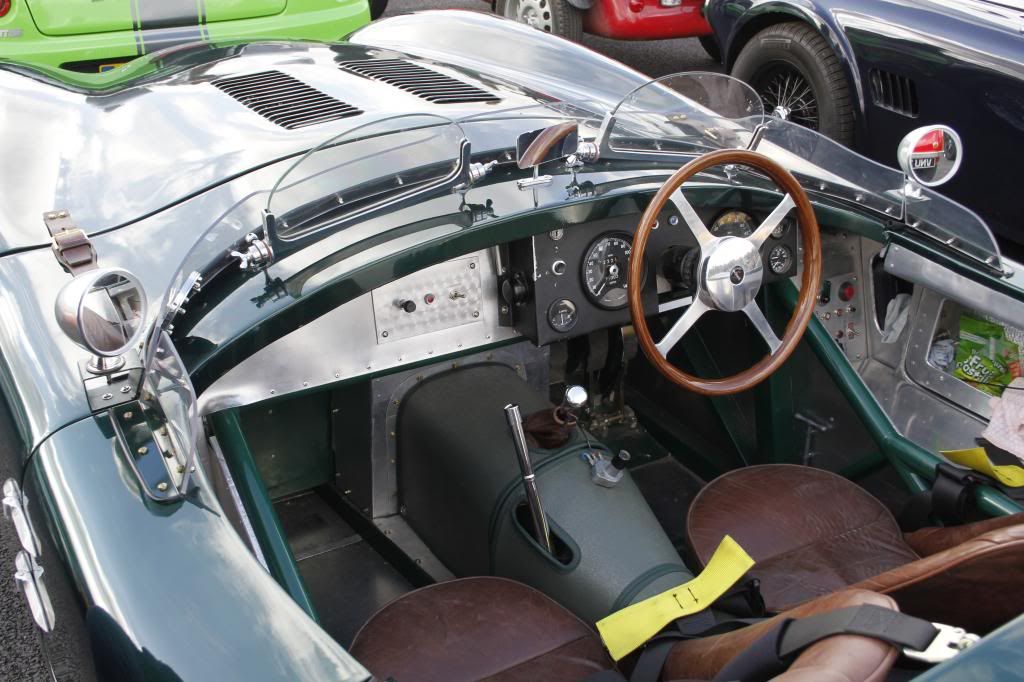
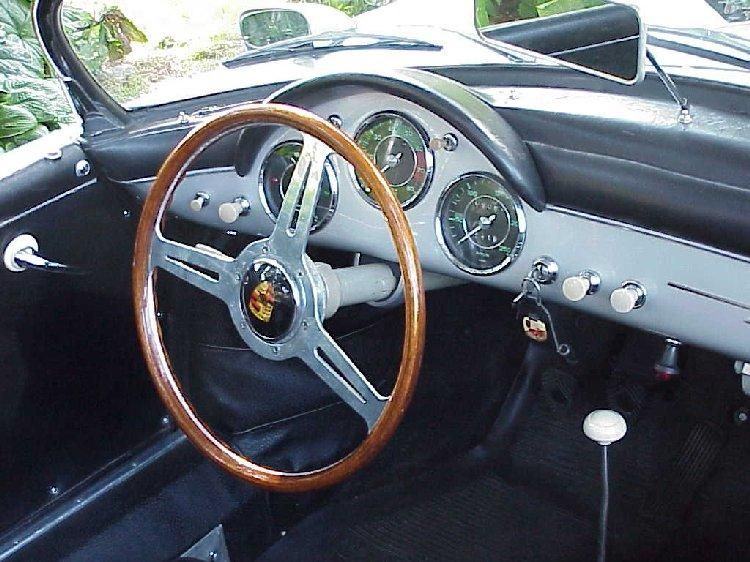
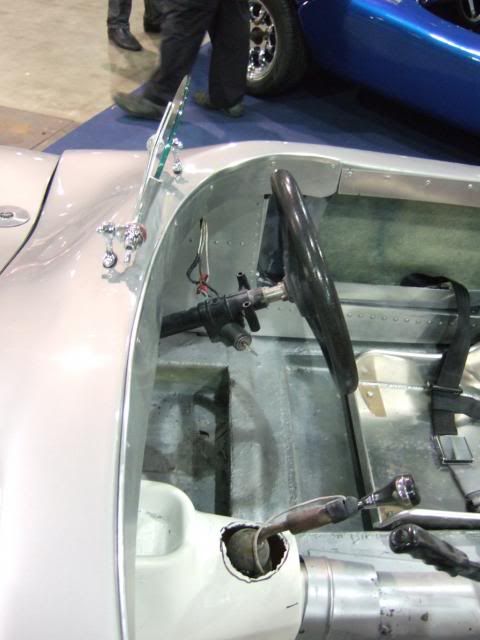
You could make that lip a feature of the dashboard Paul, it would look great trimmed to match the interior. I've always liked the padded 'eyebrow' over the 356 Speedster's gauges -
 |
1st July 2014, 19:41
|
|
Senior Member
|
|
Join Date: Feb 2012
Location: Wembley, London
Posts: 5,056
|
|
Mr T - The lip may well stay as a feature, but unfortunately I can't trim it to match the interior for two reasons:
- The aero screens will not form an inside/outside line in the same way that the original wrap around screen would.
- Apart from a padded head rest (similar to your own) and the seats, there will be no real interior trim.
I've always liked the idea of a very "Spartan" race car look, but will make a final decision in the future.
Having said that, it might be possible to just use an edge strip in a similar way to Rattler's car, see below.
Although I would prefer a smaller / thinner strip than the one he has used.
- - - - - - - - - - - - - - - - - - - - - - - - - - - - - - -
Slowly Taking Shape - Part 1:
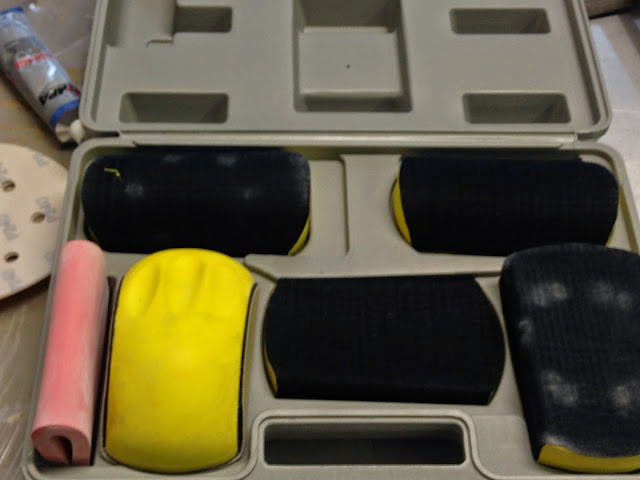
Spoke to Mac on the phone today about the sanding block set he is using on his build.
We also covered the work he did turning the old Cordite moulds into the new Navigator ones.
It is fair to say that we both agreed that I may have a few more body shell "adjustments" to make.
- - - - - - - - - - - - - - - - - - - - - - - - - - - - - - -
But before I started on the latest round of fibre glassing work, it was back to "mocking up" again.
Rattler posted this photo of his Milglia the other day.

I also went back and looked at the photos of Jerome's Spyder.

Obviously both cars have opted for aero screens and both look great.
However, I noticed that both cars have the aero screens fitted very close to the cockpit edge.
So I put my seat back on the driver's side and took some rough markings using a length of wood.


I then carefully climbed into the cockpit (remember the car is currently sitting on axle stands) to double check this looked OK.
Initially my plan was to fit the screens marginally ahead of this position.

Which gave me a nice flat section of Spitfire bulkhead to bolt them in through.
But it I fitted the screens closer to the locations used by the cars above, they would be back here.

If I fit them here they would need to be bolted through the overhanging lip!
As there is too many other things in the way behind the dash in this area.
So I am going to think about that a bit more before I commit to a final mounting point.
Initially I was planning to fibreglass in some metal support plates where the mounts were going to go today.
( Something I'd picked up while reading Scottie's build thread the other day. )
But there was more than enough work to do in other areas, so I can come back to this again.
- - - - - - - - - - - - - - - - - - - - - - - - - - - - - - -
So I carried on building up the scuttle in a number of areas.
This was the passenger side "before".

Then after a bit of a trim & some gel coat removal it looked like this.

There was actually more matting that this batch used.

So that eventually the whole area had three layers in place.

End of Part 1...
Last edited by Paul L; 1st July 2014 at 20:07..
|
1st July 2014, 19:42
|
|
Senior Member
|
|
Join Date: Feb 2012
Location: Wembley, London
Posts: 5,056
|
|
Slowly Taking Shape - Part 2:
On the passenger side, I was re-doing work I had cut out following my bulkhead bump "adjustment".
But on the driver's side of the scuttle I started on the work required to blend in the corner.


This is still at the "rough idea" stage and will only be finalised when I have got more work completed.
- - - - - - - - - - - - - - - - - - - - - - - - - - - - - - -
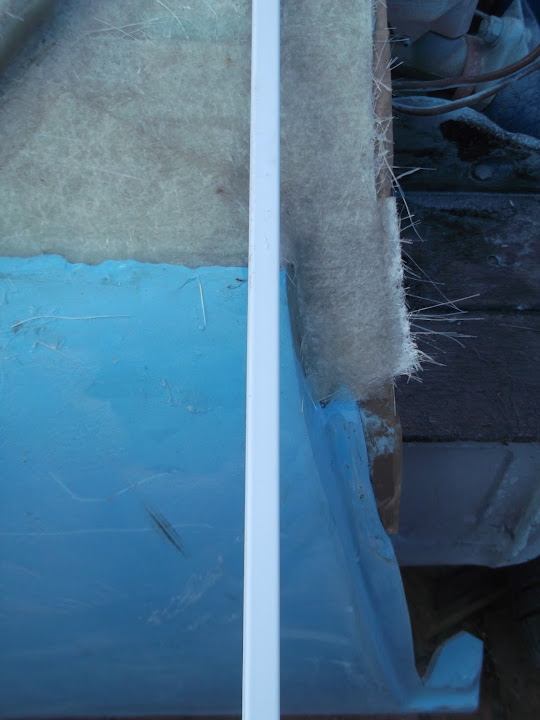
I also made a start on "beefing up" the driver's side bonnet lip.

Note:
That was the depth of fibreglass in the lip, the rest was just gel coat.
The metal strip I used to form the scuttle join was pressing into action again.

Hard to believe there are three layers of matting here.

I will be re-enforcing the entire length of these lips from the "inside" at some point when the body shell is removed.
- - - - - - - - - - - - - - - - - - - - - - - - - - - - - - -
The only other bit of "normal" fibre glassing work was on the edges of the bonnet lip / shut line on both sides.

- - - - - - - - - - - - - - - - - - - - - - - - - - - - - - -
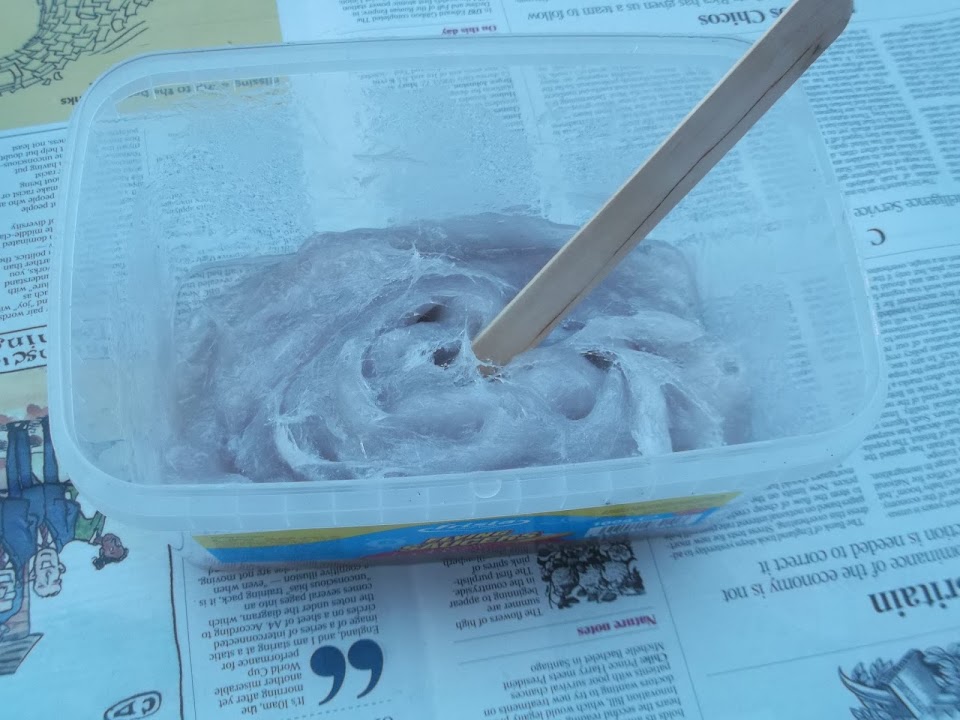
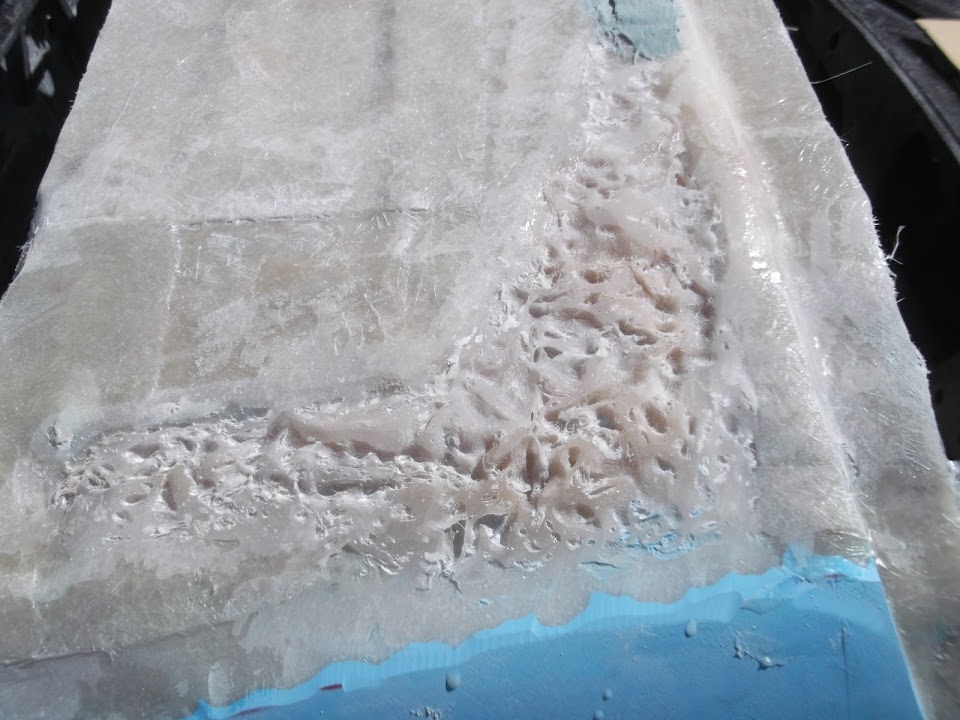
The last job of the day was some "abnormal" fibreglass work with my first attempt at "Home Made Filler".
I chopped up some of my matting "scraps" and put them in an old ice cream tub..

Note:
Looking back at this photo now , it is clear I was not chopping this up into small enough bits.
As the "filler" currently looks like a rough sea.


I am sure I can "calm the waters" with a gentle brush of my angle grinder.
And the main reason for using this stuff is to give me a base to add the final layers of matting over the top of.
- - - - - - - - - - - - - - - - - - - - - - - - - - - - - - -
Finally with the covers back on and the front drive swept & washed, you'd hardly know I was there.
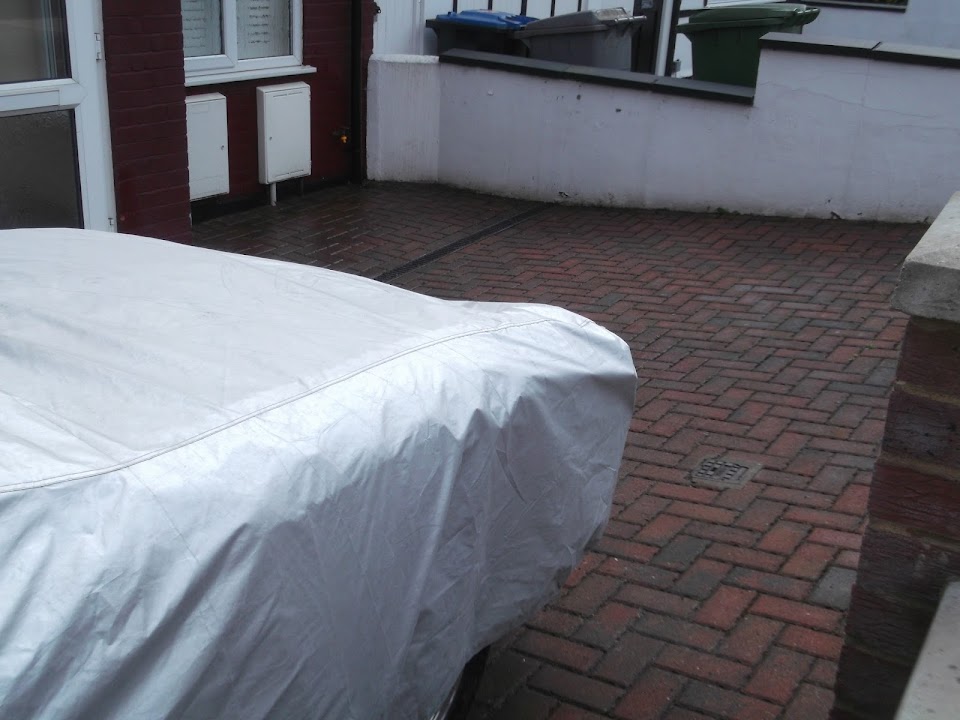
Whilst there is a lot of work involved in sorting this out, at least it feels like I am building something.
Until next time, take care, Paul.
|
2nd July 2014, 16:34
|
|
Senior Member
|
|
Join Date: Feb 2012
Location: Wembley, London
Posts: 5,056
|
|
More Thoughts:
Too many other chores to do today to even peak under the cover, let alone work on the car.
However, I did get a chance to dig out two more photos of aero screens fitted.
There was this car, which I don't know much about.
Plus the original Cordite/Navigator demonstrator had an aero screen.
I've actually used this photo before when comparing it to the position of my Spitfire bulkhead.
So oddly, if I fitted the screen in the same place as above, it would actually line up half way across my extra wide scuttle.
I also went back through my old photos and this was the best I could find of my original donor set up.

Clearly the Spitfire also had an over hanging lip across the dash, although that was neatly covered as it was part of the interior.
I will need to make a decision soon, so I can drill the holes through the bulkhead.
Which in turn will bring me one step closer to the bulkhead being ready for its final fitting to the chassis.
( I still have to give it a coat of stone guard when I finish drilling all the holes. )
Take care, Paul.
PS
The other thing I have noticed is that some screens sit behind the bracket & others sit in front of it.
Does it make any difference?
|
3rd July 2014, 19:26
|
|
Senior Member
|
|
Join Date: Feb 2012
Location: Wembley, London
Posts: 5,056
|
|
Slowly, But Surely - Part 1:
I've grouped today's activities together, as there was a lot of "to-ing & fro-ing" going on today.
I wanted to get some Kurust on the flattened lumps in the bulkhead.
So I lifted the body shell clear and, while I was at it, removed the "formers" too.

I also ran the angle grinder around the area to remove anything flaky first.


The only other part of the bulkhead I wanted to look at today was this surplus hole.
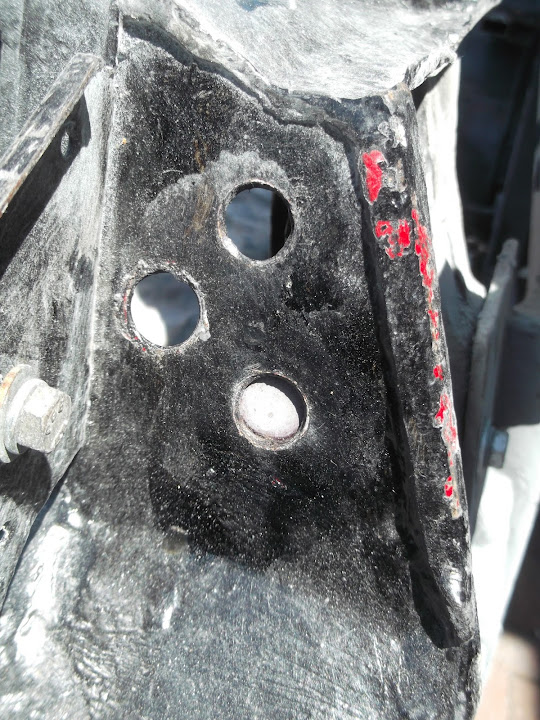
Note: I'd already welded some metal over it from the other side.
After leaving that to dry for 3 hours I then put some fibreglass filler on.


At some point I will tidy all of this up and get it painted.
- - - - - - - - - - - - - - - - - - - - - - - - - - - - - - -
The rest of my time was spent on the scuttle.
I started by using some card to keep the scuttle off the fresh filler on the bulkhead.
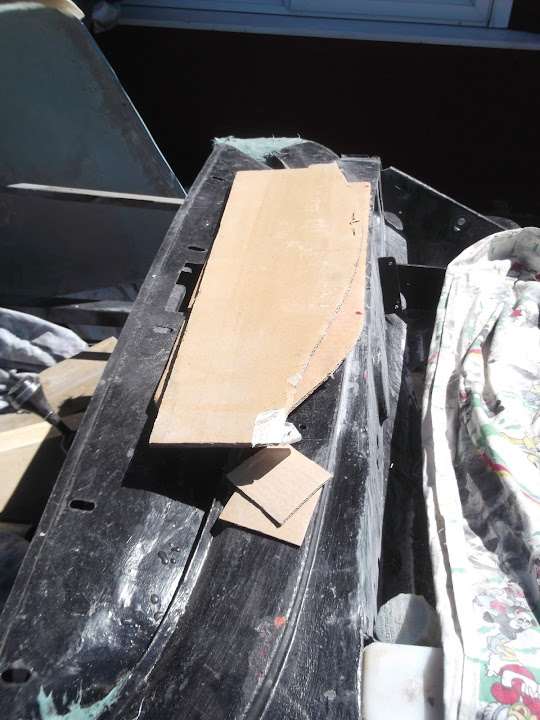
Then I gave the "rough sea" of home made filler a quick going over with the angle grinder.


I then made up another batch of "home brew", which really does have a mind of its own.
As the finish on this second batch was just as rough as the first.

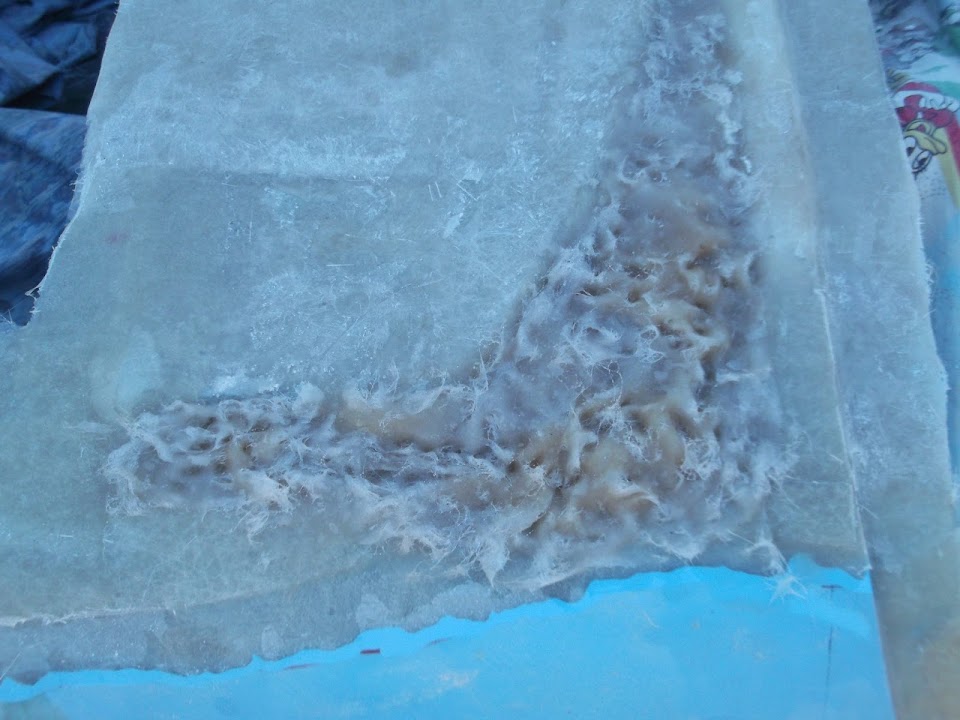
Still, this is only a "stepping stone" on the way to building a smooth (ish) scuttle.
In fact, after grinding down the "peaks", the surface "voids" provide a good key for the filler.

End of Part 1...
|
3rd July 2014, 19:27
|
|
Senior Member
|
|
Join Date: Feb 2012
Location: Wembley, London
Posts: 5,056
|
|
Slowly, But Surely - Part 2:
The filler was then layered on over the top like so.

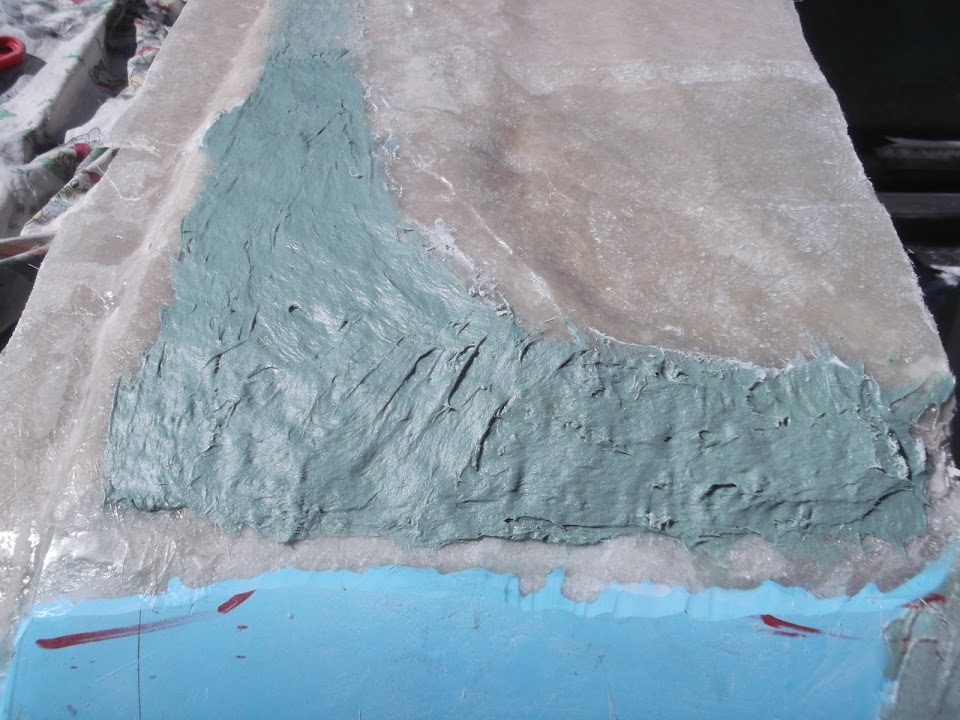

Actually, I'm not sure if the fact the filler is green makes it easier, or harder, to see what I am trying to do.


Anyway, that filler was also roughly ground into shape when it had set.


Again, this is just a former, not the final surface.
I added a few more sections of matting to even out the "patch work quilt" a bit.

Before cutting some big sections of matting to cover the whole scuttle like so.

In the end I had time to lay 5 sections starting from the centre and working outwards.

I will start from the outside corners next and work my way inwards to meet this section.
After that I need to make some decisions about the aero screens and the side repeaters.
As I need to put the final tidying up of the scuttle to one side in order to focus on the "moon rover" stage.
The main thing is that the body shell will be strong enough to lift off.
And finally, as an alternative to the car photos, here is what our first veg. patch looks like now.

Until next time, take care, Paul.
|
|
Currently Active Users Viewing This Thread: 3 (0 members and 3 guests)
|
|
|
 Posting Rules
|
You may not post new threads
You may not post replies
You may not post attachments
You may not edit your posts
HTML code is Off
|
|
|
All times are GMT +0. The time now is 12:22.
|


 Linear Mode

