|
|
| Sammio Builds and discussions Sammio bodied car builds and specials |

30th July 2014, 21:05
|
|
Senior Member
|
|
Join Date: Jun 2011
Location: birchington, kent
Posts: 1,769
|
|
Posh ones... fruity!
|

30th July 2014, 21:54
|
|
Senior Member
|
|
Join Date: Apr 2012
Posts: 1,163
|
|
Slarti please don't take this the wrong way others may have had a different experience but after using loads of rivnuts on different race cars over the years in ali Steel and different composites I now only use them where there is no other option. Where I do use them I double up the bond by coating them with PU adhesive both on the rivnut and around the hole before fitting. I have lost count of the number of these things I have had to cut bolt heads from and then drill out as when I needed to remove a panel the damn rivnut just merrily spun!
keep at it your making good progress sir!
Mac
|

31st July 2014, 08:41
|
 |
Senior Member
|
|
Join Date: Aug 2012
Location: Surrey/Sussex border
Posts: 169
|
|
Thanks for the advice Viatron. I shall be VERY careful for future use. My intention here was to have a fixing I could pull into ....hopefully I will never have to remove the floorpans. When I fix them permanently I will put a bead of mastic underneath so that it sqidges out when pinched up tight and HOPEFULLY ... reduce any rattle/make a watertight seal.
This is what a forum is all about ... learning from others past experiences.
Cheers. More piccies to follow after this week end. 
Slarti |

31st July 2014, 19:14
|
 |
Senior Member
|
|
Join Date: Feb 2012
Location: Wembley, London
Posts: 5,056
|
|
Slarti - Good to see you are still chipping away at your build. 
I wasn't sure if your "slow" comment referred to the build, or the updates, but there are certainly very few "fast" builds!
Good luck with the trial fit of the body shell, Paul. 
|

1st August 2014, 21:23
|
 |
Senior Member
|
|
Join Date: Aug 2012
Location: Surrey/Sussex border
Posts: 169
|
|
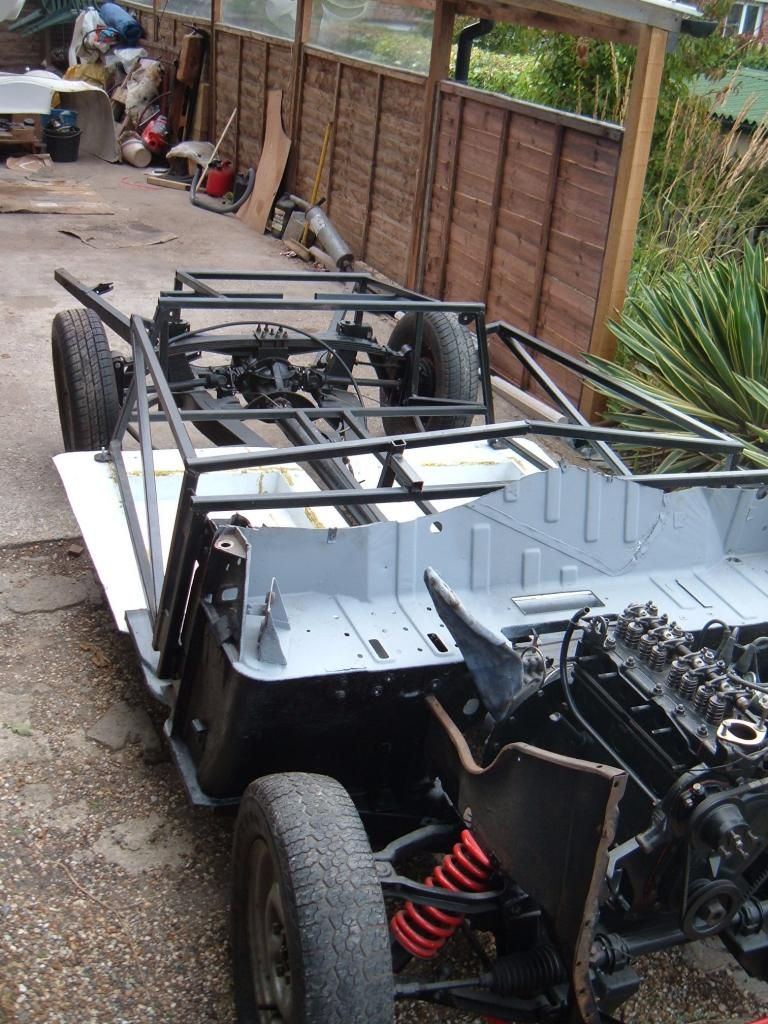
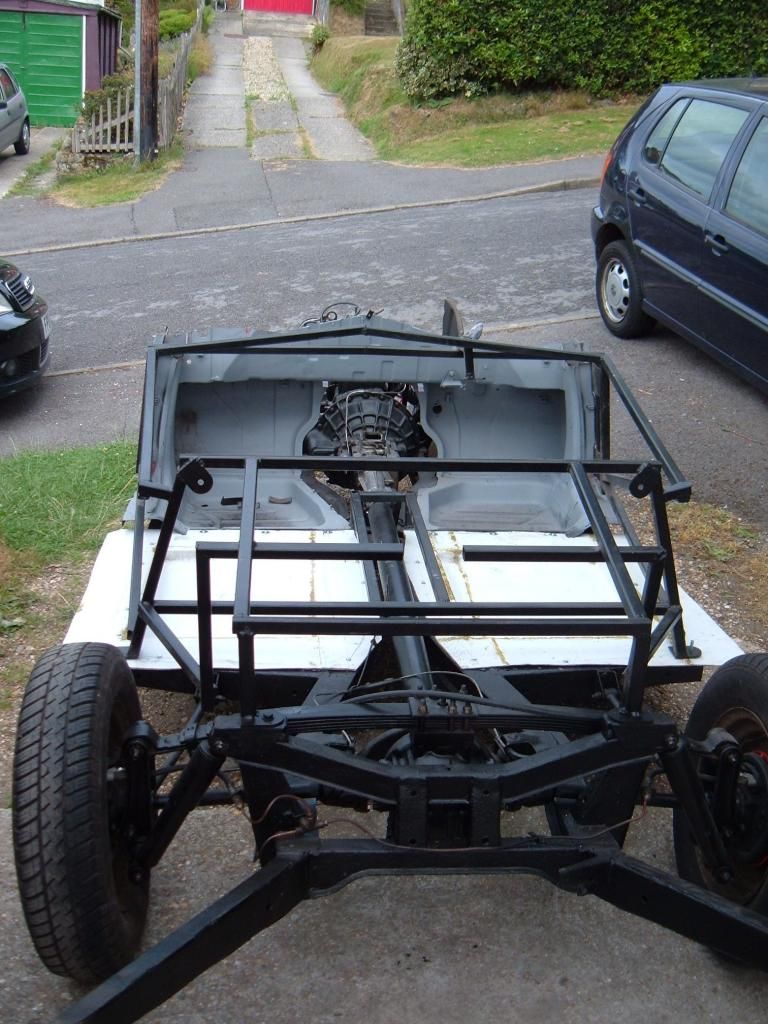
Viatron.... all went well ! the Rivnuts held firm and the mastic sqidged out as planned. Floorpans now firmly in place. It all took a little longer than planned ( as usual ) so haven't got round to a trial fit of the bodyshell. Off to Selsey now for the rest of the week-end so no further action ... with all said and done, a GOOD day in the "office" .. 
Here's a few photies as promissed.


Slarti |

11th September 2014, 08:27
|
 |
Senior Member
|
|
Join Date: Aug 2012
Location: Surrey/Sussex border
Posts: 169
|
|
Yes, it's been weeks since I've had a chance to work on the Spyder. Other things seemed to get in the way .... like our daughter's wedding preparations for 20th September. The Morris failed its MOT and I had to get that back on the road for the bridesmaids!! long story  ... the short version is, I replaced a rear wheel cylinder and we are back on the road ...just in time. As for the Sammio, I've now got a fuel tank, twin carbs & a 4 branch exhaust manifold ready to fit when I get some time. 
This week-end I'm off to Goodwood Revival ... all 3 days  as one of their many actors. So if any of you are going ... do look out for the Spivs ... one of them could be me trying to sell you some dodgy watch or scabby nylons! ... might see you MrTowed ....
Slowly slowly ......
All the best
Slarti |

11th September 2014, 10:26
|
 |
Senior Member
|
|
Join Date: Jul 2011
Posts: 5,328
|
|
I'll keep my eyes open for you Slarti - I shouldn't have too much trouble spotting you trying to flog hooky watches to gullible marks given what I do for a living...
|

11th September 2014, 20:26
|
 |
Senior Member
|
|
Join Date: Feb 2012
Location: Wembley, London
Posts: 5,056
|
|
Good luck for your daughter's wedding (& Goodwood).
I remember the photo of your Minor and that will make a great bridesmaid car. 
Good luck with the Sammio when everything else calms down, Paul.  |

18th December 2014, 18:33
|
 |
Senior Member
|
|
Join Date: Aug 2012
Location: Surrey/Sussex border
Posts: 169
|
|
Hi all
Daughter's wedding was absolutely MAGIC! (thanks Paul) Got the Rover P5B out and drove her to the church myself. Reception in the local cricket field all done out like a village fayre!!!!
Back to the Sammio ............... an early Christmas present arrived today...the FULL kit to rebuild the Twin SU carbs. At last I can get on with some work over the winter. I've re-routed the oil breather (pictures to follow) and part fitted the fuel tank. Also had a test fit of the body and ended up making a few adjustments to the frame.
Made a mounting plate for the handbrake pivot mechanism ...
very slow but at least it's progress.
Slarti
|

19th December 2014, 08:06
|
 |
Senior Member
|
|
Join Date: Jul 2011
Posts: 5,328
|
|
Nice to hear that you're still making progress Slarti, keep plugging away and you'll be on the road before you know it.  |

30th December 2014, 16:02
|
 |
Senior Member
|
|
Join Date: Aug 2012
Location: Surrey/Sussex border
Posts: 169
|
|
with the cold weather it's an ideal time to work inside rebuilding the carbs on the kitchen table. All going fairly well ..... but a bit of advice from any of you guys/gals who have done the same. The kit came with replacement butterfly valve and spindles and ...er... bushes to mount the spindle. Do the old ones press/push out, or do I have to drill them out and press in the new ones?
Here's some pictures.
http://s1287.photobucket.com/user/sl...5009f.jpg.html
http://s1287.photobucket.com/user/sl...87971.jpg.html
The bush must go in the hole indicated but the old one doesn't seem to press out. Any ideas.
Slarti |

30th December 2014, 19:50
|
|
Senior Member
|
|
Join Date: Apr 2012
Posts: 1,163
|
|
From the looks of the pics I would guess you will need to team out the original hole to fit the bushing. How tight a fit is the new spindle in the old hole? You may not need the bushes.
Mac
|

30th December 2014, 20:46
|
 |
Senior Member
|
|
Join Date: Dec 2013
Posts: 839
|
|
I found that by replacing the brass butter fly spindle and fitting new seals the original bushes were ok i.e. no lateral movement in the spindle but if they do need replacing then i think mac is right you have to ream the old bushes out.
|

31st December 2014, 08:48
|
 |
Senior Member
|
|
Join Date: Jul 2011
Posts: 5,328
|
|
I bought rebuild kits for my 1.5" Strombergs, mainly due to them spraying neat fuel into the shower of sparks from the exploding starter solenoid when I first tried to start my donor. 
I too found I had a few little brass tubes/bushes left over that I couldn't replace with hand tools, so I just left the originals in place.
Although they no longer leak it was a mistake not to fully recondition them. The dyno chappie suggested that the carbs are strangling the engine's ability to rev and make power - I only got 79bhp and the engine just wouldn't rev beyond 4300rpm (although that still feels quick in a 650kg car).
I have a pair of 1.75 Strombergs awaiting fitment to address that issue, but I think a pair of properly reconditioned 1.5's would've done the job.
My advice would be: if you can, replace everything included in the rebuild kit, if you can't, pay a pro to do it.
Best of luck. |

2nd January 2015, 11:20
|
 |
Senior Member
|
|
Join Date: Aug 2012
Location: Surrey/Sussex border
Posts: 169
|
|
Thanks for your feedback and advice one and all. I will have to ream out the old ones and replace as suggested. The spindles are a very floppy fit ... a bit like waving a pencil in the Albert Hall 
Upon further inspection, the carb floats are knackered ... the clips that hold them in place on the pin are completely worn through, so another couple are on order. I hope they don't take 8 weeks to arrive like the previous parts 
Still plenty to get on with as you all will know.
Happy New Year to all my readers 
Keeeeep buildin'
Slarti |

3rd March 2015, 21:30
|
 |
Senior Member
|
|
Join Date: Aug 2012
Location: Surrey/Sussex border
Posts: 169
|
|
Rebuild of the carbs completed. Fuel tank fully bolted in and manifolds and carbs fitted. Hope to have a running engine by late spring.
Had a trial fit of body shell (at last).
Purchased a few goodies in Rimmers winter sale. Wood rimmed steering wheel and a pair of wing mirrors ...I know it's early days but .....I'll get there eventually. Meanwhile ... a couple of pictures.
Slartihttp://www.madabout-kitcars.com/forum/attachment.php?attachmentid=2102& http://www.madabout-kitcars.com/foru...1&d=1425421785 |

4th March 2015, 06:06
|
 |
Senior Member
|
|
Join Date: Feb 2012
Location: Wembley, London
Posts: 5,056
|
|
Slarti - Engine looks good. 

Maybe it is the angle of this photo, but is the floor pan pushing out the bottom of the body shell?

Either way, the whole point of test fitting things is to see what needs to be done.
So good luck, Paul. 
|

4th March 2015, 06:51
|
 |
Senior Member
|
|
Join Date: Jul 2011
Posts: 5,328
|
|
Nice to see some progress Slarti.
First fit of the body is quite a milestone, well done for getting to that stage. Once you bond the body on I think you'll be surprised how quickly you can get the rest of the car finished. Mine was only about eight months from bonding on the body to MOT. Whoosh!
Have you got a driveable moon rover yet? That's another big signpost that it's coming together nicely.
Anyway, keep up the good work Slarti and I'll see you on the road later this summer.  |

4th March 2015, 19:08
|
 |
Senior Member
|
|
Join Date: Aug 2012
Location: Surrey/Sussex border
Posts: 169
|
|
As you say Paul, a trim back on the floorpans should do the trick; and MrT ... looking to get a running "moon-rover" by end of spring. This summer is a bit optimistic to be on the road ....but perhaps next spring/summer.
Hope to do a bit of water plumbing this week end. I might get away with the old Herald radiator otherwise, have any of you guys/gals got any alternative suggestions. ?
Cheers
Slarti
|

5th March 2015, 06:09
|
 |
Senior Member
|
|
Join Date: Jul 2011
Posts: 5,328
|
|
Don't be seduced by a modern, shiny alloy radiator, they don't cool as efficiently as good old fashioned copper cored ones.
If your Herald rad is in good condition I'd go with that Slarti. You can always swap to something bigger if you run into cooling issues. Oh, and a header tank of some description is a good idea.
|
|
Currently Active Users Viewing This Thread: 1 (0 members and 1 guests)
|
|
|
| Thread Tools |
|
|
| Display Modes |
 Linear Mode Linear Mode
|
 Posting Rules
|
You may not post new threads
You may not post replies
You may not post attachments
You may not edit your posts
HTML code is Off
|
|
|
All times are GMT +0. The time now is 00:07.
|