|
|
| Sammio Builds and discussions Sammio bodied car builds and specials |

18th January 2016, 18:28
|
 |
Senior Member
|
|
Join Date: Dec 2013
Posts: 839
|
|

Thanks for the reply guy's, when it comes from a group of guys who have been through or in the process of a build it means a lot, cheers.
When i mentioned about may be spraying some of the ally parts satin black i had in mind just the screen base mount, one of the reasons was that i am finding it difficult to get the parts anodized plain silver and i know that if they are left untreated then i will be for ever polishing them to keep the surface finish, especially the screen base mount due to its position on the car. I did go down the route of maybe DIY anodizing but the cost of a power supply out ways the justification for a couple of parts so if anybody knows of a good source for the correct power supply let me know.
The other factor about spraying satin black is the name plate i made is black, so these couple of parts will tie in with the black wheels.
IMG_5289.jpg
This is the screen base mount i made from ally sheet and i think it will look well in satin black.
IMG_52283.jpg
Name badge in black.
IMG_6314-copy.jpg IMG_6314.jpg
Another area to possibly spray black is the grill, tried to show what it will look like in photoshop compared to the ally on the right image. The scoop grill has already been powder coated black.
Any way it's food for thought and Ive still got the interior to finish putting back together, see you all soon and roll on summer.
Last edited by swifty; 18th January 2016 at 19:54..
|
18th January 2016, 21:52
|
 |
Senior Member
|
|
Join Date: Sep 2011
Posts: 1,446
|
|
Can't you get them bright anodised ? Pretty sure someone had some bits on my bike forum recently
|
19th January 2016, 17:40
|
 |
Senior Member
|
|
Join Date: Feb 2012
Location: Wembley, London
Posts: 5,056
|
|
Swifty - OK, what I should have said was...
What ever combination of red, shiny & black parts you end up with, the car will still look amazing. 
Cheers, Paul. 
|
20th January 2016, 07:48
|
|
Senior Member
|
|
Join Date: Mar 2012
Posts: 745
|
|
just one thing swifty ...they would not have been black in period... i think that what make's a car look like an older car, then a kit trying to look old with modern colours and parts .......it all down to builder' but my view is try to make it as period as poss and for me just black wheels its a great looking car you should be proud.......
|
20th January 2016, 09:11
|
|
Senior Member
|
|
Join Date: Dec 2013
Posts: 839
|
|
Cheers Phil.
The period look is what i have tried to achieve and i do agree that the ally parts would look period if left bare sort of speak especially the screen base mount which i have copied from cars in the mid fifties but i would prefer to anodize all the ally parts that are on the outside to stop them looking scruffy but then again i supose that could be seen as patina which may go towards the illusion, decisions decisions.
I wonder if ally was anodised in the fifties.
Last edited by swifty; 20th January 2016 at 09:14..
|
20th January 2016, 11:20
|
|
Senior Member
|
|
Join Date: Mar 2012
Posts: 1,152
|
|
I think anodyzing was around from the 1920s but may not have been particularly widespread. Given what you have already achieved, have you thought of experimenting yourself -
http://media.rsc.org/Classic%20Chem%20Demos/CCD-17.pdf
I did it with some scooter parts many years ago and it worked. And, yes, you achieve the colour you require using Dylon! |
20th January 2016, 13:18
|
|
Senior Member
|
|
Join Date: Mar 2012
Posts: 745
|
|
Quote:
Originally Posted by swifty

Cheers Phil.
The period look is what i have tried to achieve and i do agree that the ally parts would look period if left bare sort of speak especially the screen base mount which i have copied from cars in the mid fifties but i would prefer to anodize all the ally parts that are on the outside to stop them looking scruffy but then again i supose that could be seen as patina which may go towards the illusion, decisions decisions.
I wonder if ally was anodised in the fifties.
|
what ever way you go ..its one of the best yet..... love it..... love to see it out with me barry and towed now that be a day .... |
20th January 2016, 19:26
|
|
Senior Member
|
|
Join Date: Dec 2013
Posts: 839
|
|
Quote:
I think anodyzing was around from the 1920s but may not have been particularly widespread. Given what you have already achieved, have you thought of experimenting yourself -
http://media.rsc.org/Classic%20Chem%20Demos/CCD-17.pdf
I did it with some scooter parts many years ago and it worked. And, yes, you achieve the colour you require using Dylon!
|
Oxford I did a little research some months ago on this subject which looks to be relatively easy but the problem i have is the length of the screen base which will require boiling in water for 30mins to seal it off and i don't have a pan big enough to do this, the smaller parts will not be a problem. The anodizing tank i thought could be made out of a plastic christmas wrapping paper storage box the type you see for sale in poundland etc.
I had thought that it would be simply a case of going to go to a local company but so far nobody is willing to tackle the job for what ever reasons.
Back to the drawing board on this one.
Quote:
|
what ever way you go ..its one of the best yet..... love it..... love to see it out with me barry and towed now that be a day ....
|
Phil Would love to be able to do that but i live many miles away from you three guys, but who knows if the car performs then i may trust it to do a long journey.
Last edited by swifty; 22nd January 2016 at 21:48..
|
22nd January 2016, 21:00
|
|
Senior Member
|
|
Join Date: Dec 2013
Posts: 839
|
|
I have been looking around for advice on setting up and tuning the suspension and come across this site http://auskellian.com/paul/links_fil...hancements.htm which offers easy to understand information along with good reference pictures. There's also a drawing for the rear leaf spring lowering block for anybody wanting to make their own along with links to other sites that offer after market none standard suspension parts.
IMG_6322.jpg IMG_6323.jpg
Recently made a selection of spacer rings 16mm/10mm/5mm thick which i am going to trial fit between the front suspension spring top cup and the chassis suspension arm, the reason is to try and lift the body slightly up to give more wheel clearance as the drivers side sits down slightly plus Ive read the spitfire suspension setup is better if the front is slightly higher than the rear, the different thicknesses is to find the one that works. Another area i need to check is the front ARB to make sure it's not twisted and causing the drivers side to sit lower, i have read that it's very unlikely that you find a ARB that is not slightly twisted and a solution is to fit adjustable ARB drop links to compensate, check this site out for what i mean http://www.wolfitt.com/wolfitt_produ...d%20conversion they look very easy to make, be sure the rod end bearings are adequate enough.
Well that's it for now see you soon and i will post pictures of the front suspension mods when complete.
Last edited by swifty; 22nd January 2016 at 21:24..
|
23rd January 2016, 17:55
|
|
Senior Member
|
|
Join Date: Dec 2013
Posts: 839
|
|
Today was a result, ive manage to lift the front end of the body by 20mm. First i dropped the drop link arms off the ARB to amke sure it was not twisted and all was well, i dd notice the top ball joint on each drop link arm was flexed to its max the steel cup was hard against the ball shaft, decide to make a couple of spacers to alleviate this problem which they did.
IMG_6324.jpg IMG_6327.jpg
First image shows the 7mm brass spacer and second shows the spacer in place. This simple fix allowed the car to sit slightly more level then before.
Next i removed both front shock units and fitted the ally spacers made earlier, i used the 12mm thick spacers so that when the car was dropped and moved about to settle the suspension the front was lifted by 20mm. The problem i had was with full lock applied with the car moving the tyres were rubbing slightly on the top of the fixed part of the front arch.
IMG_6328.jpg
Ally spacer fitted to the top of the suspension unit on top of the spring cup.
Tomorrow i hope to start fitting the dash, gearbox tunnel etc.
Well that's it for now see you all soon.

|
24th January 2016, 08:35
|
|
Senior Member
|
|
Join Date: May 2013
Posts: 2,161
|
|
Hey Swifty, ref spraying your car parts satin black.
When I finished my windscreen surround, I had all sorts of problems with it as I wanted it chromed, (like some of them are)
That was impossible to do as I found out, so in the end I simply sprayed it silver, with a rattle can. The effect was really good surprisingly.
The last time I drove it out for a day, someone asked me if the screen surround was made from alloy, which was a real compliment since it was just steel sprayed silver, so you may want to consider doing the same.
Like your suspension spacers! A good solution.
|
24th January 2016, 09:59
|
|
Senior Member
|
|
Join Date: Feb 2012
Location: Wembley, London
Posts: 5,056
|
|
Swifty - Glad you have got your front end sorted.
Looking forward to seeing your dash in place.
Good luck, Paul.
|
24th January 2016, 18:50
|
|
Senior Member
|
|
Join Date: Dec 2013
Posts: 839
|
|
Cheers Scottie i may end up doing that, there's one last local company to try before i give up on the anodizing.
A question regards seat belts, i am looking to fit a 4 point harness and have come across a 4 point harness made specifically for the caterham, has anybody used these or what alternative is there due to the short length required.
Also looking for a self adhesive number plate with silver border but so far not had any luck with a couple of online companies, any suggestions.
Last edited by swifty; 24th January 2016 at 18:55..
|
25th January 2016, 15:59
|
 |
Senior Member
|
|
Join Date: Nov 2013
Posts: 143
|
|
Quote:
Originally Posted by garyh
You have a lovely shaped scoop.
|
f'nar , f'nar... |
25th January 2016, 16:00
|
|
Senior Member
|
|
Join Date: Nov 2013
Posts: 143
|
|
cars looking great by the way - well done
|
27th January 2016, 18:44
|
|
Senior Member
|
|
Join Date: Dec 2013
Posts: 839
|
|
A long time back or at least it seems that way i fitted a type 9 gearbox to a straight six, i wanted a mechanical driven speedo fitted so due to the tight space between the type 9 gearbox and the fabricated tunnel side has meant ive had to use a 90 degree gearbox on the speedo output as you need about a 150mm radius bend in a speedo drive cable to prevent premature cable wear.
I did find an off the shelf speedo 90 degree gearbox but at £110 i thought was just to expensive so after a little further searching i came a cross a gearbox for a triumph stag and other triumph models of that era for £40 the only problem was the square drive shaft is 3.1mm AF while the type 9 is 2.6mm AF plus the mount is different so ive machined the square shaft down to 2.6mm AF and turned an adapter to suit the gearbox and type 9 speedo drive output.
IMG_6346.jpg
Adapter made from aluminum, the thread is a none standard thread of 26 tpi, 55 degree thread angle with a .996 pitch on a 17.9mm diameter which Ive not found listed in any data books.
IMG_6347.jpg
Speedo drive 90 degree gearbox with adapter.
IMG_6349.jpg
Adapter fitted to gearbox, this small gearbox is held in the type 9 with a circlip so hopefully this weekend i will have that tied up, just need to work out the speedo cable length and either buy one off the shelf or have one made by speedy cables.
Today had some good news regards the anodizing of the ally parts, a local company has said they can do the lot for £80 which is very reasonable for the quantity of parts.
IMG_6351.jpg
Parts to do minus the windscreen base support.
Well that's it for now see you all soon.
Last edited by swifty; 27th January 2016 at 19:15..
|
28th January 2016, 18:19
|
|
Senior Member
|
|
Join Date: Feb 2012
Location: Wembley, London
Posts: 5,056
|
|
Your speedo drive solution is some serious clever s***!
Sounds like a great result on the anodising place and your collect of machined parts reflects the high quality of your build.
Good luck, Paul. |
29th January 2016, 19:38
|
|
Senior Member
|
|
Join Date: Dec 2013
Posts: 839
|
|
Cheers Matey
The time is getting closer to sort out buying the seat belts, i had thought the 4 point race harness was the way to go but after a little bit of digging around i have found arguments for and against for general road use with no roll cage fitted. They say that the 4 point harness prevents any side movement if fitted correctly so prevents ducking if the car rolls where as an inertia 3 point belt allows the body to roll and duck but there again there is evidence that in a roll its not uncommon for 15 to 20 G's to be experienced which is impossible to fight against so you would have to go with the roll so the argument of a 3 point inertia being safer is doubtful.
A couple of points that are repeated time and again is the anchor mount points in relation to the occupant, one area that is a no no is the mount for the shoulder straps should never be on the floor, they should be either horizontal to the shoulder or no more than 45 degrees (10 degrees being the optimum) below with a short a distance as possible from the rear of the seat, i have seen mentioned no more that 200mm. Apparently if the belts are mounted on the floor with a frontal collision the force is transmitted down through the shoulder strap and directly down the spine which can result in un repairable spinal damage.
The seat belt mount situation is critical to the well being of anybody in the car. Out of interest what has anybody else fitted to these cars, 3 point inertia or 3-4 point harness.
fa.jpg index.jpe images.png
Images of correct mount positions.
It would be interesting to hear what others think on this issue and what they have experienced with day to day driving with a race harness fitted.
Well that's it for now see you all soon.
|
31st January 2016, 21:04
|
|
Senior Member
|
|
Join Date: Dec 2013
Posts: 839
|
|
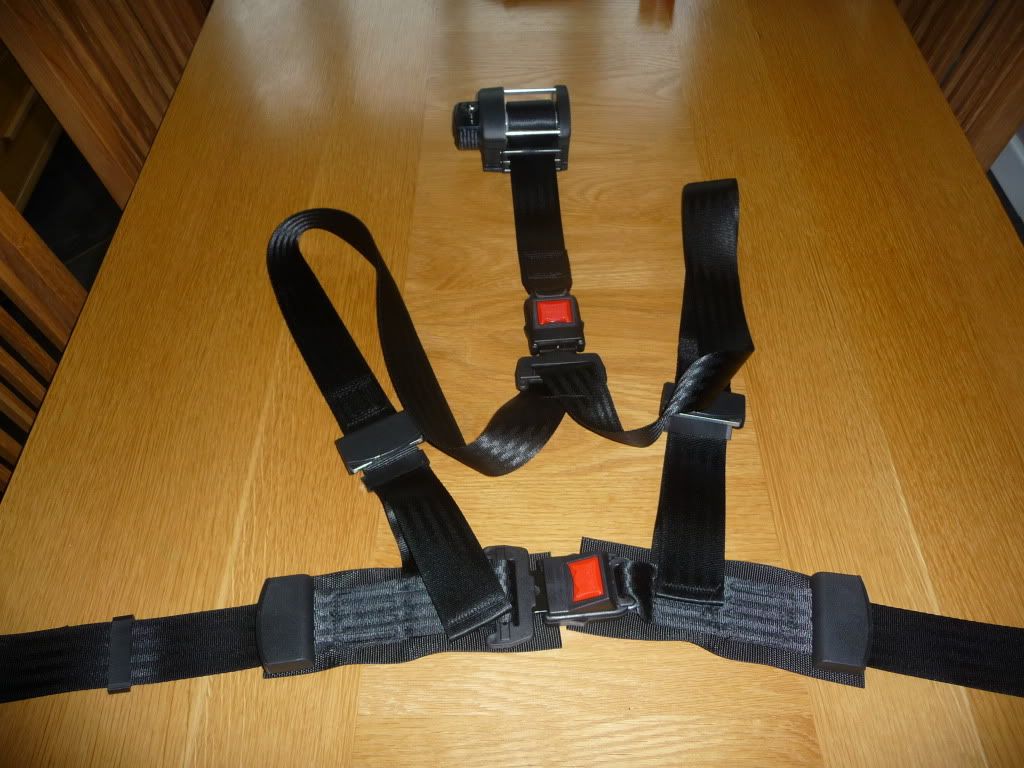
Today i trial fitted a 4 point harness i have lying around to see how comfortable it is and to be honest they are very restrictive for general moving around in the cockpit when pulled tight, you are basically strapped to the seat and can not even turn your head around to look over your shoulder. They do how ever look the part but i think they may be more of a hassle for the driver and certainly the passenger so i am now thinking of may be a 3 point harness as these i believe have a little more room for movement or even a standard inertia type belt that Mr T has fitted.
jaguar-XK150-FHC-drivers-seat-belt.jpg
Even may be one of these, a 3 point with inertia mechanism. This has the best of both worlds looks a bit like a race harness but with easy of use and comfort.
|
1st February 2016, 07:07
|
|
Senior Member
|
|
Join Date: Feb 2012
Location: Wembley, London
Posts: 5,056
|
|
Swifty - Psycho Pops fitted these belts to his Spyder.
Good luck, Paul.
|
|
Currently Active Users Viewing This Thread: 2 (0 members and 2 guests)
|
|
|
| Thread Tools |
|
|
| Display Modes |
 Linear Mode Linear Mode
|
 Posting Rules
|
You may not post new threads
You may not post replies
You may not post attachments
You may not edit your posts
HTML code is Off
|
|
|
All times are GMT +0. The time now is 23:41.
|


