|
|
| Tribute Automotive Builds Discuss your Tribute kit build |

18th May 2016, 18:02
|
 |
Senior Member
|
|
Join Date: Jun 2015
Location: MK
Posts: 435
|
|
Wow, you are certainly motoring on, you won't believe how quickly you can get it roadworthy. Thanks for the pictures as well, looks like you are dodging the rain showers. 
I am really interested in the gas struts as I need a good fix for that so would love to see it working when you have all of the lights, etc on it. Are you putting spots into the grill area, or bumpers? Also are they a like for like in terms of position and fitting?
Ha ha, I just read that you are covering something I haven't, there will be plenty of those for sure, my boot hinges are external and yes it took loads of time measuring before nervously drilling the right location 
Will be following the build closely as we can all still learn things, for sure.
All the best,
 |
18th May 2016, 21:56
|
 |
Senior Member
|
|
Join Date: Jan 2014
Location: Egham, Surrey
Posts: 1,780
|
|
Bonnet, front grill and front bumper sold £205, takes the car down to £570.
So far everything has bolted together perfectly, I haven't had to re drill a single hole.
The doors rub very slightly when opening, I need to remove some material from the rear of the bonnet and build it up on the front of the door.
It's been raining on and off all day so I would think I've spent 4 hours on it today.
So long as it doesn't rain tomorrow I'll have a go at the boot floor.
I intend to invert the impact bar making the top lower, this should make the boot floor much more level. I am then going to trim the back of the boot to make it look more like one boot rather than a sub divided boot. Not to bothered about the finish of the boot floor infill as it will be carpeted. I will try and add some strengtheners under the boot floor.
Last edited by Jaguartvr; 18th May 2016 at 22:01..
|
18th May 2016, 22:31
|
|
Senior Member
|
|
Join Date: Aug 2012
Posts: 2,142
|
|
Quote:
Originally Posted by oxford1360

The simplest solutions are the best. Top thinking.
|
We should put a team together for " Scrap Heap Challenge " !
Well done , top bodging ! |
19th May 2016, 05:42
|
 |
Senior Member
|
|
Join Date: Feb 2012
Location: Wembley, London
Posts: 5,056
|
|
Quote:
Originally Posted by Jaguartvr
… At last something that Eric hasn't covered! ...
|
Jag - Thanks for posting lots of detail in your build. 
As I am sure this is a big help to other builders who want to know what is involved.
Good luck, Paul.  |
19th May 2016, 07:35
|
|
Senior Member
|
|
Join Date: Jan 2014
Location: Egham, Surrey
Posts: 1,780
|
|
To anyone contemplating a build, go ahead it really is straight forward, the 250swbc is very easy as there is no bonding involved. Chris reckoned the Kobra was even easier and more straight forward. (He did say the new 275 would be very, very tricky to build and only for really expert builders) 
So far 4 hours to strip and 4 hours to build back up. This is about the amount of time that it took me replace the handbrake cable and get the handbrake working well enough to pass the MOT, sort of puts it into perspective.
Going to have a go at modifying the boot floor today.
Last edited by Jaguartvr; 23rd July 2017 at 19:32..
|
19th May 2016, 08:14
|
|
Senior Member
|
|
Join Date: Jan 2014
Location: Egham, Surrey
Posts: 1,780
|
|

Quote:
Originally Posted by ericholm
Wow, you are certainly motoring on, you won't believe how quickly you can get it roadworthy. Thanks for the pictures as well, looks like you are dodging the rain showers.
I am really interested in the gas struts as I need a good fix for that so would love to see it working when you have all of the lights, etc on it. Are you putting spots into the grill area, or bumpers? Also are they a like for like in terms of position and fitting?
Ha ha, I just read that you are covering something I haven't, there will be plenty of those for sure, my boot hinges are external and yes it took loads of time measuring before nervously drilling the right location
Will be following the build closely as we can all still learn things, for sure.
All the best,
|
The struts are a straight swap, the only difference is that the rod is 10mm rather than 8mm to take the extra pressure. The old struts will only just support the weight of the front end without the bonnet. With the bonnet and grill assembly in pace the new struts hold the front open easily, more than enough force left to allow for the spotlights. As I mentioned previously it also has enough lift that when pop the bonnet and release the bonnet catch the front rises with no effort. Before I was pulling hard on the bonnet and realise at the same time and was still struggling to get the bonnet open. No need to bother with Land Rover bonnet springs.
Another 10 minute job.

|
19th May 2016, 08:54
|
 |
Senior Member
|
|
Join Date: Apr 2016
Location: Camberley
Posts: 972
|
|
Quote:
Originally Posted by Jaguartvr
To anyone contemplating a build, go ahead it really is straight forward, the 250swbc is very easy as there is no bonding involved. Chris reckoned the Kobra was even easier and more straight forward. (He did say the new 275 would be very, very tricky to build and only for really expert builders)
So far 4 hours to strip and 4 hours to build back up. This is about the amount of time that it took me replace the handbrake cable and get the handbrake working well enough to pass the MOT, sort of puts it into prospective.
Going to have a go at modifying the boot floor today. |
Jag, thanks for posting your build, the information is really useful and reinforces the advise given previously, that this is do-able by a careful beginner. I know that there is still work to do, but 1 working day to get the old panels off and the new ones on and aligned is stunning wrt build process. How much more do you reckon it takes to get it driveable? Even if you double or triple the time for caution/inexperience, it is clearly not something that need take months on a part time basis.
For all kit builders, this is invaluable in making decisions about make/buy services, and the amount of discretionary spend available for the bling. I am very interested to see how the paint job progresses.
|
19th May 2016, 09:16
|
|
Senior Member
|
|
Join Date: Jan 2014
Location: Egham, Surrey
Posts: 1,780
|
|
Probably a day to wire the lights in, not a hard job but will take some time.
Door lock shouldn't take long but a small problem could add hours.
Fitting the standard boot floor shouldn't be more than an hour, with my modifications it could take a couple of days to allow for the extra GRP work.
My bonnet is fractionally wide at the point where it meats the sills. I certainly do not think it will need the 7mm cut. I think if you do do the 7mm cut it could well cause stress fractures or cracks in the outer skin. If I do resort to cutting a slot to massage the lower edge in I will do I think 3 separate slots to spread out any stress. I also think that just one large cut could also result in a feelable (if that makes sense) line in the outer panel. This would probably show after it was painted. The finish of the panels out of the moods is very,very good.
Apart from being given a hand mounting the bonnet, everything is down to just me which does make it a little harder.
Build it without any modifications, start on a Friday evening and there should be no reason why you shouldn't be taking a test drive on Sunday evening!
From placing the order it took six weeks to get the kit increasing with better weather coming and lots of positive articles about Tribute the waiting time I'm sure will increase.
It does give you time to order all the parts that you need. You can plan the wiring, what lights and door handles you will use. Having this all laid out on a bench (or scattered over the garage floor in my case) helps greatly with the build time.
Only major thing I haven't ordered is the fuel filler. I love the look of where Smash's fuel filler is positioned but couldn't live with the awful bend under the wing. I have a few ideas but need to get the boot floor nailed down first.
You're only down the road in Camberley so if you want a peek just let me know, but be warned, your wallet will be twitching on the way home!
|
19th May 2016, 09:52
|
|
Senior Member
|
|
Join Date: Apr 2016
Location: Camberley
Posts: 972
|
|
Will PM you
|
19th May 2016, 10:40
|
|
Senior Member
|
|
Join Date: Apr 2016
Location: Camberley
Posts: 972
|
|
Doesn't look like they are sending, are you getting anything from me? Off to work now until this evening. I'd love to come and see the fleet. I could arrange next week. Day or evening best? I can arrange my week to suit, otherwise mostly out west.
|
19th May 2016, 10:54
|
|
Senior Member
|
|
Join Date: Jan 2014
Location: Egham, Surrey
Posts: 1,780
|
|
Not getting anything
steve.turner9@googlemail.com
Normally around most of the time. |
19th May 2016, 11:10
|
|
Senior Member
|
|
Join Date: Apr 2016
Location: Camberley
Posts: 972
|
|
Quote:
Originally Posted by Jaguartvr
Probably a day to wire the lights in, not a hard job but will take some time.
Door lock shouldn't take long but a small problem could add hours.
Fitting the standard boot floor shouldn't be more than an hour, with my modifications it could take a couple of days to allow for the extra GRP work.
My bonnet is fractionally wide at the point where it meats the sills. I certainly do not think it will need the 7mm cut. I think if you do do the 7mm cut it could well cause stress fractures or cracks in the outer skin. If I do resort to cutting a slot to massage the lower edge in I will do I think 3 separate slots to spread out any stress. I also think that just one large cut could also result in a feelable (if that makes sense) line in the outer panel. This would probably show after it was painted. The finish of the panels out of the moods is very,very good.
Apart from being given a hand mounting the bonnet, everything is down to just me which does make it a little harder.
Build it without any modifications, start on a Friday evening and there should be no reason why you shouldn't be taking a test drive on Sunday evening!
From placing the order it took six weeks to get the kit increasing with better weather coming and lots of positive articles about Tribute the waiting time I'm sure will increase.
It does give you time to order all the parts that you need. You can plan the wiring, what lights and door handles you will use. Having this all laid out on a bench (or scattered over the garage floor in my case) helps greatly with the build time.
Only major thing I haven't ordered is the fuel filler. I love the look of where Smash's fuel filler is positioned but couldn't live with the awful bend under the wing. I have a few ideas but need to get the boot floor nailed down first.
You're only down the road in Camberley so if you want a peek just let me know, but be warned, your wallet will be twitching on the way home!
|
Scarily, I think I understand all that.
|
19th May 2016, 11:32
|
|
Senior Member
|
|
Join Date: Feb 2016
Posts: 272
|
|
Keep up the good work Jag. You are flying!!!
|
19th May 2016, 15:47
|
|
Senior Member
|
|
Join Date: Jan 2014
Location: Egham, Surrey
Posts: 1,780
|
|
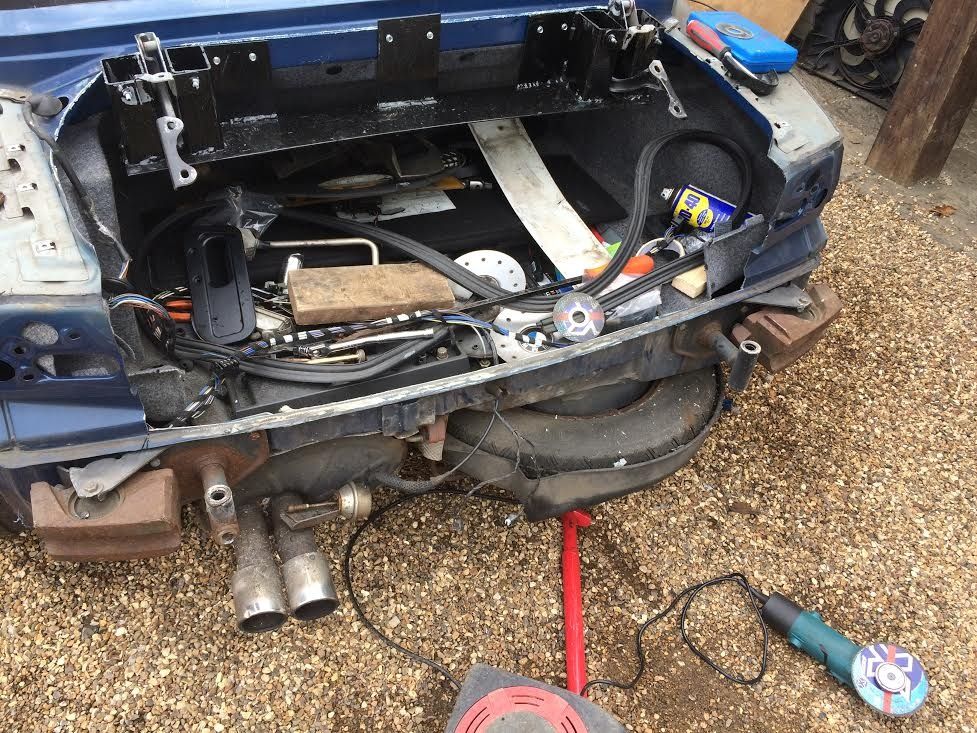
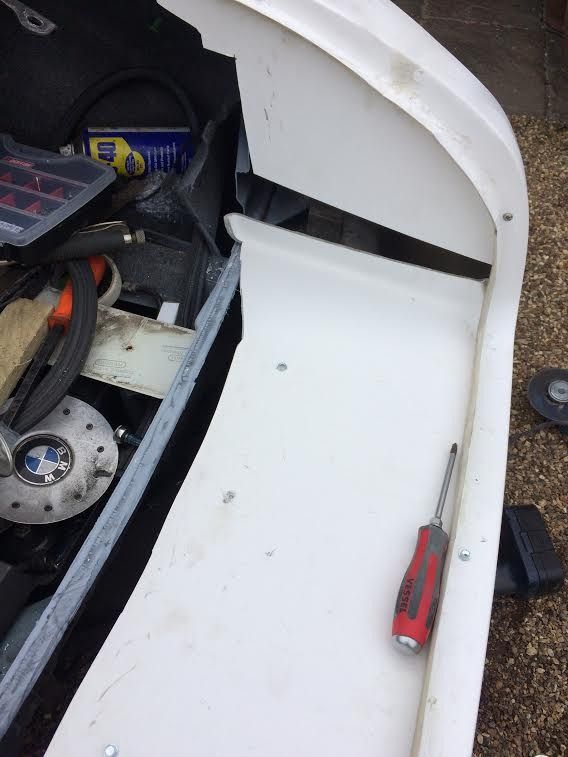
Boot floor
Spent about 3 hours on it today, doesn't look like much progress but a major modification made.
First was to modify the alloy crash bar at the rear. I worked out that if I turned it upside down I could probably get a flat boot floor. I got to use my favourite tools, a small hammer and a little heat 
Unfortunately it proved harder to bend than I thought so I cut a bit out. I needed to remove a section so that it would clear the spare wheel which I am keeping. 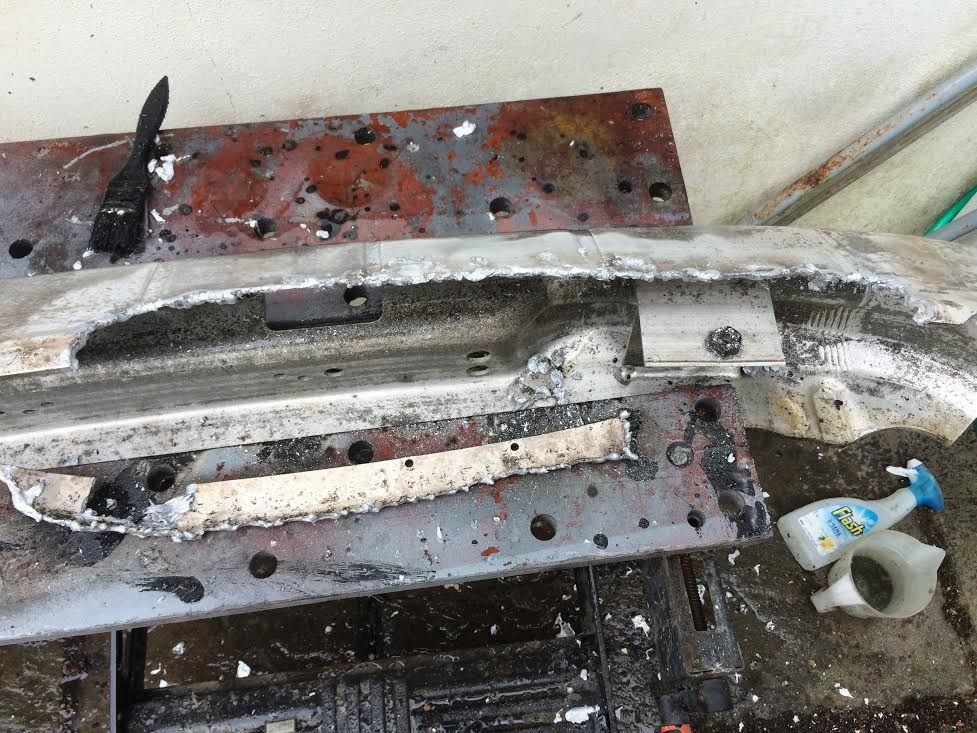
Needed to trim the towing eye to fit the crash bar back on. (just above the exhaust) 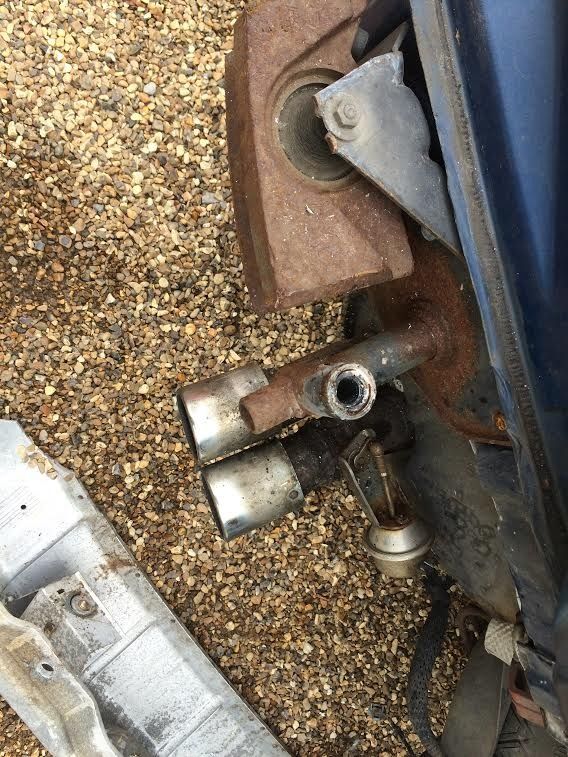
this leaves plenty of room for the spare wheel. I then trimmed the rear panel, the fold is just about level with the crash bar, I managed to take it out in 1 piece with an angle grinder using a 1mm cutting disc.
 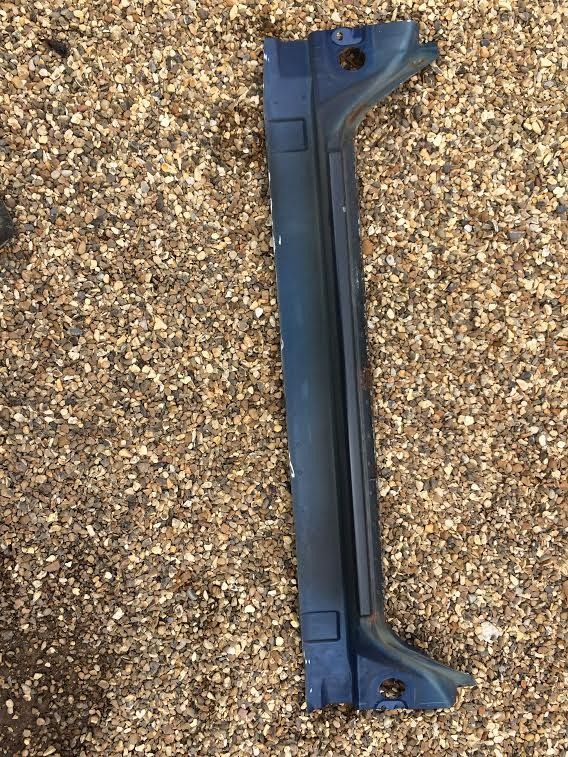 .
Then choped the original boot panel into 3, mounted the main piece directly to the crash bar and the 2 side pieces to the rear boot section with self tappers.
Covered the gaps with duct tape and laid some GRP on top. 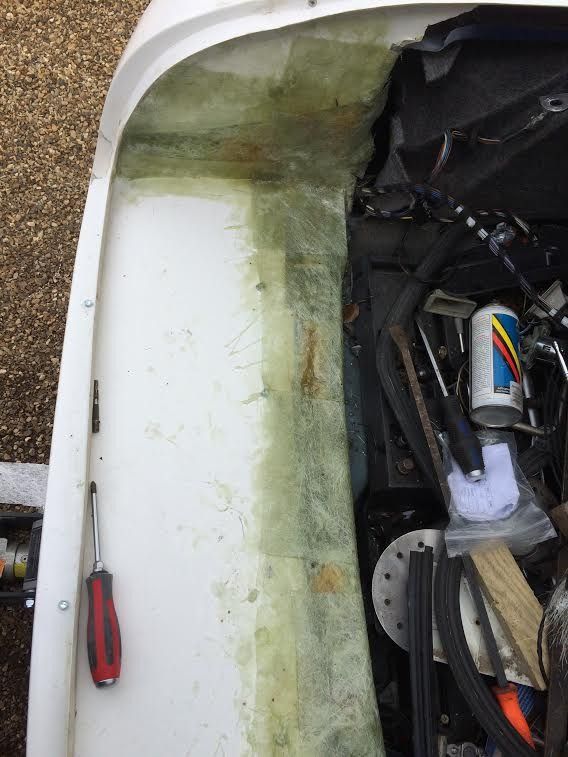
Still a couple of layers to put on. Not worried about the appearance, want it fixed on nice and strong. The boot floor is going to be carpeted so will hide any "bodgering".
It would be nice to have a trap door in either side to access the rear lights but little sidetracks like this take time and I don't want to get side tracked.
|
19th May 2016, 17:56
|
|
Senior Member
|
|
Join Date: Aug 2012
Posts: 2,142
|
|
Quote:
Originally Posted by Jaguartvr
Spent about 3 hours on it today, doesn't look like much progress but a major modification made.
First was to modify the alloy crash bar at the rear. I worked out that if I turned it upside down I could probably get a flat boot floor. I got to use my favourite tools, a small hammer and a little heat
Unfortunately it proved harder to bend than I thought so I cut a bit out. I needed to remove a section so that it would clear the spare wheel which I am keeping.
Needed to trim the towing eye to fit the crash bar back on. (just above the exhaust)
this leaves plenty of room for the spare wheel. I then trimmed the rear panel, the fold is just about level with the crash bar, I managed to take it out in 1 piece with an angle grinder using a 1mm cutting disc.
.
Then choped the original boot panel into 3, mounted the main piece directly to the crash bar and the 2 side pieces to the rear boot section with self tappers.
Covered the gaps with duct tape and laid some GRP on top.
Still a couple of layers to put on. Not worried about the appearance, want it fixed on nice and strong. The boot floor is going to be carpeted so will hide any "bodgering".
It would be nice to have a trap door in either side to access the rear lights but little sidetracks like this take time and I don't want to get side tracked. |
I noticed in the photo above your angle grinder . I know it makes it easier to use but I found out the hard way that if you remove the guard like you have, the thing can turn into the , "grinding wheel of death ".
I ended up in A&E , I'm alright now but I always use it with the guard and eye protection and gloves !!
|
19th May 2016, 18:08
|
|
Senior Member
|
|
Join Date: Jan 2014
Location: Egham, Surrey
Posts: 1,780
|
|
I do try and use the guard but I was using over size cut of discs from my chop saw
|
19th May 2016, 19:15
|
|
Senior Member
|
|
Join Date: Feb 2016
Posts: 272
|
|
You have oxy acetylene???? I am so jealous!!!! Why does everyone have such a bigger garage than me? I am getting so hacked off with the weather in Belfast at the moment - rain / cover on, sun / cover off, rain / cover on, annoyed, in the house, sulk!
Good progress Jag.
I won your BM lights by the way, looking forward to getting those in the post and putting them in the garage for 'come in handy in the future'!!!!!
|
19th May 2016, 19:18
|
|
Senior Member
|
|
Join Date: Jan 2014
Location: Egham, Surrey
Posts: 1,780
|
|
Trouble is that I have so much crap in the garage that I'm forced to work on the drive.
Your lights will go tomorrow Royal Mail. Thanks for the bid.
|
19th May 2016, 19:33
|
|
Senior Member
|
|
Join Date: Jun 2015
Posts: 1,401
|
|
oxy acetylene
Over on this side of the pond we call a "Mississippi Hotwrench".
|
19th May 2016, 19:43
|
|
Senior Member
|
|
Join Date: Feb 2016
Posts: 272
|
|
Quote:
Originally Posted by Jaguartvr
Trouble is that I have so much crap in the garage that I'm forced to work on the drive.
Your lights will go tomorrow Royal Mail. Thanks for the bid.
|
Justice!!!!!!!!!! Someone else working on the drive. I feel so much better already. The Mrs has actually said she has no problem with me extending our garage 'car port style'. Worth serious consideration!!!!!!!!  |
|
Currently Active Users Viewing This Thread: 1 (0 members and 1 guests)
|
|
|
 Posting Rules
|
You may not post new threads
You may not post replies
You may not post attachments
You may not edit your posts
HTML code is Off
|
|
|
All times are GMT +0. The time now is 07:15.
|


 Linear Mode

