|
|
| Marlin Sportster, Cabrio, Berlinetta and Roadster builds Enthused or Confused about your vintage Marlin build? Ask away here or show off your build. |

30th March 2015, 18:44
|
 |
Senior Member
Enthusiast
|
|
Join Date: Mar 2005
Posts: 3,077
|
|

Quote:
Originally Posted by 8 Valve Ed

My understanding is there is no way VOSA will pass a Berlinetta with the Cortina front cross member/subframe because it's not carrying the imposed loads in the way Ford intended, nor is it mounted as Ford intended. I am aware of a Berlinetta with welded in suspension mounts like the Cabrio which uses a form of Sierra suspension but are't there issues with using the cut down struts?
When I fist saw mine I thought it needed a strut across where the engine would have been, that isn't practicable because of the position of the nose cone but I have put a strut across the front extensions which carry the tie rods to help strengthen that area. Time will tell if that improves things.
There is no mention of a V5 or date of registration, if it is unregistered then it's grossly overpriced in my opinion, only worth the value of the parts, which while they may be new they are old hat.
|
Hi Robert,
I guessed you would have heard about the Berlinetta suspension issues. But Marlin do use cut down BMW front struts on the Sportster and they pass SVA/IVA without issue so that could be an option, if indeed necessary.
Buying an unregistered car would certainly be a huge risk and I wonder if the dealer selling that car is aware and just chancing his luck in finding someone unaware of the VOSA issue?
...peter

|
31st March 2015, 07:06
|
|
Senior Member
|
|
Join Date: Dec 2013
Location: Sunny Cumbria
Posts: 470
|
|
It was Terry's Berlinetta IVA fail which I was referring to...
http://www.marlinownersclub.com/foru...IVA-Test/page5
That brought home to me that no matter how good a build you create, if the fundamentals are wrong then it's doomed to failure. Also the essential of correct registration.
Anyway without being smug, mine has a correct V5 so THAT shouldn't prove a problem.
I am however having problems with the ignition... Unbelievably my simple, reliable, basic P5 points distributer is playing up. It starts perfectly and runs at low speed beautifully but stutters and isn't 'happy' being revved up. Also my Snap-On Tach-Dwell meter is erratic on the tachometer mode, the needle is leaping all over and no steady reading is possible. If I rev the engine the needle goes down to zero or leaps about even more. I have tried two rotor arms, two condensers , three coils and have cleaned the points several times. My next move is to try to get a new set of points.
In desperation I dug out all the parts to make up a 'proper' SD1 distributer last night (it is actually an SD1 engine), the insulation of the internals looks dreadful with cracked leads and peeling coatings but I thought it might just work. Once re-assembled and fitted, to my annoyance the engine burst into life at the first touch, ticked over perfectly and revved on demand as expected. Grrrr! Why do we not have a smilie for tearing hair out? I could make good use of one right now! LOL
The big downside is that the SD1 distributer does not seem to be tachometer friendly, the Snap-On Tach-Dwell doesn't seem to work with it and the P6 Jaeger RVC rev counter doesn't seem to work either. Until I resolve this I can't move forward much because my dashboard hinges around the use of these instruments.
I cannot for the life of me understand how/why the points don't work properly. The engine starts and runs beautifully, it just doesn't like revving and the tachometer is erratic.
Will try checking the LT leads and connections later. The points themselves appear to be OK, I can't see any signs of damage or faulty insulation.
|
31st March 2015, 16:30
|
 |
Senior Member
|
|
Join Date: Nov 2011
Location: Exeter
Posts: 187
|
|
If it's a points type distrubutor worth checking that the earth braid between the points terminal and the case is intact. Maybe it's broken and the earth is via other things that make enough good contact when slow tickover but poor contact when revving up due to vibration. Just a thought. Peter.
|
31st March 2015, 16:44
|
|
Senior Member
|
|
Join Date: Dec 2013
Location: Sunny Cumbria
Posts: 470
|
|
Thanks Peter, I checked that but it tests OK but as you say it could appear to be OK even if it isn't, it's riveted at one end. I am going to solder another fine strand connection over it just in case.
I have got a new set of points now, am in process of fitting them, then I will solder a new link wire in, I will switch dizzy's later this evening.
|
31st March 2015, 20:56
|
|
Senior Member
|
|
Join Date: Dec 2013
Location: Sunny Cumbria
Posts: 470
|
|
Wow! Another month gone by. Been a bit of a toil with the weather and one or two setbacks, the last three days have been spent chasing my tail, trying to get the engine running properly.
I fitted the new points but my Snap-On Tach-Dwell meter is still erratic. However, I was able finally to get the Rover rev counter to work in a stable manner. I now know it's a four cylinder rev counter.  In the morning I will have to get on to my friend who I got it from, to get another, a V8 one this time. I know he has at least two more V8 Tacho's so I will get one eventually. I thought the one he had given me was an 8 Cyl one. Would have been much easier if they were identified on the back or something.
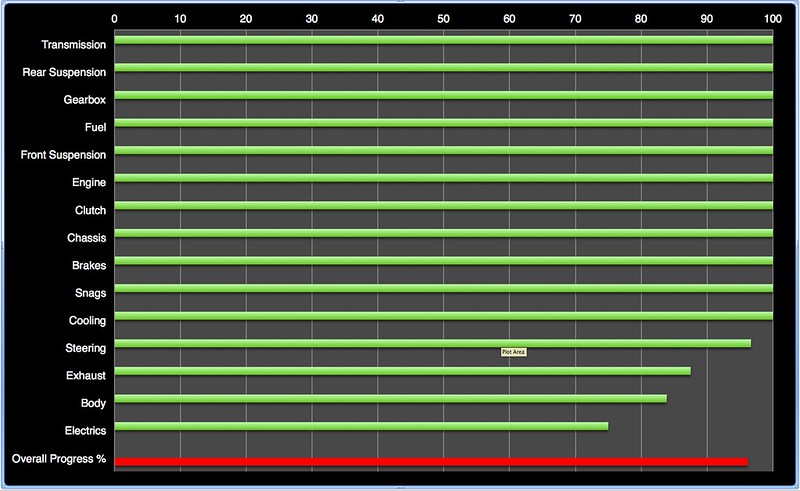
Here is the Bar Chart of my progress up to now. I am at 93.64% complete. I have sorted the items by most complete first, least complete last.
The electrics and body are the only significant aspects of the build left. The other lingering tasks are mostly simple things like track up and check the brakes for operation on the move which I can't do in the garage!!!

For comparison, here is the progress chart as of the end of February:

For comparison, the progress chart at the end of January:

And at the end of December:

Last edited by 8 Valve Ed; 31st March 2015 at 21:16..
Reason: Mistakes and a better chart image
|
31st March 2015, 22:27
|
|
Senior Member
|
|
Join Date: Nov 2011
Location: Exeter
Posts: 187
|
|
Well impressed with the bar charts!
What HT leads do you have? If carbon type ditch them! Just thinking I had a similar problem with a classic and spent months chasing fuel pump / filters / carb etc. With electronic ignition fitted, I recently eventually found that the output from that had burnt out the core of the (5 year old) carbon HT leads, just inside the dizzy cap entry holes so you couldn't see any evidence, but enough to give a misfire as soon as the revs increased! Worth a try? Peter.
|
1st April 2015, 08:56
|
|
Senior Member
|
|
Join Date: Dec 2013
Location: Sunny Cumbria
Posts: 470
|
|
Hi Peter, The progress chart is what keeps me motivated, chipping away at the various aspects of the build trying to progress them as much as possible. Also, I won't sign tasks off until they are truly finished, that helps.
Re. the Snap-On multimeter, it's an MT826, I hadn't allowed for the idiot factor... There are no instructions with it, I haven't used it since the late 80's so I had forgotten how to connect it... I was connecting it to the live side and the CB. In fact I should have been connecting it to the negative and the CB. 
Connected correctly the revs are now as steady as you would expect. I just need my mates timing light now to check the advance. I guess a set of new points were't amiss.
Have arranged to go up and swap the Rover rev counter tomorrow, so I have plenty to get on with now.  |
1st April 2015, 12:12
|
|
Senior Member
|
|
Join Date: Dec 2013
Location: Sunny Cumbria
Posts: 470
|
|
Doh! forgot to mention the leads...
The leads I had were a mishmash of junk, copper, black rubber and a couple of sillycone, I binned the lot and got a set of proper Land Rover ones from my local LR dealer, cheap! At least I should get a good grip using them.
The engine is running beautifully now and I can switch back to electronic if I choose, just by swapping the distributers.
I am entering the wiring phase, coloured spaghetti all over the garage floor. Christopher is sorting the wires into various main colours and Michael is re-constructing the rear fog and reversing lamps and making brackets for them.
A real hive of activity. The wind might have dropped a bit but it's still darned cold here. Will try to post some pix later, still trying to get my head into 'wiring gear'.  |
1st April 2015, 21:45
|
|
Senior Member
|
|
Join Date: Nov 2011
Location: Exeter
Posts: 187
|
|
Glad you got it sorted. I invested in a set of orange Magnecore leads for my Rover V8 3.9i Hunter. Quite pricey but still doing the job.
|
2nd April 2015, 20:27
|
|
Senior Member
|
|
Join Date: Dec 2013
Location: Sunny Cumbria
Posts: 470
|
|
No work done on the Marlin today. Been helping a neighbour out. I did get some heat shrink sleeving though, I was running low on that.
I find the heat shrink sleeving indispensable now. It's so good at insulating joints, terminating cables and a multitude of other wiring related jobs, so neat and efficient.
|
6th April 2015, 06:34
|
|
Senior Member
|
|
Join Date: Dec 2013
Location: Sunny Cumbria
Posts: 470
|
|
Hoping to get back to the Marlin today, I have been fitting a new clutch to my neighbours car, turned out the dual mass flywheel was knackered too, then the factors supplied the wrong release cylinder so I have had to modify the hydraulic connection. It's nearly back together so then I can resume my fun job! He needs the car for tonight...
Have still to decide how I am going to make the dash. I feel aluminium or stainless are the best options. For an open car wood isn't practical, I feel plastic would ruin the look of the car, leather wouldn't look right. I was planning to spot turn the surface but having looked at many spotted dashes I think it's a bit boring, just a repetitive pattern... Am looking to do something a bit more imaginative but what? that's the question...
I am wondering about etching some motorsport related scenes into the metal, either with an acid technique or perhaps sand blasting with a small nozzle? Perhaps even hand engraved...
I also have more ideas for the radiator grill now. The promised stainless strips haven't turned up yet so they may not materialise. I think I will go for 316 stainless mesh on the diagonal, with a polished mock stainless radiator surround, which lifts off, hack the current GRP nose cone and make the stainless mock radiator surround an easy 'lift off' affair, that would give me easy access to the radiator to top up etc.
Just thinking aloud I suppose... 
|
7th April 2015, 21:54
|
 |
Senior Member
Enthusiast
|
|
Join Date: Feb 2005
Location: Hampshire
Posts: 2,497
|
|
I sold my daily before it needed a new clutch (had 130k on the original still going strong). I'd read they needed the fly wheel changing too which makes for a bit of high parts bill!! New car has an auto so I don't need to worry about clutches (except with the sporstster!)
|
7th April 2015, 22:06
|
|
Senior Member
|
|
Join Date: Dec 2013
Location: Sunny Cumbria
Posts: 470
|
|
Quote:
Originally Posted by Patrick
I sold my daily before it needed a new clutch (had 130k on the original still going strong). I'd read they needed the fly wheel changing too which makes for a bit of high parts bill!! New car has an auto so I don't need to worry about clutches (except with the sporstster!)
|
Hi Patrick, very little change from £400 for the parts. I had never even seen a DMF before, rather a step learning curve! There was a lot of rotational slack but also the two components were not 'tight' in their axis either, one wobbled inside the other. When I compared the two the old one was obviously worn out.
On a much cheerier note I drove the Berlinetta today, I drove it out of the garage and up and down the back lane to my garage. The clutch feels very good, smooth and easy. wheelspin is easy to achieve... Although second gear seems a bit tall, not easy to judge in ten yards! |
12th April 2015, 13:53
|
|
Senior Member
|
|
Join Date: Dec 2013
Location: Sunny Cumbria
Posts: 470
|
|
Have rather lost momentum. Have tinkered and done a little wiring but I am pretty tired from doing the clutch repair, and my knees are playing up from all the kneeling it will take me a day or two to get back to normal (whatever that is!).
The build is currently at 96.2%:
I am going to turn out the register for the steering wheel tomorrow evening on my friends lathe. That should allow me to tick off the last task on the steering.
Then to finish the exhaust and the wiring, bolt some body panels on and it's finished!!! LOL Oh, and a couple of mirrors, some number plates, a VIN plate, find the two missing wheel nuts, fix the slow puncture on one tyre and a few other tasks not on my list no doubt!
New completion day: May Day!  |
14th April 2015, 06:03
|
 |
Senior Member
|
|
Join Date: Feb 2012
Location: Wembley, London
Posts: 5,056
|
|
8 Valve Ed - Glad to hear you are so close to the finish line. 
Given the huge number of hours you have put into this build, you have earned a bit of a rest.
At least you should still be finished in time to enjoy the summer.
Good luck, Paul. 
|
14th April 2015, 14:25
|
|
Senior Member
|
|
Join Date: Dec 2013
Location: Sunny Cumbria
Posts: 470
|
|
Thanks for the encouragement Paul, have started back this morning amid computer OS updates!
Spent the morning trying to get one of the horns to work, finally got it working but not reliable so I have dumped it. Will keep looking for another low horn, the high is fine, beeps every time. Must go the comp wants to re-start AGAIN!
|
14th April 2015, 20:54
|
|
Senior Member
|
|
Join Date: Dec 2013
Location: Sunny Cumbria
Posts: 470
|
|
While waiting for my computer upgrade downloads and installs to go through I have been head and chin scratching...
I got a quote for stainless mesh which almost knocked me off my chair. I had been promised some stainless folded bars to make the grill but they haven't materialised so I need to re-think. My second option was to use 316 mesh but because I want it 45º diamond pattern instead of horizontal/vertical squares, it's very wasteful of material. I need at least a two foot square, four square feet, the suppliers want to cut it across the roll, 4 ft wide. That make it very expensive.

However, I have a plan... I will make my own. The problem with that is I need to kink the rods at exactly the right intervals and exactly the same angle EVERY time, each alternate kink has to be at exactly 180º rotated from the previous kink. I have calculated I need to make (at least) 780 kinks. I have just figured how to do it with stuff I have lying about. May take me a couple of days but I have more time than money, so that's the way forward. I am intending using 2.4mm 316 TIG welding rods, I am making the apertures 12.6mm square. I make that a ratio of 69% gap to bar by area. I don't really want a bigger gap, I think I will get sufficient cooling air with that ratio, my grill is 400 mm wide and 450mm high.
My secret weapon is a very large nut and bolt... M30 by 100mm long, I will photograph the device when I have made it. It may be helpful to others. It's really very simple but it's taken me all day to work out how to do it easily, accurately and quickly.
# 5000
Last edited by 8 Valve Ed; 15th April 2015 at 08:30..
Reason: Re-wording for clarity and to correct a mistake.
|
15th April 2015, 22:58
|
|
Senior Member
|
|
Join Date: Dec 2013
Location: Sunny Cumbria
Posts: 470
|
|
Well, I have made the kinking tool. Not from my biggest bolt but from a smaller brother. I actually used a 20mm bolt and two nuts. It was easier than I expected but the indexing bar was a bit of a long winded job, 62 holes to mark out and drill, to mm accuracy, then I made 62 little pins from 2.5mm MMA welding rods and welded them into the holes. Snag... the indexing bar has bent with the heat distortion.
That's tomorrows job, straightening it up without damaging all the little indexing pegs or twisting it. I should have glued them in.
I will post some pix tomorrow, once I have straightened the indexing bar and tested it again. |
16th April 2015, 21:00
|
|
Senior Member
|
|
Join Date: Dec 2013
Location: Sunny Cumbria
Posts: 470
|
|
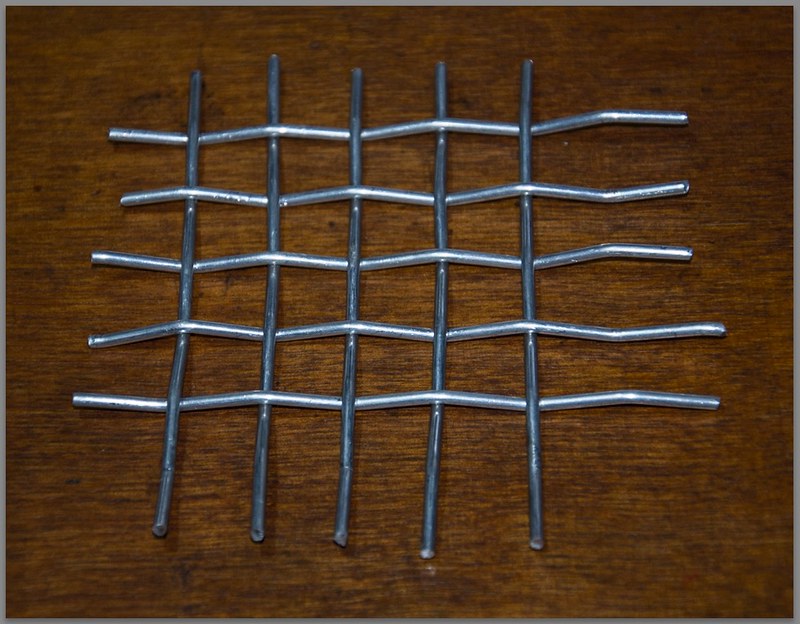
Just couldn't get in the groove today. Anyway I finished the rod kinker! I also tried it out on my sole surviving 2.4mm silicone aluminium welding rod. Just hope I don't need to weld any aluminium in a hurry.
Photographs as promised:
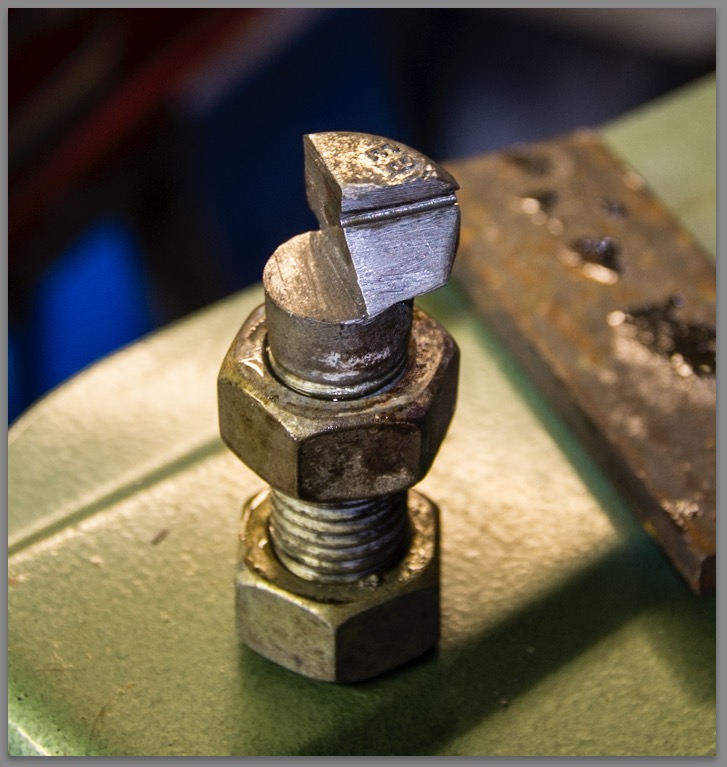
The basis of the kinker tool, is this this M20 bolt and two nuts, welded to a bit of angle iron about a metre long. I decided the M30 bolt would have been overkill, in fact the M20 was exactly right for size.

Some patience was called for to drill the 2.5mm hole through the bolt head, it wasn't exactly centred but it's near enough, it works!
Followed by 62 more 2.5mm holes drilled exactly on 16mm centres staggered alternately either side of the centre line of the angle iron.
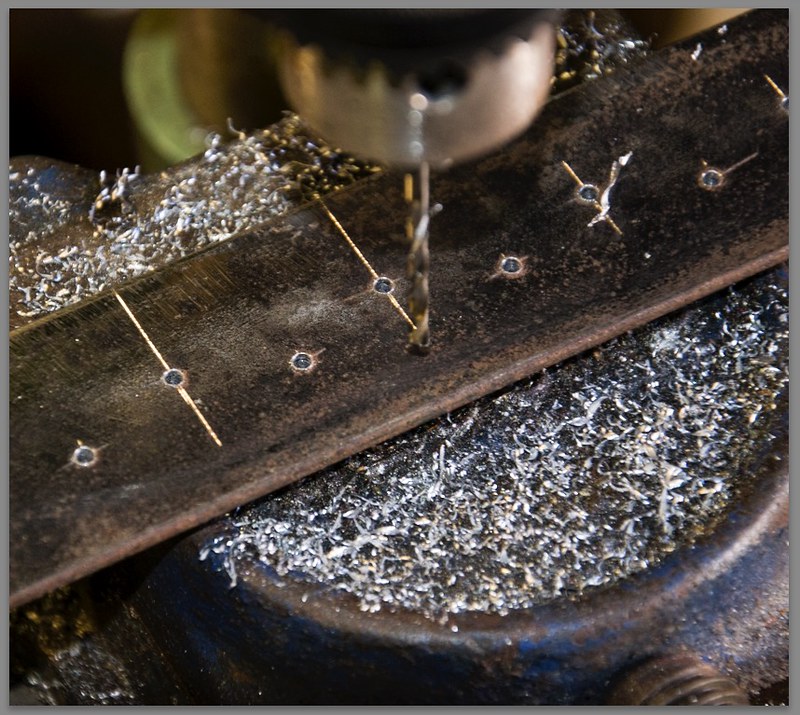
Into which I inserted and welded (doh! stupidly, should have glued them.) 62 little bits of 2.5mm MMA welding rod. The rod is rotated 180º for each kink and the leg at the end of the rod is hooked against the peg to index it's position.

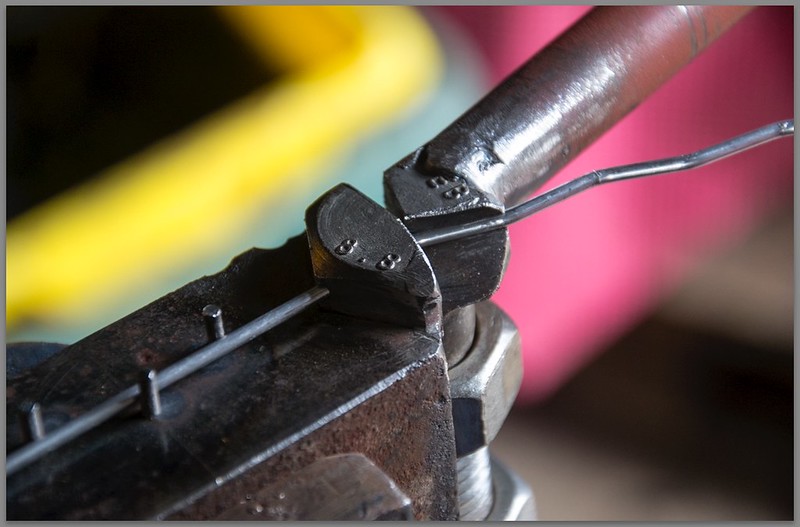
This is the result:
Made from aluminium 2.4mm rod, The proper thing will be made from 316 stainless.
This evening I bent my stainless exhaust, not as pretty as the mesh but it will have to do.
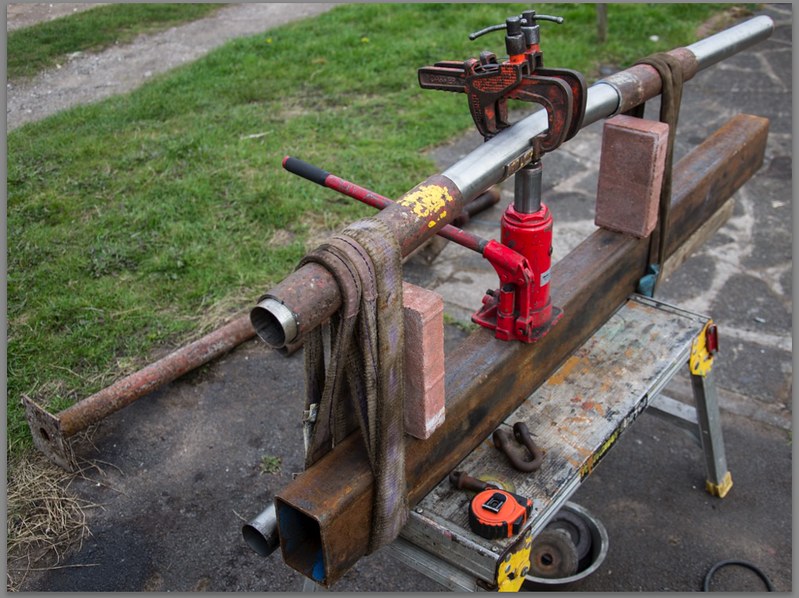
I actually bent it quite a bit more after I took the photo, it's kinked but I'm not that worried, if it proves to be a problem I will cut and weld it later. I just want to get these jobs out of the way.
|
17th April 2015, 20:20
|
|
Senior Member
|
|
Join Date: Apr 2014
Posts: 198
|
|
Kinky! Are you planning on a tiny weld on each kink overlap? Ed
|
|
Currently Active Users Viewing This Thread: 1 (0 members and 1 guests)
|
|
|
 Posting Rules
|
You may not post new threads
You may not post replies
You may not post attachments
You may not edit your posts
HTML code is Off
|
|
|
All times are GMT +0. The time now is 10:00.
|


 Linear Mode

