|
|
| Marlin Sportster, Cabrio, Berlinetta and Roadster builds Enthused or Confused about your vintage Marlin build? Ask away here or show off your build. |

14th June 2007, 07:22
|
 |
Senior Member
Enthusiast
|
|
Join Date: Feb 2005
Location: Hampshire
Posts: 2,497
|
|

First off the bonnet catches, a price item but look really nice and should go well with the rest of the bright work on the car. These are supposed to be SVA compliant, we shall see! (Got them from Marlin, better price the Europa)

Due to damaging one of the original brakes lines we had some new ones made, this time with a banjo connection for the calliper side. The problem with the original ones is that the cable comes out the top of the calliper and on full lock gets trapped between the wish bone and the front wing carrier. With the banjo its possible to angle the pipe so that there is no contact at any point in the movement of the wheels (there is a lock in place on the rack to reduce movement but experimenting showed that this is enough for slow speed manoeuvring)

Second bit of construction news, the air intake (which will be domed to create a low pressure area around the intake) now has a new much more flexible pipe than the one that came with the BMC making installation much easier:

Finally small bit of interior work. After fixing the sponge / piping for the doors we test fitted them - needs more work but getting there:


|
17th June 2007, 13:44
|
|
Senior Member
Enthusiast
|
|
Join Date: Feb 2005
Location: Hampshire
Posts: 2,497
|
|
 
After nearly a whole measuring the bonnet catches are now install. They really finish the car of nicely.

Spent a few hours day creating a centre console out of the scrap bits left from making the metal backing for the dash sponge / piping. Not sure if this will be the final piece or not yet!
|
18th June 2007, 21:16
|
 |
Senior Member
Enthusiast
|
|
Join Date: Mar 2005
Posts: 3,077
|
|
Well done. The bonnet fits perfectly now you've got those catches fitted.
Did you have to bend them or do they just pull into shape?
Peter
|
18th June 2007, 21:38
|
|
Senior Member
Enthusiast
|
|
Join Date: Feb 2005
Location: Hampshire
Posts: 2,497
|
|
Thanks 
They pull into shape quite well, I've still got to trim the edges of the bonnet a bit now the catches are on. They should sit even better then. Not 100% happy with the shape, but I think it will be fine for SVA. After that we can fine tune. They don't pull down quite as far as I would have liked but is pretty good. They should look great on dark paint |
19th June 2007, 20:28
|
|
Senior Member
Enthusiast
|
|
Join Date: Feb 2005
Location: Hampshire
Posts: 2,497
|
|

Another small step forwards - a hole cut in the dash for the glove box. The fuse box will sit in the back of here.
|
16th July 2007, 20:02
|
|
Senior Member
Enthusiast
|
|
Join Date: Feb 2005
Location: Hampshire
Posts: 2,497
|
|
Small amount of progress with the glove box:

 |
18th July 2007, 20:21
|
|
Senior Member
Enthusiast
|
|
Join Date: Feb 2005
Location: Hampshire
Posts: 2,497
|
|
I've been putting this one off for months, but today was finally the day that the floors went in!

Step 1 - measure out and drill 40 holes in one floor
Step 2 - drill 40 holes in the the floor of the other side.

Step 3 - drill 40 holes in the driver side
Step 4 - drill 40 holes in the passenger side after a trip to the DIY shop to get a new drill bit! Despite the extensive use of cutting compound the drill bits just get blunt after drilling 120 holes in hard steel!

Step 5 cover driver side with black goo from CBS and put 40 steel rivets in
Step 6 - repeat on the passenger side, then go and rest hands / arms...

And some more wiring, some more wiring added, the dash is now easy to remove if need by unplugging a few multi plugs.
 |
19th July 2007, 16:16
|
|
Senior Member
Enthusiast
|
|
Join Date: Feb 2005
Location: Hampshire
Posts: 2,497
|
|
After many hours of measuring, cutting, getting it wrong and making the holes bigger these steel square bars now fit! Only realising half way that the runners on the seat itself were not parallel! Problem solved though. Did the front holes first and then later the rear ones, which you can't get to very easily!

The steel bars will be drilled and bolted on the outsides through the chassis for extra strength.
Seat in the forward position
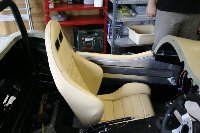
Seat all the way back
 |
20th July 2007, 15:45
|
|
Senior Member
Enthusiast
|
|
Join Date: Feb 2005
Location: Hampshire
Posts: 2,497
|
|
And then there was two! Driver side seat fitting, it was much easier second time through.

However the second seat needed to line up the same as the first seat, they are not 100% but it's very close.
 |
20th July 2007, 18:12
|
 |
Senior Member
Enthusiast
|
|
Join Date: Oct 2004
Location: Basildon, Essex
Posts: 1,800
|
|
Hi Patrick.
Mine are not the same both sides. The way I did the drivers was rest seat so other half was comfortable at the seat forward. Then try with the seat slid back to see if I was comfortable. |
20th July 2007, 18:27
|
|
Senior Member
Enthusiast
|
|
Join Date: Feb 2005
Location: Hampshire
Posts: 2,497
|
|
I did a lot of sitting in it playing with the steering wheel  
Main thing is its not overly noticeable from the outside |
22nd July 2007, 19:57
|
|
Senior Member
Enthusiast
|
|
Join Date: Feb 2005
Location: Hampshire
Posts: 2,497
|
|
Front bumper installation - just like the back the front does not fit so we made some spacers.

Spacer installed, with the spacer in the bumpers fit very snugly!

Headlights, spotlights and indicators mounted. The driver side is wired up.

Done a load of small things as well like zip tying cables in the engine bay, extra paint in the battery box to protect it, hole cut for brake fluid level sensor, lots of polishing on the headlights, spot lights and indicators. |
23rd July 2007, 22:33
|
|
Senior Member
Enthusiast
|
|
Join Date: Sep 2005
Posts: 354
|
|
bumpers
Hi Patrick,you build is looking superb. I noticed you put spacers for the bumpers;mine are a little wobbly when put in also,what did you use as a spacer?Cheers.
|
24th July 2007, 07:02
|
|
Senior Member
Enthusiast
|
|
Join Date: Feb 2005
Location: Hampshire
Posts: 2,497
|
|
They are 1mm ali - used a bodywork hammer to shape them round the bumper, it is painted beth sides but if they corrode it's not the end of the world as they'll stay in there pretty tight!
Closer to the back is a smaller spacer and then right at the front a bigger one. The mounting bolt hole is drilled a tapped right through the spacer |
24th July 2007, 13:39
|
 |
Member
Enthusiast
|
|
Join Date: Apr 2006
Posts: 61
|
|
Spacer are positioned as seen below...
 |
26th July 2007, 20:57
|
|
Senior Member
Enthusiast
|
|
Join Date: Mar 2005
Posts: 3,077
|
|
Quote:
Originally Posted by Patrick

Front bumper installation - just like the back the front does not fit so we made some spacers.
Spacer installed, with the spacer in the bumpers fit very snugly!
[. |
Patrick/Rich,
good idea with the ali spacers. My chassis tubes have weld seems inside which makes alignment more difficult. Marlin suggest you use masking tape and silicon sealant - very messy!
Getting to the fixing bolts at the rear with the body tub on is really difficult. I'm thinking of drilling some holes in the bodywork for a socket extension bar? Any other ideas?
Peter |
26th July 2007, 21:34
|
|
Senior Member
Enthusiast
|
|
Join Date: Feb 2005
Location: Hampshire
Posts: 2,497
|
|
I know what you mean they are PITA to get to at the back. What we did was weld a bolt to the top of chassis rail then you just need to stick a bolt in the bottom and do it up. Still not easy to get to with muffler in the way. A ratchet spanner with a bendy end is a useful tool to do those up.
We used insulating tape on the rear which was not overly successful so the plan is to do those with ali as well.
|
29th July 2007, 18:55
|
|
Senior Member
Enthusiast
|
|
Join Date: Feb 2005
Location: Hampshire
Posts: 2,497
|
|
All the lights are now working! Blew the 7.5amp fuses though. The current on the high beams + spots peaks at 11amps (possible spikes higher) so 15amp fuses are going in for those. We'll see how it behaves with those.

A smallish job we've been putting off for a long time. The 6 branch manifold gets quite close to the brake master cylinder and pipes so we've put in a shield to try and reduce the amount of heat around it. Keep brake fluid cooler can only be a good thing!

--------------------------
Big thanks to Mike at Car Audio Direct.com for sending this pack of Damplifer out so quickly so we could do this over the weekend! Sound deadening such as Damplifier or Dynamat is used in the car audio industry to reduce rattly panels. On the plus side this stuff will dampen vibrations through the floor as well as heat shield it.

3 sheets plus half a sheet of Dynamat we had left over from a bulk pack covers both floors, the lower half of the firewall and part of the side of the transmission tunnel. Which should be enough to protect our feet from heat.

Also added extra bolts to the seat runner brackets that go through the brackets, floor and chassis.
More dashboard work - installed the switches around the steering wheel - yes those holes on the right are in the wrong place! - oops Luckily the whole dash will be covered so its not and issue.

Bottom to top: Main light switch (from the E30), fog light, interior light, speedo LCD switch button.

The main light switch is the one from the donor E30. You can spin the button to change the brightness of the dash lighting.

Installation is made easy by using part of the E30 dashboard screwed to the back of the Sportster dash.
Glove box attached to the dash, had to chop a load off the scuttle so it would fit in nicely.

Finally the beginning of an initial template for the boot floor.

|
30th July 2007, 20:48
|
|
Senior Member
Enthusiast
|
|
Join Date: Feb 2005
Location: Hampshire
Posts: 2,497
|
|
Did a bit of measuring today on the seats. Using a block 116mm x 56mm high measuring in a straight line up to the harness holes (very roughly) seems higher than the 450mm required for the SVA test.
Based on the instructions that came with the harnesses installation should run from the back to the seats then down the sides without interruption so it will not need the bar between the turrets - the harnesses are already high enough to comply with the SVA regs.
Will do a more detailed measurement at some other point but I'm happy that it will be fine for SVA |
4th August 2007, 22:25
|
|
Senior Member
Enthusiast
|
|
Join Date: Feb 2005
Location: Hampshire
Posts: 2,497
|
|
|
|
Currently Active Users Viewing This Thread: 1 (0 members and 1 guests)
|
|
|
 Posting Rules
|
You may not post new threads
You may not post replies
You may not post attachments
You may not edit your posts
HTML code is Off
|
|
|
All times are GMT +0. The time now is 13:18.
|


 Linear Mode

