Are you madabout kit cars      
 "We've Got Kit Cars Covered" Information about Madabout-Kitcars.com Contact Madabout-Kitcars.com         Home of UK kit cars - madabout-kitcars.com Various kit car write ups All the latest kit car news Kit car related and general discussion

Search
Manufacturers
Kit Cars
Kit Car Data sheets
Picture Gallery
SVA Knowledgebase
Clubs & Communities
Build cost estimator
Kit cars for sale
Knowledge Base 
KitcarUSA.com
Classic-Kitcars.com
 

Go Back   Madabout Kitcars Forum > Mad Build Area > Sammio Builds and discussions

Sammio Builds and discussions Sammio bodied car builds and specials

Reply
 
Thread Tools Display Modes
  #581  
Old 22nd December 2015, 07:16
davecymru's Avatar
davecymru davecymru is offline
Senior Member
 
Join Date: May 2011
Location: Somerset
Posts: 1,671
davecymru is on a distinguished road
Default

Good to see others out-n-about

Have you got to the "should I fit a heater" stage yet?

I'm pondering it atm, but still not sure?
Reply With Quote
  #582  
Old 22nd December 2015, 15:43
Mister Towed's Avatar
Mister Towed Mister Towed is offline
Senior Member
 
Join Date: Jul 2011
Posts: 5,328
Mister Towed is on a distinguished road
Default

Dave, I've had a micro heater fitted to mine from 'new' -


Takes the edge off in cold weather, especially with the half tonneau fitted, also provides supplementary cooling when stuck in traffic in a heat wave.
Reply With Quote
  #583  
Old 23rd December 2015, 07:12
davecymru's Avatar
davecymru davecymru is offline
Senior Member
 
Join Date: May 2011
Location: Somerset
Posts: 1,671
davecymru is on a distinguished road
Default

ohh.... i like that!
I'm going to add that to my list of things to tinker with when SWMBO's s0dd1ng camper is finally done
Reply With Quote
  #584  
Old 28th December 2015, 14:09
Mister Towed's Avatar
Mister Towed Mister Towed is offline
Senior Member
 
Join Date: Jul 2011
Posts: 5,328
Mister Towed is on a distinguished road
Default

Iceni car club 'brass monkeys' run from Brandon to Wells-next-the-sea via Swaffham this morning.

Some fantastic American classics, resto-mods, rods, oddities and Q-cars, my guess would be well over a hundred made the journey, so here's a few pics -


A personal favourite, a Reliant Kitten running a Ford twin cam -


This was the queue for the chippy ten minutes after we got to Wells -


Not a bad view while tucking into a bag 'o' chips -


Dry weather and not too cold sealed the deal for me, a grand day out indeed!

Last edited by Mister Towed; 28th December 2015 at 14:12..
Reply With Quote
  #585  
Old 28th December 2015, 14:34
froggyman's Avatar
froggyman froggyman is offline
Senior Member
 
Join Date: Dec 2011
Location: Devon
Posts: 550
froggyman is on a distinguished road
Default

Looks like a good day out blessed with nice weather. Did you check out your future ride the Tribute 250SWB?
Reply With Quote
  #586  
Old 28th December 2015, 14:43
Mister Towed's Avatar
Mister Towed Mister Towed is offline
Senior Member
 
Join Date: Jul 2011
Posts: 5,328
Mister Towed is on a distinguished road
Default

Quote:
Originally Posted by froggyman View Post
Looks like a good day out blessed with nice weather. Did you check out your future ride the Tribute 250SWB?
Yep, had a nice chat with Bob (Hurnleft) and took some pics of his car -


Tribute really got the proportions right on the 250 SWB and I can't wait to get started on mine. Just over a year to wait now...
Reply With Quote
  #587  
Old 28th December 2015, 19:23
hurnleft's Avatar
hurnleft hurnleft is offline
Senior Member
 
Join Date: Nov 2014
Location: Norwich, Norfolk
Posts: 412
hurnleft is on a distinguished road
Default

What a great day out. As you say, must have been over 100 vehicles attending.
One of the best cars for me, as usual, was Pete's '36 Morris 14 with "Norfolk'N'Good" lettering done by my own fair hand using aerosol and marker pen after he left it in the workshop and said 'just put on whatever you like' He learn't nothing from that and left me to paint the front wheels. The other one has 'Old Git Racing'

Nice to have a chance to speak to Mr Toad himself and check out the 'Lancia'. A very nice car and another example of the variety of stuff there today,

Cheers, Bob.
Reply With Quote
  #588  
Old 30th December 2015, 07:30
Mister Towed's Avatar
Mister Towed Mister Towed is offline
Senior Member
 
Join Date: Jul 2011
Posts: 5,328
Mister Towed is on a distinguished road
Default

Found this video this morning, gives an idea of just how good the event was. Will definitely be putting it in my diary for next year.

https://www.youtube.com/watch?v=7TlAtCZavzE
Reply With Quote
  #589  
Old 31st December 2015, 06:42
phil9 phil9 is offline
Senior Member
 
Join Date: Mar 2012
Posts: 745
phil9 is on a distinguished road
Default

nice video... nice to see a sammio still out .....do the rest just sit in there garages..... would have come but just a few bits to do on engine it over fueling flooding ...just need to play with jets etc ...barrys building his new house so we be back ripping a round norfolk very soon hope you had a good xmas...... summer on the way see you for cuppa soon
Reply With Quote
  #590  
Old 31st December 2015, 06:59
Mister Towed's Avatar
Mister Towed Mister Towed is offline
Senior Member
 
Join Date: Jul 2011
Posts: 5,328
Mister Towed is on a distinguished road
Default

Cheers Phil, yep, had a good Christmas - I've been off since Christmas Eve and I don't go back to work until Monday. Will call you about dropping in for a cuppa over the weekend if you're around.

Shame those bike carbs aren't working straight out of the box, do you think the over fueling issue could be down to the less restrictive individual manifolds? After all, I'm led to believe that the boggo Triumph one doesn't flow very efficiently. Anyway, I hope it's just a case of trying a few different needles.

As for other Sammios out and about in winter, as well as my Spyder there were a couple of open top 'rods on the brass monkey run so there's really no excuse not to go out on a dry day, no matter how cold it might be. Heater helps though...

See you soon Phil.
Reply With Quote
  #591  
Old 1st January 2016, 16:00
Paul L's Avatar
Paul L Paul L is offline
Senior Member
 
Join Date: Feb 2012
Location: Wembley, London
Posts: 5,056
Paul L is on a distinguished road
Default

Mr T - Nice photos & video.
Reply With Quote
  #592  
Old 5th January 2016, 06:26
Mister Towed's Avatar
Mister Towed Mister Towed is offline
Senior Member
 
Join Date: Jul 2011
Posts: 5,328
Mister Towed is on a distinguished road
Default

Just been asked by pm about a suitable radiator.

After much R&D, and then finally taking Phil Jacklin's (old no.2) advice, I finally went with a copper cored rad from a company in Boston, and it really works.

This is the radiator that does the job -

http://www.ebay.co.uk/itm/RADIATOR-T...jsmbjwj59gmoGQ

Reply With Quote
  #593  
Old 14th April 2016, 19:32
Paul L's Avatar
Paul L Paul L is offline
Senior Member
 
Join Date: Feb 2012
Location: Wembley, London
Posts: 5,056
Paul L is on a distinguished road
Default

Mr T - Can I just ask a quick question about how you joined your body shell to the Moon Rover?

I know you added some fibreglass matting between the floor and the shell here…


Did this form the only barrier between the cockpit and the ground below?

If so, I take it that after all these years that this approach hasn't lead to any problems?

Cheers, Paul.

PS
Forgive the odd timing of this question, but I am just thinking about my plywood cockpit floor panels.


Perhaps all they need on the "ground facing" side is a layer of fibreglass for protection?
Reply With Quote
  #594  
Old 15th April 2016, 06:12
Mister Towed's Avatar
Mister Towed Mister Towed is offline
Senior Member
 
Join Date: Jul 2011
Posts: 5,328
Mister Towed is on a distinguished road
Default

Hi Paul, in line with the on line 'build manual' the gap between the edges of the floor and the inside of the body is just bridged with fibreglass as you say.

It doesn't have to look pretty if you're then going to box in the cockpit with 6mm ply side and rear bulkhead panels because you won't be able to see any of it. Fixing the floor to the sides and boxing in the cockpit results in an extremely strong structure that I can put my full weight on the edges of when getting in and out with no flexing of the body.

Although some builders have made some very pretty looking 'open' paneled cockpits with exposed tube frames I do wonder if the resulting structure is going to be strong enough, long term, to stand up to having a heavy driver put their weight on it.

Three years on the road and mine is still solid as a rock. I've got some cracks here and there on the body that formed within the first 500 miles or so, mostly where I used ordinary body filler instead of fibreglass reinforced filler to bridge gaps in the bonnet scoop, where the rear outriggers join the body, etc., and I'm planning to give those a bit of attention this spring when the weather warms up.

Hope that helps.
Reply With Quote
  #595  
Old 15th April 2016, 06:31
Paul L's Avatar
Paul L Paul L is offline
Senior Member
 
Join Date: Feb 2012
Location: Wembley, London
Posts: 5,056
Paul L is on a distinguished road
Default

Mr T - As always, a very helpful reply.

Prior to my build, I'd never used fibreglass or bonding paste before, so have no experience to go on.

So it is reassuring to hear that they do exactly what they say on the tin.

My cockpit panels will certainly hide all the joins, but will not provide as much strength as yours (as I have to cut them up to fit).

Which is one of the reasons I've added lots of extra joins along the sides of my body shell.
( Which is now feeling rock solid as well. )

Cheers, Paul.
Reply With Quote
  #596  
Old 5th May 2016, 19:44
Mister Towed's Avatar
Mister Towed Mister Towed is offline
Senior Member
 
Join Date: Jul 2011
Posts: 5,328
Mister Towed is on a distinguished road
Default

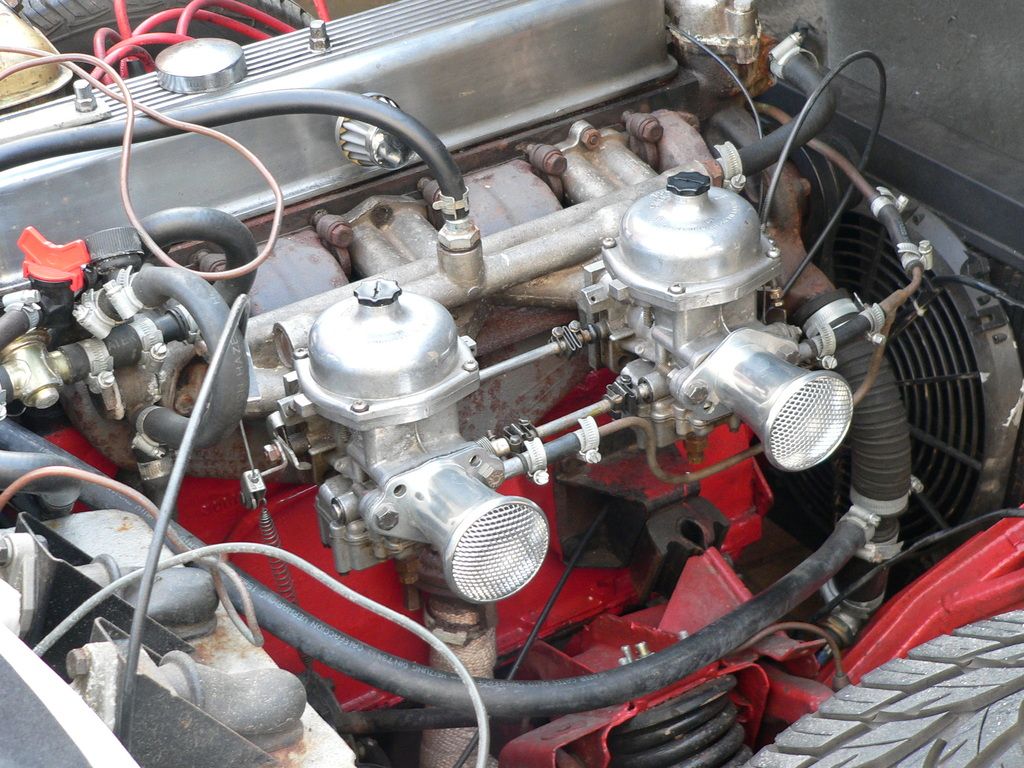
As you may recall, about a year ago I bought a pair of 1.75CD Strombergs with adaptors for my Vitesse motor for the princely sum of fifty quid on ebay. These were meant to replace my somewhat worn out 1.5's that were strangling the engine above 4,000rpm and give it a bit more oomph. The only slight fly in the Chateau Lafite was that I couldn't shut the bonnet with them fitted. So I took them off and put them to one side for a year to have a think about it.

About a fortnight ago though, I decided that my original 150's had to go. Fuel consumption had rocketed from about 28mpg to the high teens, the motor was struggling to start from cold despite all of the ignition components being in tip-top condition and the smell of fuel was all pervasive.

So, after about four hours spent replacing the rock hard rubber seals in the 1.75's, removing the old carbs and fitting up the new ones, to my delight (relief?), with just a bit of fettling needed on one sticky butterfly I had it running on the bigger carburettors. Which left me with the original problem of the bonnet not closing due to clearance problems on the front carb.

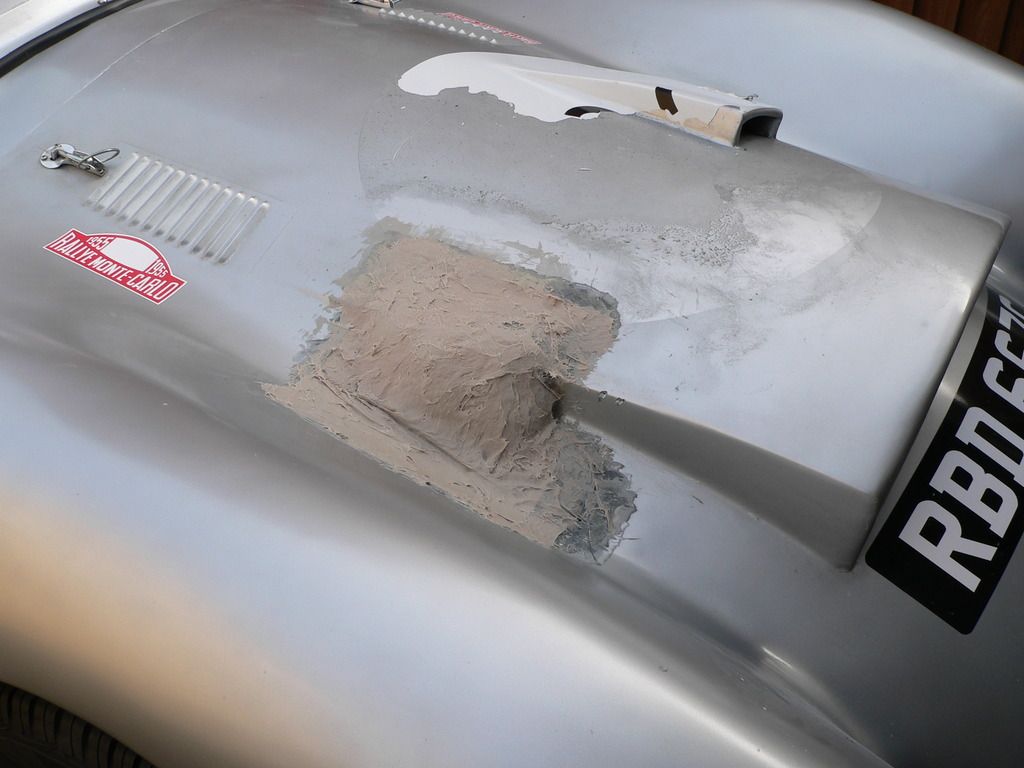
After a bit of measuring it was out with the angle grinder and cut a hole above the offending carb before a considerable amount of staring and beard scratching about what to do next. I felt a second bulge would look odd as it would've been too close to the first one, while another scoop would also look odd because it would have to be almost exactly parallel to the small one on the other side of the main one, which just wouldn't look right.

Eventually I settled on cutting out the existing bulge (which was entirely cosmetic anyway once I'd removed my methanol injection rig), fabricating a new one over the carb hole and reinstating the bit of bonnet I'd cut out for the original bulge.

I used the same technique as before - building a shape I liked out of stainless modelling mesh secured with screws around the hole then 'glassing over the top and inside the bonnet once the outside had gone off, before adding filler where necessary and sanding to a smooth, teardrop shape. Once the basic shape was set I was able to take it for a test drive and... What a difference! A lot more power, far more revs available and no more fuel smell. Phew.

And here are a couple of pictures, just bear in mind that the new bulge is still very much a 'work in progress' -


As I'm going to have to respray at least part of the bonnet I thought I might as well tackle a few other bodywork jobs that'll need a coat or two of paint over the next couple of weeks too. I've had the car on the road for almost three years now and I've used it a lot. Over that time I have had about four cracks appear in the body, almost all of which are actually my fault...

I'll take some pics when I start fixing them, but I have:

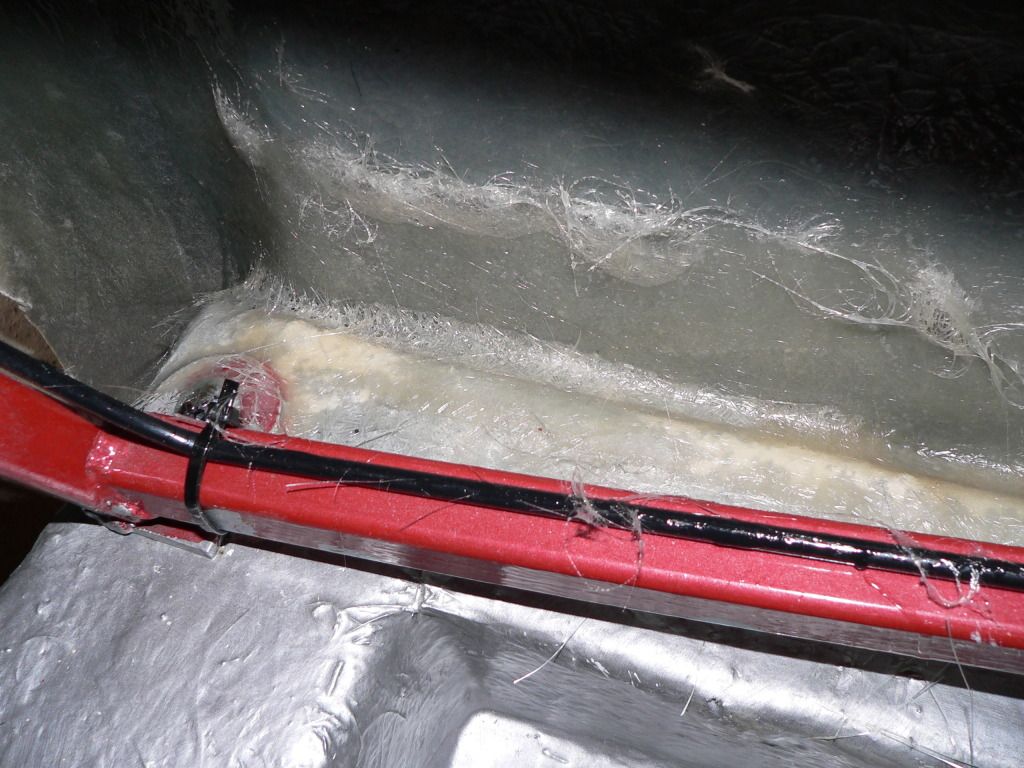
A crack at the back immediately below where the offside rear boot-rigger joins inside the body. That panel is a bit of a patchwork quilt as I cut far too much of the original body away while aligning the body on the chassis, then used ordinary body filler over stainless mesh to reinstate it where I should have used fibreglass and/or fibre reinforced filler. My bad.

A stress crack on the side of the same rear wing. Don't think that one's my fault, it's just one of them things you get with a fibreglass body sometimes.

A couple of stress cracks just ahead of the flyscreen directly above the servo I fitted. This is due to there being no support under that panel for about eight inches in the centre. The bonnet shuts onto that panel and I had put a sponge strip right the way across the underside of the bonnet, which put pressure on that unsupported panel when locked down and caused it to crack. I cut the matching section of sponge strip out of the centre of the bonnet and it's not under stress any more.

My main scoop has a number of hairline cracks under the roundel. Again, that scoop is a patchwork quilt made out of bits of the original bonnet and bits of the Sammio dash that I didn't use held together with fibreglass and body filler. I should've used fibre reinforced filler there too, of course.

I also have a 'spider' shaped crack under the front number plate where my radiator touched the inside of the bonnet for a while.

I've also decided to change my rear light setup too, just for good measure. I liked the lights I chose, but there's always been a slight niggle that the (slight) asymmetry in the design of the back end means that they look a little cock-eyed from some angles. More on that later...

So, I'll be doing a bit of repair and respray, which brings me to my final observation. There's been a bit of debate recently about how best to spray fibreglass panels. I'd never sprayed anything in my life before so I took advice from Mike (Miglia) about prep and gun spec, turned to Google and Youtube for some demonstrations, and finally spoke to Jawel (who supplied the silver cellulose paint).

Jawel's advice on how to make their paint stick was to degrease everything thoroughly then spray on a couple of coats of etch primer. Once that's dry and flatted back, follow up with two or three coats of high-build primer, flatting and degreasing between coats. Then gun on as many coats of colour as you like (I think I did about six), leaving it about twenty minutes between each coat. Having never sprayed before, the results I got were very pleasing to me indeed, in fact, the finish looks exactly like the paint you see on genuine 1950's race cars.

A few people have suggested that using the etch primer is either unnecessary or will lead to the paint flaking off. Well, I've had no paint flake off in three years and I've just given the surface finish the ultimate stiction test by trying to remove the roundel from the bonnet to get at and repair the hairline cracks mentioned above. I thought that it would be a case of lifting a corner and just peeling the roundel off in one piece. Wrong. The glue sticking it down is far stronger than the vinyl, which tends to just break off in fingernail sized bits.

With a great deal of care I was able to lift about a third of it off in one piece, but that alone took about an hour and then the whole decal snapped across just short of the secondary scoop, leaving me nothing to get hold of to start peeling again (I need speak to the people who fitted the roundels to see if there's a trick to removing them).

Now it's been a bit of a ball-ache trying to remove the roundel, but what I have done is put an enormous amount of upward strain on the paint surface on a panel with a number of cracks across it. Not one fleck of paint has lifted, and I guarantee it would have if it hadn't fully adhered to the surface of the body underneath (the rough surface and darker patch is the residual glue from the roundel, the shinier bit is where I've used thinners to remove the glue) -


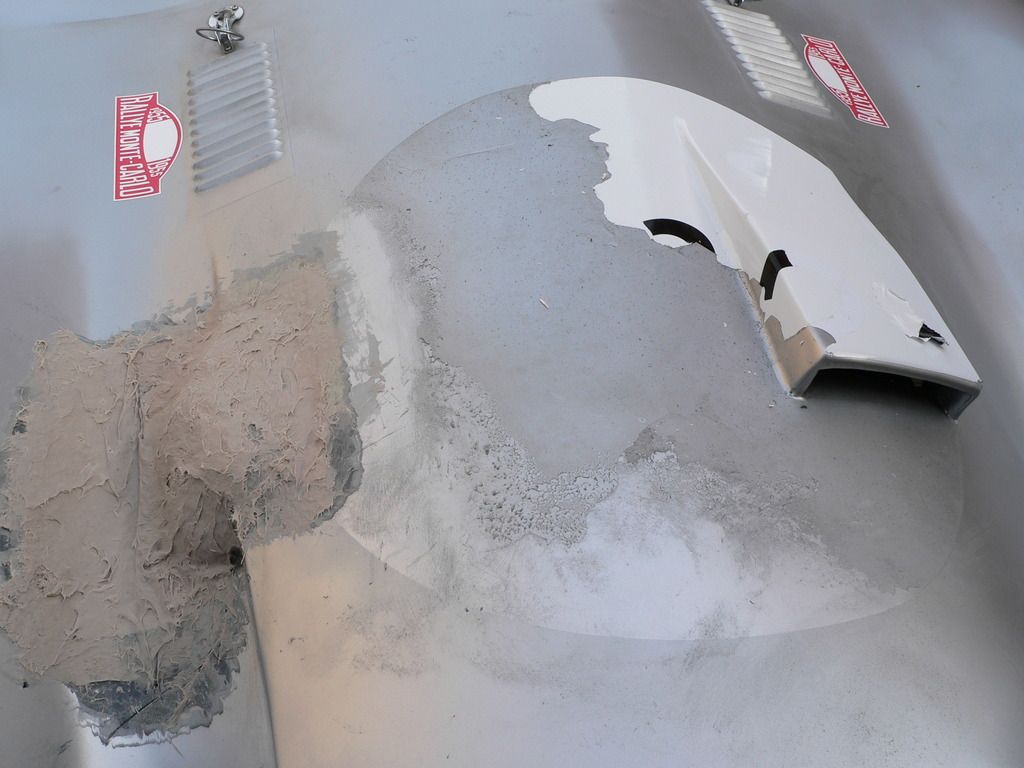
One thing I have noticed is that the paint under the roundel is a much brighter silver than what's been exposed to the air. Hmm, hoping I won't need to do a full respray now...

More later.

Last edited by Mister Towed; 5th May 2016 at 19:52..
Reply With Quote
  #597  
Old 5th May 2016, 22:36
Scottie22 Scottie22 is offline
Senior Member
 
Join Date: May 2013
Posts: 2,161
Scottie22 is on a distinguished road
Default

Well Mr T, you have been busy!

Ref the removal of your roundel, I have found from experience that when doing work of that nature it is very helpful to use a hot air gun.
This does mainly two things, firstly it softens the adhesive, and secondly, it makes the vinyl soft and elastic-like, making it rubbery and much easier to pull of in one piece.

Of course, care must be taken not to overdo it, especially where fibre-glass is concerned.

If I could offer any other advice, I would say that now may well be a good time to cut out your blanked off louvres, and make them functional while you've got the bonnet in bits.

Good luck with it, and go easy with the heat gun!


P.S. When using the heat gun, carry on heating the vinyl on the car as you pull it off with the other hand, sounds a bit odd but it works
better that way. It pulls of like rubbery skin!

Last edited by Scottie22; 5th May 2016 at 22:38..
Reply With Quote
  #598  
Old 5th May 2016, 23:10
ThatAmericanChap's Avatar
ThatAmericanChap ThatAmericanChap is offline
Member
 
Join Date: Apr 2016
Location: Under this %^$#ing Boxer.
Posts: 66
ThatAmericanChap is on a distinguished road
Default

Quote:
Originally Posted by Mister Towed View Post
I thought that it would be a case of lifting a corner and just peeling the roundel off in one piece. Wrong. The glue sticking it down is far stronger than the vinyl, which tends to just break off in fingernail sized bits.

With a great deal of care I was able to lift about a third of it off in one piece, but that alone took about an hour and then the whole decal snapped across just short of the secondary scoop, leaving me nothing to get hold of to start peeling again (I need speak to the people who fitted the roundels to see if there's a trick to removing them).

Now it's been a bit of a ball-ache trying to remove the roundel, but what I have done is put an enormous amount of upward strain on the paint surface on a panel with a number of cracks across it.

White gas - naphtha - which might well be your de-greasing agent - removes most modern adhesives, and has little effect on lacquer or acrylic enamel. "Working" it under the roundel a bit at a time will work. If the vinyl is sufficiently porous as to allow the naphtha to penetrate, a rag soaked in naphtha, laid over the area, will generally soften the decal and adhesive in short order, allowing its removal without the attendant testicular excruciation.

The usual caveats (doubtless unnecessary, as you're probably already using it as a de-greaser) apply: naphtha has a low flash point, but a relatively high auto-ignition point. Dispose of contaminated rags as usual - in an oily waste safety can; don't smoke in the area, nor use open flames, and keep your fire extinguisher at the ready, and should the worst happen and you're working in a double-bay garage, get your Wife's car out first. Remember - you can always build another car, but if your burn hers up, you will never, never, ever hear the end of it.

.
Reply With Quote
  #599  
Old 6th May 2016, 05:08
Paul L's Avatar
Paul L Paul L is offline
Senior Member
 
Join Date: Feb 2012
Location: Wembley, London
Posts: 5,056
Paul L is on a distinguished road
Default

Mister Towed - Glad to hear that the new carbs have given new life to your engine.

Also, it is great that you are prepared to highlight all your problem areas (like WCA "next door").

As this confirms I should drive my car in primer to allow time for my Frankenstein Hillbilly creation to "settle down".

I am sure your latest round of development work will look just as good as your previous efforts when you are finished.

Good luck, Paul.

Last edited by Paul L; 6th May 2016 at 05:08.. Reason: Yet another typo!
Reply With Quote
  #600  
Old 6th May 2016, 06:14
Mister Towed's Avatar
Mister Towed Mister Towed is offline
Senior Member
 
Join Date: Jul 2011
Posts: 5,328
Mister Towed is on a distinguished road
Default

Thanks for the advice and support guys, I'll hopefully find some time to get on with shaping the new bonnet bulge and stripping off the last of the roundel over the weekend.

As for the safety issues around using naphtha based products, how dangerous can it be? After all, it's not like it was used in Napalm...
Reply With Quote
Reply


Currently Active Users Viewing This Thread: 2 (0 members and 2 guests)
 

Posting Rules
You may not post new threads
You may not post replies
You may not post attachments
You may not edit your posts

BB code is On
Smilies are On
[IMG] code is On
HTML code is Off

Forum Jump


All times are GMT +0. The time now is 18:52.

copyright © madabout-kitcars.com 2000-2024
terms and conditions | privacy policy