Are you madabout kit cars      
 "We've Got Kit Cars Covered" Information about Madabout-Kitcars.com Contact Madabout-Kitcars.com         Home of UK kit cars - madabout-kitcars.com Various kit car write ups All the latest kit car news Kit car related and general discussion

Search
Manufacturers
Kit Cars
Kit Car Data sheets
Picture Gallery
SVA Knowledgebase
Clubs & Communities
Build cost estimator
Kit cars for sale
Knowledge Base 
KitcarUSA.com
Classic-Kitcars.com
 

Go Back   Madabout Kitcars Forum > Mad Build Area > Marlin 5exi builds

Marlin 5exi builds Calling all you sexi builders....sorry 5exi builders, show us your progress.

Reply
 
Thread Tools Display Modes
  #1  
Old 23rd June 2008, 08:12
eaa53's Avatar
eaa53 eaa53 is offline
Senior Member
Enthusiast
 
Join Date: Nov 2007
Location: Somerset
Posts: 232
eaa53 is on a distinguished road
Default VVC and PG1 mounting

I thought I would mock up the engine and g/box installation just to make sure that it would be okay when I came round to do it for real.

With the PG1 G/b and the 1.8 VVC engine the mountings are not straight forward as I would have hoped.

I have checked some of the threads in this forum to see if a VVC install was detailed but it is only touched on.

The problem I have encountered, using the donor car, top mounts for engine/g/box is that the oil pressure switch on the oil filter is frighteningly close to the forward suspension mount, in addition the g/box mount is clearly too low by about 35-50mm causing the engine to hang at a sloppy angle.

The adjustment I have on the cam belt end mounting position I think will allow me to get the oil switch away just enough from the chassis, but the g/box mount will have to be modified significantly to gain the correct height.

I would be interested in any completed VVC install detail.

The MG-T gearchange mech. and cables are a quantum leap better then the proposed solution by the way. I will detail the mods and the installation once I have it in a fit working state. There is quite a bit of work to do to make the stick mechanism fit the space with the pipes and everything but if Limpabit made it work I am sure I can too.

I was able to pick up a complete end to end for £55 which I thought was a good investment.


eaa53
Reply With Quote
Available from eBay
  #2  
Old 23rd June 2008, 11:10
MikeR MikeR is offline
Senior Member
Enthusiast
 
Join Date: Dec 2006
Location: Wootton Bassett
Posts: 108
MikeR is on a distinguished road
Default

Hi,
I think you should have a couple of spacers to lift the g.box mount to the required height included in the kit.

Mike
Reply With Quote
  #3  
Old 23rd June 2008, 13:42
limpabit's Avatar
limpabit limpabit is offline
Senior Member
Enthusiast
 
Join Date: Oct 2004
Location: Basildon, Essex
Posts: 1,800
limpabit is on a distinguished road
Default

Hi John.

Can't comment on the VVC engine mount. But I know for the T series, Marlin changed the gearbox and engine mount.

This is the new Marlin PG1 gearbox mount.


I also got supplied a stabiliser bar. But no bracket on the rear bulkhead lower chassis member to bolt it. I got Marlin to weld it on while it was there getting the body fitted.


That was good good price for the MG bits. The gear stick part is a bit of a head scratcher. And I'm lucky I had someone like merlin man there. Another head to scratch and weld!
Reply With Quote
  #4  
Old 23rd June 2008, 14:53
SDMC001's Avatar
SDMC001 SDMC001 is offline
Senior Member
Enthusiast
 
Join Date: Feb 2006
Posts: 351
SDMC001 is on a distinguished road
Default

When John Watson built the car for Which Kit he had the same issue useing the VVC, and after reading the magazine agian he said "With the ngine in position it was found that the oil filter was fouling the suspension mounting bracket on the right hand side. this problem was solved by swinging the bottom of the engine rearwards slightly, and suiably modifieing the the engine tie bar to hold it in this position". I found on mine the 1600 K with R65 box I still needed the engine quite slanted to avoind the oil prossure switch hitting the chasis.

Steve
Reply With Quote
  #5  
Old 23rd June 2008, 16:08
alackofspeed's Avatar
alackofspeed alackofspeed is offline
Senior Member
Enthusiast
 
Join Date: Jul 2005
Location: Dorset
Posts: 1,180
alackofspeed is on a distinguished road
Default

Quote:
Originally Posted by limpabit View Post

This is the new Marlin PG1 gearbox mount.

EEEK! Is that a standard suspension arm bush? That poor thing must be seeing more than it's fair share of torque, unless the engine's rotation is capped by a seriously rigid rotation limiting tether elsewhere. A similar design component was shipped with the Type-R kit, and I ditched it for fear of it being too stiff and being loaded inappropriately.

I had a discussion with Mark to this effect, and he didn't agree. Ultimately I remade mine, and have limited the rotation via a proper torque link.

Having canvassed the opinion of seasoned individuals subsequently, every one has cringed at the original design.
Reply With Quote
  #6  
Old 23rd June 2008, 17:09
limpabit's Avatar
limpabit limpabit is offline
Senior Member
Enthusiast
 
Join Date: Oct 2004
Location: Basildon, Essex
Posts: 1,800
limpabit is on a distinguished road
Default

That long dog bone part is holding the gearbox rigid against the lower chassis rail on the rear firewall. The problem is, the chassis does not have the bracket welded to the chassis to bolt to.

Gearbox bearings will probablty pop before the bush if torque is anything to go by!

Oh. And this is what happened to the gearbox casing after the accident. Where the bolts go through. even though the car got hit on the other side. Not sure if there was already a hairline crack already in the casing before.

Reply With Quote
  #7  
Old 23rd June 2008, 18:52
eaa53's Avatar
eaa53 eaa53 is offline
Senior Member
Enthusiast
 
Join Date: Nov 2007
Location: Somerset
Posts: 232
eaa53 is on a distinguished road
Default

The obvious is always the one you miss..
Thanks Mike that's what I needed, someone to tell me to look at what was supplied! Doh!

I have the R65 mounting kit, but in that kit where is a set of spacers, just what I need!

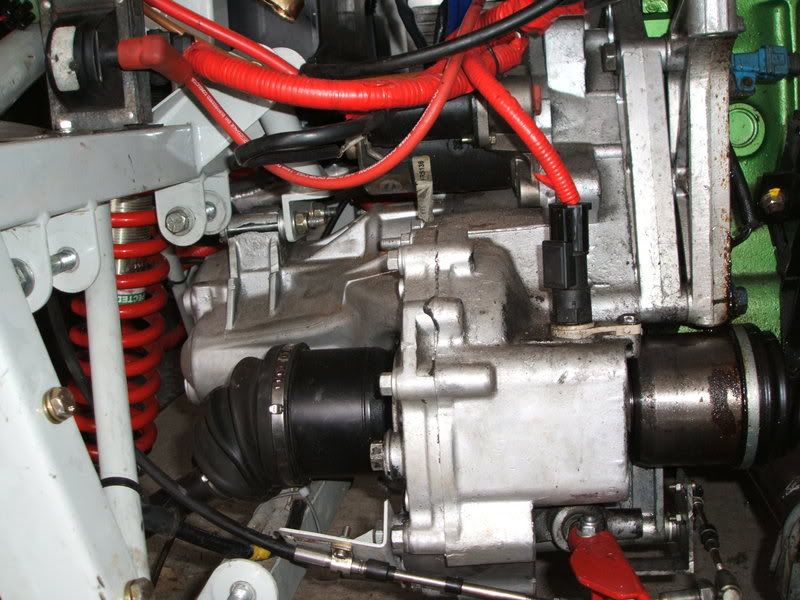
You can see that the original 200 g/box mounted bracket and the MGF dohnut top mount combine with the spacers to produce the desired effect.
The smart eyed will spot the MGF clutch hydraulic slave mounted on the MGF bracket in the background. (I got the shaft as well to convert my box to hydraulic operation). The MGF set up makes it all so easy.

http://img.auctiva.com/imgdata/7/9/7...45836020_o.jpg


http://img.auctiva.com/imgdata/7/9/7...45835660_o.jpg


http://img.auctiva.com/imgdata/7/9/7...45836155_o.jpg


With luck the problems John had, of the top casing cracking off are reduced by retaining the wrap round original bracket. Tough luck that one, ruined a perfectly good box I bet!
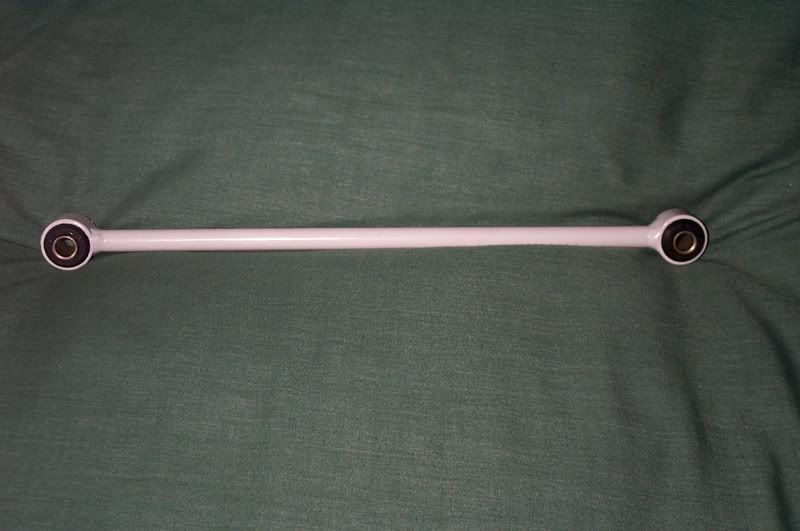


The Strut
I was never going to fit the ridged strut provided but because I have the a replacement rear frame I have something to bolt too. I believe the newest chassis provided to DavidH have a similar frame welded in now.

I have taken the original 200 engine strut, and bolted it back to the 200 top gearbox mounting (after cutting off its ears), it is remarkably similar in dimension to the subframe mounted piece on the 200 where it was originally attached. The picture is it mocked up into place, it need cleaning and some minor adjustment but its 99% there with little effort.

Into the bargain it pulls the bottom of the gearbox back about 2 inches and this then clears the oil filter and switch off the chassis and straightens the drive shafts a little as well, stunning! you could almost believe it was designed to fit!


Engine Stabilising bar
http://img.auctiva.com/imgdata/7/9/7...45835505_o.jpg


http://img.auctiva.com/imgdata/7/9/7...45835773_o.jpg


http://img.auctiva.com/imgdata/7/9/7...45835920_o.jpg


Must cut the grass, some time. Although the feet and the oil do keep it down. If it rains a lot I will have to de-camp into the garage, I need some sun cream too.


I will start a new thread for the MGF gear change mock up pictures shortly, but its coming together nicely as well..

Last edited by eaa53; 25th June 2008 at 08:01.. Reason: Re-made picture link and spelling
Reply With Quote
  #8  
Old 23rd June 2008, 20:46
alackofspeed's Avatar
alackofspeed alackofspeed is offline
Senior Member
Enthusiast
 
Join Date: Jul 2005
Location: Dorset
Posts: 1,180
alackofspeed is on a distinguished road
Default

Quote:
Originally Posted by limpabit View Post

John, that's why, in my opinion the mounting should not be so rigid. The gearbox / mount are not designed to contain the engine's desire to rotate under load. In my opinion, when the engine / gearbox is supported by the right and left mounts, the engine should swing freely as if it were suspended in a hammock. The desire to rotate should then be controlled with a suitable mount(s), using the OEM interface on the block / gearbox. These again should not be too rigid (like the dire double ball joint I've seen used on the R45 installations), as the transient forces won't do the chassis / gearbox / block any good.

As a slight aside, did anyone see Top Gear last night, and observe the movement of the 430 Scuderia's engine under load?

John (eaa53) did you look at my car on Friday?
Reply With Quote
  #9  
Old 23rd June 2008, 21:20
craig's Avatar
craig craig is offline
Senior Member
Enthusiast
 
Join Date: Nov 2005
Location: Tyne and wear
Posts: 784
craig is on a distinguished road
Default

Quote:
Originally Posted by alackofspeed View Post

As a slight aside, did anyone see Top Gear last night, and observe the movement of the 430 Scuderia's engine under load?

John
Yes I noticed the movement esp when changing gear! moved almost as much as mine does
Reply With Quote
Reply


Currently Active Users Viewing This Thread: 1 (0 members and 1 guests)
 

Posting Rules
You may not post new threads
You may not post replies
You may not post attachments
You may not edit your posts

BB code is On
Smilies are On
[IMG] code is On
HTML code is Off

Forum Jump


All times are GMT +0. The time now is 16:42.

copyright © madabout-kitcars.com 2000-2024
terms and conditions | privacy policy