This is a read-only archive of the old Madabout Kitcars forum. New posts and replies are no longer possible, but every thread is still here to browse and read.
I thought I'd start fitting the doors last night, in preperation for fitting the rear tub (I'm following Peter's wisdom, garnered from Simon).
I've used some 3mm board to give me the gap between the bottom of the door and the chassis rail, and butted the hinges into the mounting holes as far as they go - but they rear or the door (just) hits the verticle flange of sheet steel that rises up from the chassis at that point (the bit that the stricker plate is to be mounted to)
Having looked at Peter & Robin's pics, I can see that you've trimmed that plate back - how did you do this? I don't fancy taking an angle grinder to it on the off chance I slip and gouge the chassis.
Also, the hinges - they dont sit flat on the upright they bolt to in the chassis. The 'barrel' of the hinge makes it sit up along one side. Do I need to pack this with a spacer to allow it to sit flat?
And the welds on the door - I was planning on using a sanding disk on my grinder with some 240 grit paper to smooth those down - but again, I don't want to go thorough the aluminium with over zelous grinding...
I cut the chassis with a hacksaw as far as I could go and then cold chiseled the rest of and cleaned up with the angle grinder.
Fix the stricker plates after you have got the rear tub in the right place, that way you can get it flush to the GRP. (I assume you have the separte sricker plates to bolt on?)
I've found some more photo's that might help and i'll upload them later today.
You need lots of spacers between the hinges and the chassis to get the doors right. (mine are spaced about 3-4mm)
Sanding down the welds on the doors took ages. I used a B&D power file but an angle grinder might have been better
Fix the stricker plates after you have got the rear tub in the right place, that way you can get it flush to the GRP. (I assume you have the separte sricker plates to bolt on?)
Yep - Galavanised jobbies just like the ones you have, with a folded 'foot' that points toward the front of the car which gets a pop rivet.
Can't comment on fitting your doors, but on my cabrio I used an angle grinder with a very worn disk to remove most of the weld, then a fine flat file and finally 320 grade grit. This was for the screen pillars.
However the welds on the inside of the door looked so neat that in keeping with the aim to have a functional interior I've decided to leave them .
Having looked at Peter & Robin's pics, I can see that you've trimmed that plate back - how did you do this? I don't fancy taking an angle grinder to it on the off chance I slip and gouge the chassis.
Don't forget there is also the thickness of the tub to take into account. Peter's method for removing the existing plates is good. A sharp cold chisel cuts through the plate very easily. Marlin should have supplied you with a replacement striker plate that bolts on and hence is adjustable. (Although its a PITA job to fit)
GreatOldOne wrote:
Also, the hinges - they dont sit flat on the upright they bolt to in the chassis. The 'barrel' of the hinge makes it sit up along one side. Do I need to pack this with a spacer to allow it to sit flat?
And the welds on the door - I was planning on using a sanding disk on my grinder with some 240 grit paper to smooth those down - but again, I don't want to go thorough the aluminium with over zelous grinding...
Dunno about the hinges. I have the earlier ones. These have a different problem....
I found the best technique for the doors was a very coarse file first (You will also need a file card to regularly un-clog the file) Followed by a largish flap wheel in a drill - although be careful with this and keep it moving as it can remove material quickly.
You may also find that you need to twist the doors slightly. Be careful as you can split the welds on the inside door face if you are too rough. After twisting you can dress the inside of the door (where it will probably bulge) with a hammer and dolly (I used a hardwood block). If you take your time and do it carefully it is a lot easier than it sounds! There's some pictures of door twisting on my website!
I have to bend my doors over a table edge to get them the right shape, this was after they had been back to Marlin to "fix" - I didn't have the separate striker plate mounts originally, only once I had those was I able to get things sitting correctly.
Well, I've trimmed the plate back 10mm each side, using a hacksaw and cold chisel as suggested.
I've also smoothed the welds over with a 60 grit sanding disk in the angle grinder, and the doors now sit on the 3mm packing on the sill with no interference.
I think I'm going to modify the striker plates to remove the bent 'foot' - it goes the wrong way in my opinion, as it will stick out from under the tub later on, which won't look very nice when the door is open. I'll cut it off and make a seperate bracket to go behind the plate and rivet it on.
I have to say It's amazing the difference just resting the doors in place makes to the car. It's starting to actually look like one!
I think I'm going to modify the striker plates to remove the bent 'foot' - it goes the wrong way in my opinion, as it will stick out from under the tub later on, which won't look very nice when the door is open. I'll cut it off and make a seperate bracket to go behind the plate and rivet it on.
I have to say It's amazing the difference just resting the doors in place makes to the car. It's starting to actually look like one!
Sounds like you are making good progress!
I've posted some more photo's on my Flickr site. They were taken down at the factory when Simon gave me my tuition and they are not my car. Some of the quality is poor but i've included them all which I think are self explanatory. I forgot to mention that you have to hit the piece left with the big effing hammer to get it in the right place. Simon said not to be afarid to hit hard to get it right! I had to remove the little weld left. (Look in my Bodywork Flickr set for a full sequence)
The little foot stays hidden away under the tub when its all in place. If it shows you've got the striker plate too far forward.
These pictures are of my own car.
Hope that helps but just ask if any of it doesn't make sense
P.S. I left my doors warped as I thought that they are actually supposed to be like that!
It does beg the question why so much persuation is needed to get the plates to fit. If they just made that plate 10mm shorter and welded it in the correct position, there wouldn't be a need for percussive engineering.
I think I may have lucked out, and got it pretty much on straight (to my eyes at least) after trimming the front to match the angle of the chassis... Does it look ok to you guys? It may need a little fine tuning... The welds need smoothing down more, and I'll get round to that now I have some flap wheels for my grinder.
Also, do I need to cut anywhere else to get it to fit? specifically, do I need to shape the area that goes around the chassis in the second pic? Should I cut the lower edge of the fiberglass back so it's parallel with the chassis rail?
Looking good to me. I'd now wait until you've got the rear wings on before doing anymore trimming as most of it's hidden with the wings and internal panels.
Ok - I did a little bit more tidying up last night - I have noticed that whilst the tub sits fine on the chassis, it's a good fit on the drivers side around the striker plate location and the box section behind it (above the swing arm mounts), but on the passanger side it's very tight - It's jammed up against the box section and the upright the striker plate will bolt to.
There's no possibility of movement from side to side, as the tub fits perfectly over the suspension turrets and doesn't allow for any movement.
Also, whilst it all looks ok by eye, measuring the gaps from the edge of the top of the tub to the roll bar shows that it's off.
Hi
If its any help, I found I had to trim away some of the tub behind the wheels, as it fouled the suspension when going over medium sized bumps.
Good luck!
Tim
Dude, sacrilege using a tape measure I also took that route to start with but soon gave up when nothing was straight, both the tub and chassis. I took the view if it works visually that's fine be me. I found the passenger side by the door the most difficult to get right which is why I used bolts to pull the bottom edge in, there's spacers behind + the counter sunk screw to twist into a decent place. I'm not 100% happy with the fit but if I wanted 100% I'd still be fitting the tub today
Oh fudge. I measured not once, or twice, but three times. I still managed to get the hole for the striker pin too far over.
Both sides where out by 5mm as when I measured the position of the pin I clicked it into the lock - but hadn't pushed it in all the way, not realising that there are two positions.
So I've elongated the holes in the striker plates to allow the pin to sit further out, but that puts it out of centre of the whole I cut in the fibreglass
I think what I'll do is make some cover plates up out of some stainless steel that will cover the cock up.
One other thing I've found is there seems to be a lot of voids in the fibreglass. The gel coat on the tub has come away on one edge leaving a pit, and you can see two distinct layers with a void between them on one of the striker pin holes.
Guess I'm going to be busy with the filler as well.
I did the same. No-one is going to see it anyway unless they have a thing about door shuts. The quality of the fiberglass was - err - middling on my tub as well. I am used to the sort of quality you get in dinghys - Marlin could learn a few lessons here... I suppose it's all down to price in the end.
I've got odd shaped holes as well, ended up needing to move them a bit, wouldn't worry too much. You could always stick some fibre fill in and re-cut the holes if want to


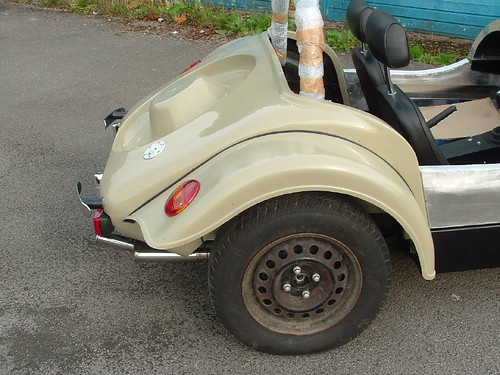
 I also took that route to start with but soon gave up when nothing was straight, both the tub and chassis. I took the view if it works visually that's fine be me. I found the passenger side by the door the most difficult to get right which is why I used bolts to pull the bottom edge in, there's spacers behind + the counter sunk screw to twist into a decent place. I'm not 100% happy with the fit but if I wanted 100% I'd still be fitting the tub today


