
MadaboutKitcars

This is a read-only archive of the old Madabout Kitcars forum. New posts and replies are no longer possible, but every thread is still here to browse and read.

New build log

9 Jan 2011, 6:37pm
Having picked up my donor this morning, I've done the traditional thing of creating a flickr account to post progress on. Obviously it's a bit limited at the mo but hopefully I'll have more to show over the coming months.

http://www.flickr.com/photos/58068042@N07/
10 Jan 2011, 11:52am
morris wrote:
Having picked up my donor this morning, I've done the traditional thing of creating a flickr account to post progress on. Obviously it's a bit limited at the mo but hopefully I'll have more to show over the coming months.

http://www.flickr.com/photos/58068042@N07/


It looks far too good a car to scrap!
Mike
10 Jan 2011, 1:30pm
morris wrote:
Having picked up my donor this morning, I've done the traditional thing of creating a flickr account to post progress on. Obviously it's a bit limited at the mo but hopefully I'll have more to show over the coming months.

http://www.flickr.com/photos/58068042@N07/


Many happy hours dismantling now. Remember to label and keep everything and, if you are doing it now (ie in the winter), add a fan heater to your list of essential tools....

Have fun

Robin
10 Jan 2011, 9:18pm
Until a month ago, my garage was a store room at the front and a room off the kitchen at the back. I've had it knocked through and a proper garage door put back in. This means that it comes with a radiator plumbed into the central heating down the far end so as long as I stay down there I can warm my hands up :). I could do with a set of flood lights really as with the dark nights I can't touch it till the weekend. Picking up my engine stand, crane and drill press from machine mart on saturday morning so provided the weather is ok, I can start the destruction.

It looks far too good a car to scrap!
Mike


Yeah, you do get that impression as it looks on surface to be a very straight car but just from my basic pre-purchase inspection and drive home i think to make it a good, safe daily driver again it needs a fair bit of work:
- new front and rear shocks
- exhaust is blowing
- rear window seal on one side is missing completely
- one of the headlamp washers lifted out in my hand
- nearside front ball joint has an advisory from MOT
- lots of the internal electrics dead (windows, sun roof)
- sun roof has a gale coming through it
- oil leak from the sump somewhere, may be the coolant system too.
- not convinced the torque convertor is working too well
- auto box didn't seem to respond to the sport mode so was stuck in eco.
- arches are starting to rust.

no doubt the list will get bigger as I pull it apart. I hope that ball joint is not a bad start from a donor point of view. I'm working on the assumption that the ball joint is on the suspension arm and not the hub assembly that I'll be keeping. If it is a part i need it shouldn't be expensive as it's a standard part to replace on an older car

Remember to label and keep everything


Can anyone give me a comprehensive list of the E36 parts I need? There's a list on the Marlin website but it seems a tad high level
10 Jan 2011, 10:19pm
morris wrote:
Until a month ago, my garage was a store room at the front and a room off the kitchen at the back. I've had it knocked through and a proper garage door put back in. This means that it comes with a radiator plumbed into the central heating down the far end so as long as I stay down there I can warm my hands up :). I could do with a set of flood lights really as with the dark nights I can't touch it till the weekend. Picking up my engine stand, crane and drill press from machine mart on saturday morning so provided the weather is ok, I can start the destruction.


Yeah, you do get that impression as it looks on surface to be a very straight car but just from my basic pre-purchase inspection and drive home i think to make it a good, safe daily driver again it needs a fair bit of work:
- new front and rear shocks
- exhaust is blowing
- rear window seal on one side is missing completely
- one of the headlamp washers lifted out in my hand
- nearside front ball joint has an advisory from MOT
- lots of the internal electrics dead (windows, sun roof)
- sun roof has a gale coming through it
- oil leak from the sump somewhere, may be the coolant system too.
- not convinced the torque convertor is working too well
- auto box didn't seem to respond to the sport mode so was stuck in eco.
- arches are starting to rust.

no doubt the list will get bigger as I pull it apart. I hope that ball joint is not a bad start from a donor point of view. I'm working on the assumption that the ball joint is on the suspension arm and not the hub assembly that I'll be keeping. If it is a part i need it shouldn't be expensive as it's a standard part to replace on an older car


Can anyone give me a comprehensive list of the E36 parts I need? There's a list on the Marlin website but it seems a tad high level


You'll have fun taking that part! Looks like a really good donor car.
I think the Marlin list is probably right but I kept lots of bits that either came in handy or ended up on eBay. (Lamp clusters go very well on eBay.)
If you can afford the space, keep as much mechanical and electrical bits until your sure you don't need them. I found lots of stackable plastic storage boxes very useful.
When your at machine Mart you'll also need a track rod end splitter and a half shaft hub puller.
A garage with radiator sounds like luxury. I built most of my car in a lock up without even electricity!

Have fun....


,,,Peter
12 Jan 2011, 10:50pm
I just had a warning email from Flickr stating I was using their service against the T&Cs to sell something. Obviously the language used on some of my donor car captions was picked up by a computer running a screening algorithm somewhere and it's interpreted the text as an advert. I sent a polite response back stating that selling a car I bought 3 days ago was the last thing on my mind. but I expect to receive for cease and desist messages until I remove all the text.

Before I start dismantling the car, I was wondering if anyone could give advice on the gotchas they've come across too late after they've pulled it all apart. I'm thinking mainly of things you wish you'd tried out or tested while the original car was still in one piece but now can't. I was going to try disconnecting various electrical components I won't need (such as the instrument binnacle) to see what affect it has on the car starting etc.

I've worked out a rough order of the work
- prop shaft
- gearbox
- engine bay bits 'n' bobs
- engine ancillaries
- engine
- interior items (ECU, steering column etc)
- front suspension
- rear suspension, diff, sub frame etc
- handbrake

I figure that in this order it will be movable on its wheels for the longest time before I have to pop it up on stands permanently.

Good tip about the hub puller, I'd not thought I'd need one but looking at all the other build logs it looks like something every one has done. I've already got a ball joint splitter, one of the long handled tuning fork ones but maybe one of those short ones you tighten up with a spanner would work better?
13 Jan 2011, 8:35am
Top tip - when I hoicked the engine out my e30 donor, I made life easier for myself my cutting away the front of the engine bay with an angle grinder (Ooooo - Sparks! :)).

I didn't have to lift so high then - just up a bit and straight back.

I'm not sure how the rear subframe / swing arms are assembled on an e36, but I had a devil of a job dropping the subframe off the donor - the bushes and metal had merged and become one, and had been welded to the chassis. I ended up having to cut the subframe mounts (more sparks, and the great smell of burning rubber) and pry them open.
13 Jan 2011, 9:28am
GreatOldOne wrote:
Top tip - when I hoicked the engine out my e30 donor, I made life easier for myself my cutting away the front of the engine bay with an angle grinder (Ooooo - Sparks! :)).

I didn't have to lift so high then - just up a bit and straight back.


I did exactly the same.

One extra tip. Make yourself up a large VERY strong board ( 3ft x 2ft x 1") with some big castor wheels on it. I used a couple of sheets of cheapo 1/2" plywood with some 2x3 timber for reinforcement. Very useful to move the engine about on but also useful to support what is left of the body on (when it has been stripped of mechanical bits) so that you can get it out of the garage for the scrap man to take away.

Robin
13 Jan 2011, 12:40pm
the haynes manual says you should remove the gearbox from under the car before lifting the engine rather than the typical out in one go approach you normally see. I'm hoping that will make life easier for a start. not sure if bonnet removal will be necessary, we'll see.

I'll keep my stock of metal grinding wheels high then.

I'll be carrying out the destruction on my front drive as I have the space and it will avoid the claustophobia of trying to do it inside the garage. I think the car would fit but it wouldn't be comfortable. I'm hoping to find a scrappy with a crane on his truck so that the end result of my labours can be just plucked from over my low front wall.

I had thought of building some sort of castored trolley but had moving the exhaust, propshaft, gearbox etc more in mind so probably a single piece of 1/2" ply about 3 foot square will do the job
13 Jan 2011, 7:24pm
For my first attempt at at a castored trolley I used 15 mm ply - it snapped in two within seconds! So agree with Robin's tip :)
Tim
13 Jan 2011, 10:36pm
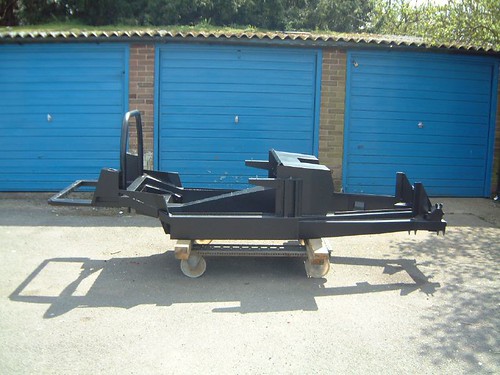
I think you've all seen my dexion trolly.

I used it originally for moving the donor shell out the garage for the last time and then for moving the Sportster chassis in and out of the garage before it had wheels.

This is the chassis by marlinpeter, on Flickr


The dexion was found in my father-in-laws garage and the casters where bought at a car boot sale for £5. I think I spent as much again on a box of M8 nuts and bolts :smile:
You'll see the bits of 2x4's under the chassis. I used to put axle stands under these and remove the trolly when working under the donor or the chassis.

I can't fully remember but I think I took the gearbox out after removing the engine. Taking the bonnet off takes about 2 minutes and gets it out the way. Don't forget to loosen the wheel hub nuts before you disconnect the brakes. My advice on the order is, if its raining work inside the car and if its not start with all the stuff under the bonnet and work from the front of the car of the back. Apart from the hub nuts, it doesn't really what matter you remove things. Regular trips to your local dump with stuff you don't need like door cards and carpets, etc, stops it all building up and getting in your way.
14 Jan 2011, 7:38am
I hope you have more luck at the dump than I did. My local council won't accept any parts from a car. I went there some time ago with a plastic bumper off a Mondeo and they refused to take it. I was told to saw it into small bits and put it in my house hold rubbish black bin bags.

I asked them that if I did that where would it end up, to be told it would be a landfill site. I then pointed to a large skip of 'non-recyclable waste' and asked where that would end up. Landfill site again. So I asked again if I could put the bumper in the skip. Emphatic no from the workers.

So I went home and played with a saw.

More stupid red tape.