MadaboutKitcars

This is a read-only archive of the old Madabout Kitcars forum. New posts and replies are no longer possible, but every thread is still here to browse and read.

Another little project!

21 Feb 2014, 6:39pm
Evening all!

Thought I'd stop lurking and commit myself to publishing an introduction...

My name is Richard and I have been following the evolution of these beautiful machines over the last couple of years. Anyway, circumstances have, at last, conspired to allow me to start my build!


The body arrived on Monday and I have been trial fitting on a 1964 Vitesse 1600 chassis that I bought late last year. Like all things four wheeled in my life, they have already started to breed and now I have a 1967 2 litre (Sunday night eBay...!). Looks like the first chassis has to go now so I might try on the for sale board, before resorting to fleaBay...is that the done thing here - don't want to turn it into a market stall :ohwell:

So far body is sitting on frame and I got the Spitfire tank in today. Planning rear luggage store next - looks like B&Q for plywood this weekend then.

Hope that I can provide the same level of detail that some of you guys have done - started a blog at http://migliaspeedster.blogspot.co.uk/ which seems to make photo linking easy.

That's all for now,

Richard
21 Feb 2014, 7:09pm
hi d/d welcome chassis look good is it the green one for sale be good if you go on the location map rattler
21 Feb 2014, 7:22pm
Yep, the green one is for the off - 1964, 1600cc with V5 - chassis restored, engine will need a rebuild.
21 Feb 2014, 7:40pm
Welcome matey, good luck with the build! :)
21 Feb 2014, 7:44pm
Welcome Richard, i will have the extras in the post for you , early next week.

Looking great , how much was you looking for the chassis and v5 ??
21 Feb 2014, 11:26pm
welcome Richard
I,m new to this forum posting myself should have no trouble selling the chassis it looks great, good luck with the build.
22 Feb 2014, 6:50am
Thanks for the welcome guys! Nice to be around such a nice bunch!

Mike - will test the pm thing about the chassis.
22 Feb 2014, 8:54am
Hello Richard,

Welcome to the forum. You must have lot of ideas if you are thinking about your build for so long. I know I had!
What kind of overall look/result are you aiming for? For trackdays, for concours, period illusion, chique, personal free style, rat-look, replica, other?

With these builds, there are so many approaches that work well.

Michiel
22 Feb 2014, 9:39am
Hi Michiel

Sooooo many ideas! I am inspired by the OSCA and Maserati racers from the 1950's really. Much as my two boys would like a red one, I am thinking air force blue, maybe, but with stickers! Already have a pair of Morris minor lights (like the red one on the Miglia website) although thinking I might look at alternatives...guess I hope to end up with a car that looks the part without the need to win the lottery!

Back to the garage! Rear luggage box is today's project.

Richard
23 Mar 2014, 3:07pm
Wheely good idea?

Just looking at wheels to be able to set my body height and whilst the cheap set of 15" TR6 wires that I got would be nice, by the time I have bought the adaptors, had them sandblasted, new tyres, tubes etc....you get my drift....

Anyway, in my travels on the forums, it seems that the MGF might be another source (don't worry not alloys!) as the spare wheels seem to be available quite cheaply with largely unused tyres; they look surprisingly like fifties Dunlop steels with lots of holes. Now, if I could source some fake spinners...

Anwyay, to get the point, they have 175/65/14 tyres on them - should this clear the chassis and will I still need to limit the steering lock as Mr T did? Also, they have a warning sticker on them saying max 50mph - I assume that this is because the other wheels on the MGF would be bigger wheels? I'm sure that 50mph will be enough in the Miglia but I might get confident in it one day!

Reading this back I could have said it more concisely...sorry! :tape2:

Thoughts appreciated...

Richard
23 Mar 2014, 4:12pm
hi dd my tyers are 175/70/14 I think thay fit spot on /mgb/14 inch wires/ about 110 mm clearance under the cherry bomb . hope this helps rattler
23 Mar 2014, 4:16pm
hi dd thay also miss the b/h by 10mm
5 Jul 2014, 3:40pm
Another little update!

Must be time for an update - lots of little jobs been going on...

Body shaped to fit over the chassis (was able to follow the flash lines in the gelcoat and it matched perfectly)


Lights and grille make a big difference...


Hours of procrastination needed to decide where to put the dials, but I eventually settled on a central array of instruments...

http://3.bp.blogspot.com/-9sr4RPXOgSE/U7gHX6uaDuI/AAAAAAAAAYc/uGH_zBCnAHg/s1600/1st+dashboard+idea.jpg


Shaping the dashboard has made access easier, but I will still need to extend the gearshift, as I can't quite reach 1st and 3rd!


This central 'pod' will have an engine-turned aluminium panel to house the instruments, in the style of this custom Ford dash:


Bought a sheet from Europa and shaped with bandsaw and holesaw:


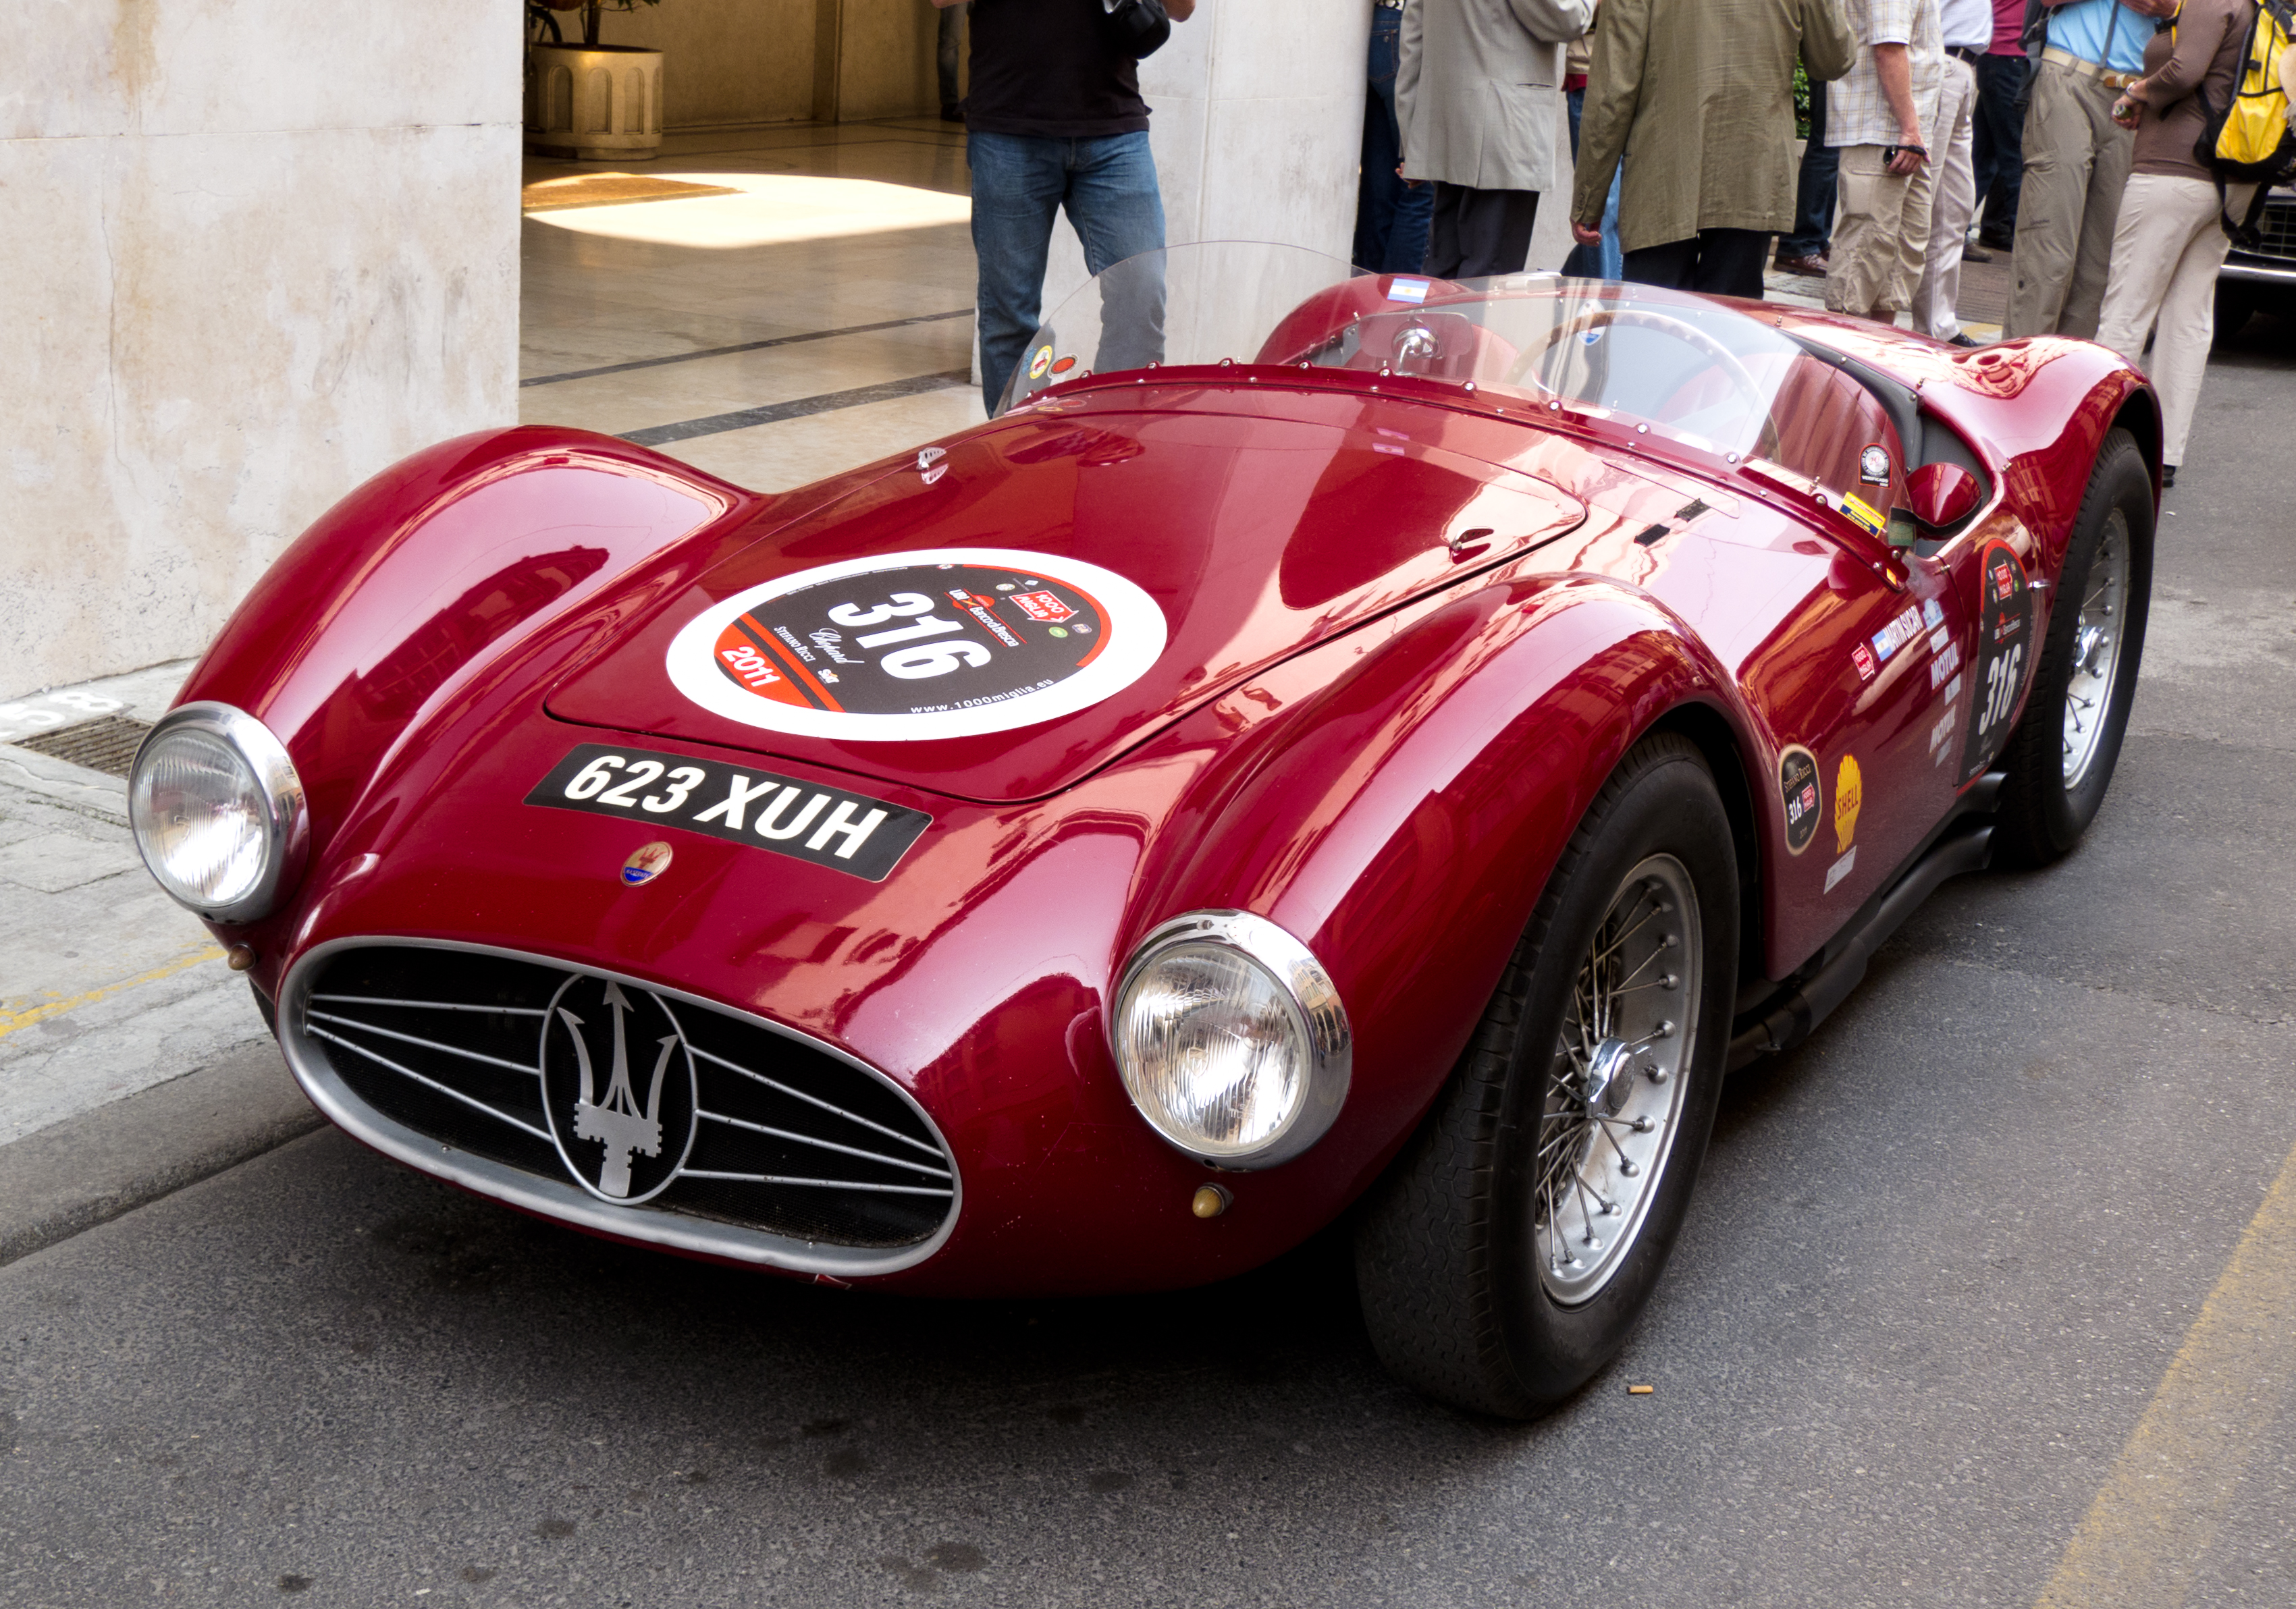
Wanting to keep the front end in the 50's style, I couldn't find any very small bullet sidelights as used on the Maserati A6 GCS, so I have settled on leaving the sidelights in the headlight bowls and I have been able to produce some indicator 'pods' on a 3-D printer which will incorporate an orange LED indicator (the pods will, of course, be blended and painted in body colour).


I have also been able to get the doors hung (using classic mini door hinges) and chosen my bucket seats to keep the driving position low enough:


Need to work on lowering the rear suspension now and adjust the rear wheel arches to give an equal gap around the tyre on each side:


I had originally thought about wire wheels but these proved to be very expensive to have reconditioned, so I settled on MGF spare wheels, which will have a dummy 'spinner' fitted:


That's about it for now - hoping for the final pieces of the jigsaw soon, so that I can get the pedals, headrests and side vents fitted in the weeks ahead...
6 Jul 2014, 4:42pm
Looking like you're making some really good progress!
I'm very jealous and itching for my kit to turn up, but i know I've got a few little jobs to finish first :)

You went for the vertical-bar grill as well then! That seems to be fast becoming the Miglia std grill :)
6 Jul 2014, 7:28pm
Progress...if only!

Thanks Dave, although looking at your progress already, I think you'll get there first!

Quite motivated to create something like this Maserati A6 GCS:


Even managed to win a new/old bonnet badge on the Bay this week! Takes my mind off the bigger issues :ohwell:

Richard
7 Jul 2014, 4:33pm
davecymru wrote:
Looking like you're making some really good progress!

+1 :cool:

Your seats & steering wheel look very similar to mine, so I will be interested to see how yours comes together.

Good luck, Paul. :)
7 Jul 2014, 7:50pm
DerbyDreamer wrote:
Need to work on lowering the rear suspension now and adjust the rear wheel arches to give an equal gap around the tyre on each side:


Blimey, that's even worse than my old Sammio body. Think I will stick with it after all
11 Oct 2014, 10:03pm
Progress!

Really impressed to see the progress of others (especially those who have only recently got their bodies and are already well on the way!) so thought I'd post an update...

Lots of bits came together over the Summer - doors on, rear swing spring and lowering block fitted, dashboard finalised. Oh, and a change of chassis - partly because I wanted a bulkhead and the rigidity that it has brought to the body...and the opportunity to fit a 2 litre engine (although the thought of the extra horses slightly worries me!)

Pleased to get the instrument cluster sorted (it is turned ally under the protective plastic)


Front grille, indicators & badges sorted (I have the CAD drawing for the large oval grille badge if it's of any use :icon_exclaim:).


Bulkhead fitted...


Template made....


and now just a small gap to fill (thinking I might shorten the bonnet)...


and lastly, got my head around the rear storage area, for that impromptu picnic!


Still a mountain to climb but you guys are great motivators (& checking your progress keeps me motivated:amen:)

Richard
8 Aug 2019, 7:38pm
So...where did FIVE years go???

Verging on embarrassed that I have made such slow progress but...[insert appropriate excuse here]!!

Anyway...back on it now and had a productive few days.

One of the things I was procrastinating about was the lack of symmetry - those who are familiar with the Miglia will understand! I finally bit the bullet and performed surgery on the rear end today, with the result that I can now close both doors and put passenger seat back far enough to get a passenger in!

Before...

Before.jpg


and after surgery... (no idea why the image is rotated...sorry!)

After.jpg


Before another five years goes by, I thought that I would seek advice from others who have split their bodies as to how to fill in the gap...do I need to work from underneath and if so, how best to ensure a decent surface finish that is going to be 'seamless'...all advice welcome.

Richard
9 Aug 2019, 9:16am
Derby Dreamer – Welcome back Richard. :cool:

I made a similar cut to the rear of my car…


With an extra slice off the driver’s side too.
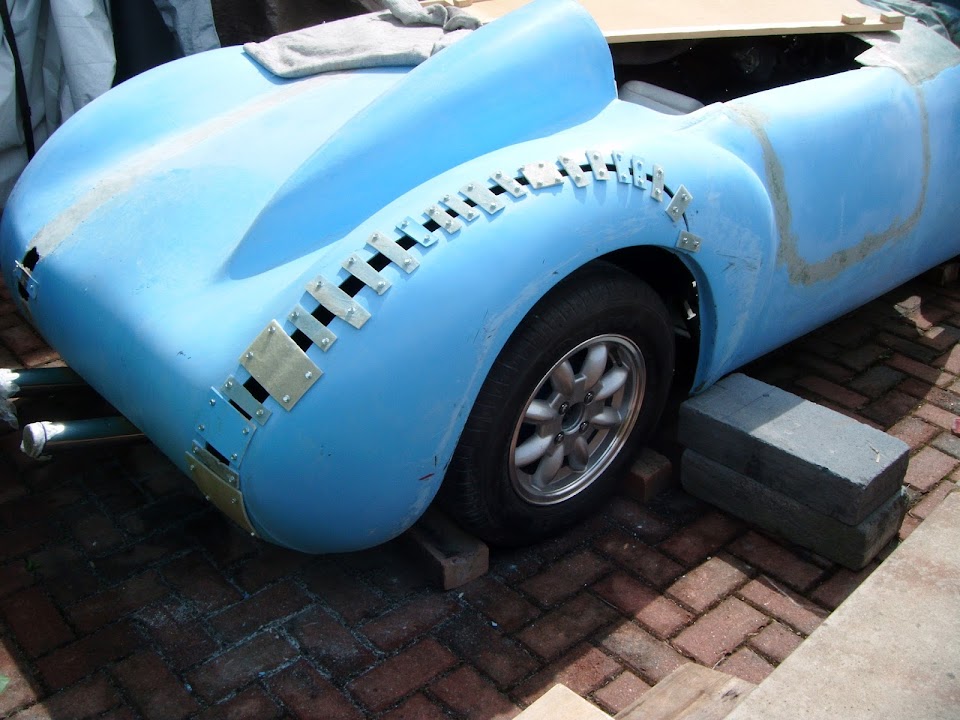


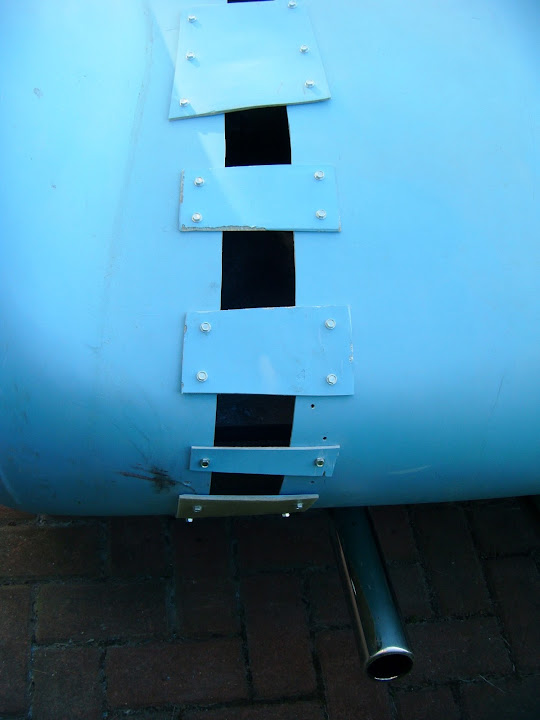
Whilst I initially used fibreglass brackets, I later switched to Builders Band which was much better for this kind of work.


- - - - - - - - - - - - - - - - - - - - - - - - - - - - - - -

To get a “seamless” join, you will have to tackle the gap from both sides.

I used brown parcel tape as a release agent that the fibreglass matting will not stick to.

You can either simply put it on cardboard, or even some modelling mesh.


At first, I tried to work inside the gap created by the brackets on the outside.
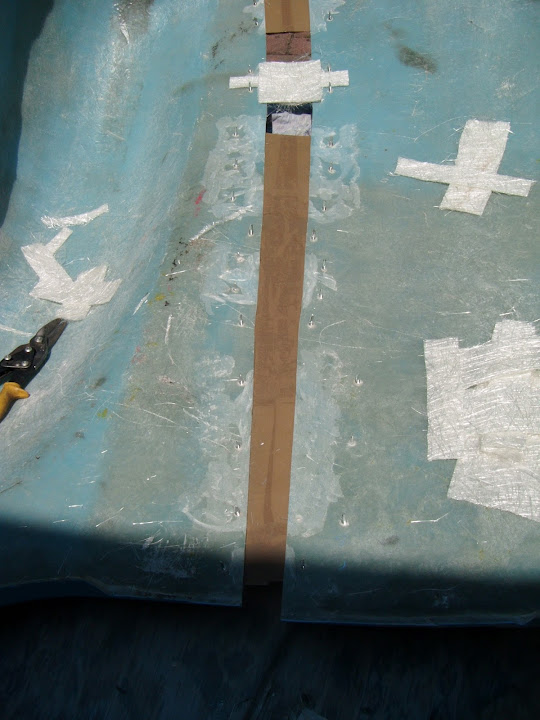


Before filling both the gap and joining the two sides together.
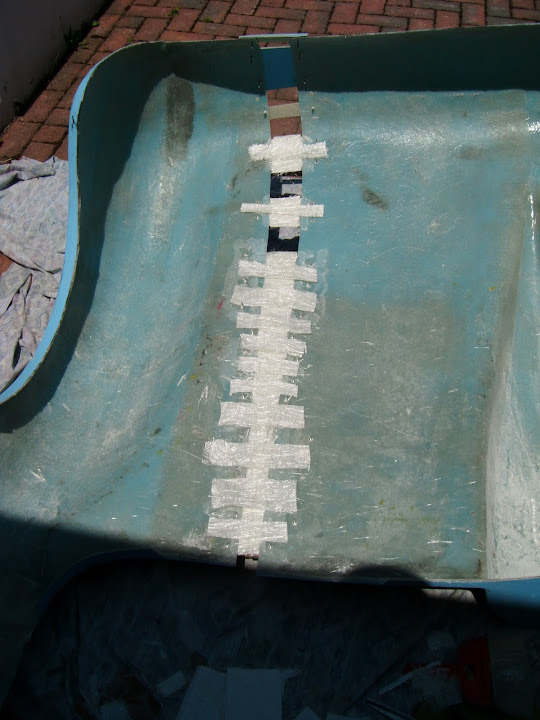


Note:
This was at an early stage and extra matting was added across the join as the real strength comes from below.

Later on, I put the brown tape across the join from the outside, held in place by the brackets.

Believe it, or not, but this mess gave me a smooth surface to work on the other side.
(Note: The use of parcel tape on a yoga mat to create a curve. )


- - - - - - - - - - - - - - - - - - - - - - - - - - - - - - -

Once you have added strength to the inside surface, you can remove the brackets and tidy up the ‘sunny side’.

This shows that, initially, you will have ugly joins where the original body shell meets the new extension piece.
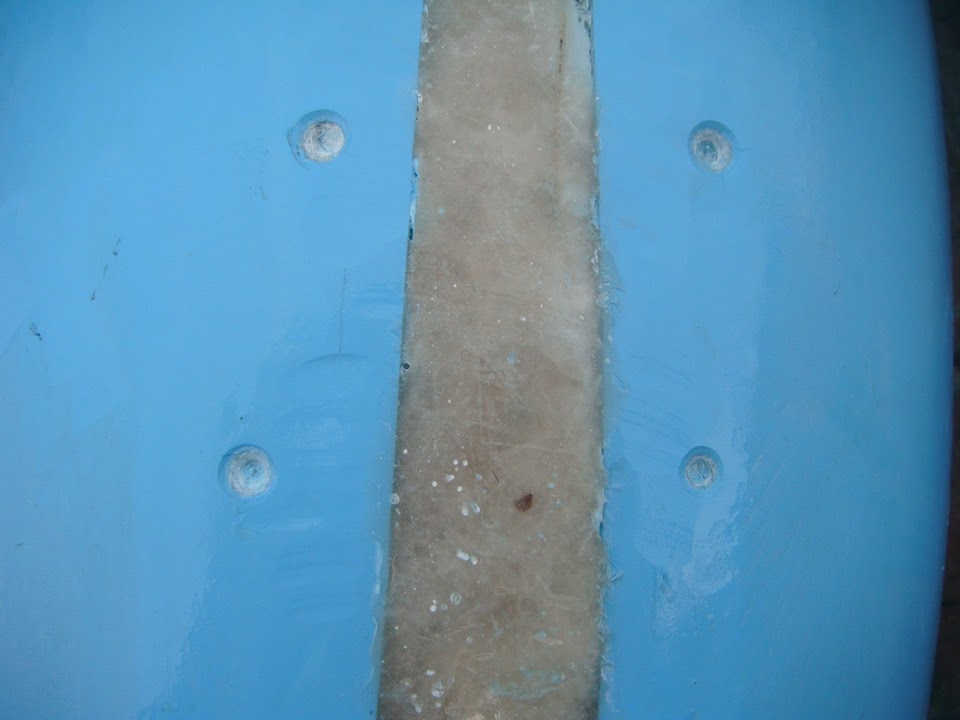


Note: The bracket holes have all been countersunk to help the fibreglass filler work better.

These photos from work on my doors give a better example of tidying up the join.
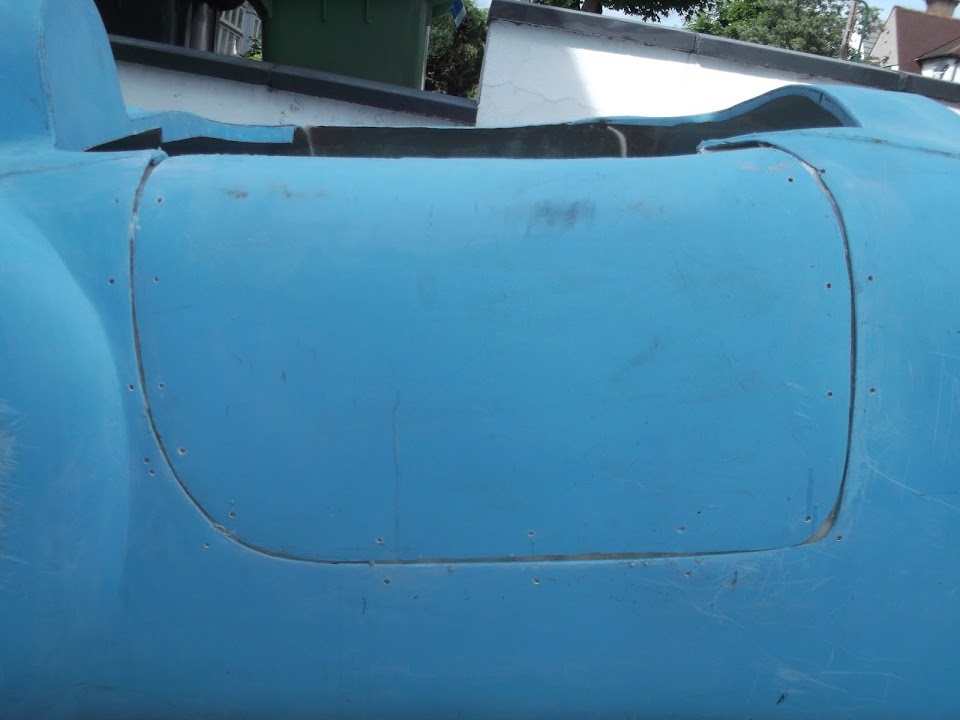


The small join gap is ground out into a “V” which is narrow and the bottom and wider at the top.
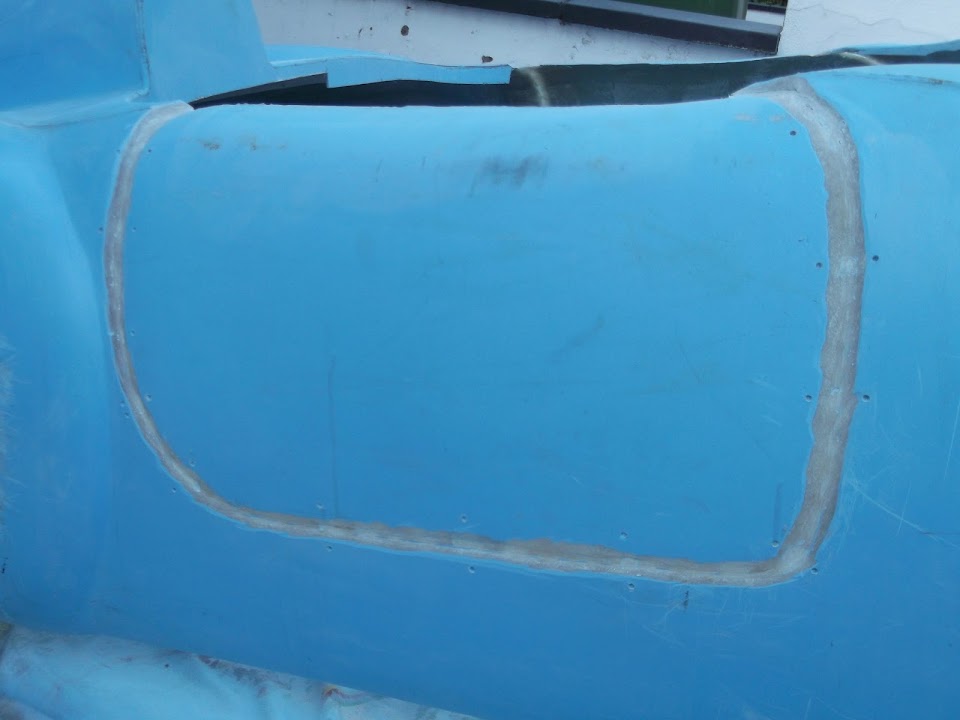


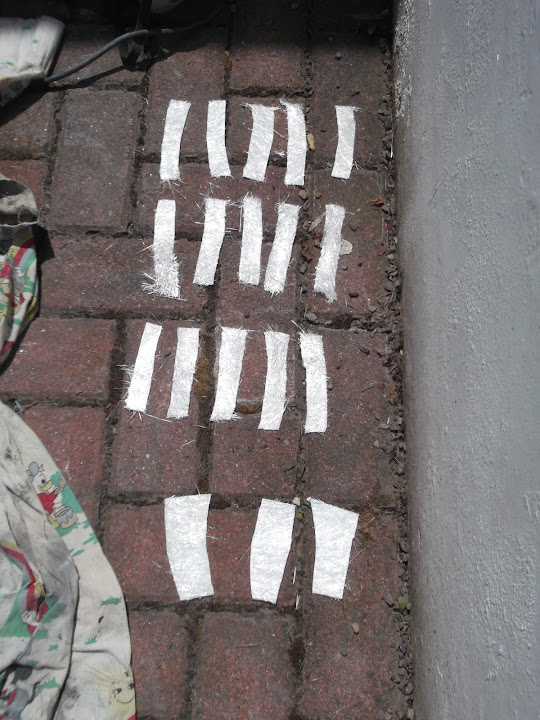
To fill this, I cut out a selection of fibreglass strips in various widths.
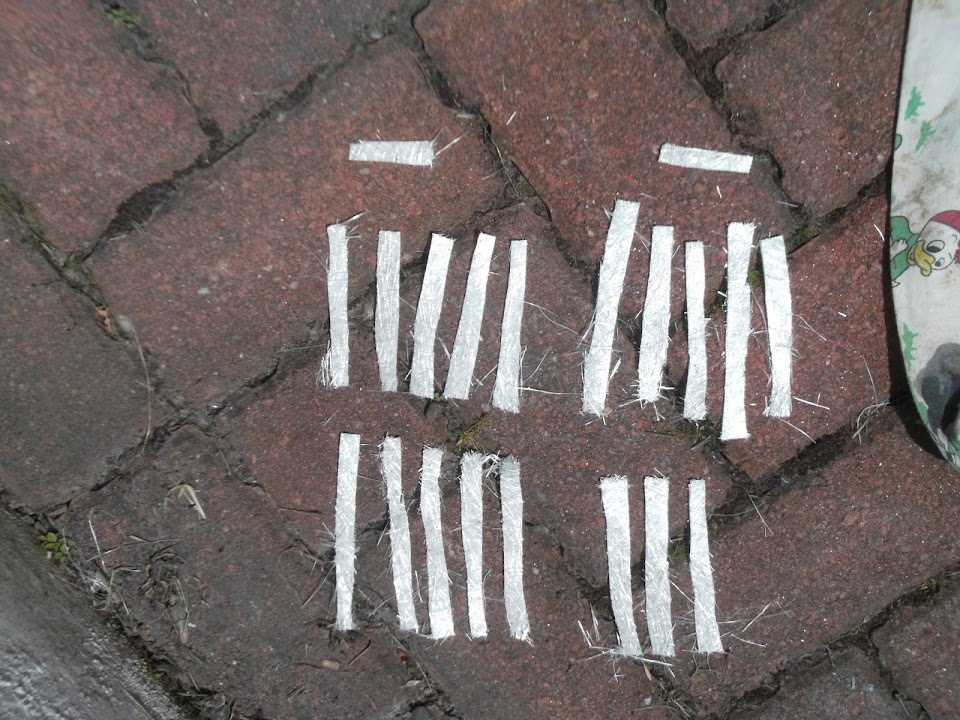


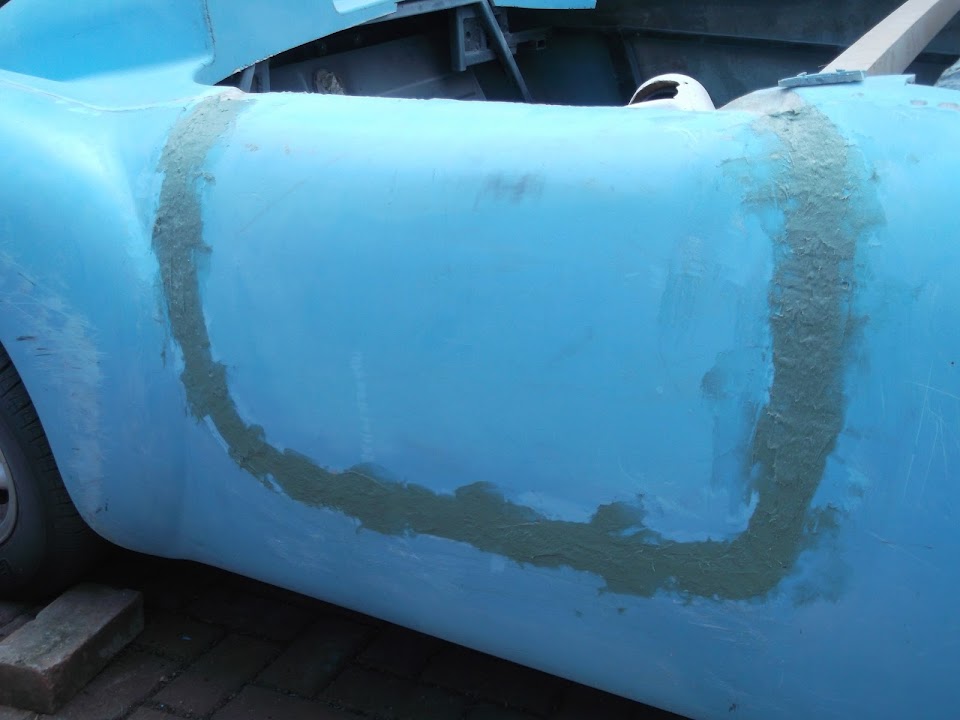
Then I slowly built up the layers of matting in the V.


Before a final layer of filler to tidy things up a bit more.


By the time the sanding is finished and the primer is on, you can’t see the join on the sunny side.
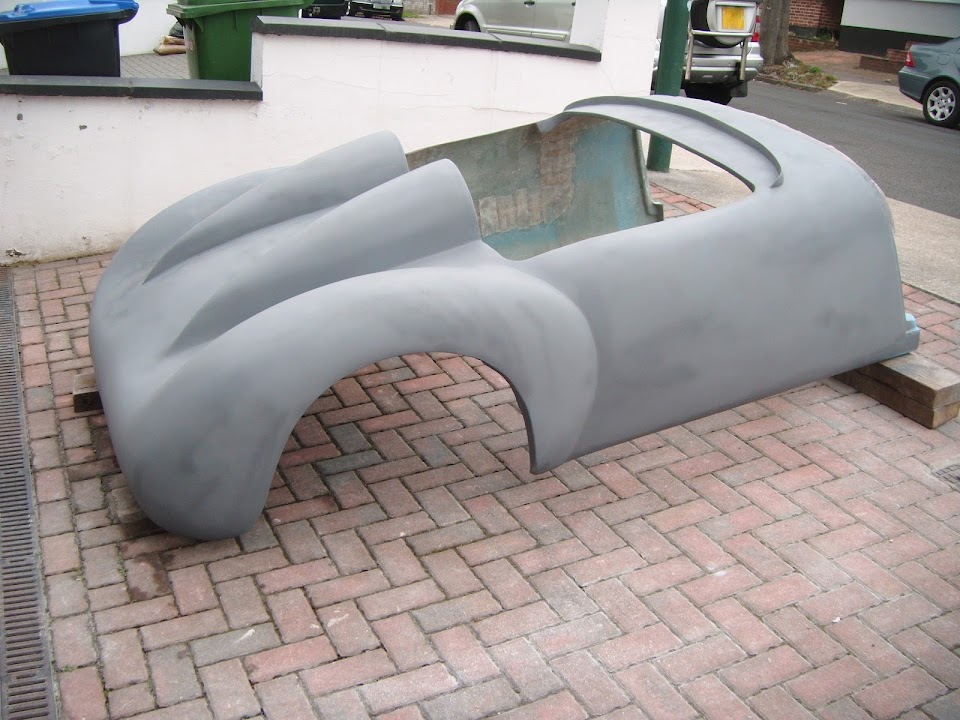


The photo above, also shows how the rear wing chop has also blended in.

- - - - - - - - - - - - - - - - - - - - - - - - - - - - - - -

Anyway, I hope that helps.

Also, as far as I am concerned, it doesn’t really matter how long you build take if you actually finish it.

As that first drive will make all the effort seem worthwhile. :cool:

Good luck, Paul. :)
9 Aug 2019, 5:03pm
Better than a Haynes manual!

Wow! Thank you, Paul!

I was hoping for a few pointers and you took the time and effort to produce such a detailed guide - that's fantastic!:bounce:

Just hope that my wife won't notice when her yoga mat gets a little bit shorter!

Onwards and upwards...

Richard
13 Aug 2019, 4:56pm
Front end progress

On a bit of a roll...

Having sorted the rear, I fitted the screen using Mr. Towed's trusty rubber well nuts and suddenly things are looking better! Before I left my job, I printed the housings for very discrete LED indicators which will be painted in body colour (now decided - more later). These will need an inline resistor to work with the flasher unit, but I can mount these on the frame inside the engine bay.

front end.jpg


Need to address the negative camber and I have re-read davecymru's thread so will have to take the plunge for new adjustable shocks and springs at some point, although I see that Canley's do an adjustable top wishbone - anyone tried one?

Just waiting on some more aluminium to make a mounting for the fusebox. I opted to keep the original bulkhead (it was the only one I had!) so have drilled a big hole to route the loom inside the footwell and there were some conveniently placed holes already there to bring engine bay cables back out again - result!

fuse box.jpg


A slight conundrum withe the brake master cylinder - I bought a 3/4" uprated one to replace the original very big 5/8" one in the hope that it would fit under the front wing but alas, still a bit of a clash...I could move the frame rail but it would still make removing the lid / filling with fluid difficult. Guessing a remote filler version would be the answer - Wilwood seem to do a good range - all thoughts welcome!...

master cylinder.jpg


Hopefully, the weather will hold, so I can crack on :flame:

Richard
13 Aug 2019, 7:26pm
The adjustable top wishbone works well and you can always get some spacers for the bottom wishbone brackets but may need to extend the bolt through the chasses. look at [url]www.wolfitt.com[/url] he has some good information on Triumph.
19 Aug 2019, 8:35am
A few bits

Thanks for the suspension info Keith - will take a look at Wolfitt.

In between tidying the garage, whilst labourer is back from Uni, I have finalised a few more bits and pieces...

The nearside wheel arch has never fitted the wheel (which I showed previously), so out with the jigsaw and more surgery:

Wheel arch profile.jpg


Much better!

Mounted the screen and finalised the profile for the weather/retaining strip:

Windscreen profile.jpg


This made a bit more space for fitting a rearview mirror which I bought as a blind spot mirror. Unfortunately, the field of view is just about the width of the two headrests, so it creates more blind spots than it solves! Thinking about an early Beetle oval one...

Dashboard.jpg


Finally cut out vents on wings and test fitted my 3D printed grilles - the centre one has a modification for an LED indicator repeater (the same type used on the front) which I thought might be an added safety feature:

Indicator vent.jpg


And finally...a bit of bling...found a local metal laser cutter in Derby who was able to cut out the front trident from my DXF file:

Aluminium trident.jpg


Chip, chip, chippin' away!

Richard
20 Aug 2019, 6:33am
Starting to come together nicely. Not sure if you've thought of this, but a 'rubber' sealing strip along the bottom edge of the screen frame stops water coming through underneath it and gives a more finished look.

My trimmer gave me a suitable length of open 'P' shaped seal and I can't seem to find it online now, but there are lots of options. Check out E Type edge seal ATJ1927 in the link as it looks suitable -

https://www.sealsdirect.co.uk/shopping.asp?intDepartmentId=68#86

Keep up the good work!