MadaboutKitcars

This is a read-only archive of the old Madabout Kitcars forum. New posts and replies are no longer possible, but every thread is still here to browse and read.

Berlinetta Restoration 2015

7 Jan 2015, 2:52pm
[SIZE="4"]Project Outline[/SIZE]

I plan to make a thread up to the present time, this restoration started in June 2013, but I want to get this thread rolling from now, I don't have the time at present to go back over what I have already done, basically I have a really good rolling chassis with Cortina 3/4/5 running gear and an SD1 V8 engine with an LT77 manual gearbox. The engine is good as is the gearbox, I have to re-assemble the engine but basically all it needs is gaskets and seals.

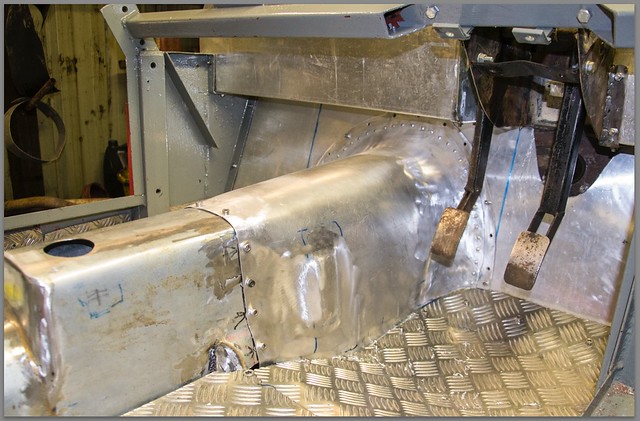
I am moving on apace, this week I have done a multitude of 'log-jam' tasks and a couple of tasks I have been sort of dreading because I was stepping outside my experience and had nobody I could call to guide me really. I have made a new scuttle out of 1.5mm Aluminium on my English Wheel, substantially it was formed but needed trimming around the doors and fitting to the also new bulkhead, I need to make brackets and form the door opening.

I also needed to form a gearbox housing which I also made on the English wheel. It took me about 3 hours to form the flare for the clutch housing on the English Wheel and about three days to make and fit it

These and several other tasks are now completed, so I am moving to the back of the car and have mounted the fuel tank, loaded the suspension with concrete blocks and tightened the rubber bush bolts, these were loose and floppy when I stripped the car, two bolts were partly worn through and the holes in the chassis and axel mountings badly worn. All that has been rectified and the suspension is now in really good condition.

This is a photo of the gearbox cover, it doesn't look that good in the photo but it's a really good fit and nice and strong too.


This is sort of what I would like it to resemble...


Here is the chassis:


The state of progress at the start of 2015 is here, I am using a spreadsheet to keep myself organised and struck on the idea of a progress chart so I could see how I was progressing...


A question follows...
7 Jan 2015, 3:11pm
I have a question...

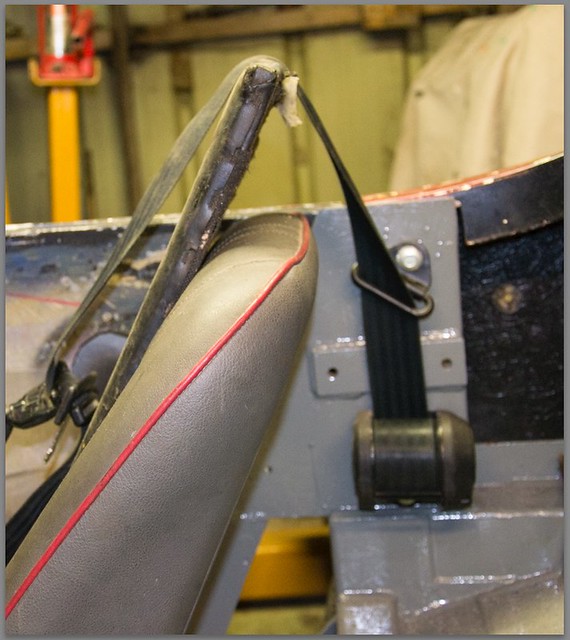
The Berlinetta has/had inertia reel seatbelt fitted. They seem very low where they are mounted on the 'B' post. The slip through fitting which the shoulder belt slides through seems to be about 6 inches BELOW my shoulder.

I am using very low seats mounted directly to the floor. I am concerned, not just about the regulations/MOT but also if I were involved in a collision, I would like the seat belts to provide some protection, NOT to make the chance of a back injury worse, which I suspect a very low shoulder mounting could do.

Has anybody come across this before?

I have considered installing a roll hoop but at a later stage, I could use the roll hoop as an upper mounting for the shoulder point mounting.

Otherwise I seem to be faced with creating a turret above the side of the car to mount the shoulder mount at a suitable height. Is this 'Done' and can anybody point me towards a successful example please?

A couple of pix, the black kneeling pad is about the same height as my shoulder, 8 inches above the sliding top mount of the seatbelt. Way too high in my opinion.


8 Jan 2015, 3:48pm
As you probably know there is a requirement in the IVA of a minimum height for the turning point of the seatbelt - presumably to avoid back injury as you mentioned. On the Sportster most of us fitted a horizontal bar between the two uprights of the "roll over car" to acheive this. I used a welded in CDS tube.

Cheers, Robin
8 Jan 2015, 7:58pm
I will have to solve this challenge on my Royale Sabre build which also has an upper mounting point too low to meet the current regulations.
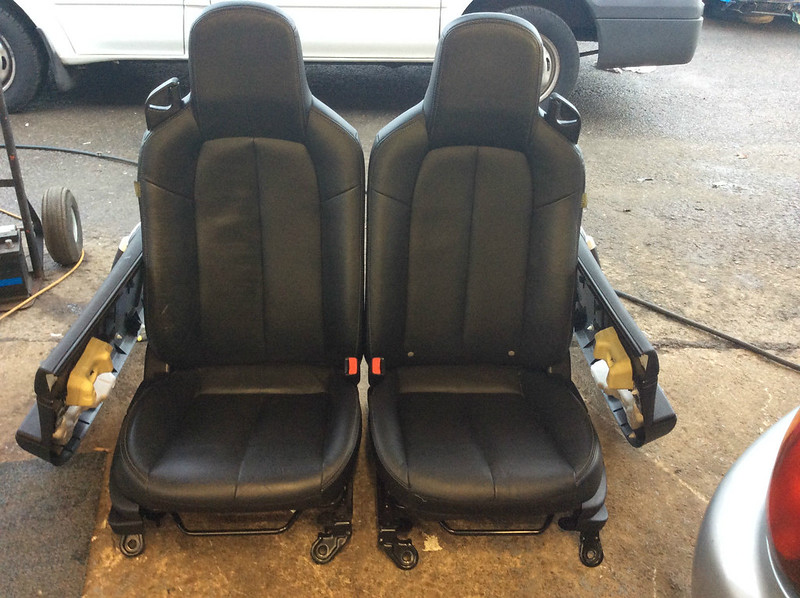
The ROC chairman suggested one option is to use Mk3 MX5 setas that have a seat belt upper mounting intergated into the seat back.

Example picture below.....(I don't own these seats)

Mazda MX5 Mk3 seats by marlinpeter, on Flickr

Presumably these seats are reinforced to take the forces in a crash situation.
I have no idea if these seats would fit in Berlinetta but offer it as another idea to consider.

BTW I'm enjoying your updates so keep them comming.... :smile:
8 Jan 2015, 10:41pm
I have a soft spot for Berlinettas so keep the progress photos coming.

A couple of thoughts on the seat belt issue.

The Berlinetta was never designed to meet the current safety requirements of kit cars: it is too narrow to be able to raise the turret height for the seatbelt mount, as the tops will then stick out of the side of the hood/hard top.

One option would be to fit a 4 point harness secured behind the seat, as in "racing bucket seats" - the seat must be strong enough to take the loads imparted on it in the event of an accident. I guess the praticality of this depends on whether you want to make use of the Berlinettas "rear seats"?

Another option to help is to make seat recesses in the floor. Marlin used to offer these at 25mm deep for the taller driver.

I welded recesses in my Cabrio with 65mm drop depth at the rear (25mm at the front) - this would solve half your problem, and make it easier to find the the remainng height from an additional modification?

9 Jan 2015, 10:32am
Another solution might be to reverse the seat belts, having the shoulder straps in the centre of the car with some sort of hooped support between the B posts across behind the seats.
9 Jan 2015, 1:04pm
In the wife's convertible Lexus the belt passes under a leather strap atop the seat in the front ( pretty sure that is just to make it easy accessible and so it can be moved for rear seat access, but maybe an option.) And in the rear they come from the middle I always presumed it was so you could sit sideways but now I am thinking its to get the required height. I can email you some pics after 6pm if you like. Ed.
11 Jan 2015, 9:48am
Hey guys, so sorry I haven't reacted to your posts, I had set notifications on for this thread but I didn't get any? I'm a bit pressed for time right now but your input is very helpful.

In short, after trial fitting the hood I have decided to investigate raising the rear tub. I raised the floor two inches because I want to be able to 'hide' the exhaust above the bottom of the chassis to improve ground clearance. I don't want to loose that by lowering the seat into the floor, also I want to sit a little higher rather than being 'sat low' with my bum on the road. More of a Land Rover than a racer... At present the seat has no runners so that means in reality the seat is only an inch higher that it was, also my floor is now only 3mm aluminium rather than the 12mm ply which was installed when I got the car, so that has saved a little too.

I don't want a seat belt turret protruding above the 'B' post, it will be unsightly and spoil the car. While I regard function over form, there are limit's! If raising the tub works I will reinforce the 'B' post structure and raise the seatbelt top anchor at least five or maybe even six inches. A small protrusion above the top of the tub will be acceptable, maybe two or three inches, but not six or seven which is what it really needs raising.

Long term I do expect to fit a simple roll bar with two back braces but not at this stage.

This will give me quite a lot more room in my boot and raise the profile of the car, which for me is good. It's very easy to achieve and low cost. <vbg> :smile:
11 Jan 2015, 10:58pm
MartinClan wrote:
As you probably know there is a requirement in the IVA of a minimum height for the turning point of the seatbelt - presumably to avoid back injury as you mentioned. On the Sportster most of us fitted a horizontal bar between the two uprights of the "roll over car" to acheive this. I used a welded in CDS tube.

Cheers, Robin


Hi Robin,

Ultimately that is what I have in mind. There is a roll cage manufacturer at Barnoldswick, not that far from me, they specialise in Land Rovers, but they are happy to bend a CDS tube for me to my specs and supply a couple of pieces of tube for back braces for me to cobble something together myself. I could easily add a cross tube at an appropriate height to pass the seat belts over.
11 Jan 2015, 11:18pm
peterux wrote:
I will have to solve this challenge on my Royale Sabre build which also has an upper mounting point too low to meet the current regulations.

Presumably these seats are reinforced to take the forces in a crash situation.
I have no idea if these seats would fit in Berlinetta but offer it as another idea to consider.

BTW I'm enjoying your updates so keep them comming.... :smile:


Hi Peter, I used something similar in my Roadster but they were very heavy and a bit tall compared with the somewhat basic bucket seats that were fitted in the Berli. I had to make very robust mountings to make the tester happy.

I will do my best to keep up the updates but i have many distractions, they may not be as regular as many of the build accounts I have been catching up on. I do enjoy producing a build story, it keeps me on my toes and may help other readers see solutions to their own problems. Sometimes I find explaining my problem in a thread focuses my mind on the issues and the solution appears obvious once I read the post.
11 Jan 2015, 11:49pm
Mike wrote:
I have a soft spot for Berlinettas so keep the progress photos coming.

A couple of thoughts on the seat belt issue.

The Berlinetta was never designed to meet the current safety requirements of kit cars: it is too narrow to be able to raise the turret height for the seatbelt mount, as the tops will then stick out of the side of the hood/hard top.

One option would be to fit a 4 point harness secured behind the seat, as in "racing bucket seats" - the seat must be strong enough to take the loads imparted on it in the event of an accident. I guess the praticality of this depends on whether you want to make use of the Berlinettas "rear seats"?


Hi Mike, the Berli is slowly growing on me! I have now replaced the scuttle and boot lid, with aluminium panels. If I can develop my skills with the wheel to create my own wings; if I only get part way to the original concept of the 1930's Alfas I will be well pleased.

The Berlinetta has many issues that wouldn't meet current safety requirements, not least the front cross member. yet I haven't heard of a single report of any consequences resulting from that component. I am minded to install a brace between the two sides to add some rigidity.

Although I am sticking with the V8, I am doing so not for speed but for pulling power. I grew up driving large capacity cars. A Riley engined Healey, several Alvis 3 Litre's, Mk 3 Zodiac auto, Rover P6's auto and manual, SD1's etc. An enduring memory is of riding in the back of my fathers 1936 Alvis Silver Eagle down Oxford Street at about 70 in the middle of the night, about 2am! The sound from the 2 inch copper exhaust reverberating from the tall buildings. I was probably about 7 or 8 years old then. I may have grown older but I still haven't grown up yet! LOL

Copper exhausts are on my list!!! <vbg>
12 Jan 2015, 12:13am
Sorton wrote:
Another solution might be to reverse the seat belts, having the shoulder straps in the centre of the car with some sort of hooped support between the B posts across behind the seats.


I have considered this option, there is more height to play with in the centre of the car. Mr. Towed did this in his build but apart from the issues of encroaching on the rear 'seating'. I feel that the seat belts should prevent the upper torso from being allowed to be thrown out of the side of the car, as it is when the shoulder belt is attached to the 'B' post.

I am not a safety freak but ever since a goof friend was involved in a very serious crash on Mull and had to be airlifted to Glasgow I have always worn my seat belts and treated them as an ally to be embraced, rather than a nuisance to be accommodated and tolerated. My friends life was saved by the fact she was wearing her seat belt when driving her Mini when it was hit head on by a big Merc being driven at speed over a blind crest. Since then several friends have been saved by their seat belts which has reinforced my feelings in this direction.
12 Jan 2015, 12:25am
a big scary monster wrote:
In the wife's convertible Lexus the belt passes under a leather strap atop the seat in the front ( pretty sure that is just to make it easy accessible and so it can be moved for rear seat access, but maybe an option.) And in the rear they come from the middle I always presumed it was so you could sit sideways but now I am thinking its to get the required height. I can email you some pics after 6pm if you like. Ed.


If you could post some pix it would be good, some way of locating the shoulder belt would be good, it would prevent it from slipping off and probably make it more comfortable to wear.
17 Jan 2015, 2:17pm
Berlinetta

Isn't there a problem with trying to get a Berlinetta through the IVA ?? thought they had rejected the use of the Cortina front suspension and were trying to get them to fail an MOT ??
17 Jan 2015, 8:26pm
I know of one very well built one which was rejected at IVA due to the way the Cortina cross member is used in the design, but there are many Berlinettas on the road and have never heard of any issues relating to the front suspension.

I am not aware of any regulations in the MOT which could cause a fail due to the Cortina cross member and although I am aware of the issues, given the greatly reduced weight and therefore lower forces present in the Marlin setup I don't have any concerns about it's integrity.

I know of many far worse examples of poor implementation of parts in kit cars which seem to have gone unchallenged.
19 Jan 2015, 8:05am
A Little Progress...

After much chin scratching and thinking, I came up with my solution to the seat belt issue.

I decided to raise the rear tub by 4" and create a new, much stronger 'B' post. The original 'B' post is basically a piece of flat steel 1.5mm sheet with a slender reinforcement brace behind it. I have effectively raised the top seat belt anchor 195mm, almost 8".

The top of the rear tub is now exactly level with the highest point of the scuttle, purely by accident. There are several side benefits of this approach. I have a much enhanced capacity in the boot, the rear passenger has a better seat with better back support with more enclosure, I also welcome the more 'upright' and higher profile which makes it more closely resemble the original 1930 Alfa Romeo lines which the Berlinetta is said to be modelled upon.

I have used 120mm X 80mm hollow section with 5mm wall thickness as the material for the 'B' post. While it may be a little over the top in some ways I know it will be man enough for the job and since this is safety critical I will accept the slight weight penalty. Given it's at the back, a little extra weight over the back axle is not a bad thing anyway, in moderation!

I have tapered the box section down to about 50mm X 70mm at the top and when it's finished I will cap the post and blend in the corners. If I do decide to use a hood I will have a perfect platform on which to mount the hood hoops.

The first stage welding in the new 'B' Post.


The weld at the base.


This is the 'Before' picture with the black kneeling pad standing in for my shoulder...


The effect on the angle of the seat belt over my shoulder is to make it almost horizontal, even after I raised my seat 45mm.


The robust nature of the new 'B' post can be seen here.


It only remains to do the same at the near side and I can tick another task off my list.

I will be ordering the gaskets for the engine and gearbox soon, so I can start re-assemby, the metal for the bonnet and bonnet sides will be in at my suppliers now, so I need to collect that. That will provide another challenge, forming the louvers in the bonnet side panels. I may need to make a press to do that, I haven't decided exactly how I am going to make them yet. I intend to have a play once the 'B' post task is completed.

In the mean time I am doing MOT remedial tasks on my ex wife's Vectra replacing the front-rear brake pipes with the car perched on ramps in her drive, at least it's not raining, although snow forecast tomorrow. Big incentive to get it finished today!
19 Jan 2015, 4:47pm
Ed - Sorry it has taken me a while to spot your build thread. :rolleyes:

That is a nice bit of welding on the "B" post and a HUGE improvement on the seat belt routing. :cool:

How did you raise the rear tub to match? Is it a separate piece?
( Sorry I am not familiar with the kit you are using. )

Good luck, Paul. :)
19 Jan 2015, 6:17pm
Hi Paul, welcome aboard!

I am very slowly finding my way around the threads here.

Thanks for the compliment on the weld, purely a fluke! LOL I have been welding for nearly sixty years so I deserve to get the odd one right... You don't want to see my oxy acetylene aluminium welds.:dizzy:

I am much happier with the seat belt alignment now, it was a fundamental issue which had been troubling me since I got the car. I decided to grasp the nettle and make a decisive improvement, rather than tinkering at the edges.

The back tub is a one piece fibreglass moulding, quite heavy, not bad quality for f/g, the main attachment is down each side on flanges to the massively solid chassis (makes a Land Rover look flimsy!!!). I simply made two plates of aluminium 6" high and bolted them across the gap caused by lifting the tub.


I had been considering it for a while, I am looking for a sort of more 'upright' style which the 1930 Alfa's had. I have dumped the f/g boot lid and wheeled up an aluminium replacement. It is a bit floppy at the moment but I plan to make a backing frame by beating some sheet into shape or maybe a tubular surround linked to the outer panel.

Paul, I am away from home at present at my ex-wife's, on my main computer at home I have a page of your main thread open at a point where somebody showed an open car with new aluminium doors, there was a comment that they have been professionally made. Right now I can't find the pictures. The frame was tubular, with a panel beaten flange riveted or welded to the tube, then the door skin folded round the flange. I am not sure where you are with your car in that regard, I am at about the beginning of 2014 and up to date, if that makes sense, I have yet to read most of 2014. I plan to use the idea I got from that picture to make my own doors and may be able to give you some ideas how to make your doors from aluminium depending on where you are at with them.

Working with aluminium is really quite easy, unless you decide to try to weld it of course!
19 Jan 2015, 9:04pm
Thanks Paul, that's brilliant! This is the other side door. Shows the lock mechanism a bit better.


Even better they have used a similar technique for the boot lid...


That's a really useful link Paul, thank you.

As for sealing the doors shut that was my plan, but my son Michael outvoted me, he is nearly bigger than me now! He also wants doors on his little Land Rover...


All great fun!

# [COLOR="white"]450[/COLOR]
20 Jan 2015, 9:47pm
The Bonnet...

Picked up the hinge for the bonnet today, 16 gauge stainless, a tad over 2" wide and 72" long. I was a bit concerned the flats would be too narrow but they seem well wide enough. Tomorrow I hope to collect the sheet aluminium for the bonnet so there will be no reason not to crack on with that aspect of the project.

I am still unsure how I am going to make the transition from flat to curved profile but my usual trial piece with scrap will hopefully reveal the technique.

I haven't decided whether to use dome headed solid aluminium rivets or 4mm stainless dome head cap screws. I very much like the way solid rivets pull the panels together and make a really rigid joint. I think it's because the rivets expand in the hole and that makes the whole thing so much more rigid.
25 Jan 2015, 10:26pm
Unexpected Visitor.

Having lost the last two weeks to MOT rectification on my ex wife's car, replacing half the braking system in less than ideal conditions, I resumed work on the Berli yesterday. I fabricated the new nearside 'B' post ready to install it today but ran out of MIG wire at the last minute. I reverted to stick welding, nothing wrong with that, but messier and not as quick/easy. Will post some pix soon.

This morning I welded the 'B' post in and buffed up the welds, I was about to break for lunch when a chap peered into the gloom of my garage, wondering what the angle grinding was about...

My visitor asked me what I was working on, he was very interested in the build. Much admired the rolled aluminium panels and the rest of the car too. He told me he was working on a similar project and that he had some experience of car building.

His name is Mark, from near Rugby. He was involved in the building of the Dunsmore - Jaguar specials of the early to mid 90's. Apparently they built about 15 of these cars, until DVLA decided they were a manufacturer. Being a manufacturer meant a big step up with all sorts of issues like crash testing and stuff, so they packed it in.

http://www.classicmotor.co.uk/dunsmore.htm

My visitor, Mark told me that sadly, Bill Hines the originator of the Dunsmore, passed away some years ago. He told me how they made the curves on the bonnet by tacking the panel to a welding bottle and rolling it on the workshop floor!!! All high tech stuff!

Bearing in mind my little workshop is tucked away in a very remote corner of Cumbria, I do attract some very interesting visitors. We had a really nice chat about interesting cars.
28 Jan 2015, 7:42pm
Speak German?

I have a little puzzle, my brake master cylinder is from a BMW, I don't know which, although I think I was told once...

I have started to pipe up the brakes and the old chestnut of which port goes where arrises once again. It would have been very convenient if the front brakes were connected to the back part of the master cylinder because that has two ports, and the back circuit to the single port at the front of the master cylinder.

However, given the rear outlets are marked 20 (mm?) and the front outlet is marked 19 (mm?) I am assuming the front outlet should go to the front brakes via a 'T' piece and the rear outlet with one outlet port blanked off, to the back brakes. That assumption because usually you need a greater pressure to the front brakes, the back brakes just assisting, also you don't want the back brakes locking up well before the fronts have started to bite.

I have made a photo of the m/c; beside the 19 and 20 markings there is a letter, my query relates to the letter, does it indicate H and V to indicate F and R (front and rear)?

Also, can anybody explain why there are two outlet ports on the outlet marked 20?

Any suggestions will be appreciated, while I could look a word up, H and V are difficult to look up! ...Just thought, perhaps I just look up Front and Back in German?

Anyway, any suggestions still appreciated.


Ordered the gaskets for the engine today, may start assembling that tomorrow. :icon_biggrin:
28 Jan 2015, 7:50pm
Doh!

:doh: Vorderseite means front...

zurück apparently means back. Mmmm, still unsure. :icon_frown:

Knowing what little I do about German they probably have a special word for 'Rear Brakes'.

... Like, Bremse hinten is this the H?

Still think I would rather have the smaller piston going to the front brakes. Unless of course somebody here knows otherwise?

Reminder; the brakes are Mk 3-4-5 Cortina, disk - drum; while the master cyl is BMW.
28 Jan 2015, 8:14pm
When I did my Sumo I used a Cortina master cylinder. It was the other way round to yours though with the two outlets at the front and the single one at the rear.

The twin outlets fed the front brakes, one for each side. The single outlet for the back brakes. The pipe for this one goes to one of the rear cylinders and then back out again to the other rear cylinder over the live rear axle, hence why only needing one outlet.

Hope this makes sense.

John