MadaboutKitcars

This is a read-only archive of the old Madabout Kitcars forum. New posts and replies are no longer possible, but every thread is still here to browse and read.

250 swb build

6 Jul 2016, 7:45pm
I was approached via Jeff H on here to put a 250 SWB together for a guy that had started the build but come up against a brick wall . He went to see Jeff's car with a view to building some similar features to Jeffs into his and , long story short ..I have the build .
Jeff will be doing prep and paint , I have been asked to fit the kit and incorporate a few changes ...

The customer had fitted the front end , placed the rear section on but not fitted , wired the rear lights in , fitted grille and plates and door frames ...and drove it 65 miles to my workshop !!

I made a start yesterday ..

I have fabricated from ally sections , some rain channels to go around the bonnet aperture .. these are bonded , rivetted and fibreglassed in place .

I have done the inner wing slice both sides , I chose the two slice method and glassed it back together .
I have removed the original BMW wing mounts ..
Washer jets and side repeaters have been trial fitted .


I have begun to fit hidden fixings to hold the bonnet in place , simple homemade 'bighead' style fixings using flat plate and 8mm bolts welded in the centres , bonded to the underside with tiger seal ...

I have also removed the doors and interior in preperation for the shorter door / higher cill modification that this ones getting too ...
6 Jul 2016, 8:06pm
I'm not sure how well it shows in the picture , but the front rain gutter has 2 ovalish dips to allow the bonnet pins to locate fully back in their holes .


I ended the day with seats and rear carpet section removed . Drivers seat came out in about 10 mins ...passenger seat about an hour ! The electric motor stopped working , so I couldnt get to the rear bolts that hold the seat in ...after messing about trying lots of different things , I phoned Chris at Tribute to see if there was an easy way ...Chris basically said , you are screwed ! but if you can get the cables on either side of the motor to turn , you can very slowly wind the seat forward manually ...the cables turned ! so that was cool ...I decided to cut the cables , put the cut end in a cordless drill and wind them that way ...it worked !!
6 Jul 2016, 8:41pm
Those seats are blooming heavy aint they ?

Be good to see another one of these coming together, I like the rain channel idea, looks very neat.
7 Jul 2016, 8:27am
Door/sill mod

I do like the look of the modified door and sill but it looks like an awful lot of work. Could anybody do a photoshop of the rear of the door being curved and the rear wing / sill gap being filled but leaving the bottom of the door and sill itself alone?
7 Jul 2016, 4:24pm
The more different build threads the better. I am watching your thread and Jeff's avidly along with JagTVR's.
7 Jul 2016, 6:18pm
Managed to get 4 hours in on the car today .

The bonnet pins I made yesterday had cured overnight , so a quick clean up and my nylon spacer added with a washer and the bonnet was ready to fit.

(Luckily whilst I was in Wicks yesterday I spotted that they had put the 250 SWB bonnet spacers they sell in the wrong aisle and they were in the 'door stops' category and priced at 49p a pair !!)

I drilled holes in the fixing plates to allow the tiger seal to bleed through and grab the bracket better ...


rest of the afternoon was spent mostly removing stuff ...rear bumper and all its bracketry in preperation for a Jeff H rear framework to be fitted.

seat belt mounts were cut off as this ones getting a harness bar ..I welded 4 ringbolt seat belt mounts into the car as well ...2 on inner cill where a handy grommet lives and two on the rear of the tunnel...

final job of the day was to remove the passenger side boot hinge ...


more tomorrow ...
7 Jul 2016, 7:27pm
Thanks

Thank you for doing this thread. Some useful information and good photographs!
7 Jul 2016, 7:36pm
I sit here smug in the knowledge that I know why Gary has removed the nearside hinge.........

Any guesses chaps ?
7 Jul 2016, 7:42pm
Hmmmmmm are you just fuelling the curiosity?
7 Jul 2016, 7:45pm
jones wrote:
Hmmmmmm are you just fuelling the curiosity?


You guessed that quickly, Well done fella.
9 Jul 2016, 6:14am
Gary - Love the use of door stops. :cool:

Good luck, Paul. :)
9 Jul 2016, 7:36pm
Not much achieved today as I had my son to look after this morning and had some parts chasing to do ...

I have now got this section ...


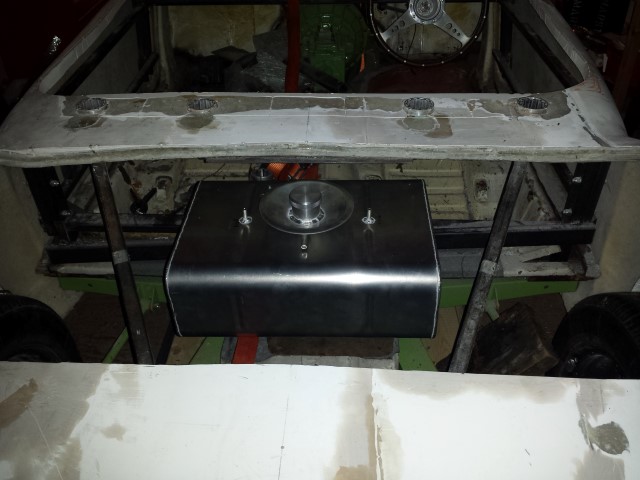
I'm fitting the filler cap in the 250 GTO location , which has me a little perplexed at the moment trying to find a solution to the new placement and the route the fill tube can take to enter the tank nicely , no kinks , not too slow a fill etc...I've got a rough idea how its going to work but until I start digging , not totally sure ...

The boot corner piece Chris at Tribute supplied is a good starting point , the cap needs to be recessed slightly , reducing the flow angle , but I think we can make it happen ...

I finished the hinge movement earlier , rebraced it and checked for operation ...so not much achieved today , hoping to get a few hours on it tomorrow as I only have a certain amount of time to get this car ready for the paintshop ...

9 Jul 2016, 9:13pm
Is the filler going in the LHS? If so is it possible to turn the tank 180 degrees to improve the fill route? (might make it difficult for exit tubes on tank though?)
Just a thought.
10 Jul 2016, 3:04pm
Mitchelkitman wrote:
Is the filler going in the LHS? If so is it possible to turn the tank 180 degrees to improve the fill route? (might make it difficult for exit tubes on tank though?)
Just a thought.


The filler will be mounted LHS,

This is what the customer has asked for, it will be a challenge to get the pipes routed across to the offside, the customer is fully aware it may be a slow fill but he is happy for the trade off.

Gary picked up my old filler recess this morning to use, he is so keen he is working on it on a Sunday .
10 Jul 2016, 4:32pm
Managed to get 3.5 hours in on her today ....
Jeffs old filler recess he decided not to use on his car was a godsend today ...Combining trimming it down in height and a section of MX250 acquired from Tribute , enabled me to do this ....


All held together with straps and tec screws for now .. a section of the SWB boot aperture was cut away and the MX panel grafted in ...the rain channels and a bit of bodywork will need fettling but I managed to get the rear back off , turned over and glassed up before I left.
The reference pics I found show the cap on close inspection to not be fully flush as I first thought , but to actually stick out a little bit ...

The cap supplied is a bit larger than the originals , so will dominate this area a bit more than they normally do , but its minimal really and once all the edges are straightened out , gapped around the cap etc..she should be good to go ...


When I put it back on , I can start the bootlid mod. and then the task of connecting to the tank begins ......
10 Jul 2016, 4:53pm
Looking good Gary, I found these pics if it helps ?

10 Jul 2016, 5:10pm
Thanks Jeffy baby .... I used these two images ...

http://www.boldride.com/ride/1960/ferrari-250-gt-swb-berlinetta/image/26


http://www.boldride.com/ride/1960/ferrari-250-gt-swb-berlinetta/image/27

If you take the image number bit off the end of the adress , it links to a great gallery ...

Its interesting because looking at your pic above , I would have opted to put the cap hinge above the shut line ..a few pics suggest that , but my links show it inline with the shut line ...I know they all have subtle differences , no 2 are quite the same ...and that is great news for the fakers !!
10 Jul 2016, 5:29pm
Jeff H wrote:
The filler will be mounted LHS,

This is what the customer has asked for, it will be a challenge to get the pipes routed across to the offside, the customer is fully aware it may be a slow fill but he is happy for the trade off.

Gary picked up my old filler recess this morning to use, he is so keen he is working on it on a Sunday .


So not possible to turn the tank 180 degrees so the filler can be on the same side?
10 Jul 2016, 5:34pm
Mitchelkitman wrote:
So not possible to turn the tank 180 degrees so the filler can be on the same side?


I don't know to be truth full,

On my E36 the tank is shaped to fit only one way, The rear suspension on these are E30 based, also as you mentioned not sure how the flow and return pipes are done.

I hope to get mine on the ramp later on this week so will have a look.

Would save a lot of aggro if it could be done.


Actually a quick Google looks as if the tank is a one way fit.
11 Jul 2016, 6:29am
Gary - So far, it does look like this…


Is going to make a good tribute to this. :cool:


Is there any way of fitting a different petrol tank in the current space?

Something similar to Oxford's Sammio, but bigger, just to make the fuel hose route easier.


Good luck, Paul. :)

PS
I've only just started using those straps on my own build and they are great for this kind of thing. :D
11 Jul 2016, 6:51am
It might be easier to modify the tank cut a new inlet and patch the old
11 Jul 2016, 6:31pm
ROADSTER - Yes mate , thats one option I am considering ...

PAUL L - I wanted the customer to fit a new tank in the boot , thats actually how the 250 SWB is ..but he wants to retain bootspace as much as possible , even creating some extra space if we can ...

Today I continued to beaver away on the fuel cap mod ...

We are at this stage now ...


I have modified the boot inner skin as well , moved the original hinge mount in to match the hinge and re-instated the inner rib to flow better with the new location ...its only roughly filled so far , another bit of filling required to straighten it out a bit , but you get the idea ...


So at the end of today , we are at this point ...it still needs gapping up a bit , but thats Jeff's dept . !!


tomorrow I go digging and hopefully find a solution to the fuel flow ...
11 Jul 2016, 6:49pm
I know its a lot of work but I much prefer this fuel cap location
11 Jul 2016, 6:56pm
That looks really good Gary,

Good luck sorting the fuel connection out.