|
|
| Sammio Builds and discussions Sammio bodied car builds and specials |

5th April 2014, 19:35
|
 |
Senior Member
|
|
Join Date: Dec 2013
Posts: 839
|
|
 Swifty's Navigator
The first post for my Navigator build and the start of a great journey.
Bought a rather tired looking GT6 engine off flea bay for a reasonable price local to where i live which is handy.
IMG_3992.jpg
Engine out of the van and ready for a full strip down.
IMG_4001.jpg IMG_4005.jpg
She does look like she needs some TLC so here goes
IMG_4021.jpg
Last edited by swifty; 26th May 2014 at 17:43..
|
5th April 2014, 19:44
|
|
Senior Member
|
|
Join Date: Dec 2013
Posts: 839
|
|
IMG_4021.jpg IMG_4024.jpg
Rocker cover off then head removed to find six domed topped pistons as this is from a 1973 GT6 the later version, stronger crank etc.
IMG_4027.jpg IMG_4032.jpg
Now it's the turn of the head which has the larger inlet valves, a little bit of carbon build up and few burnt valve seats which will be fixed later.
|
5th April 2014, 19:52
|
|
Senior Member
|
|
Join Date: Dec 2013
Posts: 839
|
|
Engine turned through 180 degrees to strip the bottom end.
IMG_4040.jpg IMG_4046.jpg
View into the crank case where the sump goes, all pistons con rods, main bearing housings and rocker shaft laid out in order. You can see a slight build up of carbon deposit around the piston skirts where the hot gases have been passing the piston rings, also there is a little rub wear adjacent the gudgeon pin axis which is normal for an engine of this age.
The engine was then sent off to an engine machine shop to be De-greased, the crank shaft journals polished, cylinder bores honed, the cylinder head was also converted to run on unleaded with hardened exhaust valve seats along with new valve guides and a 6th head skim.
IMG_4051.jpg
A very clean degrease crank case is ready for re assembly, all the oil and water channels have been cleaned and blasted with compressed air before the re assembly begins to make sure the engine has many more years ahead. New core plugs fitted.
IMG_4053.jpg IMG_4055.jpg
Crank shaft fitted and torqued down with new main bearings. New crank shaft oil lip seal in place.
Well that's it for now, its time for a cuppa, i will load more photos soon.
Last edited by swifty; 6th April 2014 at 20:09..
|
5th April 2014, 20:03
|
|
Senior Member
|
|
Join Date: Dec 2013
Posts: 839
|
|
Exciting time the donor spitfire has arrived looking worse for wear but ready for a complete make over to a 50's sports car, roll on.
IMG_4058.jpg
Cant wait to start the strip to get a better look at the chassis.
IMG_4073.jpg
Body midway from being removed.
IMG_4091.jpg
First major hurdle the body tub is off and time to inspect the chassis for problems.
IMG_4076.jpg
The chassis is not too bad just a couple of front outriggers to replace but will get a better idea once the engine is removed.
Well i now have loads of bits to sell hopefully i will get back most of the purchase price for the spitfire.
|
5th April 2014, 20:05
|
|
Senior Member
|
|
Join Date: Mar 2012
Posts: 1,152
|
|
Welcome, Swifty. I look forward to following your build. And to think, somebody said that you would never build a car. You've made the right choice.
Last edited by oxford1360; 5th April 2014 at 20:10..
|
5th April 2014, 20:44
|
|
Senior Member
|
|
Join Date: Dec 2013
Posts: 839
|
|
Thanks Oxford, i have followed your build and you have an eye for quality and detail which is the type of build i am hoping to achieve.
I do have more photos as i know the guys on here love to see what your up to and I've been busy manufacturing parts on the CNC gear we have so exciting times ahead.
Last edited by swifty; 23rd January 2016 at 09:04..
|
5th April 2014, 20:45
|
 |
Senior Member
|
|
Join Date: Jul 2011
Posts: 5,328
|
|
Quote:
Originally Posted by oxford1360

Welcome, Swifty. I look forward to following your build. And to think, somebody said that you would never build a car. You've made the right choice.
|
Never build a car? Who said that then...
Welcome to the fold Swifty, looking forward to seeing your build come together.  |
5th April 2014, 21:43
|
|
Senior Member
|
|
Join Date: Mar 2012
Posts: 159
|
|
Hi Swifty,
This is looking very productive and thoroughly at the same time. Looking forward to see the progress on this project.
michiel
|
5th April 2014, 21:44
|
|
Senior Member
|
|
Join Date: Dec 2013
Posts: 839
|
|
Has anybody attempted to hinge the hump like in this photo, it looks like a cool solution for a rear boot lid.
53_Alfa_Bucci_Special_TV_05_PBL_03.jpg
|
6th April 2014, 10:23
|
 |
Senior Member
|
|
Join Date: Dec 2011
Posts: 656
|
|
Welcome top the fold Swifty. You've started your project in the right place, getting the Engine (Heart) of the car sorted. I hope the chassis is in as good condition when you're done. Ring or pop in for a chat when you can as we're doing a few interesting things to the Navigator kit that may help you along.
|
6th April 2014, 18:27
|
|
Senior Member
|
|
Join Date: Dec 2013
Posts: 839
|
|
Thanks Andy, will contact you soon more than likely by phone.
Been busy today removing the redundant engine and gearbox, its sooo easy with the open front end which will come in handy for future work once the car is complete.
IMG_4096.jpg
Engine out, its an easy task to complete with an engine crane, a couple of bolts to remove and hay presto job done.
IMG_4116.jpg
The chassis not too bad especially when you consider it's 41 years old, some area's even have the original paint which when removed has clean steel. The area around the oil leaker parts is as good as the day it was manufactured, its a shame the oil had not traveled all over the chassis.
IMG_4103.jpg IMG_4104.jpg
The two front outriggers will require attention, i think i will fabricate complete new parts as the replacement's cost £109 and a piece of 2mm plate will be no where near that, one more part on the ever growing list of replacements.
IMG_4097.jpg
Thought i would include a picture of my electrolysis tank which is excellent at cleaning all the crud and rust off the metal parts before painting. It's very easy to put together and if you fancy one too then Google electrolysis metal cleaning for lots of info, some good guides on YouTube. Just be careful with ventilation as the gases given off i believe to be hydrogen and chlorine.
Last edited by swifty; 6th April 2014 at 18:32..
|
6th April 2014, 18:35
|
|
Senior Member
|
|
Join Date: Jul 2011
Posts: 5,328
|
|
Sure I've seen one of those vats somewhere before...
Oh yes, that's right, Crystal Meth making chemistry teacher Walter White had something similar for dealing with business rivals.

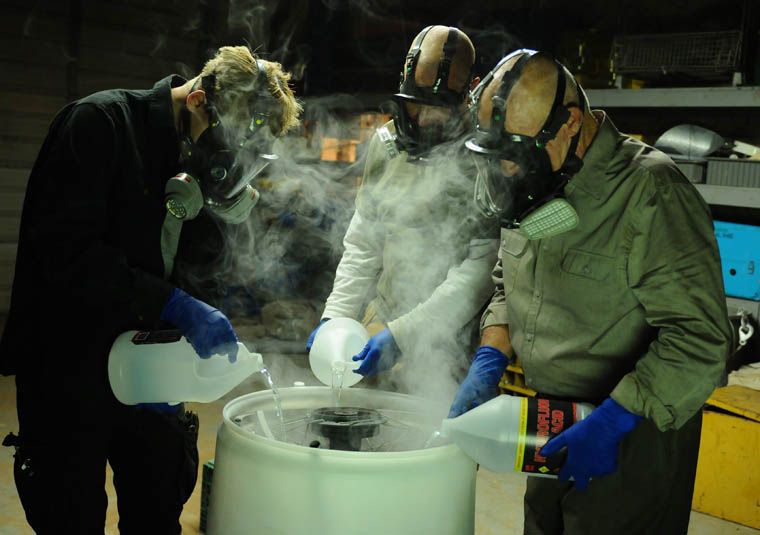
Best of luck with the chassis restoration, it was my most onerous task.  |
6th April 2014, 18:47
|
|
Senior Member
|
|
Join Date: Dec 2013
Posts: 839
|
|
Nice one Mister Towed  , i can do with one of those masks when spray painting  .
Last edited by swifty; 6th April 2014 at 18:54..
|
8th April 2014, 07:00
|
 |
Senior Member
|
|
Join Date: Feb 2012
Location: Wembley, London
Posts: 5,058
|
|
Swifty - Good to see another Spitfire based build on the go. 
Given the improvements to the Navigator body shell and internal framework, you should have an easy build.
OK, there is no such think as an "easy" build, but at least it will not be my Cordite based nightmare. 
Although the sight of dismantled Spitfire, open driveway & tarpaulin are sending shivers down my spine. 
I really hope that is a garage I can see in one of the photos and that is where the building will take place.
Good luck, Paul. 
|
8th April 2014, 14:49
|
 |
Senior Member
|
|
Join Date: May 2012
Location: Preston
Posts: 139
|
|
Welcome aboard the good ship Ribble Swifty 
I look forward to seeing how your build progresses 
Good to see another Navigator build 
Cheers
"Lil" Andy |
12th April 2014, 11:44
|
|
Senior Member
|
|
Join Date: Jun 2011
Location: birchington, kent
Posts: 1,769
|
|
How do you start? Do you have to draw it up and make note of measurements?
|
13th April 2014, 17:05
|
|
Senior Member
|
|
Join Date: Dec 2013
Posts: 839
|
|
Quote:
Originally Posted by garyh
How do you start? Do you have to draw it up and make note of measurements?
|
Hi Garyh Yes i start by looking at the part or parts that the new machined component will fix too then base the new part around those measurements, sometimes if its a simple job i will make and measure as i go along using my eye for judgment as i did with the hand brake ally handle.
The one time i do make a cad drawing is where the shape is less simple with PCD's etc, for example when i eventually make the adapter plate for the type 9 gearbox to attach to a GT6 bell housing i will measure accurately with no wastage as the cad drawing gives me information at the click of a mouse that would require various calculations done long hand using trig, the beauty of modern technology.
Last edited by swifty; 27th November 2014 at 20:24..
|
13th April 2014, 17:59
|
|
Senior Member
|
|
Join Date: Dec 2013
Posts: 839
|
|
The cylinder head is now re-assembled and back on the engine so one more step closer.
IMG_4175.jpg IMG_4183.jpg
Rocker shaft parts laid out pre assembly to check the layout and then the Rocker shaft assembled ready to fit to the cylinder head, the rockers are handed left and right and there are spacer washers which have to be added to the shaft in the correct sequence, all in all a simple task.
IMG_4189.jpg IMG_4192.jpg
Valves in head with new springs ready to fit. The next image shows the valve spring compressing tool used to compress each valve spring so the retaining collect can be fitted.
IMG_4193.jpg
Another image of the valve compressing tool showing the point where the spring top seat and collect go onto the top of the valve stem. If you look at the valve on the right you can just make out the split taper collect that stops the valve popping off the valve stem, the compressed valve has the split Collete's fitted prior to releasing the tool.
Last edited by swifty; 13th April 2014 at 19:16..
|
13th April 2014, 18:16
|
|
Senior Member
|
|
Join Date: Dec 2013
Posts: 839
|
|
More images of the cylinder head overhaul.
IMG_4190.jpg IMG_4191.jpg
These images show the difference between the inlet and outlet valve fittings, the left hand image has two components to the Collette retainer whilst the right hand image shows only one component.
IMG_4187.jpg IMG_4188.jpg
This images shows the hardened exhaust inlet valve seat, you can just make out the different colour metal ring. The next image shows the valve after the valve seat was lapped in, you need to see a gray colour band all the way around the valve taper seat.
IMG_4195.jpg
All the valves are now fitted to the cylinder head, valve stems and guide bores etc were lubed with engine oil prior to assembly, also the rocker shaft oil feed galley in the cylinder head was checked with compressed air to make sure its clear.
Last edited by swifty; 13th April 2014 at 18:19..
|
13th April 2014, 18:37
|
|
Senior Member
|
|
Join Date: Dec 2013
Posts: 839
|
|
This section shows the wear on the old rocker shaft.
IMG_4179.jpg
The new rocker shaft at the top has deeper flats machined, i think this may be an improvement to help in lubing each rocker as they pivot on the shaft at this point. I have laid the old shaft next to the new so you can compare between old and new.
IMG_4178.jpg
You can see the extreme wear on the rocker shaft where one of the rockers rotated, it looks like the shaft has been starved of oil at some point, just about all the rockers had picked up the same as this one, poor maintenance by a previous owner, so let this be a warning to regular checking and changing the engine oil.
IMG_4176.jpg IMG_4184.jpg
This shows the point where the rocker comes into contact with the valve stem (the point you put the feeler gauge in to adjust the gap, this images shows the rocker arm upside down), the valve stem has worn an indentation into the rocker toe. The second image shows what a new rocker looks like, no wear at all. Apparently this wear affects the angle at which the valve opens so effecting the performance of the engine.
IMG_4203.jpg
The cylinder head fitted and torqued down, valve timing is checked to make sure its correct i did set the cam shaft up with a dial gauge on no 1 piston prior to fitting the cylinder head, then each valve gap is set to the correct tolerance. Made three new rocker box studs out of my favorite material, stainless steel.
Job done and the engine is beginning to come together, the real test will be when i start her up so fingers crossed all will be ok.
Last edited by swifty; 3rd January 2015 at 20:41..
|
|
Currently Active Users Viewing This Thread: 1 (0 members and 1 guests)
|
|
|
 Posting Rules
|
You may not post new threads
You may not post replies
You may not post attachments
You may not edit your posts
HTML code is Off
|
|
|
All times are GMT +0. The time now is 13:52.
|


 Hybrid Mode
