|
|
| Vintage and Classic Roadster Kit Car Builds For Vintage and Classic era kit cars. Post your build reports, problems and progress here |

24th March 2021, 14:00
|
 |
Senior Member
Enthusiast
|
|
Join Date: Mar 2005
Posts: 3,079
|
|
Quote:
Originally Posted by Mitchelkitman

Just a small thought..... do you need to use dome head screws, or covers over the existing hex screws to make the IVA compliant?
|
Yes, of course , you are right but on the Sabre all this gubbins is covered by a trim panel.
But thanks for your thought  |
27th March 2021, 09:01
|
|
Senior Member
Enthusiast
|
|
Join Date: Mar 2005
Posts: 3,079
|
|
Quote:
Originally Posted by peterux
So, all I have to do now is cover it in a new piece of vinyl!! 
...peter |
So this week I've made some more progress on the dashboard surround.........
First I made a paper template, not wishing to mess up a large length of vinyl.
 Dashboard surround Dashboard surround by Sabrebuilder, on Flickr
I then cut out the piece of vinyl which turned out to be 108" long.
 Dashboard surround Dashboard surround by Sabrebuilder, on Flickr
I'm using this contact adhesive from Woolies.
 Dashboard surround Dashboard surround by Sabrebuilder, on Flickr
I started gluing at the base of the surround.
 Dashboard surround Dashboard surround by Sabrebuilder, on Flickr
I then worked my way around the edge.
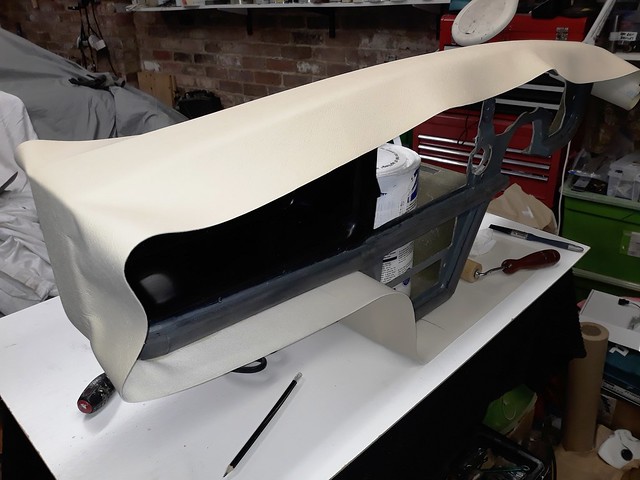 Dashboard surround Dashboard surround by Sabrebuilder, on Flickr
After much trimming and gluing I've got his far.
 Dashboard surround Dashboard surround by Sabrebuilder, on Flickr
A bit more work required to finish off around the steering column shroud and fixing the de-mister vent escutcheons.
Stay safe..........
...............peter |
27th March 2021, 10:53
|
 |
Senior Member
Enthusiast
|
|
Join Date: Sep 2004
Posts: 1,897
|
|
Looking great. Upholstery is one of those things that I never achieved satisfactory results. I don't think I have the patience....
Cheers Robin
|
27th March 2021, 22:43
|
 |
Senior Member
Enthusiast
|
|
Join Date: Feb 2005
Location: Hampshire
Posts: 2,497
|
|
Looking good |
3rd April 2021, 19:29
|
|
Senior Member
Enthusiast
|
|
Join Date: Mar 2005
Posts: 3,079
|
|
Thanks for the feedback, Robin and Patrick.
----------------------------------------------------
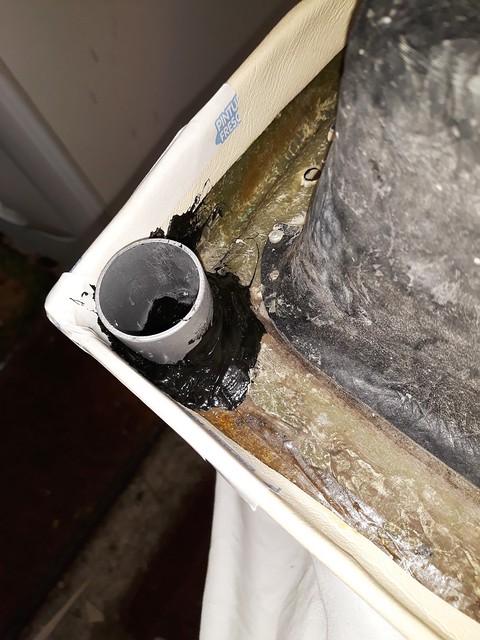
This week I've finished covering the dashboard surround so I've PU glued the demister pipes back in again.
 Demister pipe Demister pipe by Sabrebuilder, on Flickr
CORRECTION: THESE TUBES SHOULD HAVE BEEN FIXED AT 45 DEGREES. SEE POST #535 for the correct method.
And, I've made up these little adapters to connect the demist hoses to the Sierra heater box. I Araldited the tubes into the plywood bases before giving them a coat of black paint.
 Demister heater adapters Demister heater adapters by Sabrebuilder, on Flickr
I'm planning on fitting my windscreen glass before re-fitting the dashboard surround as it's easier access to both sides and I don't want to get the windscreen adhesive on the dash surround. 
Stay safe.................peter
Last edited by peterux; 31st July 2021 at 21:14..
Reason: correction to demister tube mounting
|
11th April 2021, 19:10
|
|
Senior Member
Enthusiast
|
|
Join Date: Mar 2005
Posts: 3,079
|
|
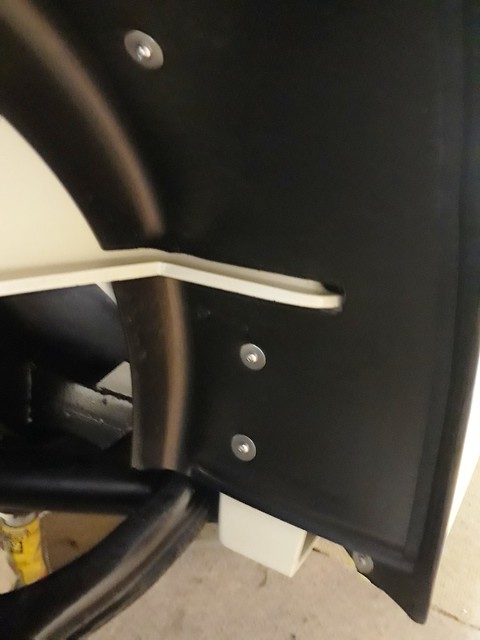
This week I've finished off the dashboard surround by fitting a new pair of chrome plated vents. Amazingly these are still available after 27 years!
 Dashboard surround Dashboard surround by Sabrebuilder, on Flickr
I've pre-wired the aux power outlets and attached the demister hoses ready to be connected to the heater box.
 Dashboard surround Dashboard surround by Sabrebuilder, on Flickr
I then remembered to fit the chrome side finishers. The rear fixing stud is very difficult to reach and see and would not be possible to reach with the dashboard surround in place.
 Chrome finisher Chrome finisher by Sabrebuilder, on Flickr
The rear stud is fiendishly difficult to reach and should have been fitted before anything else. A lesson for any other builders following my re-build. 
 Chrome finisher Chrome finisher by Sabrebuilder, on Flickr
Stay safe...............peter. |
19th April 2021, 20:40
|
|
Senior Member
Enthusiast
|
|
Join Date: Mar 2005
Posts: 3,079
|
|
 Windscreen recovery
The original windscreen fitted to my Sabre was BSI marked but not E-43R marked as now required for the IVA test. I'd removed the old windscreen when I first stripped the car down and purchased a new 'E' marked from Automotive Creations back in 2013 or maybe 2014. But for some reason, which escapes me now, I had never trial fitted it in the car, that is until a coupe of wees back when I found it didn't fit. 
I was dreading the thought of taking the laminated windscreen to the local glazers expecting to be greeted with the usual sucking through teeth and shaking of heads!
So I turned to YouTube for inspiration where I found lots of 'how to' video's. One guy in particular impressed me as he was cutting down curved laminated 'screens for American custom cars. He made it look so easy so I thought I'd give it a go.
I first armed myself with a new 'professional' glass cutter (Japanese Toyo TC17), a small bottle of cutting oil and a cheap pair of 'grozing' pliers. You also need a blow lamp to soften the plastic core of the laminated screen!
 Windscreen Windscreen by Sabrebuilder, on Flickr
The oil goes inside the glass cutter and automatically feeds a small amount to the wheel.
I also bought the cheapest laminated windscreen I could find to practise on. It cost me less than £35 including delivery.
I had a few practise runs with quite a good result.
 Windscreen Windscreen by Sabrebuilder, on Flickr
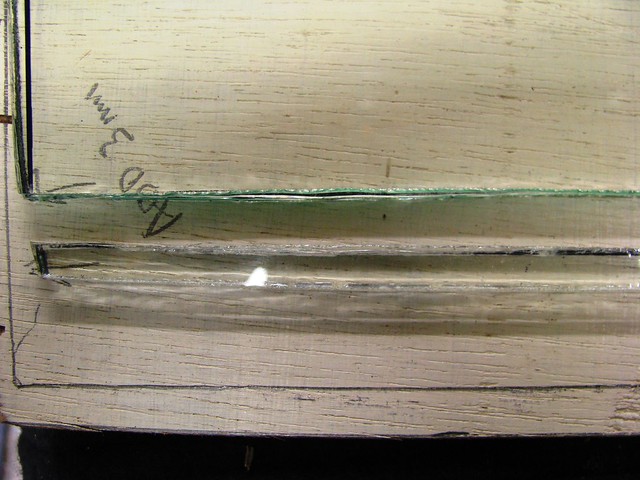
I then made a plywood template to fit the car so that I knew exactly what cuts to make. It turned out I needed to remove 8mm from the long edge and 4mm from the short edge. I was lucky that the curved side of the windscreen was fine. So I had another practise removing 8mm strip from my test 'screen.
 Windscreen Windscreen by Sabrebuilder, on Flickr
I then took a deep breath and had a go at the Sabre windscreen...
 Windscreen Windscreen by Sabrebuilder, on Flickr
Success......
 Windscreen Windscreen by Sabrebuilder, on Flickr
The edges were a bit rough so I bought one of these from Amazon...
 Windscreen Windscreen by Sabrebuilder, on Flickr
Which gave a very acceptable finish........
 Windscreen Windscreen by Sabrebuilder, on Flickr
Not bad for pure novice but I haven't had a go at cutting a curve yet 
The other little job I've done this week is make and fit a tether for the fuel cap.
I used stainless steel picture wire and part of a bath plug chain.
(Another pesky IVA requrement).
 Fuel tank cap tether Fuel tank cap tether by Sabrebuilder, on Flickr
 Fuel tank cap tether Fuel tank cap tether by Sabrebuilder, on Flickr
 Fuel tank cap tether Fuel tank cap tether by Sabrebuilder, on Flickr
 Fuel tank cap tether Fuel tank cap tether by Sabrebuilder, on Flickr
So another couple of tasks crossed of my list..........
Stay safe, peter

|
19th April 2021, 21:02
|
|
Senior Member
|
|
Join Date: Jun 2015
Posts: 1,401
|
|
Very good info on laminated glass cutting. Another skill learned.
|
20th April 2021, 13:35
|
|
Senior Member
Enthusiast
|
|
Join Date: Mar 2005
Posts: 3,079
|
|
Quote:
Originally Posted by molleur
Very good info on laminated glass cutting. Another skill learned.
|
This is the guy that gave me the inspiration and the confidence to have a go but there are lots of other 'how to' videos available.
https://youtu.be/kTM8Xy4HYAI
He uses a bit of broken tape measure to cut through the plastic but I just used a single sided razor blade. |
20th April 2021, 15:01
|
|
Senior Member
|
|
Join Date: Jun 2015
Posts: 1,401
|
|
Your post had me very interested. Watched some videos and
it looks like a good method. Filed away for future reference.
Thanks, good info.
|
20th April 2021, 15:04
|
|
Senior Member
|
|
Join Date: Oct 2013
Location: norfolk
Posts: 695
|
|
I witnessed a laminated screen being trimmed by a professional many years ago.
He scored each sheet of glass, and cracked it, then to deal with the laminate he dripped lighter fuel in the gap and ignited it.
|
20th April 2021, 19:56
|
|
Senior Member
Enthusiast
|
|
Join Date: Mar 2005
Posts: 3,079
|
|
Quote:
Originally Posted by Mitchelkitman
He scored each sheet of glass, and cracked it, then to deal with the laminate he dripped lighter fuel in the gap and ignited it.
|
Yes, there are even video's showing that technique on YouTube but I decided the blow lamp was a safer option. |
20th April 2021, 20:15
|
|
Senior Member
Enthusiast
|
|
Join Date: Feb 2005
Location: Hampshire
Posts: 2,497
|
|
Nice work!
|
22nd April 2021, 07:35
|
|
Senior Member
Enthusiast
|
|
Join Date: Sep 2004
Posts: 1,897
|
|
I have a remark about your "sunken" fuel filler. I don't know if it may be an IVA issue but possibly worth checking.
Is there anything in place to drain away any splashes or fuel spillage? Normally with an external filler it would just run down your nice clean bodywork, but with a sunken filler where does it go?
When race and rally cars have an internal filler like that it is normally surrounded by a splash bowl. Or so I beleive looking at various pictures :-)
Cheers, Robin
|
22nd April 2021, 19:32
|
|
Senior Member
Enthusiast
|
|
Join Date: Mar 2005
Posts: 3,079
|
|
Quote:
Originally Posted by MartinClan
I have a remark about your "sunken" fuel filler. I don't know if it may be an IVA issue but possibly worth checking.
Is there anything in place to drain away any splashes or fuel spillage? Normally with an external filler it would just run down your nice clean bodywork, but with a sunken filler where does it go?
When race and rally cars have an internal filler like that it is normally surrounded by a splash bowl. Or so I beleive looking at various pictures :-)
Cheers, Robin
|
Hi Robin,
that's an interesting point you raise that could affect other builders so I had a look at the IVA manual. The closest I can find is in Section 3A requirement 10. that says...... 10. The fuel tank must be positioned so that in the event of a leak the fuel could not accumulate or find a path to the passenger compartment. (if fitted in a compartment there must be a drain which does not exit onto a heat source)
However, this is not an issue on the Sabre because the plate you see above that holds filler neck and cap is not sealed to the wing so any spills will just drip to the road below.
The photo below shows the filler neck before the wing was fitted, which I think explains it better.
 Fuel Filler Fuel Filler by Sabrebuilder, on Flickr
There is quite a big gap around the filler neck and the wing.
In fact, it was while I was fitting the tether that I realised I need to fit some kind of inner wheel arches to stop rain and road dirt being thrown up by the wheel all over the filler neck.
I think my car will be OK but thanks for the feedback as I'm keen to head off as many IVA issues as possible.
cheers, Peter
|
29th April 2021, 18:39
|
|
Senior Member
Enthusiast
|
|
Join Date: Mar 2005
Posts: 3,079
|
|
Just a small update to show you all what I'm working at the moment when I get the odd spare moment in the garage.
When fitting the tether to the fuel cap I realised that I needed to fit inner wheel arches or all the road muck will go all over the filler. My car wasn't fitted with anything as it was never finished. The Sabre manual says " Cut aluminium splash plates to fit between the body and the wings, behind the rear wheels. Secure to the inner wheelarch with self tapping screws. Fit edge seal to the splash plates where they contact the wings."
But, I thought I'd try and fabricate something a bit more professional looking so I bought these truck mudguards.
They looked about the right size and cost £36 delivered.
My plan was to cut them up to fit.
 Rear inner wheel arches Rear inner wheel arches by Sabrebuilder, on Flickr
I first made a cardboard template and set about cutting up a mudguard. I used my jigsaw to cut the edge off and a hand wood saw to cut the slots for the Sabre's body flanges.
 Inner rear wheel arch template Inner rear wheel arch template by Sabrebuilder, on Flickr
I then offered it up and with a bit of pushing and shoving it popped in to place. I then discovered the mudguard is the exact same diameter as the Sabre's inner wheel arch. A perfect fit!
 Inner rear arch top Inner rear arch top by Sabrebuilder, on Flickr
I then found on-line this edge seal that has a finned edge and I fitted that to the cut edge of the mudguard. It's good stuff but a PTA to fit to the now floppy edge of the mudguard.
 Small leaf fin edge seal Small leaf fin edge seal by Sabrebuilder, on Flickr
At the front and top I've fixed the arch in place with m6 rivnuts.
 Inner rear wheel arch front Inner rear wheel arch front by Sabrebuilder, on Flickr
But at the back there is nothing to fix the mudguard to and it's too flexible to leave as is, so I am going to make up a bracket to support it that will be fixed behind and to the lower edge of the body tub.
 Inner rear arch back Inner rear arch back by Sabrebuilder, on Flickr
It's coming together nicely and looks production.
A bit more to do and the other side, of course.
Stay safe..............peter
|
29th April 2021, 20:41
|
|
Senior Member
Enthusiast
|
|
Join Date: Feb 2005
Location: Hampshire
Posts: 2,497
|
|
Those look nice
|
8th May 2021, 20:51
|
|
Senior Member
Enthusiast
|
|
Join Date: Mar 2005
Posts: 3,079
|
|
Work continues on fitting the inner rear wheel arches.
On the nearside, I've fabricated a support for the rear of the inner wheel arch from 8mm mild steel bar. It's fixed to the rear tub floor with saddle clips and now needs painting. The saddle clips are fixed to the bar with a dab of J-B weld to stop any movement.
 Inner wheel arch stay nearside Inner wheel arch stay nearside by Sabrebuilder, on Flickr
I then moved on to cutting and fitting the offside wheel arch.
It is fixed in the same way as the nearside at the front.
 Inner wheel arch offide2 Inner wheel arch offide2 by Sabrebuilder, on Flickr
But, at the rear, I had to re-arrange one of the breather pipes to clear the inner wheel arch.
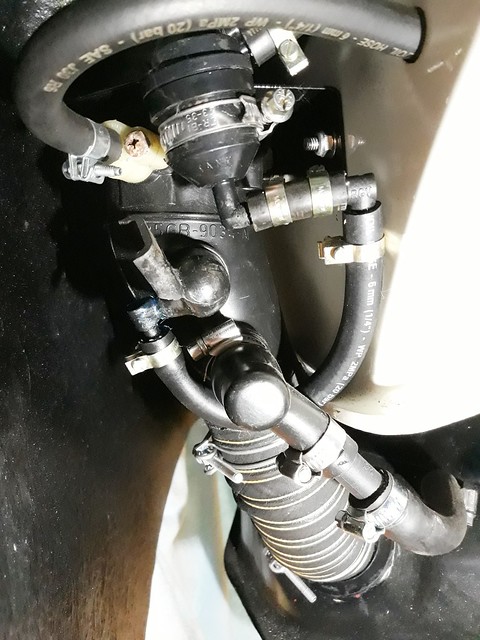 Rerouted breather pipe Rerouted breather pipe by Sabrebuilder, on Flickr
And the stay fixing had to be bent forward as the fuel tank was in the way at the rear. It can just be seen here below the body tub seam.
 Inner wheel arch offside Inner wheel arch offside by Sabrebuilder, on Flickr
This shot is looking up behind the offside inner wheel arch, showing the fuel filler and breather pipes.
 Inner wheel arch offside stay Inner wheel arch offside stay by Sabrebuilder, on Flickr
I just need to now remove the stays for paint and final refit.
It's taken far too much time but I'm pleased with the final result.
Stay safe...........peter
|
15th May 2021, 18:58
|
|
Senior Member
Enthusiast
|
|
Join Date: Mar 2005
Posts: 3,079
|
|
This week I've been tackling various small jobs. Slowly working my way through my task list.
Firstly, I painted the inner rear wheel arch stays and refitted them. So that's the inner rear wheel arches completed and ticked off my list.
Whilst I have the car raised on axle stands at the rear with the rear wheels off there were a couple of other jobs I needed to do.
One was to do with the rear brakes.
I have had issues with a 'soft' brake pedal with a feeling of some air in the system. Despite numerous attempts at bleeding the brakes I couldn't get any improvement. I found one obscure reference on the internet suggesting that air can become trapped in the Sierra rear brake calipers. I removed each rear caliper and wound the piston back with a wind back tool. I then bled the rear brakes with the tool still in place to stop the piston moving out. After some aggressive pumping of the brake pedal I did get some air out of the offside caliper. The brake feel is now much better.
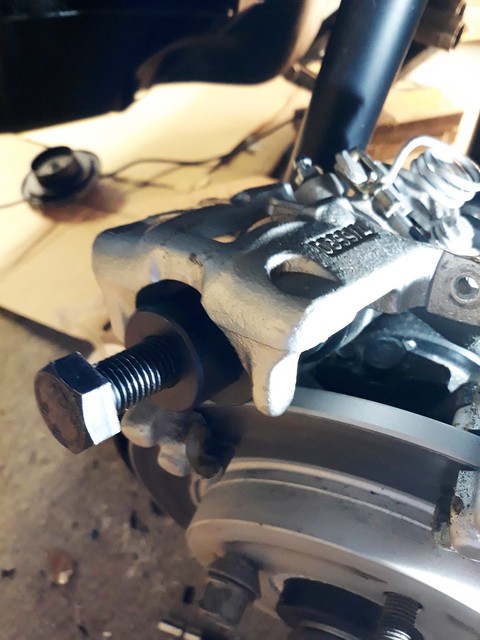 Brake wind back tool Brake wind back tool by Sabrebuilder, on Flickr
I was surprised that the brake fluid bled from the rear calipers was somewhat dirty and had some suspended sediment in it. Since the only brake component that isn't new or reconditioned is the rear proportioning valve, I presume this is where the dirt has come from?
 Old brake fluid Old brake fluid by Sabrebuilder, on Flickr
Another job was to remove the rear silencer and pipework.
 Rear silencer Rear silencer by Sabrebuilder, on Flickr
Since I first fitted this I've always had a small leak at the middle joint. I'd used some joining sleeves and exhaust clamps from Jetex that looked like these...
 Exhaust shortening Exhaust shortening by Sabrebuilder, on Flickr
Despite using exhaust sealing paste these didn't work very well at all and tightening the clamps didn't resolve the issue.
I've bought some of these which seem to be a much better design as the sleeve overlaps on the inside and the clamps are wider.
 Exhaust clamp Exhaust clamp by Sabrebuilder, on Flickr
They look a bit flimsy in the photo but I was pleased to find when they arrived that they are very substantial. I've not fitted them yet but hopeful they will make a much better joint and keep the IVA inspector happy.
There are a few other jobs I've started but will include those in next weeks update. Until then, stay safe.......
...........peter
|
23rd May 2021, 20:07
|
|
Senior Member
Enthusiast
|
|
Join Date: Mar 2005
Posts: 3,079
|
|
A few more jobs off my list this week........
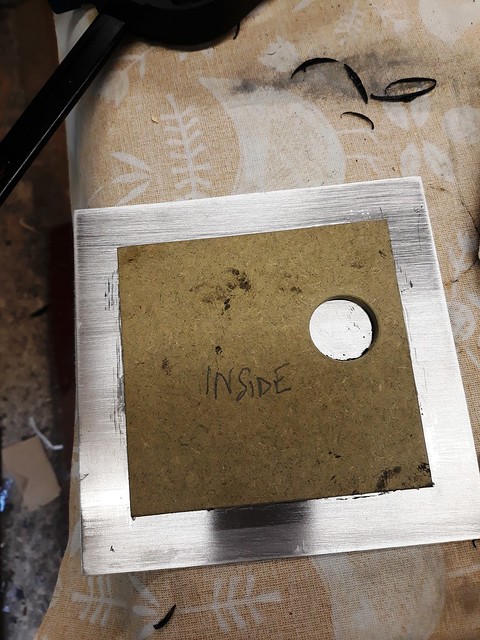
In no logical order I'll start with the speedo sensor access hatch.
I started by cutting a piece of damp resistant mdf. The round hole is to provide clearance for the sensor cable.
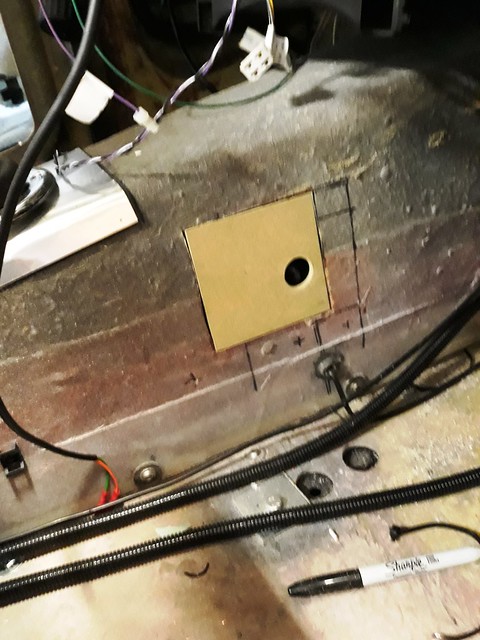 Hatch Hatch by Sabrebuilder, on Flickr
I then PU glued it to a piece of thin ali.
 Hatch2 Hatch2 by Sabrebuilder, on Flickr
And I painted the inside to prevent moisture ingress. It was fitted with 4 self tappers and a very thin beed of RTV silicone sealer to allow removal, if necessary.
 Painted hatch Painted hatch by Sabrebuilder, on Flickr
Another thing that needed to be addressed was that I had already fitted the window switch cables in conduit and attached them to the gearbox tunnel and I was concerned that I would end up with an unsightly bulge in the carpet.
 Window switch cables Window switch cables by Sabrebuilder, on Flickr
I was not happy about this so I stripped out the conduits shown above. And then to reduce the thickness to a minimum, I turned the cables into a kind of 'ribbon cable' by sticking them to PVC insulation tape.
 Window cables Window cables by Sabrebuilder, on Flickr
I then ran the cables in some flat PVC sleeving and glued them to the transmission tunnel with contact adhesive.
 Window switch cables Window switch cables by Sabrebuilder, on Flickr
There are a few more wiring jobs that I need to do and a general tidy up before I refit the dashboard but I'll come back to those in future updates.
Another small job I've completed this week is fitting the front bumpers which was very straightforward.
First the bumper support bars are fitted after trimming the grommets to size.
 Bumper bar and grommets Bumper bar and grommets by Sabrebuilder, on Flickr
The bumpers are then fitted with 16mm of washers per the RMC manual.
 Front Bumper Front Bumper by Sabrebuilder, on Flickr
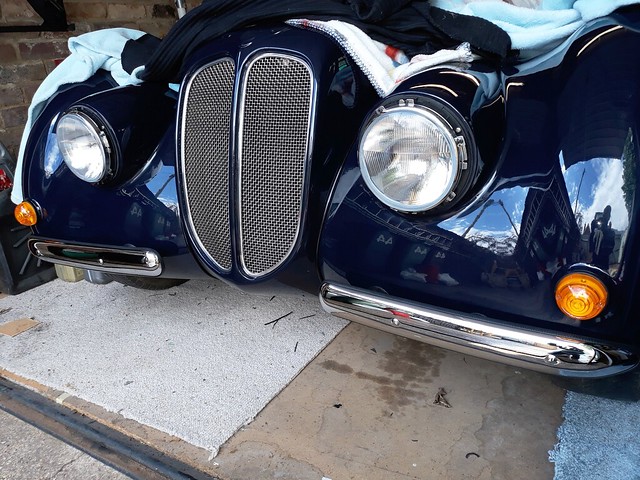 Front Bumpers Front Bumpers by Sabrebuilder, on Flickr
So that's another couple of jobs ticked off my list.........
Stay safe, Peter
Last edited by peterux; 24th May 2021 at 07:29..
Reason: correction
|
|
Currently Active Users Viewing This Thread: 2378 (0 members and 2378 guests)
|
|
|
 Posting Rules
|
You may not post new threads
You may not post replies
You may not post attachments
You may not edit your posts
HTML code is Off
|
|
|
All times are GMT +0. The time now is 07:44.
|


 Linear Mode

