|
|
| Vintage and Classic Roadster Kit Car Builds For Vintage and Classic era kit cars. Post your build reports, problems and progress here |

7th March 2016, 19:49
|
 |
Senior Member
Enthusiast
|
|
Join Date: Mar 2005
Posts: 3,079
|
|
Quote:
Originally Posted by MartinClan

Hi Peter
Have you considered making the "bulge" in aluminium. I can tell you, from experience :-), it is pretty easy with just basic tools. I have plenty of offcuts if you want to try!
Cheers, Robin
|
Hi Robin,
to be honest, no I hadn't thought of using aluminium. The bulge doesn't need to be very pretty as it will be covered in carpet but, I'll bear it in mind if it doesn't work out with the GRP.
thanks, Peter |
9th March 2016, 12:33
|
 |
Senior Member
Enthusiast
|
|
Join Date: Sep 2004
Posts: 1,897
|
|
The principle is pretty easy. Two pieces of 18mm mdf. Cut matching holes in them the shape of the bulge. Sandwidge the ali sheet between them and clamp well. The ali needs to be about 50mm bigger all round than the hole. Belt with a soft headed hammer.
To make it easier you can anneal the ali first. Smear if with bar soap. Heat it with a blow torch until the soap goes brown. Allow to cool. Bar soap goes brown just before the melting point of ali so don't overdo it!
Robin
|
24th March 2016, 19:40
|
|
Senior Member
Enthusiast
|
|
Join Date: Mar 2005
Posts: 3,079
|
|
 Propshaft
Now my engine and gearbox are mounted in their final positions I could turn my attention to writing a specification for a propshaft. This needed to have a suitable flange at the front to match the BMW gearbox and a standard four bolt flange to match the Ford Sierra diff at the back. Royale specified a 2" tube to allow the 'shaft to be removed through the top of the transmission tunnel. Alternatively, you have to remove the engine and gearbox to get the propshaft out. I hope I will never have to replace the propshaft in my lifetime but I still wanted to retain the ability to remove it without taking the engine and gearbox out.
I sent my spec to four suppliers and made my decision based on the quality of their response and price. Bailey Morris and D&F (Dunning and Fairbank) both raised an eyebrow about building it with a 2" tube but when supplied with with further details about the gearbox, diff, tyre diameter, etc they both confirmed that this would be safe up to 85mph cruising in fifth gear.
In the end I chose D&F who were very helpful, knowledgeable and came back with a keen price.
It arrived last week and I'm very pleased with the quality and finish.
Front end is a flange to match the BMW gearbox. Sliding joint to allow variation in length under acceleration.
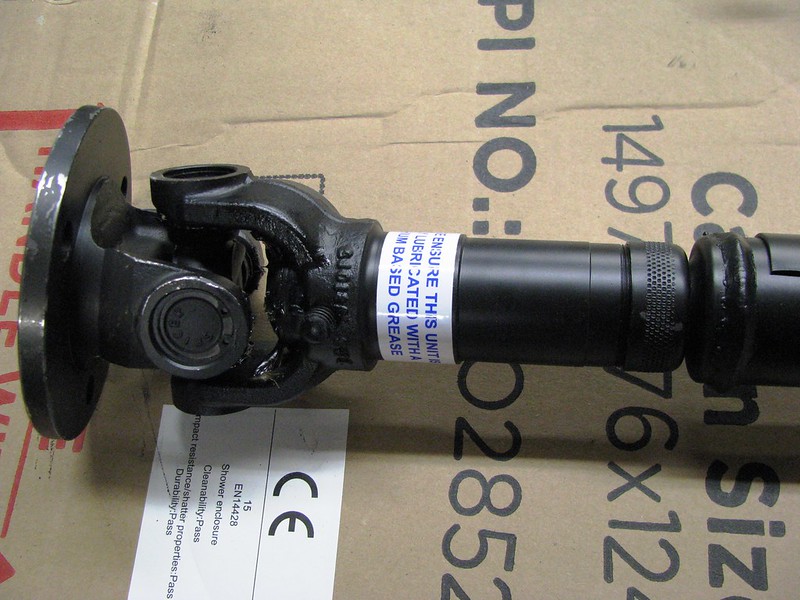 Propshaft Propshaft by marlinpeter, on Flickr
Final drive/diff flange to match Ford Sierra diff.
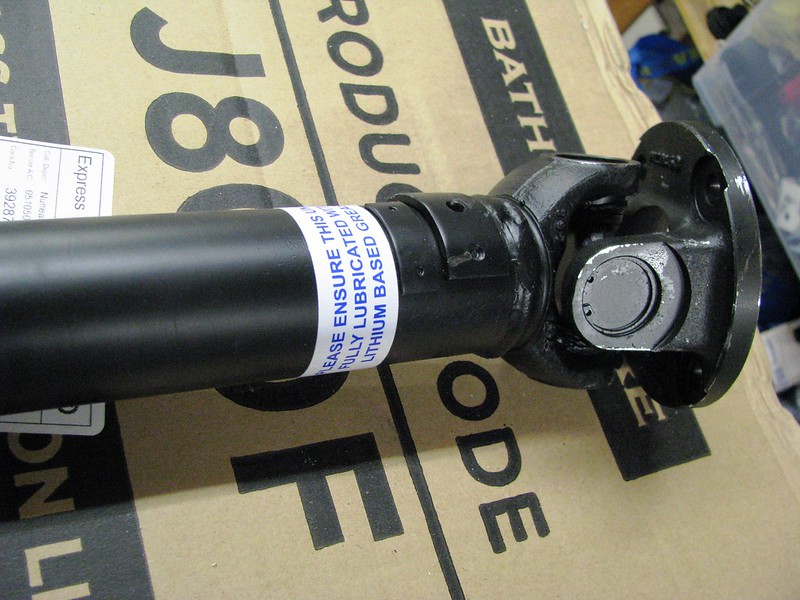 Propshaft Propshaft by marlinpeter, on Flickr
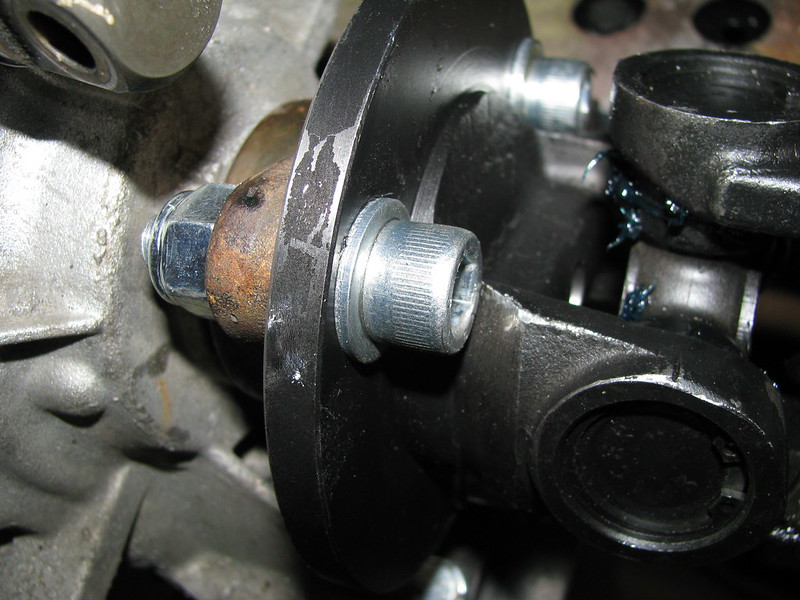
Propshaft bolts fitted.
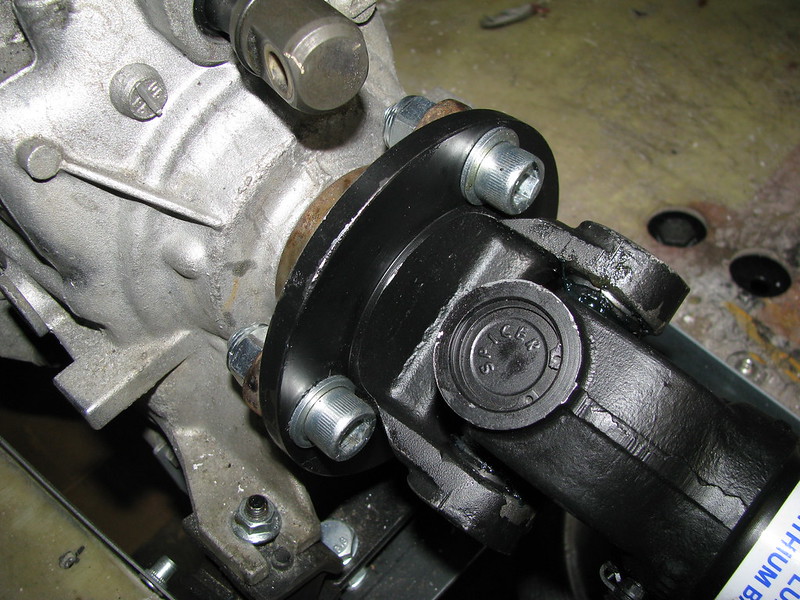 Propshaft bolts Propshaft bolts by marlinpeter, on Flickr
These M12x40mm cap head screws just fitted past the yokes without any modification.
 Propshaft bolts Propshaft bolts by marlinpeter, on Flickr
This bolt needs to be fitted through the flange before offering it up to the gearbox.
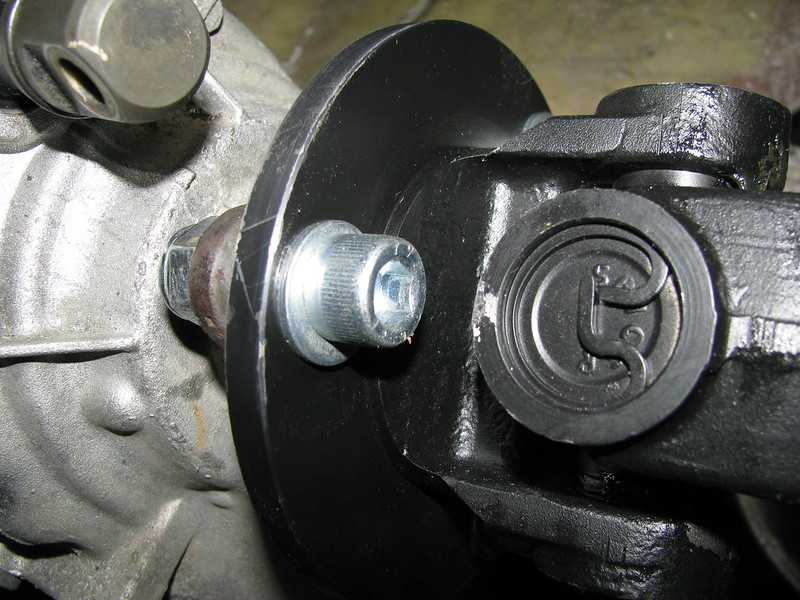 Propshaft bolts Propshaft bolts by marlinpeter, on Flickr
And, I had to modify one of my allen keys to fit the bolt that is opposite the U/J.
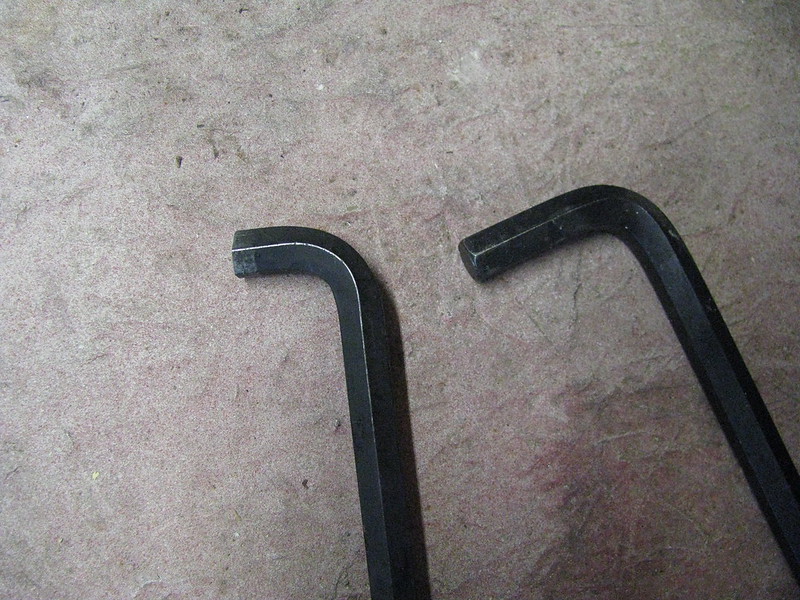 Propshaft bolts Propshaft bolts by marlinpeter, on Flickr
All in I'm very pleased and would highly recommend D&F propshafts. 
...peter

|
3rd September 2016, 19:00
|
|
Senior Member
Enthusiast
|
|
Join Date: Mar 2005
Posts: 3,079
|
|
Pedaling along.....
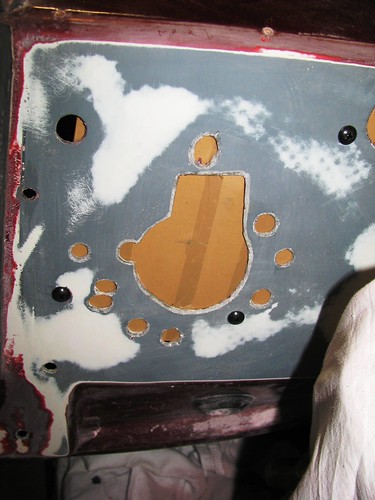
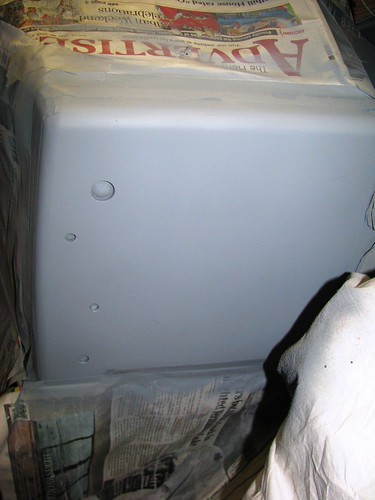
I've been working on the pedal box and brake master cylinder mounting.
Before mounting the pedal box and brake master cylinder, I needed to clean up this area of bodywork. It was a bit of a mess from the original builders holes plus some holes I made trial fitting other types of brake servos. First I sanded off all the original paint and primer. I chamfered the holes and screwed a piece of MDF covered in packing tape behind the holes.
 Brake M/C mounting area repair Brake M/C mounting area repair by marlinpeter, on Flickr
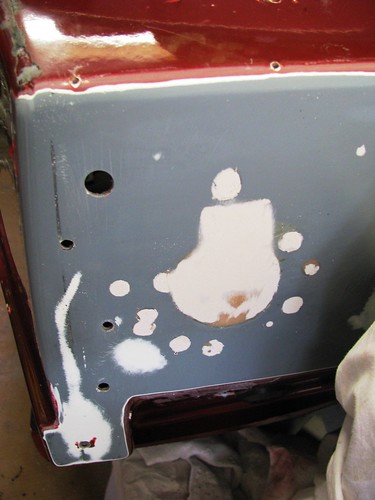
I filled the holes roughly with Isopon P40 fibre filler, sanded down and filled with Isopon P38 and then sand flat and smooth.
 Brake M/C mounting area repair Brake M/C mounting area repair by marlinpeter, on Flickr
Primed and then filled some small indents with a fine surface filler. Then sanded flat with wet and dry and then another coat of primer.
 Brake M/C mounting area repair Brake M/C mounting area repair by marlinpeter, on Flickr
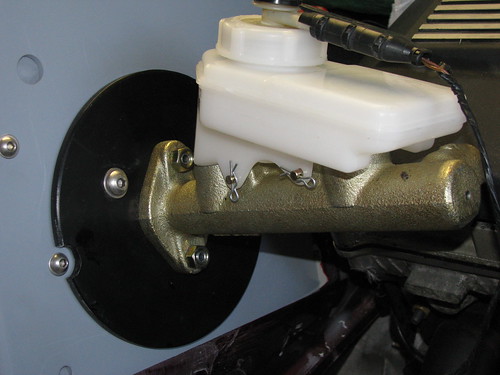
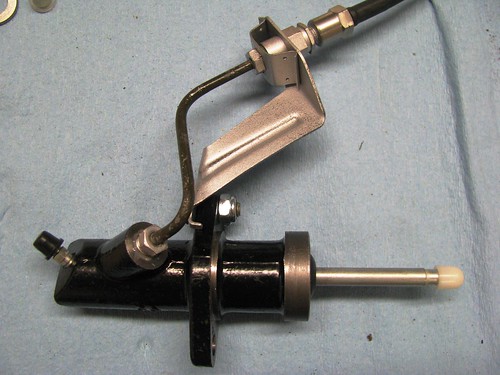
I've mounted the brake master cylinder on a 6mm thick steel disc (from Lasermaster.co.uk). The holes for all the bolts are threaded so that I don't have to be Houdini and get to both sides at the same time. The bolts will be threadlocked in the disc during final assembly. There are three M8 bolts that go through the GRP bulkhead and connect with the Sierra pedal box. Longer m/c bolts will be used during final assembly.
The m/c reservoir isn't quite at the right angle but I think it will work OK.
 Brake Master Cylinder mounting Brake Master Cylinder mounting by marlinpeter, on Flickr
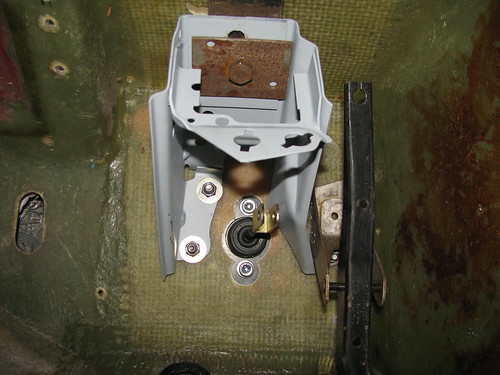
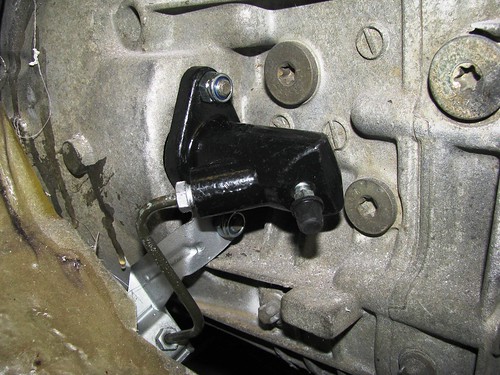
The pedal box is fixed by three M8 bolts through the bulkhead to the steel disc plus a single M12 bolt to the substantial scuttle bar. I need to replace that rusty rectangular spreading plate.
 Pedal box mounting Pedal box mounting by marlinpeter, on Flickr
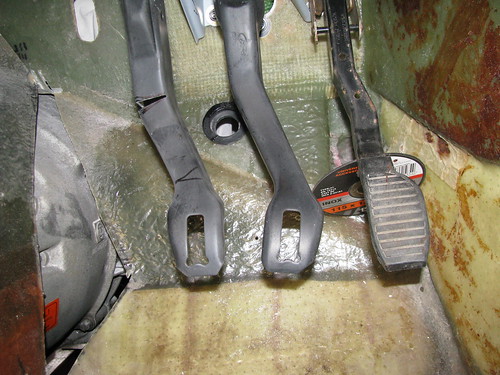
The pedal spacing is a bit weird so I've started work on cutting the clutch pedal to reshape it.
 Pedal Spacing Pedal Spacing by marlinpeter, on Flickr
...peter
|
4th September 2016, 18:13
|
|
Member
|
|
Join Date: Jul 2014
Location: Ealing London
Posts: 54
|
|
Hi peter, Good to see you are back on the project. And must say, it is a brilliant way of mounting the Brake master cylinder onto the bulkhead.
I had a thought about the gearbox cover which you had to modify. Have you considered making it a removable cover, like that of the old Triumphs and Morris minors? It would make the removal of BMW Gearbox a much simpler job, should a new clutch be required. It can be done without jeopardising the integrity of the body tub.
Just a thought.
Wishing you all the best with the project.
Amir
|
5th September 2016, 20:31
|
|
Senior Member
Enthusiast
|
|
Join Date: Mar 2005
Posts: 3,079
|
|
Quote:
Originally Posted by Amir Manzoori
I had a thought about the gearbox cover which you had to modify. Have you considered making it a removable cover, like that of the old Triumphs and Morris minors?
|
Hi Amir,
progress on the Sabre has been unfortunately slow due to too many other projects!
And yes, my plan is to make the gearbox cover removable but things were not going to well with the re-shaping, so I've decided to leave it for now and come back to it later.
best regards,
Peter |
13th September 2016, 18:21
|
 |
Senior Member
Enthusiast
|
|
Join Date: Feb 2005
Location: Hampshire
Posts: 2,497
|
|
Nice clean up job on the bulkhead |
10th October 2016, 19:36
|
|
Senior Member
Enthusiast
|
|
Join Date: Mar 2005
Posts: 3,079
|
|
Quote:
Originally Posted by Patrick
Nice clean up job on the bulkhead |
Thanks, Patrick, it came out better than expected.
I've now finished modifying the pedals to improve the spacing, painted all the parts and rebuilt the pedal box.
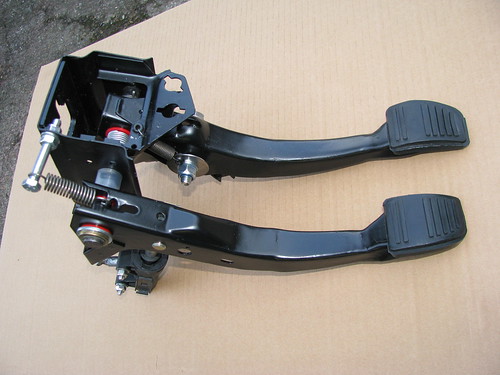 Pedal Box Pedal Box by marlinpeter, on Flickr
And here it is back in the car....
 Pedal Box Pedal Box by marlinpeter, on Flickr
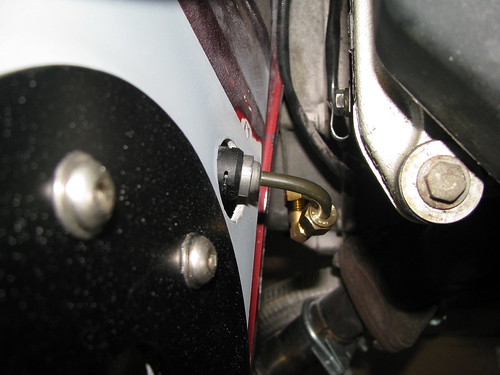
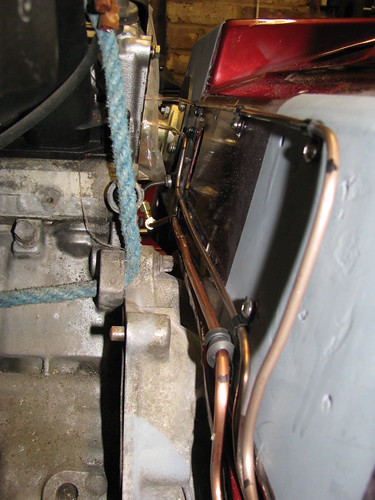
The clutch master cylinder hydraulic connection exits here. I'm using a regular 6mm plumbing fitting to join onto the BMW pipe.
 Clutch M/C Clutch M/C by marlinpeter, on Flickr
Next on the plan is the brake lines from the master cylinder to the servo and the clutch hydraulic line to the slave cylinder.
...peter |
15th October 2016, 19:08
|
|
Senior Member
Enthusiast
|
|
Join Date: Mar 2005
Posts: 3,079
|
|
Brake Master Cylinder mounting by marlinpeter, on Flickr
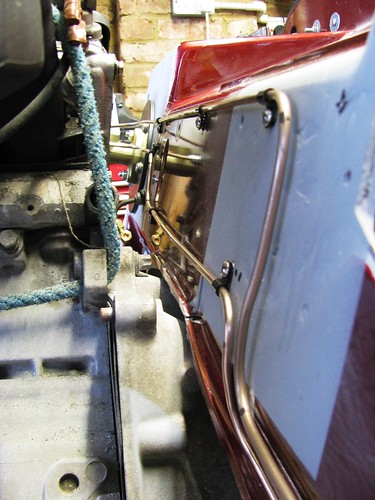
Whilst the brake master cylinder clears the engine OK, one of the ports is directly opposite the rocker cover. Even with the tightest bend, the pipe still wouldn't fit even if I carved a slot in the cover. The solution I came up with is to use a banjo fitting.
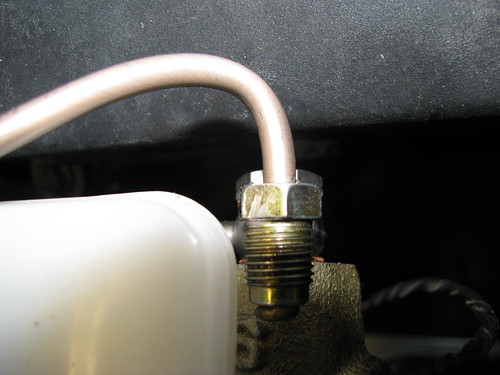 Brake M/C to Servo lines Brake M/C to Servo lines by marlinpeter, on Flickr
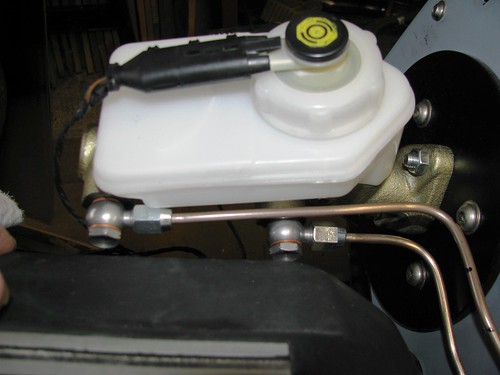
Having decided to use a banjo fitting but I found the price of separate fittings so high that I decided to go for some complete custom flexible lines from HEL. The banjo fitting fitted just fine but an unforeseen issue is that the other end doesn't fit my Iruna brake servo slave cylinder.
 Brake M/C to Servo lines Brake M/C to Servo lines by marlinpeter, on Flickr
Despite remembering to order 3/8" UNF to match the Iruna servo the HEL fitting doesn't tighten before the threads bind at the bottom of the hole. I think the issue is that the HEL fitting is threaded right to the end whereas some fittings have an unthreaded section just before the flared end of the pipe.
 Brake M/C to Servo lines Brake M/C to Servo lines by marlinpeter, on Flickr
To solve this issue I've made up this short adapter but its not a very eloquent solution and not very mechanically strong. (By now I was wishing I bought separate fittings and ran the lines in Knufer pipe.)
 Brake M/C to Servo lines Brake M/C to Servo lines by marlinpeter, on Flickr
The other idea I've had is to try and carefully file away the last two threads but I'm not sure I can do this without damaging the fitting.
Any other suggestions welcome!
cheers, Peter
|
15th October 2016, 21:44
|
 |
Senior Member
Enthusiast
|
|
Join Date: Jun 2008
Posts: 167
|
|
Peter
Could you not run the hel pipe to a three way bulkhead connector to allow you to use a goodridge style hose onto the slave and blank one of the outlets on the three way. Car builder solutions sell a three way bulkhead fitting and a blanking fitting for the unused 3rd outlet.
John
|
16th October 2016, 18:59
|
|
Senior Member
Enthusiast
|
|
Join Date: Sep 2004
Posts: 1,897
|
|
Quote:
Originally Posted by peterux
Brake Master Cylinder mounting by marlinpeter, on Flickr
Whilst the brake master cylinder clears the engine OK, one of the ports is directly opposite the rocker cover. Even with the tightest bend, the pipe still wouldn't fit even if I carved a slot in the cover. The solution I came up with is to use a banjo fitting.
Brake M/C to Servo lines by marlinpeter, on Flickr
Having decided to use a banjo fitting but I found the price of separate fittings so high that I decided to go for some complete custom flexible lines from HEL. The banjo fitting fitted just fine but an unforeseen issue is that the other end doesn't fit my Iruna brake servo slave cylinder.
Brake M/C to Servo lines by marlinpeter, on Flickr
Despite remembering to order 3/8" UNF to match the Iruna servo the HEL fitting doesn't tighten before the threads bind at the bottom of the hole. I think the issue is that the HEL fitting is threaded right to the end whereas some fittings have an unthreaded section just before the flared end of the pipe.
Brake M/C to Servo lines by marlinpeter, on Flickr
To solve this issue I've made up this short adapter but its not a very eloquent solution and not very mechanically strong. (By now I was wishing I bought separate fittings and ran the lines in Knufer pipe.)
Brake M/C to Servo lines by marlinpeter, on Flickr
The other idea I've had is to try and carefully file away the last two threads but I'm not sure I can do this without damaging the fitting.
Any other suggestions welcome!
cheers, Peter
|
I think as a first thing to try I would ask HEL what they suggest. You never know they might remake with a different fitting for free! It would be good PR for them :-)
Cheers Robin
|
16th October 2016, 21:33
|
|
Senior Member
Enthusiast
|
|
Join Date: Mar 2005
Posts: 3,079
|
|
Quote:
Originally Posted by MartinClan
I think as a first thing to try I would ask HEL what they suggest. You never know they might remake with a different fitting for free! It would be good PR for them :-)
Cheers Robin
|
Robin,
yes, I've taken this photo today to better explain the issue. I've now emailed it to HEL to seek their advice.
 Brake line fitting issue Brake line fitting issue by marlinpeter, on Flickr
John,
your three way bulkhead suggestion would certainly work but maybe it would look a little messy as there are two lines.
thanks, Peter
Last edited by peterux; 16th October 2016 at 21:56..
Reason: correction
|
3rd November 2016, 19:33
|
|
Senior Member
Enthusiast
|
|
Join Date: Mar 2005
Posts: 3,079
|
|
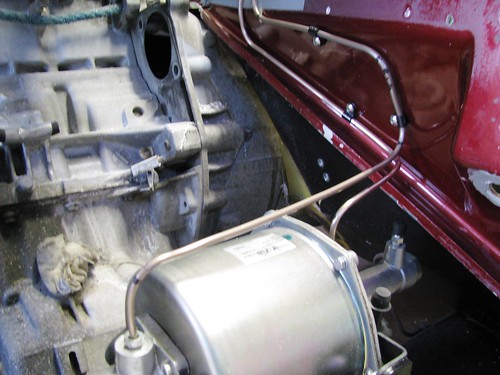
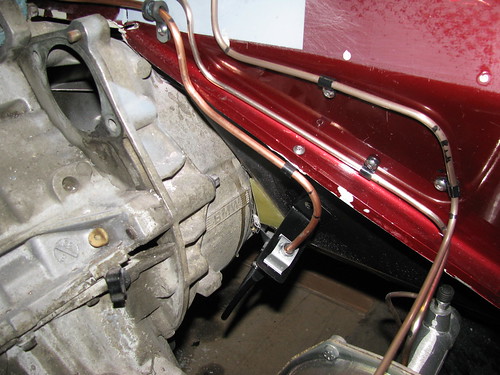
Well sorry to say this but HEL custom hoses were as useful as a chocolate teapot so I've resorted back to the tried and tested Copper/Nickel brake pipes.
These Goodridge banjo fittings solve the problem of clearance with the ignition coil cover.
 Brake pipes - M/C to Servo Brake pipes - M/C to Servo by marlinpeter, on Flickr
Brake line routes chosen to work around the heater hoses.
 Brake pipes - M/C to Servo Brake pipes - M/C to Servo by marlinpeter, on Flickr
And then down to the remote servo.
 Brake pipes - M/C to Servo Brake pipes - M/C to Servo by marlinpeter, on Flickr
Also, way ahead of my needs but a bit of what I call 'armchair building' resulted in this nice VIN plate. It's engraved lettering on brushed stainless steel. I just hope DVSA don't change the requirements before I'm ready for my IVA!!
 VIN Plate VIN Plate by marlinpeter, on Flickr
Next up will be the clutch hydraulic line from M/C to slave cylinder.
...peter |
3rd November 2016, 19:59
|
|
Senior Member
Enthusiast
|
|
Join Date: Jun 2008
Posts: 167
|
|
Well it may have been some hassle and involved some avoidable expense but in the end the solution you have come up with works well and to my eye looks better than the original Hel approach, copper / nickel sort of looks right on the Sabre.
John
|
5th November 2016, 19:12
|
|
Senior Member
Enthusiast
|
|
Join Date: Mar 2005
Posts: 3,079
|
|
Quote:
Originally Posted by cabrioman
Well it may have been some hassle and involved some avoidable expense but in the end the solution you have come up with works well and to my eye looks better than the original Hel approach, copper / nickel sort of looks right on the Sabre.
John
|
Thanks John, with hindsight, I think you are so right. From now on,I'll be sticking to traditional parts where possible. |
5th November 2016, 19:30
|
|
Senior Member
Enthusiast
|
|
Join Date: Mar 2005
Posts: 3,079
|
|
I've now completed the clutch hydraulic line from the clutch master cylinder to the slave cylinder.
I've used a new Febi clutch slave cylinder and a HEL flexi hose. The short fixed pipe and bracket are from the BMW donor.
 Clutch Slave cylinder Clutch Slave cylinder by marlinpeter, on Flickr
Clutch Slave cylinder fitted. I need BMW locknuts as the studs are quite short.
 Clutch Slave cylinder Clutch Slave cylinder by marlinpeter, on Flickr
Clutch hydraulic line made up from 6mm microbore copper pipe.
 Clutch M/C to slave line Clutch M/C to slave line by marlinpeter, on Flickr
Clutch line routed to bracket fixed to body tub.
 Clutch M/C to slave line Clutch M/C to slave line by marlinpeter, on Flickr
But I wasn't happy with the routing of the front brake line so I have remade it.
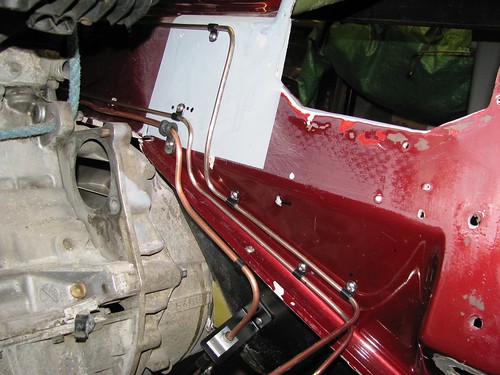 Brake M/C to servo - v2 Brake M/C to servo - v2 by marlinpeter, on Flickr
Clutch hydraulic reservoir mounted. The ali bracket came with the reservoir but it's a bit flimsy so I will probably remake from steel.
 Clutch Reservoir Clutch Reservoir by marlinpeter, on Flickr
I will drill the hole for the fluid hose the next time the engine is removed.
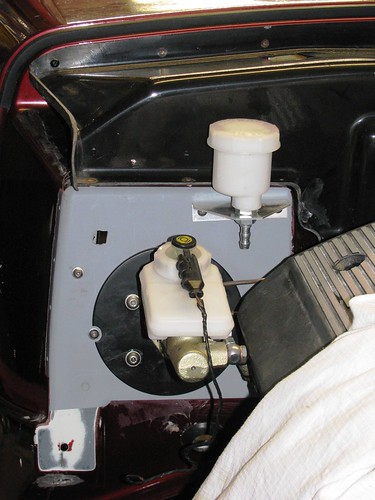 Clutch Reservoir Clutch Reservoir by marlinpeter, on Flickr
Well that will be all for now, for a couple of weeks whilst I catch up on some other projects....
....peter
|
30th November 2016, 19:25
|
|
Senior Member
Enthusiast
|
|
Join Date: Mar 2005
Posts: 3,079
|
|
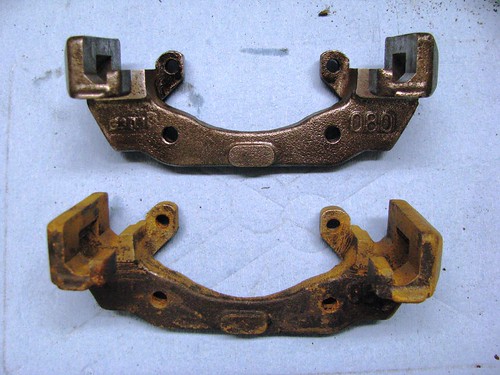
Front brake caliper refurb
These are the brake calipers that came with the Sabre. They show signs of being refurbished before but don't show any signs of any major rust pits, so I've decided to refurbish them myself. The brown colour is a mixture of gold paint and surface rust.
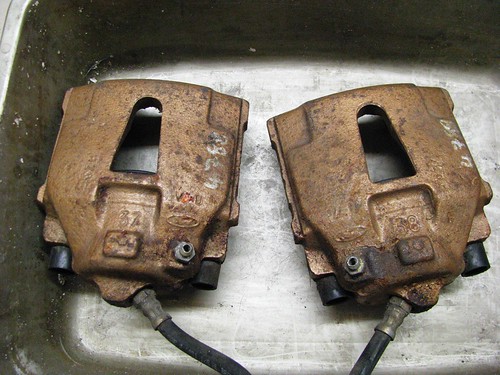 Front bake caliper refurb Front bake caliper refurb by Sabrebuilder, on Flickr
 Front bake caliper refurb Front bake caliper refurb by Sabrebuilder, on Flickr
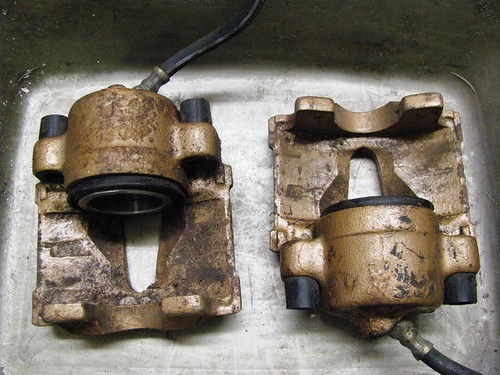
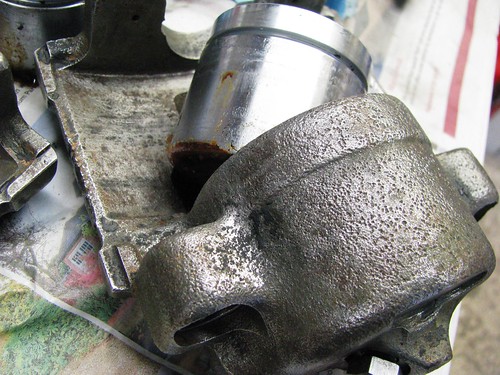
The brake caliper pistons look like new items when the calipers were refurbished back in 1995. All rubber seals will be replaced but the pistons look re-usable.
 Front bake caliper refurb Front bake caliper refurb by Sabrebuilder, on Flickr
These are calipers after paint stripping, derusting and wire brushing. They have been oiled with 3in1 oil to stop them rusting again before I paint them. At this stage I've left the pistons, bleed niplles and the old hoses in place to stop dirt getting inside the calipers chambers.
 Front bake caliper refurb Front bake caliper refurb by Sabrebuilder, on Flickr
(the strange brown colour is a trick of the camera and flourescent lights)
Caliper carriers. The top one has been cleaned up. The remaining black paint wouldn't shift with the paint stripper so I had to use wire brushes in a drill.
 Front bake caliper refurb Front bake caliper refurb by Sabrebuilder, on Flickr
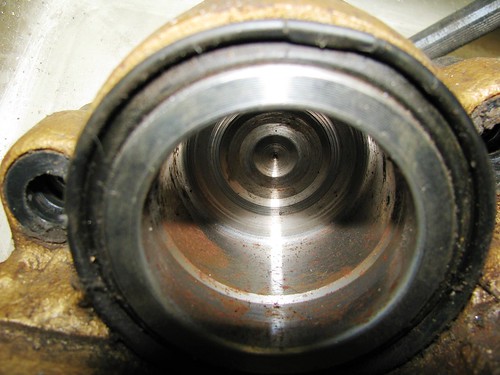
I saw this tip on the internet and it worked a treat! It's a car air pump inflatable adapter which you just push into the cut off old flexi hose. A little compressed air and the cylinder just pops out with no effort.
 Front Brake Caliper rebuild Front Brake Caliper rebuild by Sabrebuilder, on Flickr
Piston popped out without any issues.
 Front Brake Caliper rebuild Front Brake Caliper rebuild by Sabrebuilder, on Flickr
The caliper pistons came up looking like new after a quick clean up with very fine wire wool and oil.
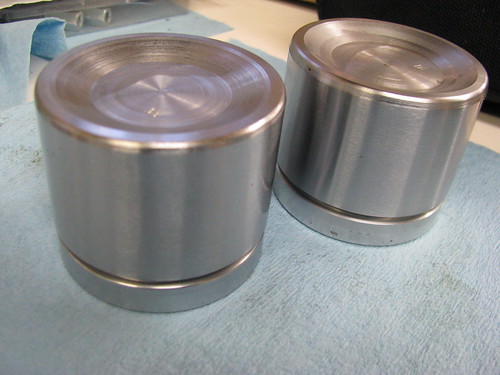 Front Brake Caliper rebuild Front Brake Caliper rebuild by Sabrebuilder, on Flickr
The Sabre's boot makes good temporary spray booth.
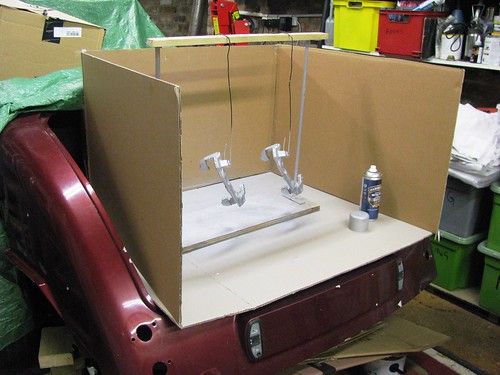 Front Brake Caliper rebuild Front Brake Caliper rebuild by Sabrebuilder, on Flickr
Brake caliper rebuild kits purchased from Brakes International.
 Front Brake Caliper rebuild Front Brake Caliper rebuild by Sabrebuilder, on Flickr
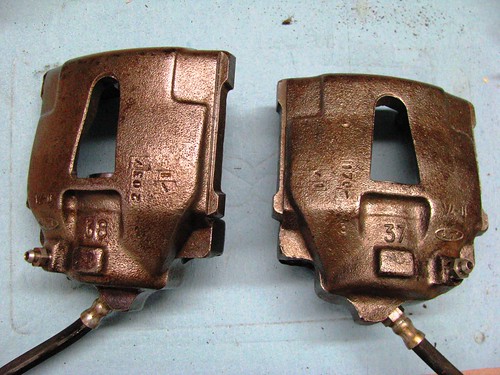
After finishing painting and leaving for a few days for the paint to harden, i fitted the new seals and rubber parts. The service kits came with assembly grease and all parts fitted perfectly.
 Front Brake Calipers Front Brake Calipers by Sabrebuilder, on Flickr
 Front Brake Calipers Front Brake Calipers by Sabrebuilder, on Flickr
And finally, the brake caliper carriers painted and new 10.9 bolts ready for fitting.
 Front Brake caliper carriers Front Brake caliper carriers by Sabrebuilder, on Flickr
There now all wrapped up in a shoe box ready for fitting.... Quite a lot of messy work and time but much more satisfying than buying refurb'd calipers.
...peter
|
30th November 2016, 19:56
|
|
Senior Member
|
|
Join Date: Jun 2015
Posts: 1,401
|
|
Looking good!
|
1st December 2016, 06:24
|
|
Member
|
|
Join Date: Jul 2014
Location: Ealing London
Posts: 54
|
|
Job well done, as no one could do it better than yours elf.
|
1st December 2016, 06:25
|
|
Member
|
|
Join Date: Jul 2014
Location: Ealing London
Posts: 54
|
|
should have been SELF. sorry.
|
|
Currently Active Users Viewing This Thread: 2480 (0 members and 2480 guests)
|
|
|
 Posting Rules
|
You may not post new threads
You may not post replies
You may not post attachments
You may not edit your posts
HTML code is Off
|
|
|
All times are GMT +0. The time now is 06:31.
|


 Linear Mode

