Are you madabout kit cars      
 "We've Got Kit Cars Covered" Information about Madabout-Kitcars.com Contact Madabout-Kitcars.com         Home of UK kit cars - madabout-kitcars.com Various kit car write ups All the latest kit car news Kit car related and general discussion

Search
Manufacturers
Kit Cars
Kit Car Data sheets
Picture Gallery
SVA Knowledgebase
Clubs & Communities
Build cost estimator
Kit cars for sale
Knowledge Base 
KitcarUSA.com
Classic-Kitcars.com
 

Go Back   Madabout Kitcars Forum > Mad Build Area > Sammio Builds and discussions

Sammio Builds and discussions Sammio bodied car builds and specials

Reply
 
Thread Tools Display Modes
  #1  
Old 11th December 2013, 09:59
slartibartfast's Avatar
slartibartfast slartibartfast is offline
Senior Member
 
Join Date: Aug 2012
Location: Surrey/Sussex border
Posts: 169
slartibartfast is on a distinguished road
Default

Thank you all for you most encouraging comments. Such a welcome boost.
Happy Christmas to you all and happy driving/building.
Slarti
Reply With Quote
Available from eBay
  #2  
Old 7th March 2014, 16:54
slartibartfast's Avatar
slartibartfast slartibartfast is offline
Senior Member
 
Join Date: Aug 2012
Location: Surrey/Sussex border
Posts: 169
slartibartfast is on a distinguished road
Default

Is it that long since I last posted an update? Shame on me ....! Well actually I've not been that busy on the Sammio lately ... daughter moved to a new house and needed Dad's help ... grandchildren in Nottinham ... you know how it is !. But I have refurmed the water pump (still in fine condition!) as iare the dynamo & the starter motor ... both still had the stickers on which indicated that they were virtually brand new.
But, some advice please .... not the Sammio, but my Rover P5B (I'll be posting on that forum as well). Today had the old girl MOT'd ... not a problem, in fact no remarks from my friendly tester at all ... but, driving back a few miles, stopped to put some more petrol in (including the lead replacement additive) ... drove the couple of miles back home and at the bottom of our road she stalled. Engine starts, but as soon as you select a gear (it's auto) ..fud ...stalls again.
So, park up, a short walk to the house (50 yards) and get on with degreasing the Sammio engine and have a cuppa! .. when the Rover had cooled down, abot an hour and a half she started and drove like nothing had happened.
Any feedback or ideas MOST welcome.
I hope to do some catching up soon on the Sammio and post piccies.
Cheers guys (& gals)
Slarti
Reply With Quote
  #3  
Old 18th March 2014, 19:55
slartibartfast's Avatar
slartibartfast slartibartfast is offline
Senior Member
 
Join Date: Aug 2012
Location: Surrey/Sussex border
Posts: 169
slartibartfast is on a distinguished road
Default

Got a fair bit of feedback from the Rover Forum and should get the old girl sorted when I have half an hour to spare.
Current wife has pressed me into sorting out the garden ... so not much going on with the Sammio. However, now got round to stripping the engine. Head off, valves out and starting to grind them back in. As I'm not going for an out and out racer AND this is on a bit of a tight budget, I am considering a using existing valves (none have been burned out) but replacing the springs. The rocker shaft has a little play in some of the arms and I'm wondering if I should replace the whole lot. Any suggestions?
Oddly one of the cam followers appears to have been ground down at the top end .... but for the life of me a can't think why. I have decided to replace all of them.
Any of you guys attempted to replace valve guides ?? ... can they be drifted out or do I need a whacking great press ??
Once I've rebuilt the head I will start on the bottom end. I hoping to get away without a regring or rebore but will keep you advised.
Keeeeep buildin'
Slarti
Reply With Quote
  #4  
Old 18th March 2014, 20:19
Viatron Viatron is offline
Senior Member
 
Join Date: Apr 2012
Posts: 1,163
Viatron is on a distinguished road
Default

You could drift them out but without the right tools you would probably damage the new ones putting them in, by the time you've bought or made the right tools I reckon it would be as cheap to have them done professionally . Nice looking chassis btw the red against the black really pops!
Mac
Reply With Quote
  #5  
Old 19th March 2014, 10:56
slartibartfast's Avatar
slartibartfast slartibartfast is offline
Senior Member
 
Join Date: Aug 2012
Location: Surrey/Sussex border
Posts: 169
slartibartfast is on a distinguished road
Default

Cheers Viatron. I know a chap that runs a small engineering works. I'll offer a few beers and see if I can make use of a fly-press.
Will keep you all posted ....
Slarti
Reply With Quote
  #6  
Old 31st March 2014, 20:08
slartibartfast's Avatar
slartibartfast slartibartfast is offline
Senior Member
 
Join Date: Aug 2012
Location: Surrey/Sussex border
Posts: 169
slartibartfast is on a distinguished road
Default

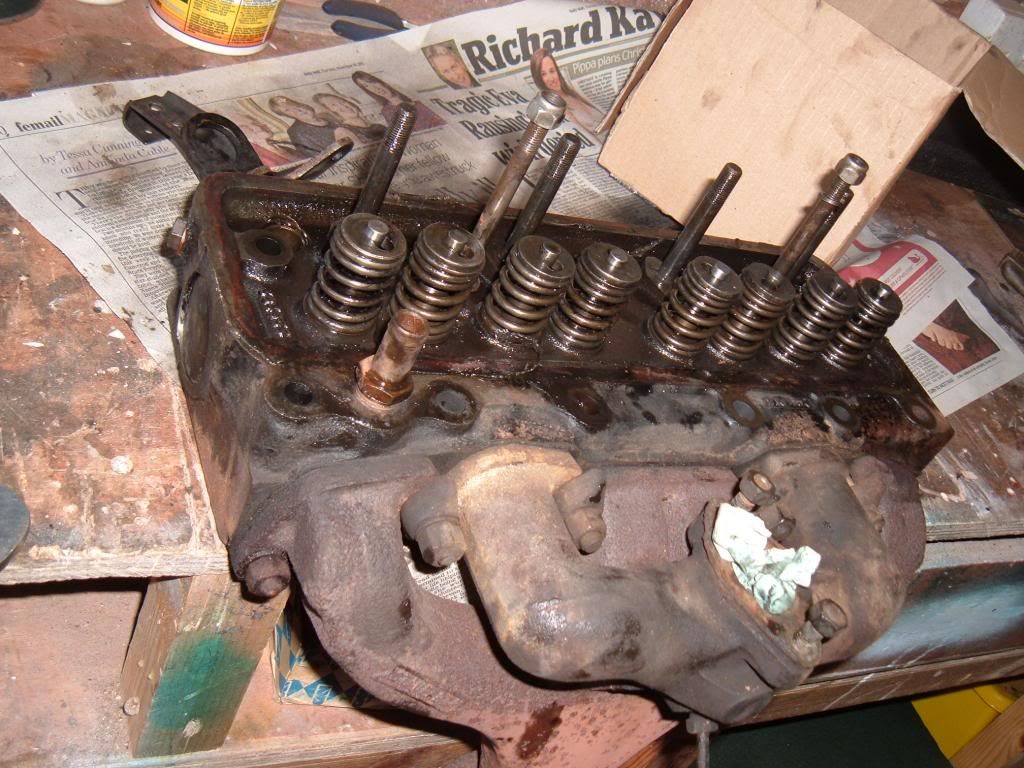
Hi. A decision has been made. Get the head done professionally. Found a specialist engineering works about 8 miles away in Milford, near Godalming. Facinating place to visit. He will skim the head and put new valve guides in and regrind the valves for less than 200 quid .... bargain in our part of the world.

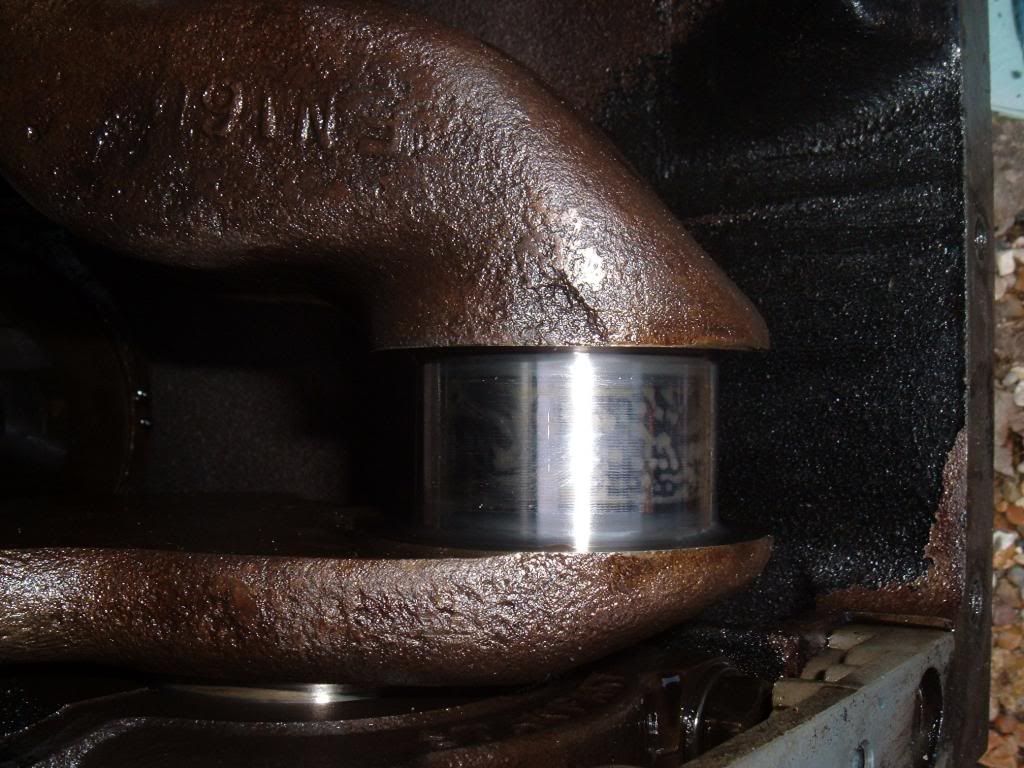
Next took ot the valve guides. This tells a different story. See if you can spot the odd one out?

Yep!. I'll replace them all.
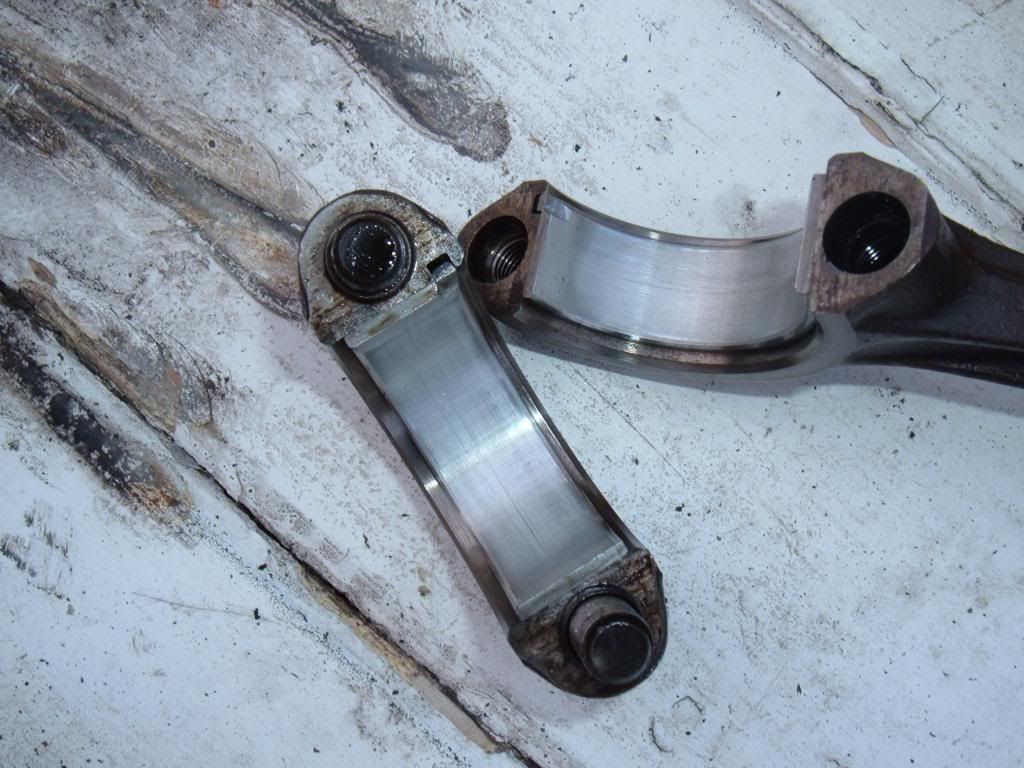
The big end bearings and crank look virtually brand new. No scoring oand as tight as .... well ... as tight as a very tight thing


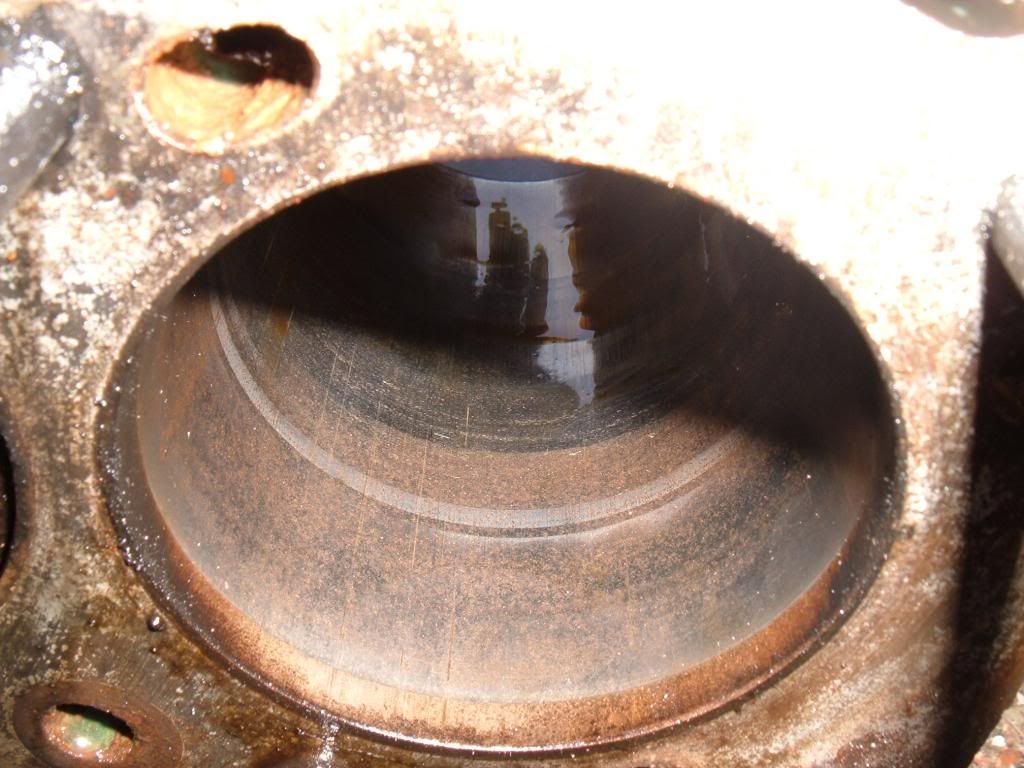
The cylinder bores also look pretty good with no scoring (although this photo doesn't look that good). I think I can go ahead with just replacing the piston rings although open to suggestions/comments.

Should I replace the pistons at the same time?
<a href="http://s1287.photobucket.com/user/slartibartfast52/media/DSCF9870_zps48b4eda1.jpg.html" target="_blank"><img src="http://i1287.photobucket.com/albums/a638/slartibartfast52/DSCF9870_zps48b4eda1.jpg" border="0" alt=" photo DSCF9870_zps48b4eda1.jpg"/></a>
Should get the head back in a couple of weeks and start the engine rebuild.
Will update you all in due course.
looks like I have some catching up to do.
Slarti
Reply With Quote
  #7  
Old 1st April 2014, 07:53
garyh garyh is offline
Senior Member
 
Join Date: Jun 2011
Location: birchington, kent
Posts: 1,769
garyh is on a distinguished road
Default

I thought that was a holesaw! thanks for the pics as it actually shows what i should look for.
Reply With Quote
  #8  
Old 27th April 2014, 19:03
slartibartfast's Avatar
slartibartfast slartibartfast is offline
Senior Member
 
Join Date: Aug 2012
Location: Surrey/Sussex border
Posts: 169
slartibartfast is on a distinguished road
Default

I have been working on the Sammio .... honestly ... Mainly painting up and cleaning bolts & things whilst the head is being sorted .... I think I will give the guy a call tomorrow ... he's had it for over 4 weeks. Once that's back I can fully rebuild the engine & gearbox & put it back in the chasis. I'll replace the clutch plate & release bearing whilst it's all stripped down.
The bulkhead is prepped, just wondering what colour to spray up inside. Black or silver? I'm going for a maroon type red for the main colour.
Today I've been doing a few little jobs on the Morris Minor & Rover P5b. Still can't get the Rover to run properly .... it stalls when hot and then it'll start but just won't pull when put in gear ... just stalls again. Hey ho !
Some pictures attached. Hope to make some serious progress soon.
Slarti


This is the bulkhead getting prepped


A good rub down and a couple of coats of Hammerit plus another couple of coats of underseal.

And 3 or 4 coats of etch primmer inside.

Big ends all back in place and torqued up as per the manual. Seems like the oil pump had been replaced so I didn't strip that doen.
More soon.
Slarti
Reply With Quote
  #9  
Old 28th April 2014, 18:20
Paul L's Avatar
Paul L Paul L is offline
Senior Member
 
Join Date: Feb 2012
Location: Wembley, London
Posts: 5,058
Paul L is on a distinguished road
Default

Your bulkhead reminds me of the one on my original donor, "good to go" with just a lick of paint required.

So let's not talk about the fact I actually ended up using a rusty mess of a bulkhead instead.

Other Spyder builders have said that cutting the bulkhead to match the contour of the body/bonnet is a good idea.

I guess the inside colour of the bulkhead would depend on what colour the rest of the cockpit is going to be?

Good luck, Paul.
Reply With Quote
  #10  
Old 29th April 2014, 12:43
slartibartfast's Avatar
slartibartfast slartibartfast is offline
Senior Member
 
Join Date: Aug 2012
Location: Surrey/Sussex border
Posts: 169
slartibartfast is on a distinguished road
Default

Cheers Paul. I've decided on silver inside the cockpit, although a lot will be covered in black/brown vinyl in due course. The final colour for the car will be a dark red/maroon.
I chased the guy refurbing the head yesterday and assured that this would be ready by next week-end latest as I hope to have a proper rolling chassis by the end of May.
More piccies to follow.
Q: any of you guys recommend stripping a gearbox? Not done one before and it seems a little daunting. I was only thinking of replacing the synchro gears. Any answers most welcome.
Slarti
Reply With Quote
  #11  
Old 29th April 2014, 16:46
Mister Towed's Avatar
Mister Towed Mister Towed is offline
Senior Member
 
Join Date: Jul 2011
Posts: 5,328
Mister Towed is on a distinguished road
Default

Nice to see you're making some progress Slarti. I've never rebuilt a gearbox myself but I've just come across the perfect tool to tackle the Herald gearbox rebuild with on ebay though. Well, the description says 'fits Triumph Herald' anyway...

http://www.ebay.co.uk/itm/SOFT-GRIP-...item5408841825

Bizarre.
Reply With Quote
  #12  
Old 30th April 2014, 19:56
slartibartfast's Avatar
slartibartfast slartibartfast is offline
Senior Member
 
Join Date: Aug 2012
Location: Surrey/Sussex border
Posts: 169
slartibartfast is on a distinguished road
Default

Bizarre indeed Mr T Looks like that instrument is more suited to brain surgery than car mechanics
Anyway .. been in the workshop/carport painting up and stuff ..
Removed the timing chain cover ....
.. looks like just a new chain and tensioner .....
of course I'll put a new seal in. I just want to get the engine & gearbox back by the end of May .... grrr
Never mind ... all progress is good as I'm sure you all know.
Won't get much done this week-end .. a School Reunion in Worcester .... GREAT FUN ... many beers !
Keeeep buildin'
Slarti
Reply With Quote
  #13  
Old 11th May 2014, 16:49
slartibartfast's Avatar
slartibartfast slartibartfast is offline
Senior Member
 
Join Date: Aug 2012
Location: Surrey/Sussex border
Posts: 169
slartibartfast is on a distinguished road
Default

A good week-end on th Sammio ! Wife went shopping with our eldest daughter for wedding dresses ... another expense! but it did give me the chance to work in the carport under cover (didn't it rain!). But as I STILL haven't got the head back I did some more painting and cleaning of bits & bobs ....
Thought I would try the frame on the chassis ....with a bit of coaxing it dit fit and all the bolt holes lined up ..


Then I stripped down the fuel pump.
Nice and clean out side! ...
but inside was a diiferent story ... ..gauze filter seemed ok ... but inside was ... well ... slightly MUCKY ...
...over a heaped teaspoon of ... rust and dirt. .
Hopefully pick up the reconditioned head next week and start to put things together.
I've got this idea at the back of my mind to put 2 x 6v batteries behind the seats a la MGB instead of dropping the battery box .... any thoughts on that from you guys/gals in the know??? Love to hear from you ....
Onward & upward ...!
Slarti
Reply With Quote
  #14  
Old 11th May 2014, 18:44
Paul L's Avatar
Paul L Paul L is offline
Senior Member
 
Join Date: Feb 2012
Location: Wembley, London
Posts: 5,058
Paul L is on a distinguished road
Default

Good to hear the framework lined up without any major problems.
Reply With Quote
  #15  
Old 11th May 2014, 19:26
Viatron Viatron is offline
Senior Member
 
Join Date: Apr 2012
Posts: 1,163
Viatron is on a distinguished road
Default

Or you could fit a smaller battery like the one I'm using from here:
http://www.ebay.co.uk/itm/151127206701
Reply With Quote
  #16  
Old 13th May 2014, 14:28
slartibartfast's Avatar
slartibartfast slartibartfast is offline
Senior Member
 
Join Date: Aug 2012
Location: Surrey/Sussex border
Posts: 169
slartibartfast is on a distinguished road
Default

Thanks Viatron. I take it you've had no problems ...
Reply With Quote
  #17  
Old 14th May 2014, 18:23
Viatron Viatron is offline
Senior Member
 
Join Date: Apr 2012
Posts: 1,163
Viatron is on a distinguished road
Default

Nope not with the battery anyway!
Reply With Quote
  #18  
Old 14th May 2014, 19:58
slartibartfast's Avatar
slartibartfast slartibartfast is offline
Senior Member
 
Join Date: Aug 2012
Location: Surrey/Sussex border
Posts: 169
slartibartfast is on a distinguished road
Unhappy

Cheers Viatron.
I Think I will go that route.
To update ... I gave the chap who is refurbishing the head another chase-up today ... it's been 7 weeks now when I was quoted a fortnight
As I'm off on holiday till 24th May ... I ain't gonna get the head back for the long Bank Holiday week-end ... which means I will certainly miss my target of having a rolling chassis with engine & gearbox by the end of May
Will keep you all updated ...
Slarti
Reply With Quote
  #19  
Old 17th June 2014, 21:15
slartibartfast's Avatar
slartibartfast slartibartfast is offline
Senior Member
 
Join Date: Aug 2012
Location: Surrey/Sussex border
Posts: 169
slartibartfast is on a distinguished road
Default Two Steps Forward ! One Step Back :(

One of the reasons I've not updated is because my computer has been playing up BADLY !! The other reason ... I've not actually done much ...
But... received the bits & pieces I ordered ...


and started fitting ...


With help from my Son in Law, the engine & gearbox are now back in the frame ..


The head has at last been returned & will be fitted shortly, along with the water pump & other ancilliaries...


The one step back relates to the Hardy Spicer joints in the propshaft ....
One of the needle bearings fell over in assembly & I had to prize it appart again. All is now well & more piccies to follow .... Hope I'm doing well ..
Slarti
Reply With Quote
  #20  
Old 29th July 2014, 09:10
slartibartfast's Avatar
slartibartfast slartibartfast is offline
Senior Member
 
Join Date: Aug 2012
Location: Surrey/Sussex border
Posts: 169
slartibartfast is on a distinguished road
Default

It seems ages since my last post but I have been working away. As before the engine & gearbox are firmly in and with a little blood, sweat & a few tears the prop shaft is back in with new Hardy Spicer joints. Oddly when I phoned a chap about having it rebalanced he said that it was probably not necessary ...? if it does vibrate it shouldn't be too much to whip it out again. The bulkhead is back on and I've test fitted the lowered floorpans. I put a series of Riv-nuts in and will bolt them down with some sealant/mastic to get a water-tight fit. After that it will be a test fit of the body. More piccies to follow.
Sorry I've been so slow .....
Slarti
Reply With Quote
Reply


Currently Active Users Viewing This Thread: 1 (0 members and 1 guests)
 

Posting Rules
You may not post new threads
You may not post replies
You may not post attachments
You may not edit your posts

BB code is On
Smilies are On
[IMG] code is On
HTML code is Off

Forum Jump


All times are GMT +0. The time now is 11:35.

copyright © madabout-kitcars.com 2000-2024
terms and conditions | privacy policy