|
|
| Sammio Builds and discussions Sammio bodied car builds and specials |

2nd November 2011, 16:47
|
 |
Senior Member
|
|
Join Date: Jul 2011
Posts: 5,328
|
|
Quote:
Originally Posted by redratbike

just missed a vitesse for £300 buy it now on ebay ...bugger!
|
Ye Gods, I got £311 for my Vitesse bonnet alone! |
2nd November 2011, 19:57
|
|
Senior Member
|
|
Join Date: Jul 2011
Posts: 5,328
|
|
Anyone tried welding aluminium?
Now that I've had a go with my cheap MMA stick welder I'm starting to have ambitious thoughts:
I need a 3 to 4 litre capacity tank for the methanol/water injection system and I've been looking at ally sheet and my arc welder and wondering...
What are the chances of me welding up a watertight aluminium water tank?  |
2nd November 2011, 22:08
|
 |
Senior Member
|
|
Join Date: Jul 2011
Location: Marmande 47200
Posts: 501
|
|
None with an Arc welder , Aluminium is a different game all together, a real skill, Stick to steel is best advice I can give.
Cheers Psycho
|
3rd November 2011, 06:19
|
|
Senior Member
|
|
Join Date: Jul 2011
Posts: 5,328
|
|
Quote:
Originally Posted by Psycho pops
None with an Arc welder , Aluminium is a different game all together, a real skill, Stick to steel is best advice I can give.
Cheers Psycho
|
Yes, I had a feeling that would be the case.
I've noticed that aluminium arc electrodes are much harder to source and far more expensive than steel ones which tells a tale.
I also need to fabricate an aluminium air-box to shroud the carburettor trumpets and duct in the water/methanol mist from the nozzle so I might have a go at welding one up rather than riveting it, just so I can say I at least tried it.
After all, how hard can it be?  |
4th November 2011, 14:08
|
|
Senior Member
|
|
Join Date: Jul 2011
Posts: 5,328
|
|

Took the plunge this morning and cut off the rotten rear outrigger and side rail, then ground down the old welds leaving a nice shiny base to weld the new parts onto.
Not much left of the old ones to take to the scrappy I'm afraid.

After much measuring and checking and double checking I clamped the new parts in place and struck up my cheapo arc welder. I can't believe how quickly it's possible to get on with a job like this once you've got a bit of confidence in the equipment and your ability to use it.
So long as you follow the instructions and always think safety first, I'd recommend anyone to have a go at doing their own welding. I won't say it's easy, but it isn't anywhere near as difficult as some would have you believe.
So, the results of a couple of hours of work this morning are that there's some visible progress on my rotten chassis.

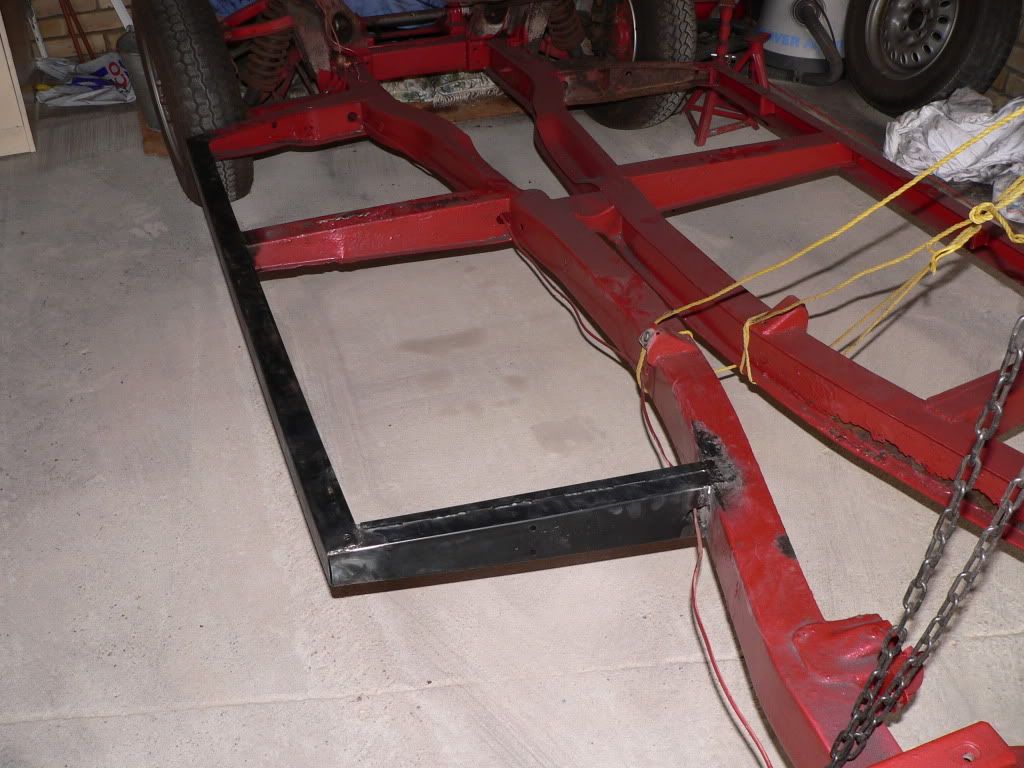
I'm happy that it's all structurally sound as I can lift the whole chassis up and down by using the new rear outrigger as a handle with no sign of it snapping off.
Next job is to replace the rotten front offside outrigger and attack the holes along the spine. But now I'm gaining in confidence and experience with the arc welder I say: bring it on, bring it all on! 

|
5th November 2011, 11:05
|
|
Senior Member
|
|
Join Date: Jun 2011
Location: birchington, kent
Posts: 1,769
|
|
You're making this look easy... Have started on bulkhead? Have you got much to do with it?
|
6th November 2011, 10:06
|
|
Senior Member
|
|
Join Date: Jul 2011
Posts: 5,328
|
|
Quote:
Originally Posted by garyh
You're making this look easy... Have started on bulkhead? Have you got much to do with it?
|
Hi Gary, I've made a start on the bulkhead only in so much as I've cut off the windscreen frame (and sold it!), ground off the redundant wiper-motor bracket and inspected it to see where repairs a needed.
The plan is to get the chassis finished including a full refurb of the brakes all round, then tackle the bulkhead next.
Work needed:
Remove pedal assemblies and give them a service;
sand blast bulkhead back to bare metal;
cut in lowered battery tray;
check clearance for brake servo unit which I'm hoping will fit where the heater box was without further mods;
Paint with red hammerite (other brands are available  );
replace badly welded in repair patch to passenger footwell (done by a previous owner I hasten to add);
cut the rotten off-side floor pan out completely to remove the possibility of doing a 'Fred Flintstone' on the bypass;
fit the bulkhead back on the chassis to keep everything straight before welding in the new driver's side floor-pan (£70 from Canleys);
Further coats of hammerite as necessary;
replace pedal assemblies including new accelerator mounting bracket and fittings ('king expensive for what it is) and a new throttle cable since I managed to cut through the old one while grinding off the wiper bracket  )
post loads of before 'n' after pictures on madabout as I get things done.
Then, finally, I can start building a Sammio rather than just repairing a Vitesse. 
|
6th November 2011, 14:48
|
 |
Senior Member
|
|
Join Date: May 2009
Location: POOLE , DORSET
Posts: 2,200
|
|
Quote:
Originally Posted by Mister Towed
Then, finally, I can start building a Sammio rather than just repairing a Vitesse. |
I think thats why I always suggest people should buy the best donor they can....I know its not always possible to do that , availability of cars and money being a key factor , but none of us want to be restorers really !! |
7th November 2011, 08:19
|
|
Senior Member
|
|
Join Date: Jul 2011
Posts: 5,328
|
|
You're absolutely right of course, Gary. Buying a car with a new mot would be a good start imho.
Having said that, the major weaknesses in my chassis were well disguised by a previous owner: the gash along the main chassis rail was plastered over with bitumen and was hidden from view by the prop shaft while the nearside rear outrigger and siderail had thin tinplate wrapped around them and seam welded very prettily to make them look structurally sound, which they just were not.
Without stripping and sandblasting the whole thing I never would have known that the nearside rear wheel could take over steering the car at any moment with potentially disastrous consequences, and I doubt an mot inspector would have failed it because you could happily stab the 'repair' with a screwdriver and it sounded solid.
On the plus side, this project is primarily a chance for me to dust off my old engineering skills and learn a few new ones along the way, and my rotten chassis sure is helping me do that!
|
7th November 2011, 18:16
|
|
Senior Member
|
|
Join Date: Jul 2011
Posts: 5,328
|
|
And while we're on the subject of hidden horrors, I cut the front, off-side outrigger off today with a view to welding in a replacement before getting a dozen other jobs done.
I only did this because there was a hole in the outrigger where it joined the main rail and I could see evidence of some welding having been done nearby. Having already removed some of the existing 'repairs' I was keen to see what lay beneath...
Good decision as it happens.
I cut through the outrigger at the side rail end and then started cutting through where it joins the main rail from the top down. Half way through it very slowly fell off, taking some of the chassis main rail with it.
I was then left with what looked like a plug of rust about the size of a two pence piece.

So. Simple enough job: stab at it with a jumbo screwdriver until all the rust has dropped out then clean up the edges with the grinder and a file before welding in a small fillet piece to reinforce the chassis. 
Reality. Stab at it with a screwdriver. Hole gets bigger. 
Wiggle said screwdriver a bit. Hole gets bigger still and wafer thin tinplate tack-welded onto the surface starts to separate from the chassis. 

Bit of modest levering with a bigger screwdriver and hole starts to get pretty serious. Going at it with a hand file I finally found solid metal when I got here:
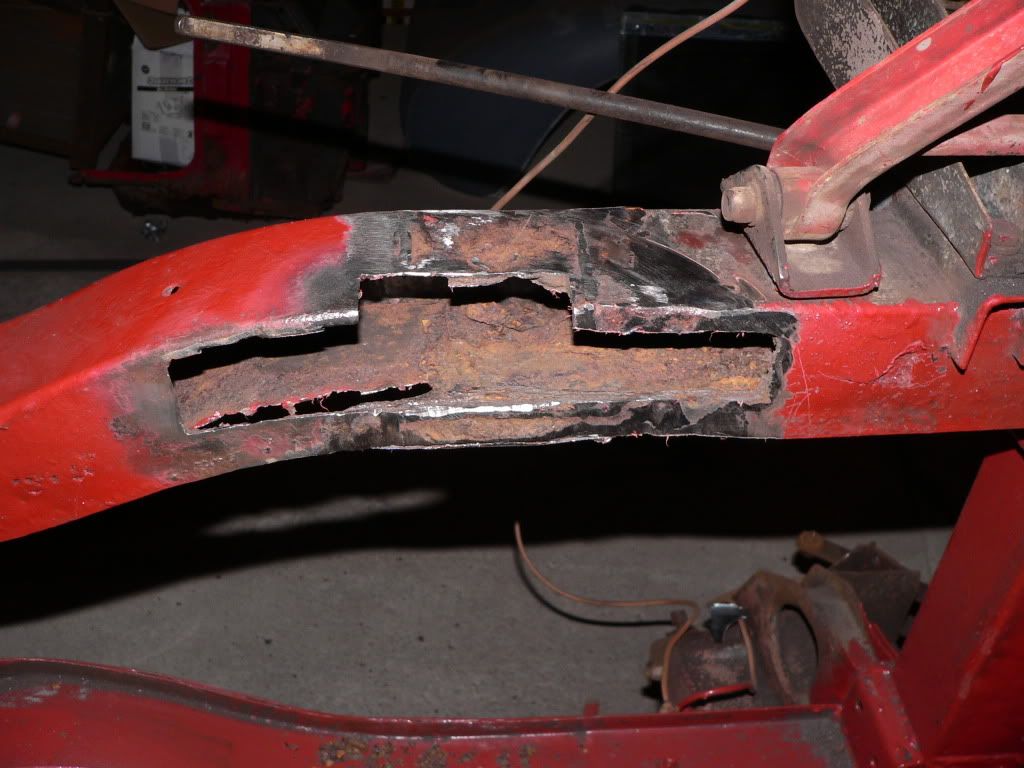
But hey, at least I know how to weld...
|
8th November 2011, 21:23
|
|
Senior Member
|
|
Join Date: Jun 2011
Location: birchington, kent
Posts: 1,769
|
|
 That looks 'orrible'...
You're certainly getting lots of practice welding! obviously more than whoever tried to do it in the first place. great pics by the way!  |
9th November 2011, 08:26
|
 |
Senior Member
|
|
Join Date: May 2011
Location: Somerset
Posts: 1,671
|
|
Blimey!! It makes me think that i really should investigate the bitumen covered bumpy bits on the underneath of my chassis sooner rather than later.
|
9th November 2011, 08:33
|
|
Senior Member
|
|
Join Date: Jun 2011
Location: birchington, kent
Posts: 1,769
|
|
Dave, it will make a change from doing bodywork!
Try a magnet... not too strong, just in case you start pulling big lumps out! |
9th November 2011, 15:03
|
 |
Senior Member
|
|
Join Date: Sep 2011
Posts: 1,446
|
|
i'd be injecting waxoyl into that chassis as soon as all the welding is complete looking at how rusty it is inside..just for the peace of mind!
|
9th November 2011, 18:05
|
|
Senior Member
|
|
Join Date: Jul 2011
Posts: 5,328
|
|
Yep, been googling waxoyl today for that very reason. 
Lots more welding practice ahead before I'm ready to inject something flammable into it though.
I've already burnt a hole in my fire retardent overalls by inadvertently directing a shower of sparks from the grinder straight at my dangly bits. |
9th November 2011, 20:06
|
|
Senior Member
|
|
Join Date: May 2011
Location: Somerset
Posts: 1,671
|
|
Quote:
Originally Posted by Mister Towed
I've already burnt a hole in my fire retardent overalls by inadvertently directing a shower of sparks from the grinder straight at my dangly bits. |
Welcome to the club!  |
9th November 2011, 21:04
|
|
Senior Member
|
|
Join Date: Jul 2011
Posts: 5,328
|
|
Sold my Vitesse radiator on ebay yesterday for £65, which means my reconditioned straight 6, gearbox and chassis (rotten though it is) have cost me the grand total of thirty three quid, and if I get four pounds each for the Spitfire wheels it came with it'll have cost me just over a tenner.
I had a lovely chat about all things engineering with the chap who collected it, as you do. He was particularly interested in the water injection system that I'm adding to the engine and has asked me to provide him with some more information, so, I thought why not share it with the madabout Sammio community as well?
But why do I want to add water injection? The answer is because I want to run an old engine on modern fuel. I have a 2 litre Vitesse lump going into my Sammio, and here's what the Vitesse handbook says about fuel:
The Vitesse 2-litre engine is designed to operate on fuels having a minimum octane of 100 (RON). Using fuel of this, or higher rating, the static ignition timing should be 13 degrees B.T.D.C.
Where such fuels are not available and if, therefore, it becomes necessary to operate on fuels of lower or unknown rating, the static ignition timing must be retarded just suficiently to prevent audible detonation (pinking) under all operating conditions. Failure to do so may result in serious damage to the engine.
Using fuel having a minimum rating of 97 (RON), the static ignition timing should be retarded to 7 degrees B.T.D.C. Because loss of engine power and efficiency will result from retarding the ignition, it is strongly recommended that fuel having a minimum octane rating of 100 (RON) is used whenever available and that the static ignition timing is set accordingly.
Now, standard unleaded is 95 (RON) and super unleaded is 97 (and mightily expensive) meaning that even with super unleaded the ignition will have to be retarded by 6 degrees or risk having it detonate itself to destruction.
And if anyone is unfamiliar with what the octane rating means, the higher the number the more resistant it is to compression ignition allowing a higher compression ratio and more aggressive ignition advance giving more power at faster crank speeds with better economy across the board, a win-win situation.
By introducing a fine mist of water into the intake charge you effectively increase the octane rating of the fuel/air mix. For a more detailed technical description follow link the here:
http://www.turbomirage.com/water.html
Now, although these days the focus for water injection is on the highly tuned turbo brigade it still works wonders on a normally aspirated engine and the setup described in that web site is pretty much what mine will have:
A water tank; a high pressure pump; a vacuum actuated switch (sited outside the throttle butterflies so it's triggered when the engine is under load); a solenoid valve; and a fogger nozzle, all linked together with high pressure pipe. I've sourced all the parts I need from the internet for a total of less than £120.
A simpler setup is possible, however, which consists solely of a water tank and some copper capillary tube: The water tank needs to be sited below the level of the carburettor(s) (so the water doesn't gravity feed into the intake) but higher than the exhaust down-pipe, while the capillary tube is routed from the underneath of the tank, around the exhaust down-pipe a dozen or so times and then up into the bottom of the air filter housing inboard of the filter. As soon as the exhaust gets hot, the water in the capillary boils and the steam is forced up into the air filter where it is drawn into the intake charge. Nobody knows why, but steam works just as well as a fine mist of water giving significant gains in power and economy. Simple.
With any water injection system it's important to use distilled water so it doesn't fur up and with the pump and nozzle system it's also wise to add some methanol, both to stop the water freezing and to inhibit bacteria growth. I'm planning to run about a 5 to 1 mix. It's also worth mentioning that this won't allow you to run a leaded cylinder head on unleaded as the valve seats will still wear out if they're not the hardened type.
Et voila! Or, as they say in France, there you 'ave eet. DIY water injection for beginners, if you dare... 
|
9th November 2011, 21:35
|
 |
Senior Member
Enthusiast
|
|
Join Date: Mar 2005
Posts: 3,080
|
|
Quote:
Originally Posted by Mister Towed
Bit of modest levering with a bigger screwdriver and hole starts to get pretty serious. Going at it with a hand file I finally found solid metal when I got here:
But hey, at least I know how to weld... |
That rust looks quite serious. 
It might be worth investing in one of these...
http://www.ebay.co.uk/itm/TM-8810-Di...ht_2069wt_1110
I've not looked into it but maybe you can hire something similar?
It will be better to know what you've got and you'll be able to drive the car with confidence.. |
9th November 2011, 21:52
|
|
Senior Member
|
|
Join Date: Jul 2011
Posts: 5,328
|
|
That looks like a seriously Gucci measuring toy, I like it!
At the moment I'm gauging the thickness of the metal by giving it a bloody hard jab with a big screwdriver: screwdriver stays outside chassis, pass; screwdriver disappears into chassis, fail.
Although the rust looks pretty bad it is quite localised and most of it, no, some of it, is really quite sound, ish. |
14th November 2011, 13:38
|
|
Senior Member
|
|
Join Date: Jul 2011
Posts: 5,328
|
|
Just finished the repair to the chassis where the front o/s outrigger attaches.
It's taken ages to sort, but that's because I've done it properly, welding in carefully shaped peices of 5mm x 50mm, flat steel bar to give it strength. Whoever tackled it before just did a cosmetic job so it could bluff its way through the mot.

Also had time this morning to weld on the new outrigger. I'm happy with the repair as once again I can lift the whole chassis up and down using the outrigger as a handle with no sign of failure.

I'm off to work in an hour but I've got Tuesday, Wednesday and Thursday off so I'll be tackling the gash along the inside of the chassis rail and hopefully stripping off the rest of the existing 'repairs' to see what lies beneath... |
|
Currently Active Users Viewing This Thread: 3 (0 members and 3 guests)
|
|
|
 Posting Rules
|
You may not post new threads
You may not post replies
You may not post attachments
You may not edit your posts
HTML code is Off
|
|
|
All times are GMT +0. The time now is 15:30.
|


 Linear Mode

