|
|
| Marlin Sportster, Cabrio, Berlinetta and Roadster builds Enthused or Confused about your vintage Marlin build? Ask away here or show off your build. |

6th November 2011, 19:29
|
 |
Senior Member
Enthusiast
|
|
Join Date: Sep 2005
Location: Northampton, UK
Posts: 1,891
|
|
Yes - well, there will be. I need to take it off again and see if I can re polish the sides again. I'm not completely happy with the finish, as I haven't got all the tooling marks out.
I'll be putting some rubber in the barrel that holds the pipe, and on the inside of the clamping collar
I've already started on my next parts as well - I'm making some brackets to mount on the inside of the windscreen for a rod mounted rearview mirror (ala E-Type or early MG) so I can move the rearview mirror up. All I can see at the moment in it is the spare wheel!
It'll also mean that I can get a second clamp, and with a bit of jiggly pokey be able to clamp my iPhone to the lower section of the rod so I can see my sat-nav app.
|
6th November 2011, 20:29
|
 |
Senior Member
Enthusiast
|
|
Join Date: Mar 2005
Posts: 3,079
|
|

Quote:
Originally Posted by GreatOldOne

I've already started on my next parts as well - I'm making some brackets to mount on the inside of the windscreen for a rod mounted rearview mirror (ala E-Type or early MG) so I can move the rearview mirror up. All I can see at the moment in it is the spare wheel!
|
I found getting the right mirror position a bit challenging.
My original mirror was on a longish stalk so I could see over the spare wheel, but I found it obscured my view when looking left when pulling out of junctions.(But I am quite short and my seats quite low)
 Drivers view
 by marlinpeter, on Flickr
I tried a stick-on one at the top of the screen but I couldn't see out when the hood was fitted and was constantly falling off! So I threw that away.
Currently I've got a small low mounted one...
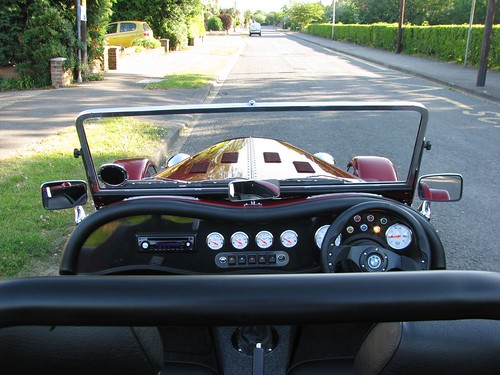 Marlin Sportster
 by marlinpeter, on Flickr
 Marlin Sportster
 by marlinpeter, on Flickr
I do get a good view of the spare wheel cover 
A rod mounting sounds ideal as you will be able to adjust to the right position 
Do be careful when drilling the windscreen surround or you'll end up with a cracked windscreen like mine 
P.S. those brake hose clamps might look nice black anodised? Just a thought?

|
7th November 2011, 07:35
|
|
Senior Member
Enthusiast
|
|
Join Date: Sep 2005
Location: Northampton, UK
Posts: 1,891
|
|
That's exactly the same rear view mirror as I have.
I'm not looking forward to drilling the windscreen... I think it'll have to be nice sharp drill, slow speed, plenty of cutting fluid. And then a plug tap.
That or take the windscreen out before I do it, and then reseal it afterwords.
|
20th November 2011, 17:13
|
|
Senior Member
Enthusiast
|
|
Join Date: Sep 2005
Location: Northampton, UK
Posts: 1,891
|
|
Well, I've done it - I've made up a stainless rod and some brackets to hold it to the windscreen.
I had to start from scratch again on the brackets - my carefully engineered ones I made on the mill at college where complete bobbins. Yes, very accurate, let down by piss poor drilling of the rod holes at the end of a session... 
Anyway - I did all of this this afternoon with nothing put a pillar drill, a hack saw and my trusty wet & dry and polishing kit. I'm quite pleased how it's turned out.


The brackets are 12mm square section aluminium bar stock, cut to length (40mm) with centred fixing holes at 10mm and 30mm. The holes are counter bored to 8.5mm to suit the stainless fixings I was using (M4 countersunk cap head)
The rod is stainless and 5mm in diameter, and the brackets are tapped to accept an M5 thread to approx 8mm in depth. Both brackets had 45 degree shoulder cuts with a hacksaw in my vice, and then they where neatened up with a file. Then the sanding and the polishing commenced. The metal is shiny. My fingers are black. 
The windscreen was remarkably simple to drill and tap - I used my cordless drill on the slow / high torque setting, had a bit of cutting fluid and went to it. It was so easy I have my doubts that my windscreen surround is stainless steel. I think it's Aluminium!
Any way - I have two chrome rod mounted mirrors on order. One will be used as intended, the other will be dismantled and remade into a mount for my iPhone.
|
20th November 2011, 17:55
|
|
Senior Member
Enthusiast
|
|
Join Date: Mar 2005
Posts: 3,079
|
|
Very nice, well done!!
I can confirm that the windscreen surround is made of aluminium, not S/S.
I think you have been very lucky drilling those holes without hitting the glass. I've just seen my old cracked windscreen now that it's been replaced.
It confirms that the reason mine split is that the glass was mounted only 4mm from the top edge of the screen surround. So insufficient clearance for the hood retaining pins. My new screen has cut outs in the glass to prevent any re-occurrence.
It will be interesting to see where you find the best position for the sliding mirror.
|
21st November 2011, 08:47
|
|
Senior Member
Enthusiast
|
|
Join Date: Sep 2005
Location: Northampton, UK
Posts: 1,891
|
|
Quote:
Originally Posted by peterux
I think you have been very lucky drilling those holes without hitting the glass. I've just seen my old cracked windscreen now that it's been replaced.
|
Not luck. Skill! 
Honestly though, it wasn't that scary.
As I said, my cordless drill has two torque ranges - fast, low torque and slow, high torque... plus it has the usual variable speed according to the trigger position. So with a sharp bit, a dab of oil and a slow start to keep the drill point wandeing, is started to cut very easily and freely.
I stopped every couple of seconds to make see how deep I was, and when you're going that slowly you can feel when your about to break through. At that point I just took all pressure of the drill and allowed it to finish off itself.
The tapping was fine as well. Because the screen is aluminium, it's easy to tap, with very little resistance. so you can tell that you've reached the bottom or a touching the glass as there is a sudden change in resistance to turning the tool.
That's when you come to a full stop and ring down to the engine room for full reverse.
The fixings have been cut to length so they're the thread protruding from the back of the bracket is the same length as the depth of the screen surround.
|
21st November 2011, 20:29
|
|
Senior Member
Enthusiast
|
|
Join Date: Mar 2005
Posts: 3,079
|
|
|
5th December 2011, 16:42
|
|
Senior Member
Enthusiast
|
|
Join Date: Sep 2005
Location: Northampton, UK
Posts: 1,891
|
|
|
5th December 2011, 18:25
|
|
Junior Member
|
|
Join Date: Nov 2011
Posts: 25
|
|
Filing that in the must do docket  |
5th December 2011, 20:42
|
|
Senior Member
Enthusiast
|
|
Join Date: Mar 2005
Posts: 3,079
|
|
Very smart, well done!!  |
5th December 2011, 21:05
|
|
Senior Member
Enthusiast
|
|
Join Date: Sep 2005
Location: Northampton, UK
Posts: 1,891
|
|
Thanks guys. Now I have to modify the second mirror into my iGOO iPhone iMount |
5th December 2011, 21:19
|
|
Senior Member
Enthusiast
|
|
Join Date: Jan 2007
Posts: 932
|
|
Quote:
Originally Posted by GreatOldOne
Thanks guys. Now I have to modify the second mirror into my iGOO iPhone iMount |
I love the idea. |
5th December 2011, 21:20
|
|
Senior Member
Enthusiast
|
|
Join Date: Mar 2005
Posts: 3,079
|
|
Quote:
Originally Posted by GreatOldOne
Thanks guys. Now I have to modify the second mirror into my iGOO iPhone iMount |
Just hope you don't get stopped by the iplod! |
24th December 2011, 12:06
|
|
Senior Member
Enthusiast
|
|
Join Date: Sep 2005
Location: Northampton, UK
Posts: 1,891
|
|
The iGOO iPhone iMount takes shape!


I've cut a 3mm thick blank of aluminium the same shape as the mirror that was in the casing, and riveted a L shaped extrusion through a slot I cut in the plate. for the phone to sit on.
The plate is held in via an M4 screw from the pack of the casing, and 8 holes have been drilled (4 each side, 2 front, 2 back) for some 3mm black elasticated cord I've got.
The front face and the top of the shelf will get some of that grippy rubber stuff they sell for phones on your dashboard. All the exposed edges not covered in rubber have been polished, as has the M6 coach bolt that's had it's head ground to an appropriate diameter. I reused one of the black plastic knobs that used to be on the windscreen to tighten it up, as it'll be easier to get off the windscreen rod when I'm not using it.

By happy coincidence, if the phone is the right way up, the camera lens clears the top of the casing. On the move videos! |
31st December 2011, 14:51
|
|
Senior Member
Enthusiast
|
|
Join Date: Sep 2005
Location: Northampton, UK
Posts: 1,891
|
|
|
1st January 2012, 12:16
|
 |
Senior Member
|
|
Join Date: Apr 2009
Location: Somerset
Posts: 518
|
|
Isn't an Iphone going to be a bit out of place with all the other retro finishes? Can you put it in some kind of wooden cabinet?  |
1st January 2012, 12:51
|
|
Senior Member
Enthusiast
|
|
Join Date: Sep 2005
Location: Northampton, UK
Posts: 1,891
|
|
What, like this:
https://www.miniot.com/webshop/
The iPhone mount won't be attached to the screen all the time... Only when I need it for stuff like the navigation app. The rest of the time the phone will be in my pocket. |
3rd January 2012, 17:07
|
|
Senior Member
|
|
Join Date: Apr 2009
Location: Somerset
Posts: 518
|
|
That will do nicely sir!
|
18th January 2012, 21:09
|
|
Senior Member
Enthusiast
|
|
Join Date: Sep 2005
Location: Northampton, UK
Posts: 1,891
|
|
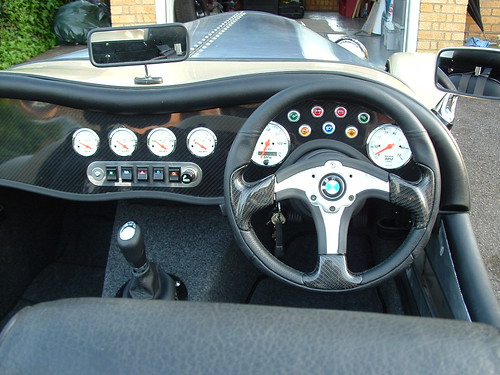
Today I have mostly been mounting the new heater valve, recovering the centre console and mounting the new switch plate:


I think it looks spiffing. Of course, you can't bloody well see the Marlin logo when you're sat behind the wheel due to the line of the dash... Ooops.
The starter button works great. I've modified the ignition switch so that it's no longer spring loaded, and won't advance to the start position - it just rotates from off to aux to run. To start her now, I put the key in the ignition (which still works the steering lock), rotate it round to start and then press the loud button. |
18th January 2012, 21:19
|
|
Senior Member
|
|
Join Date: Dec 2010
Posts: 287
|
|
Spiffing is the word, but I bet you any money one day you will get in the car to start it and turn the key and wonder why it does not start............then you remember the start button.
I have the same arrangement and still forget occasionally because your everyday runaround starts on the key.
Thinking about it a lot of new cars are like that now though.
Last edited by denniswpearce; 18th January 2012 at 21:20..
Reason: correct spelling error
|
|
Currently Active Users Viewing This Thread: 1 (0 members and 1 guests)
|
|
|
 Posting Rules
|
You may not post new threads
You may not post replies
You may not post attachments
You may not edit your posts
HTML code is Off
|
|
|
All times are GMT +0. The time now is 12:12.
|


 Linear Mode

