Are you madabout kit cars      
 "We've Got Kit Cars Covered" Information about Madabout-Kitcars.com Contact Madabout-Kitcars.com         Home of UK kit cars - madabout-kitcars.com Various kit car write ups All the latest kit car news Kit car related and general discussion

Search
Manufacturers
Kit Cars
Kit Car Data sheets
Picture Gallery
SVA Knowledgebase
Clubs & Communities
Build cost estimator
Kit cars for sale
Knowledge Base 
KitcarUSA.com
Classic-Kitcars.com
 

Go Back   Madabout Kitcars Forum > Mad Build Area > Vintage and Classic Roadster Kit Car Builds

Vintage and Classic Roadster Kit Car Builds For Vintage and Classic era kit cars. Post your build reports, problems and progress here

Reply
 
Thread Tools Display Modes
  #1  
Old 3rd April 2020, 18:35
peterux's Avatar
peterux peterux is offline
Senior Member
Enthusiast
 
Join Date: Mar 2005
Posts: 3,079
peterux is on a distinguished road
Default Bonnet stay - take 2....

Quote:
Originally Posted by peterux View Post
...... my current design causes the stay to rest on the engine cover which doesn't seem right to me as the engine moves slightly.
I need to rethink the bottom mount...
So the issue with the first version of my bonnet stays is that there is nowhere to clip it when not in use....

Bonnet stay issue by Sabrebuilder, on Flickr

To solve the problem, I have replaced the lower fixing point with an m5 stainless steel ball joint.

Bonnet stay - version 2 by Sabrebuilder, on Flickr

Which means it can swing across and be clipped on a bracket fixed to the side bonnet.

Bonnet stay clip by Sabrebuilder, on Flickr

The bracket for the bonnet stay clip was a bit of a challenge.

Bonnet stay clip bracket by Sabrebuilder, on Flickr

Moving on, I've been fitting the numerous bolts in the front wing (I think there are 15 or so) which takes some ingenious yoga positions to reach some of the nuts and bolts.

Wing fitting by Sabrebuilder, on Flickr


Then I can wire up the front lights. More on that next week.
Stay safe everyone....
....peter
Reply With Quote
Available from eBay
  #2  
Old 4th April 2020, 17:01
Grey V8 Pete's Avatar
Grey V8 Pete Grey V8 Pete is offline
Senior Member
 
Join Date: Nov 2011
Location: Exeter
Posts: 187
Grey V8 Pete is on a distinguished road
Default

Quote:
Originally Posted by peterux View Post
Moving on, I've been fitting the numerous bolts in the front wing (I think there are 15 or so) which takes some ingenious yoga positions to reach some of the nuts and bolts.
....peter
A dodge that I have used to good effect in the past is to use Evo Stik! Option 1 is to put a smear of it in a socket, then pop the nut or bolt in the socket and wait 5 minutes. You can the manoeuvre it into position, even downwards, while fitting the opposite bolt / nut into position. Option 2 is to Evo Stik the nut / bolt, plus washer if there is one, into position on the body, if neccessary using a dummy mandrel and again wait for the glue to set a bit.

The advantage is this method is that the Evo Stik is strong enough for the fitting operation but easily shears away if you later strip down. Any remnants of glue in the socket spanner can easily be scraped out. Peter.
Reply With Quote
  #3  
Old 5th April 2020, 08:59
peterux's Avatar
peterux peterux is offline
Senior Member
Enthusiast
 
Join Date: Mar 2005
Posts: 3,079
peterux is on a distinguished road
Default

Quote:
Originally Posted by Grey V8 Pete View Post
A dodge that I have used to good effect in the past is to use Evo Stik! Option 1 is to put a smear of it in a socket, then pop the nut or bolt in the socket and wait 5 minutes. You can the manoeuvre it into position, even downwards, while fitting the opposite bolt / nut into position. Option 2 is to Evo Stik the nut / bolt, plus washer if there is one, into position on the body, if neccessary using a dummy mandrel and again wait for the glue to set a bit.

The advantage is this method is that the Evo Stik is strong enough for the fitting operation but easily shears away if you later strip down. Any remnants of glue in the socket spanner can easily be scraped out. Peter.
Thanks Peter, that is a good tip i'll try next time on the other side of the car.
My tricks include putting a piece of PVC insulation tape across the head of the bolt and then wedging the bolt or nut in the socket. The tape thickness is just enough to hold the nut or bolt in the socket while you position it through the hole and the tape holds the washer in place. I also use all my socket set extensions joined together to give me about 18" extension to my arm. It's difficult to show in the pictures but the front wings are so large (and beautiful!) that you can't reach both sides of the nut and bolt.
All good fun though..........
Reply With Quote
  #4  
Old 4th April 2020, 20:04
Mitchelkitman Mitchelkitman is offline
Senior Member
 
Join Date: Oct 2013
Location: norfolk
Posts: 691
Mitchelkitman is on a distinguished road
Default

Quote:
Originally Posted by peterux View Post
So the issue with the first version of my bonnet stays is that there is nowhere to clip it when not in use....

Bonnet stay issue by Sabrebuilder, on Flickr

To solve the problem, I have replaced the lower fixing point with an m5 stainless steel ball joint.

Bonnet stay - version 2 by Sabrebuilder, on Flickr

Which means it can swing across and be clipped on a bracket fixed to the side bonnet.

Bonnet stay clip by Sabrebuilder, on Flickr

The bracket for the bonnet stay clip was a bit of a challenge.

Bonnet stay clip bracket by Sabrebuilder, on Flickr

Moving on, I've been fitting the numerous bolts in the front wing (I think there are 15 or so) which takes some ingenious yoga positions to reach some of the nuts and bolts.

Wing fitting by Sabrebuilder, on Flickr


Then I can wire up the front lights. More on that next week.
Stay safe everyone....
....peter
Very nice indeed
Reply With Quote
  #5  
Old 8th April 2020, 19:54
peterux's Avatar
peterux peterux is offline
Senior Member
Enthusiast
 
Join Date: Mar 2005
Posts: 3,079
peterux is on a distinguished road
Default Mid-week update...

Quote:
Originally Posted by Mitchelkitman View Post
Very nice indeed
Thanks for the feedback.
---------------------------------------------------------------------------------------

A midweek update.....at least I think it is midweek but during these strange times all days are alike and equal.
But every cloud has a silver lining so I'm cracking on with my re-build....

I've now finished fitting the nearside wings.
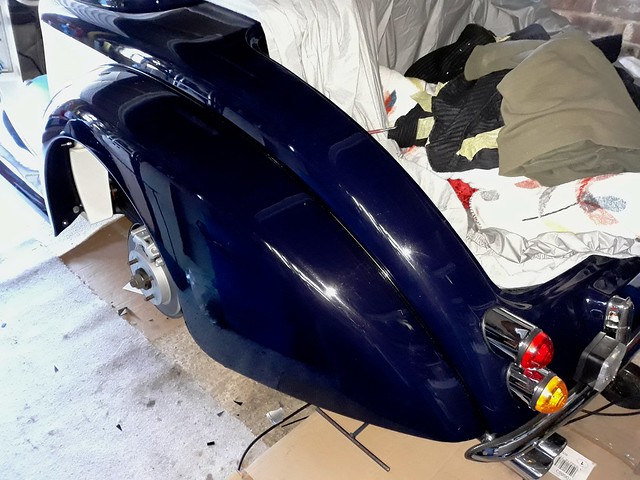
Rear Wing by Sabrebuilder, on Flickr

(the shiny blue paint is difficult to photograph inside my garage with reflections from the windows and the fluorescent tubes above)

Rear Wing by Sabrebuilder, on Flickr

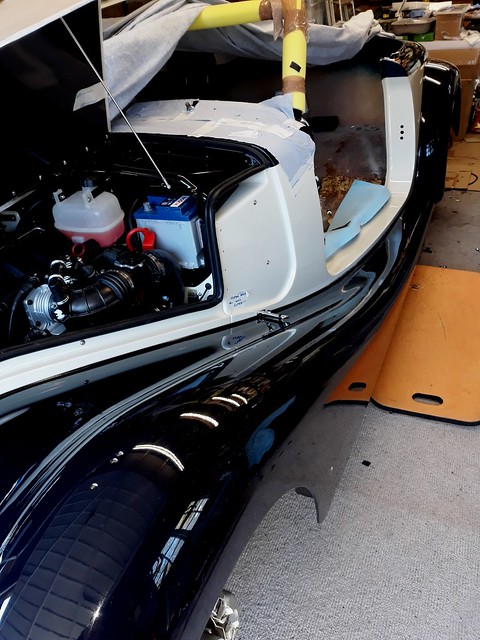
The wing piping was time consuming and the joint between the front and back wings was the trickiest bit to get a neat finish. I used patent look smooth PVC 'leathercloth' over a 6mm plastic cord. Eventually I figured out that you have to bolt the two wings together before tightening the bolts to the body. Obvious with hindsight.

Wing Piping by Sabrebuilder, on Flickr

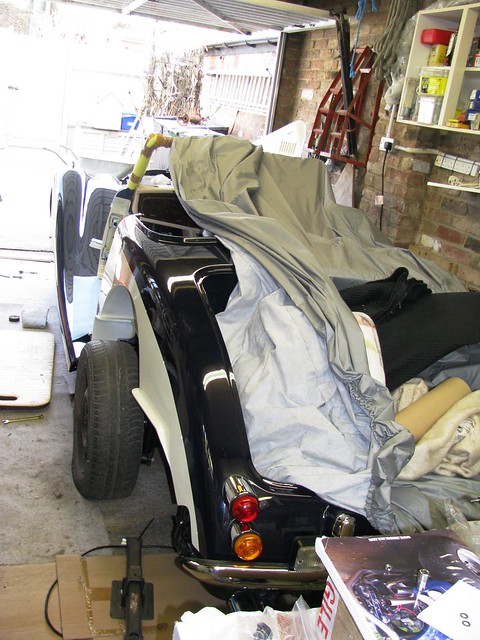
And another weird shot off my 'phone.

Front and Rear wings by Sabrebuilder, on Flickr

Now I can finish wiring up the front lamps....
stay safe everyone,

......peter
Reply With Quote
Reply


Currently Active Users Viewing This Thread: 2207 (0 members and 2207 guests)
 

Posting Rules
You may not post new threads
You may not post replies
You may not post attachments
You may not edit your posts

BB code is On
Smilies are On
[IMG] code is On
HTML code is Off

Forum Jump


All times are GMT +0. The time now is 05:46.

copyright © madabout-kitcars.com 2000-2024
terms and conditions | privacy policy