|
|
| Sammio Builds and discussions Sammio bodied car builds and specials |

24th May 2016, 19:44
|
 |
Senior Member
|
|
Join Date: Sep 2011
Posts: 1,446
|
|
Chop chop enough indeed :-)
|
25th May 2016, 09:45
|
 |
Senior Member
|
|
Join Date: Feb 2012
Location: Wembley, London
Posts: 5,056
|
|
RedRatBike - It actually feels like I've been working on this front arch for ages. 
But yesterday only marked "Day 8" since I started cutting up the original arch edge/return lip.
Apart from one rainy evening, I have managed to do something on the arch on 7 of those 8 days. 
Unfortunately, life & work will have to take priority over the next few days.
I was hoping to squeeze in a bit of fibreglass work in this morning, but it is currently raining outside. 
So until next time, take care, Paul. 
|
25th May 2016, 21:28
|
|
Senior Member
|
|
Join Date: Sep 2011
Posts: 1,446
|
|
I know how precious time can be
Just managed to rebuild my aprilia mille in a lockup with no power on odd evenings ready for this years TT trip
|
28th May 2016, 18:34
|
|
Senior Member
|
|
Join Date: Feb 2012
Location: Wembley, London
Posts: 5,056
|
|

RedRatBike - I hate to say it, but my driveway sounds more appealing than a lock up without power. 
Although, obviously, not as appealing as a huge garage with power, heating, a car lift, etc. 
Having said that, I'd actually settle for a just a driveway that was flat and level.
Enjoy the TT.
- - - - - - - - - - - - - - - - - - - - - - - - - - - - - - -
Quick Catch Up:
Wednesday Morning - A misty rain had prevented me from sneaking in some work on the car.
Wednesday evening - I had arrived here, in advance of a full day's work on Thursday.

This was the first time I'd seen the Cardiff Bay development & it is very impressive.
- - - - - - - - - - - - - - - - - - - - - - - - - - - - - - -
Saturday - Part 1:
A very slow start to the day, as the rest of the family are all ill, and I feel like I'm running on empty.
( So it is quite likely that I am fighting what ever bug has confined everyone else to the sofas. )
Started with a very simple job of tightening up the last two fixing bolts for the headlight bowls on both sides.
( I'd only tightened up two on each side originally, but the lights are now staying in place until the MOT. )

Then the rest of the day was spent getting more fibreglass matting on in a number of areas.
I opened up the joins along the bonnet return lip.


Cleaned up the inside edges of the two pieces I bolted into place on Tuesday.

Sanded down any excess bonding paste from the plywood panels next to the bulkhead.
( As it is easier to reach this area now, before I extend the side of the body shell. )

Added an extra bracket along the body shell extension piece.
( This is where the clamp originally held the panel in place. )

End of Part 1…

|
28th May 2016, 18:35
|
|
Senior Member
|
|
Join Date: Feb 2012
Location: Wembley, London
Posts: 5,056
|
|
Saturday - Part 2:
I then added the first round of fibreglass matting to these areas.
( See photos below, after round two. )
I also added some matting on the outside edge of the front wheel arch.
( Over any low spots remaining from the initial repair work. )

Once this was all set, I could remove the fixing brackets and tidy up the screw holes.

At this point, I still have two small sections of the original arch left over.

So one was trimmed down a bit and fixed into position underneath the existing body shell extension piece.

I ground out the join on the outside of the bonnet.
( Note: I've already done two small sections of this join. )

After yet more fibreglassing, these are the areas I was working on.


Again, I just can't get a photo of the inside of the body shell extension piece.
But this is what the arch is looking like now.

Let's be honest, it is still not looking very nice is it?
But with a bit of luck, some fibreglass filler will be going on a section of this tomorrow. 
So until then, take care, Paul.
|
28th May 2016, 18:58
|
|
Senior Member
|
|
Join Date: Jun 2015
Posts: 1,401
|
|
Coming along nicely!
|
28th May 2016, 19:54
|
 |
Senior Member
|
|
Join Date: Jun 2011
Posts: 935
|
|
You have been looking at it too long Paul
I think its coming along nicely, ive seen your other mods and they all look like this before just before you finish them.
|
28th May 2016, 19:56
|
|
Junior Member
|
|
Join Date: Mar 2016
Posts: 10
|
|
Been following this thread everyday since I found it a few months ago and now get withdrawal symptoms if there isn't any updates for a few days.
Then when there is, it's always uplifting to see how much you have done. It's always great to read and gives a little boost for me to pull my socks up and do more work on my car project.
Great work Paul. |
29th May 2016, 17:29
|
|
Senior Member
|
|
Join Date: Feb 2012
Location: Wembley, London
Posts: 5,056
|
|
Molleur, Roadster & WelshOne - Cheers chaps.
Even though it does feel like slow progress, I know this is definitely heading in the right direction.
And Roadster is right, all my other Frankenstein modifications looked terrible at this stage too.
So the good news is that, hopefully, by the time this area is finished, casual observers will assume it always looked like that.
Which is one of the main reasons for covering all the work I do in great detail in this build thread.
As part of me is really gutted that this project has taken me over 4 years and counting.
But whenever I go back through this thread, the sheer volume of work I've completed to get to this point defies belief.
- - - - - - - - - - - - - - - - - - - - - - - - - - - - - - -
Sunday Service - Part 1:
My wife's brother & his wife will be coming to visit us in a few weeks time, so my domestic chores list is growing fast.
So I was in the garden first thing in the morning, picking jobs that didn't require the use of "noisy toys".
A bit like the front wheel arch, sometimes you need to make a mess before things improve.


With a decent start made in the garden, I could then play (quietly) with the car for a bit.
I sanded down the front half of the wing and then cleaned it.

Mixed up some fibreglass filler and applied it.

Then it was back into the garden for some more pruning/weeding.
Back at the car, the filler was sanded down.

Obviously, this makes a HUGE difference to how the arch repairs look.
The "bandages" were also removed from the last bit of bonnet work I did.

End of Part 1…
|
29th May 2016, 17:30
|
|
Senior Member
|
|
Join Date: Feb 2012
Location: Wembley, London
Posts: 5,056
|
|
Sunday - Part 2:
More gardening and then it was time to make some noise as I ground out the bonnet joins.

I also measured up and cut out a small section of fibreglass to act as a filler piece for the body shell extension.
Which was fixed into position with the main arch extension piece like so.

One fibreglassing session later and I'd started to build up the bonnet joins.

I'd also added some matting behind the body shell extension, which is very hard to reach/photo.

While that was setting I mowed the grass and it always looks "crisp" when the edging has been done.

Unfortunately, the edging only goes a bit further than what you can see, I still have most of it to do.
Anyway, that is enough gardening for one update and I've leave you with my work in progress.

Notes:
- The car is still "tilted", so the arch will be closer to the wheel when I'm on the road.
- I still need to add fibreglass filler to the return edge which should smooth the curve out a bit.
- The rubber bonnet seal is not in place and this will "lift" the bonnet up slightly.
My current plan is to finish off the body shell extension before adding the final section to the end of the bonnet.
As I want to add a horizontal section to connect the extension to the Spitfire bulkhead.
This will hopefully add some strength/support and provide somewhere to "locate" the side of the bonnet.
But I'll worry about that another day, so until next time, take care, Paul.
|
30th May 2016, 15:47
|
|
Senior Member
|
|
Join Date: Feb 2012
Location: Wembley, London
Posts: 5,056
|
|
Bank Holiday Monday:
I felt very old and creaky this morning, as yesterday's combination of gardening & car work had really taken it out of me.
So after a very slow start to the day, I was back in the garden in the morning, but got to play with the car in the afternoon.
Removed most of the brackets from the body shell extension piece.

Then re-fixed one of the brackets back into place with some modelling mesh to form the basic shape of the bottom corner.


Cleaned up any stray fibreglass matting from around the fixing screw holes on the inside & recovered the outside in parcel tape.

Countersunk the screw holes & cleaned up the joins on the bottom edge of the bonnet.

Before shoving some fibreglass filler into the holes.

And along the joins in the return lip of the bonnet.

When the filler was set hard enough, it was sanded down.


Unfortunately, the wind was blowing so strongly, that I couldn't do any fibreglass work.
( As the matting would end up all over the driveway, the street, next door's garden, etc. )
As it was, I didn't need to sweep up, as the wind had blow the dust all over the neighbourhood.
So with the sky looking like this, I decided to call it a day.

As it currently stands, at least the front arch is still looking round(ish).

Until next time, take care, Paul.
|
31st May 2016, 17:41
|
|
Senior Member
|
|
Join Date: Feb 2012
Location: Wembley, London
Posts: 5,056
|
|
Tuesday Thoughts:
It is far too wet outside for any car work this evening.
But I picked up this month's Complete Kit Car on the way home, which feature's Swifty's build.

I was also re-reading Swifty's build thread last night, as I was checking how he did his body shell extension work.
As I remembered Mac made the extension out of aluminium and joined it to his body shell.

Whereas, Swifty re-used the section of the bonnet and did the extension work first.

Before following that will the reshaping of the arch work.

Unfortunately, I was not able to follow this approach due to my previous scuttle reshaping & bonnet lengthening work/butchery.
( Which is why I've needed to add "in fill" panels to bridge the gap between the arch and the body shell. )
However, I did notice that Swifty initially had an issue with the alignment of the outside edge of his bonnet.

I am facing a similar issue on mine, so it was reassuring to see that it clearly took a bit of effort to sort this out.

Especially when the finished car looks so spectacular.

So despite the fact that my front arch re-shaping work is slow progress, I should get there in the end.
Until next time, take care, Paul.
|
2nd June 2016, 18:43
|
|
Senior Member
|
|
Join Date: Feb 2012
Location: Wembley, London
Posts: 5,056
|
|
Summertime, and the livin' is easy…
Fish are jumpin' and the cotton is high.
Or, if you're livin' in NW London, the first days of meteorological Summer are grey & horrible.
Still, at least I managed to get a bit of car work done today...
I had to go back and re-fill one of the fixing screws holes, which required a very small amount of filler.

Sorry the photo is blurred.

At least it didn't take long to sand it back when it had set.

- - - - - - - - - - - - - - - - - - - - - - - - - - - - - - -
This is the gap I currently have at the corner of the bonnet.

There is also a small gap at the bottom edge of the bonnet, compared to the body shell.

But re-reading Swifty's build (see previous post) gives me hope this can all be fixed in the end.
- - - - - - - - - - - - - - - - - - - - - - - - - - - - - - -
I had to set up a mini wind break before I could do any fibreglass matting work.

I covered more of the inside edge of the body shell extension, including building up the new bottom corner section.

I also added more matting to both the joins and the outside surfaces of the bonnet.

End of Part 1…
|
2nd June 2016, 18:45
|
|
Senior Member
|
|
Join Date: Feb 2012
Location: Wembley, London
Posts: 5,056
|
|
Summertime - Part 2:
These are the bits I've bought to help me secure the sides on the bonnet.

I've had the bonnet straps for a while, but only ordered the Spitfire bits the other day.
Swifty used a very neat arrangement to keep his bonnet in line with the body shell extension.
( Unfortunately, this seems a bit beyond my skill level to copy. )


Although, when I checked back to see what Mac had done, his bonnet appears to just rest in place.

So far, my basic plan is as follows…
Add a fibreglass horizontal panel here, to join the top of the body shell side extension to the Spitfire bulkhead.
( And the panelling work that already joins the side of the bulkhead to the body shell. )

Then the locating hole could go somewhere like this.

With the corresponding locating pin fixed to a return lip at the bottom of the bonnet edge.
I will also need to add a small extension piece to the wheel arch return lip to join that to the Spitfire bulkhead too.

However, there is still quite a bit of repair work to do, before I need to worry about how all this is going to work.
Until next time, take care, Paul.
|
3rd June 2016, 17:43
|
|
Senior Member
|
|
Join Date: Feb 2012
Location: Wembley, London
Posts: 5,056
|
|
Thinking Out Loud:
Regular readers will know that whilst I often quote KISS, I rarely manage to demonstrate the concept in practise.
Although, since the car was returned by JY Classics, I have really tried hard to focus on just the tasks required for an MOT.
Now some might argue that re-shaping the front wheel arches is not strictly required for the MOT, as it should pass with wonky arches.
But this arch work is actually linked to completing the under sealing work on the front end of the car (the back half if already done).
And I think/hope the Tetroseal will give a good impression during the MOT when the car is inspected from underneath.
However, I am now going to adopt a KISS "Plan B" when it comes to securing the sides of the bonnet.
Pre MOT
- Fix the bonnet straps in place.
Post MOT
- Add the locating pins and cones (if required).
I decided on this approach after having another look at Mac's build.
This photo of his car was taken after it's first MOT and the sides of his bonnet line up nicely.

As long as just using the straps will get me through the MOT I will be happy.
- - - - - - - - - - - - - - - - - - - - - - - - - - - - - - -
Still Shufflin' Along:
I was able to work from home today, so after an early start, I got get some car work done in the afternoon.
Finally removed the "bandages" from the body shell extension and, obviously, it is not pretty.

Then removed the final fixing bracket and modelling mesh from the bottom of this section.
Unfortunately, it was at this point I realised I'd forgotten to add parcel tape to the mesh.
So it took a bit of effort to remove it.

Ground out the joins.

The bottom corner is a long way from being finished, but at least I have a starting point.

There are a lot of small / fiddly pieces to work with.

So I can only do a small batch in one go.

But I did managed to get some more matting on the inside of the extension too.

The sky wasn't looking too promising.

So I didn't want to push my luck and called it a day at that point.
So I'll leave you with this photo of how far I've managed to get.

Whilst this has turned into a much longer job than I was expecting, at least I am getting there.
Until next time, take care, Paul.
|
3rd June 2016, 19:37
|
|
Senior Member
|
|
Join Date: Jun 2011
Posts: 935
|
|
"Whilst this has turned into a much longer job than I was expecting, at least I am getting there."
I think deep down you always knew the front was the harder task
But with the knowledge you've gained along the way nothing can stop you now.
The final shape is there, the end is in sight
The forecast for Sunday is looking good, Id love to pop by late afternoon. Pm me if its ok
|
4th June 2016, 17:52
|
|
Senior Member
|
|
Join Date: Feb 2012
Location: Wembley, London
Posts: 5,056
|
|
Roadster - Cheers, looking forward to seeing you tomorrow.
- - - - - - - - - - - - - - - - - - - - - - - - - - - - - - -
Keeping Up Appearances...
I really wanted to make the front arch look a bit more respectable before Roadster gets to see it in person.
So I started the day by tidying up any stray bits of fibreglass matting from yesterday's work.
Then I ground out the last two joins on the return lip of the bonnet.

Counter sunk the screw holes on the body shell extension section.

There wasn't much fibreglass filler left in the tin, so I mixed it all up.

The first bit was stuffed it into the screw holes.

Whilst what was left over turned this.

Into this.

While that was setting, I cut out the horizontal panel for the top edge of the body shell extension.
Although, I had to made a few tweaks to the panel before it would sit nicely in position.

With the filler sanded down, I was left with this.


Note: I've left the bottom of the bonnet edge rough, until I add the final section of fibreglass.
Then it was time to added the fibreglass matting across the joins on the body shell extension.

Plus filling in the joins on the bonnet.
( Sorry, yet another blurred photo. )

And finally, to start fixing the horizontal panel into position.

End of Part 1...
|
4th June 2016, 17:53
|
|
Senior Member
|
|
Join Date: Feb 2012
Location: Wembley, London
Posts: 5,056
|
|
Saturday - Part 2
Now while that was setting I turned my attention to the ignition.
( As the last time I tried to start the car, the ignition light didn't come on and the car wouldn't start. )
So I put the key in to see what would happen this time and the light came on.
Then I removed all the dust sheets from the engine bay and tried to start it…
And it fired up first time, oh happy days.
Obviously I then drove the car back and forth across the driveway a few times with a big grin on my face.
Unfortunately, there is definitely an electrical gremlin in the works somewhere.
As today the temperature gauge was working, but not the fuel gauge.

Then I pushed my not road legal car into the street… 
Where I could take a photo showing the wheel arch not under the influence of my sloping driveway.
Before:

Today:

Then I pushed the car back into the driveway and sanded down the fibreglass matting.

The new tub of fibreglass filler is a bright green.

I quite like the look of my two tier horizontal bulkhead.

The old filler tin made a good bin to sweep the filler dust into.

This is what the side extension looks like now.

Leaving the whole thing looking like this.

Still a lot of work to do, but it is finally getting closer.
Until next time, take care,
Paul.
PS
RIP - The Greatest

Last edited by Paul L; 5th June 2016 at 07:45..
Reason: Typo
|
4th June 2016, 18:50
|
|
Senior Member
|
|
Join Date: Jun 2011
Posts: 935
|
|
Looking good Paul
You have had one of those joyous days where at the end it is clear to see what you have achieved.
I hate working for hours with little you to show for it.
I would guess your electrical gremlin is an earth issue and the instruments are fighting for it.
It will only being a flying visit tomorrow as I have the family in tow but im looking forward to it.
|
5th June 2016, 06:27
|
|
Senior Member
|
|
Join Date: Feb 2012
Location: Wembley, London
Posts: 5,056
|
|
Roadster - No worries on the visit, whatever works for you is fine by me.
- - - - - - - - - - - - - - - - - - - - - - - - - - - - - - -
Ying & Yang:
The weather forecast for yesterday included rain in the afternoon, so I wasn't expecting to do as much as I did.
( And picking up on Roadster's point, it was a very productive day too. )
Today is meant to be glorious weather, but I have to focus on domestic chores ahead of my wife's brother's visit.
So just in case I don't get a chance to do any car work, I want to quickly reflect on where I've got to...
I took these photos of Ribble's original Cordite demonstrator at Stoneleigh in May 2013.
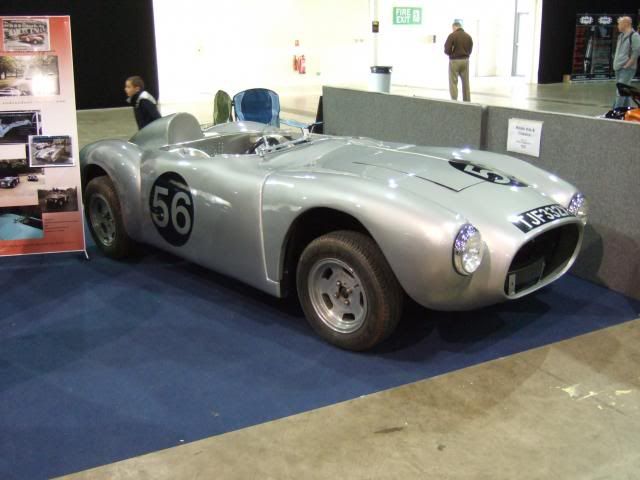
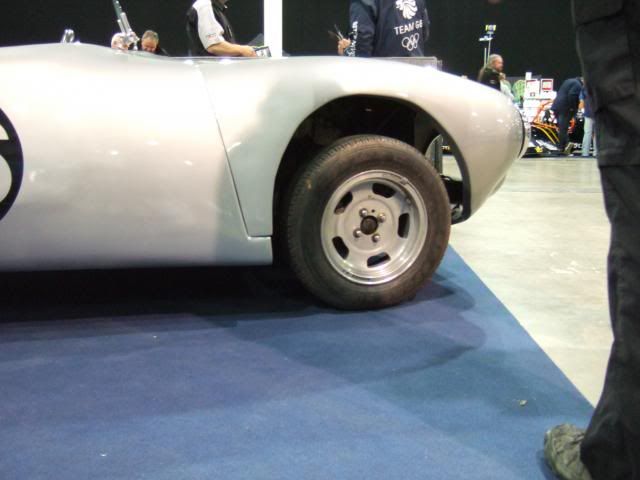
I measured the gap between the tyre and the at over 11 cm / 4 inches.
Note:
The demonstrator's bonnet was fixed into a high position and the bonnet access panel still fouled the radiator cap ( just).
I took the brave/foolish step to abandon the traditional Cordite build approach for my own Frankenstein Hillbilly one.
Today, my 'higher than standard' scuttle, together with my 'longer than standard' bonnet, have transformed my car.
My front end sits much lower that the demonstrator and yet it also has a full 90 degree flip up front.

Note:
Even today, I still get a kick out of the fact the bonnet opens on hinges I made myself.
( With full credit to Mister Towed for the "scissor" hinge design. )
My front wheel arch / body shell side extension work is already a HUGE improvement compared to what I started with.
( And after the final round of filler work, it will be less "wobbly". )
When this arch work is finally finished, my car's transformation from a Sammio Cordite/Ribble Navigator into a Triumph Swordfish 1500 will be complete.
Cheers, Paul.
|
|
Currently Active Users Viewing This Thread: 4 (0 members and 4 guests)
|
|
|
 Posting Rules
|
You may not post new threads
You may not post replies
You may not post attachments
You may not edit your posts
HTML code is Off
|
|
|
All times are GMT +0. The time now is 06:55.
|


 Linear Mode

