|
|
| Vintage and Classic Roadster Kit Car Builds For Vintage and Classic era kit cars. Post your build reports, problems and progress here |

3rd June 2015, 07:49
|
|
Senior Member
|
|
Join Date: Jun 2011
Location: birchington, kent
Posts: 1,769
|
|
is the worry that it may crack the sump if it hits?
|
3rd June 2015, 16:29
|
|
Senior Member
|
|
Join Date: Jan 2015
Posts: 168
|
|
If it is only the corner of the sump you can notch the chassis.
Easier to weld and in case of replacing sump you don't have to modifie another sump.
|
23rd June 2015, 14:02
|
|
Junior Member
|
|
Join Date: Aug 2014
Posts: 10
|
|

Hey Peter, looks like fantastic progress being made there. Lovely shiny new bits to put on - practically drooling here! I noted in your threads that you had doubts about the front springs (too many coils!?) - have to say that was my experience and eventually they just broke. Not only were they too tightly coiled they were also rather 'soft' - especially once I'd swapped out my first 2l SOHC engine for a 3.4 Essex..! You'll probably want to do the same I should think. I ended up getting new springs which a/ had fewer coils and b/ were stiffer, and it markedly improved the ride. Especially over speed bumps, as the Sabre is not particularly far off the deck anyway! After changing for the stiffer springs it made it much easier to traverse humps without bottoming out, so I thoroughly recommend doing it. I'll have a look through my old docs and see if I can find the exact spec of what I ended up with and will let you know! As ever, it's properly inspirational seeing what you're doing and I follow with interest. Cheers! Ivan.

|
23rd June 2015, 19:12
|
 |
Senior Member
Enthusiast
|
|
Join Date: Mar 2005
Posts: 3,079
|
|
Quote:
Originally Posted by lordivanhoe

Hey Peter, looks like fantastic progress being made there. Lovely shiny new bits to put on - practically drooling here! I noted in your threads that you had doubts about the front springs (too many coils!?) - have to say that was my experience and eventually they just broke. Not only were they too tightly coiled they were also rather 'soft' - especially once I'd swapped out my first 2l SOHC engine for a 3.4 Essex..! You'll probably want to do the same I should think. I ended up getting new springs which a/ had fewer coils and b/ were stiffer, and it markedly improved the ride. Especially over speed bumps, as the Sabre is not particularly far off the deck anyway! After changing for the stiffer springs it made it much easier to traverse humps without bottoming out, so I thoroughly recommend doing it. I'll have a look through my old docs and see if I can find the exact spec of what I ended up with and will let you know! As ever, it's properly inspirational seeing what you're doing and I follow with interest. Cheers! Ivan.
|
Hi Ivan,
thanks for the feedback and yes this is the exciting bit of the build with lots of new goodies 
I would be very interested to hear what size and stiffness springs you fitted as I'm definitely going to change mine.
I spoke some time ago to Malcolm Badger at Automotive Creations who now supply and build Sabres. He recommends 8" 300 lb springs which sounds a little on the firm side to me but he does have a lot more experience than me.
cheers, Peter
|
23rd June 2015, 20:42
|
|
Junior Member
|
|
Join Date: Aug 2014
Posts: 10
|
|
Hi Peter, well I just checked. 8" springs with 300lb would I suggest almost certainly not be too soft - I went for 9" springs at the same (300lb) weight. What I do remember is they certainly helped keep her a lot more level in the corners! Either way, clearly the originals would by popular opinion seem to have been very soft. I can't claim any particular expertise myself but at the time I took advice from my brother who used to do spanners for Benetton and McLaren F1 teams (as well as running his own saloon race car!) and they were his recommendation. He would probably as a rule favour slightly harder suspension, of course..! ;-) Hope that helps! Ivan.
|
23rd June 2015, 21:19
|
|
Senior Member
Enthusiast
|
|
Join Date: Mar 2005
Posts: 3,079
|
|
Quote:
Originally Posted by lordivanhoe
Hi Peter, well I just checked. 8" springs with 300lb would I suggest almost certainly not be too soft - I went for 9" springs at the same (300lb) weight. What I do remember is they certainly helped keep her a lot more level in the corners! Either way, clearly the originals would by popular opinion seem to have been very soft. I can't claim any particular expertise myself but at the time I took advice from my brother who used to do spanners for Benetton and McLaren F1 teams (as well as running his own saloon race car!) and they were his recommendation. He would probably as a rule favour slightly harder suspension, of course..! ;-) Hope that helps! Ivan.
|
Hi Ivan,
that's great information, thanks for looking it up. I think I'll be getting 8" 300 lb springs then 
Do you recall if you used the standard Sierra anti-roll bar?
thanks, peter |
5th July 2015, 20:45
|
|
Senior Member
Enthusiast
|
|
Join Date: Mar 2005
Posts: 3,079
|
|
Progress update....
Not made huge progress over the last couple of weeks but have spent a fair amount of time working out the locations for the fuel pump and filters plus the routes for the fuel and brake lines.
The previous builder had managed to crush the fuel lines between the body tub and the chassis so I have planned some routes that will hopefully avoid the same issue.
 Fuel/brake line planning Fuel/brake line planning by marlinpeter, on Flickr
 Fuel/brake line routing Fuel/brake line routing by marlinpeter, on Flickr
I've also now trial fitted the fuel tank so I can start installation of the fuel lines.....
 Fuel tank - trial fitting Fuel tank - trial fitting by marlinpeter, on Flickr
I've also been buying up more parts from ebay.....
A high flow rate 100 micron fuel pre-filter.
 High flow fuel pre filter High flow fuel pre filter by marlinpeter, on Flickr
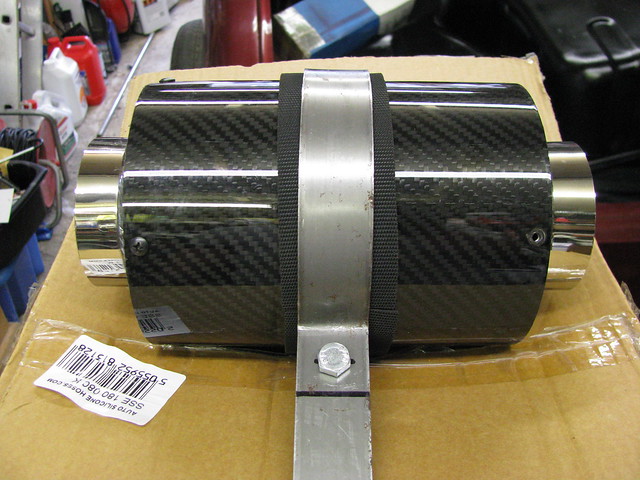
A 80mm diameter 180 degree silicone bend for the air inlet.
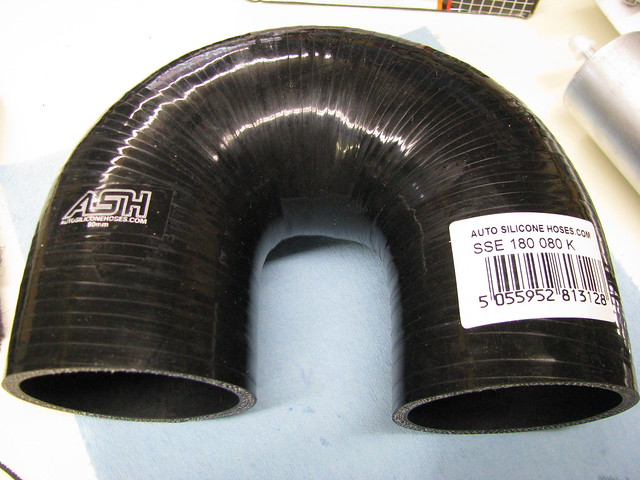 Air inlet bend Air inlet bend by marlinpeter, on Flickr
and another pedal box. This one is from an e87 BMW116 that has less offset on the brake pedal compared to the e36 and e46 pedals. Haven't had time to try it properly yet as the body tub is off at present.
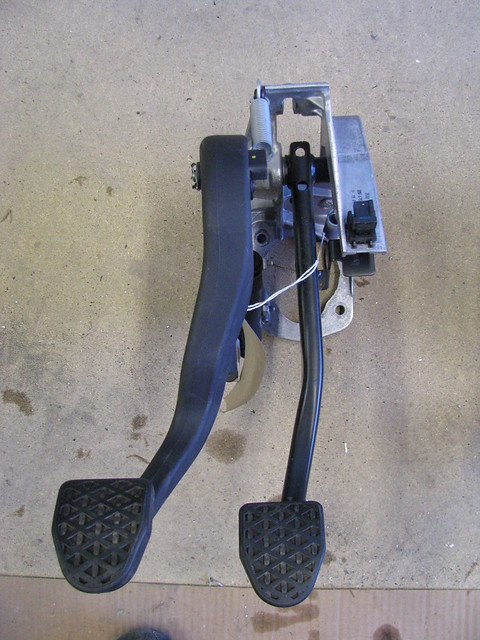 BMW 1 (e87?) series pedal box BMW 1 (e87?) series pedal box by marlinpeter, on Flickr
And finally, started making up another bracket, this time to mount the air input filter....
 Air box mounting bracket Air box mounting bracket by marlinpeter, on Flickr
Next job is to start the fuel lines and mounting the fuel pump,etc...
...peter
|
13th July 2015, 20:39
|
|
Senior Member
Enthusiast
|
|
Join Date: Mar 2005
Posts: 3,079
|
|
Weekly progress report.....
Quote:
Originally Posted by peterux
Next job is to start the fuel lines and mounting the fuel pump,etc...
|
Well, I did make a start on the fuel lines but then had to wait for some 'p' clips to arrive so went back to finishing the air inlet filter mounting bracket.
I then moved onto painting a number of brackets which I'll grab some photos in a future update.
I found the green house a useful place to let things dry....
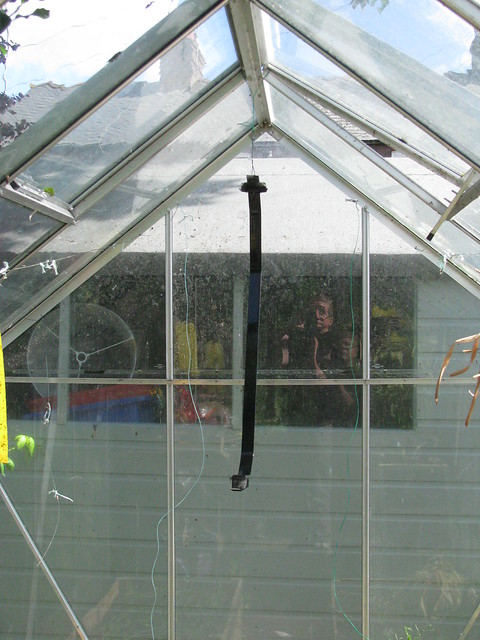 Spray booth? Spray booth? by marlinpeter, on Flickr
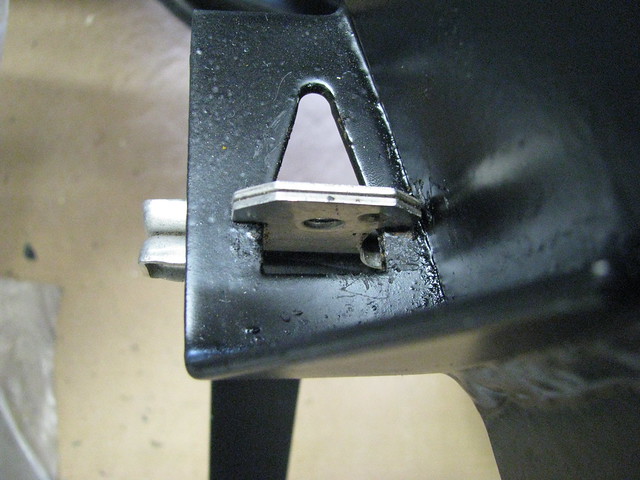
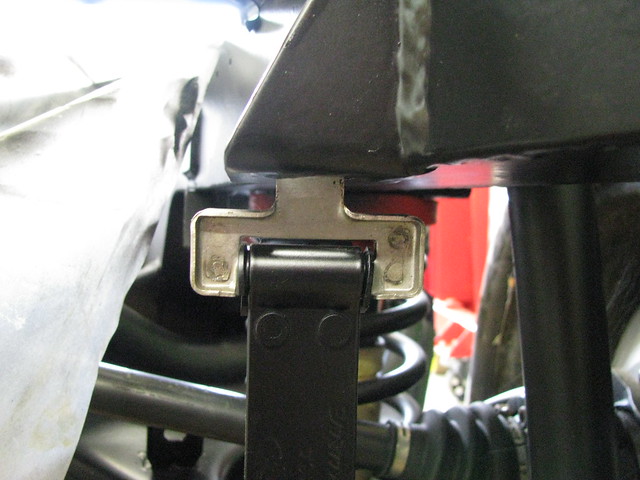
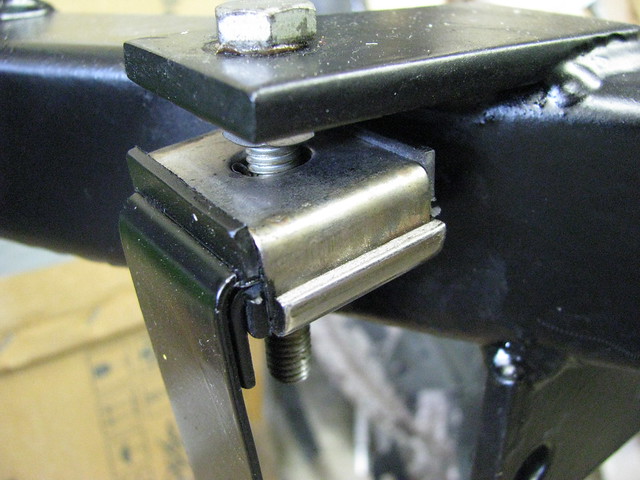
The item hanging up is the right hand fuel tank strap which is a standard Ford part with some unusual mounting points with rubber insulated mounts.
The left hand strap doesn't have any part numbers on it so I assume this was supplied by the RMC.
One of the benefits of documenting my builds on this forum is to provide a useful memoir for my own future reference and potentially for other builders, especially when some things are hidden or difficult to see once the bodywork is fitted. So here are some reference photo's of the fuel tank fixing...
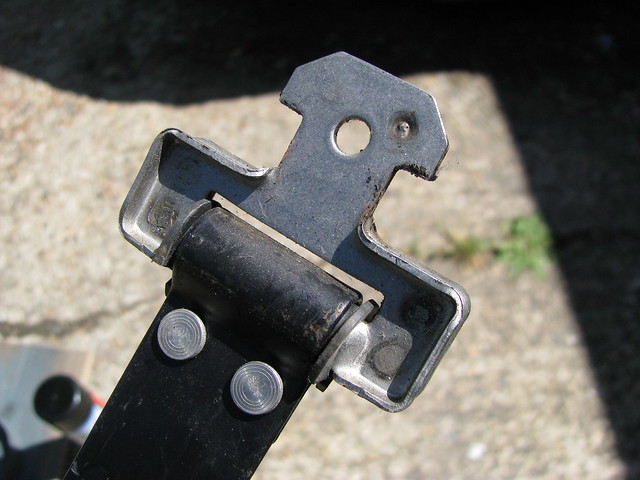 RH Fuel tank strap RH Fuel tank strap by marlinpeter, on Flickr
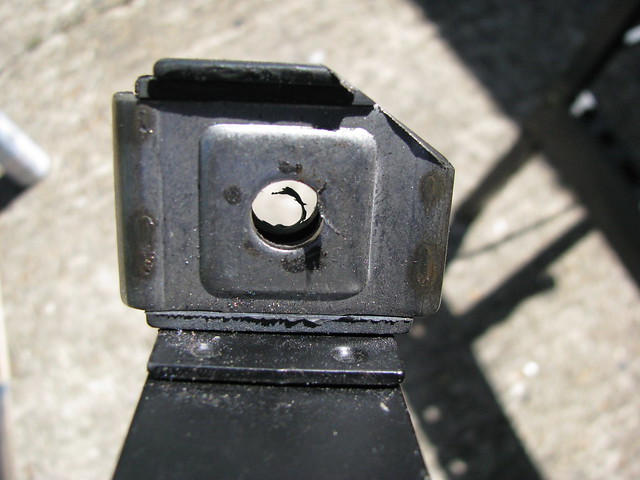 RH Fuel tank strap RH Fuel tank strap by marlinpeter, on Flickr
 RH Fuel tank strap RH Fuel tank strap by marlinpeter, on Flickr
 RH Fuel tank strap RH Fuel tank strap by marlinpeter, on Flickr
 RH Fuel tank strap RH Fuel tank strap by marlinpeter, on Flickr
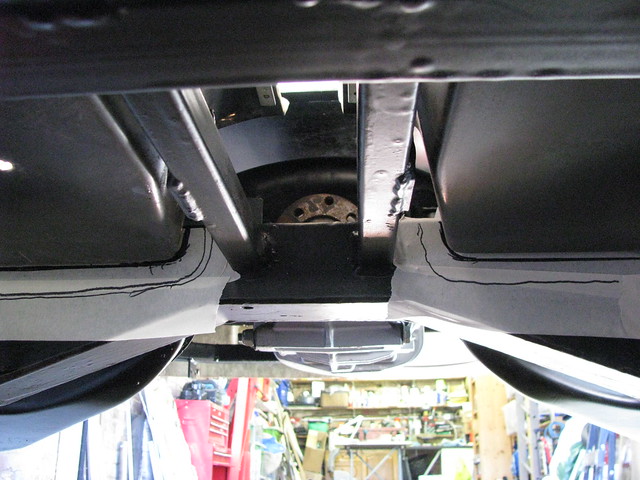
Finally, before completing the fuel tank fitting I decide to give the diff/final drive an oil change. There is no drain plug (as Ford didn't believe it needed changing before the Sierra body rusted away and the car was scrapped). I didn't fancy disturbing the real cover's seal so I used a syringe and short length of plastic windscreen washer hose to remove the old oil. There was very little swarf on the magnetic filler plug suggesting all is well. The old oil wasn't in bad shape and not black as I expected. It was more the colour of a good brown ale whereas the new stuff is a nice amber colour.
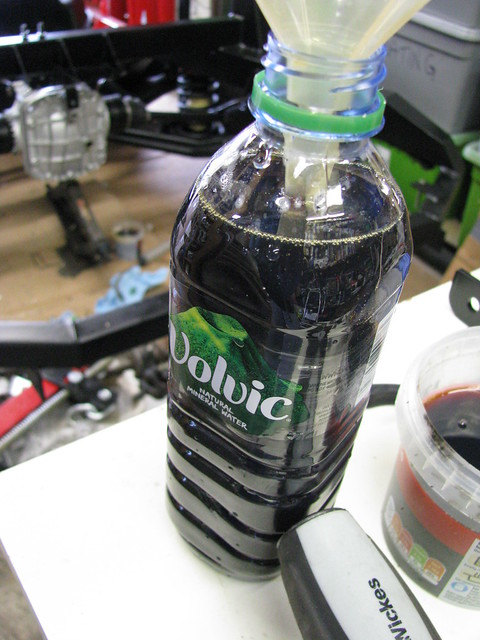 Diff oil change Diff oil change by marlinpeter, on Flickr
It looks a bit darker than it really was in this photo and it may have been unnecessary but as the oil is over 20 years old, it's one of those jobs that is worth doing while it's easy to do without crawling under the car.
Hopefully next weeks pictures will be a bit more interesting....
....peter
|
18th July 2015, 20:19
|
|
Senior Member
Enthusiast
|
|
Join Date: Mar 2005
Posts: 3,079
|
|
Weekly progress report.....
This week I made up a mounting bracket for the pre-pump fuel filter. A couple of stainless steel 'T bolt' hose clamps riveted to a strip of steel. These were amazing value at only £3.18 for both including postage! The trickiest part was drilling the holes in the SS hose clamps.
 Fuel filter mounting Fuel filter mounting by marlinpeter, on Flickr
It's now mounted above one of the rear drive shafts and is mounted so that the filter can be removed from beneath the car with all the bodywork fitted.
 Fuel filter mounting Fuel filter mounting by marlinpeter, on Flickr
I've now started on the fuel lines, photo's next week....
....peter |
11th August 2015, 12:11
|
|
Junior Member
|
|
Join Date: Aug 2014
Posts: 10
|
|
sorry peter, been offline for a bit - yes, I just used the standard sierra anti-roll bar. Didn't seem to cause a problem..!
|
11th August 2015, 12:16
|
|
Senior Member
Enthusiast
|
|
Join Date: Jan 2007
Posts: 932
|
|
Quote:
Originally Posted by lordivanhoe
sorry peter, been offline for a bit - yes, I just used the standard sierra anti-roll bar. Didn't seem to cause a problem..!
|
There are at least three, if not 4 different "standard" Sierra ARBs:
22mm
24mm
26mm
28mm
- as well as some having different crank shapes in the centre which can make a big difference depending on the engine you fit.
- do you kinow what diameter yours is? - and which donor it came from? |
11th August 2015, 12:42
|
|
Junior Member
|
|
Join Date: Aug 2014
Posts: 10
|
|
sorry..
Quote:
Originally Posted by Mike
There are at least three, if not 4 different "standard" Sierra ARBs:
22mm
24mm
26mm
28mm
- as well as some having different crank shapes in the centre which can make a big difference depending on the engine you fit.
- do you kinow what diameter yours is? - and which donor it came from?
|
Rats. Apologies, I just don't know and as you know don't have the car anymore... I do remember that the donor was an E-reg 2.0i sierra with the SOHC EFI engine, if that helps at all? |
12th August 2015, 20:55
|
|
Senior Member
Enthusiast
|
|
Join Date: Mar 2005
Posts: 3,079
|
|
Quote:
Originally Posted by lordivanhoe
sorry peter, been offline for a bit - yes, I just used the standard sierra anti-roll bar. Didn't seem to cause a problem..!
|
Thanks, Ivan.
The reason for the question was that I have been reading old ROC newsletters from 1994-1997. Early in the life of the Sabres build history the clubs technical rep and the manufacturer (John Barlow) thought that the standard ARB was deemed to be too stiff and recommended grinding some flats on the ARB to reduce its torsional rigidity. That was until in 1997 when one builder who had followed this advice (in the build manual!) had his car fail its MOT as a deliberately modified ARB is (or was then) a failure point.(This was pre-SVA when cars needed to be MOT'd before registration) I haven't found the end of the story yet but in 1997 the ROC technical advisor and the RMC withdrew this recommendation. Luckily the original builder of my car had not modified the ARB.
I think I'll stick with what I've got until I get the car on the road when I can see how it handles with the the weight of the BMW engine.
|
12th August 2015, 21:31
|
|
Senior Member
Enthusiast
|
|
Join Date: Mar 2005
Posts: 3,079
|
|
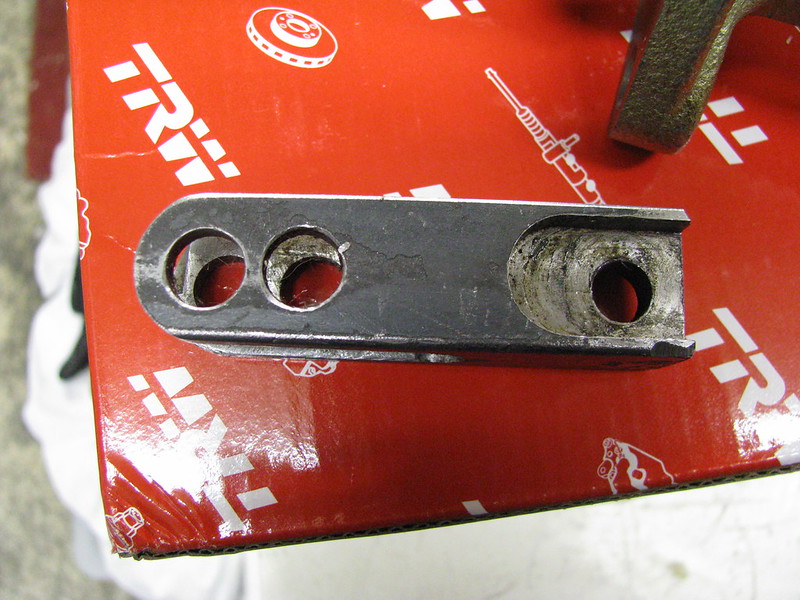
(small) Progress Report...
There doesn't seem to many build reports on the forum at present and my progress is not very exciting but here's what I've been up to over the last couple of weeks.
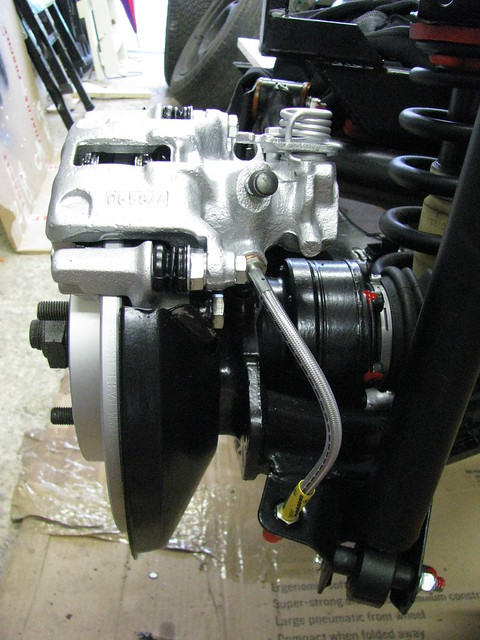
I spent a not very exciting day cleaning up the rear brake caliper carriers. They were badly painted by the original builder but had also rusted!! I had to start with some old fashioned paint stripper and then cleaned all that mess off followed by de-rusting and cleaning up with Scotch brite and lots of elbow grease.
I then gave them a coat of Hammerite Smooth and left them in the greenhouse to bake hard.
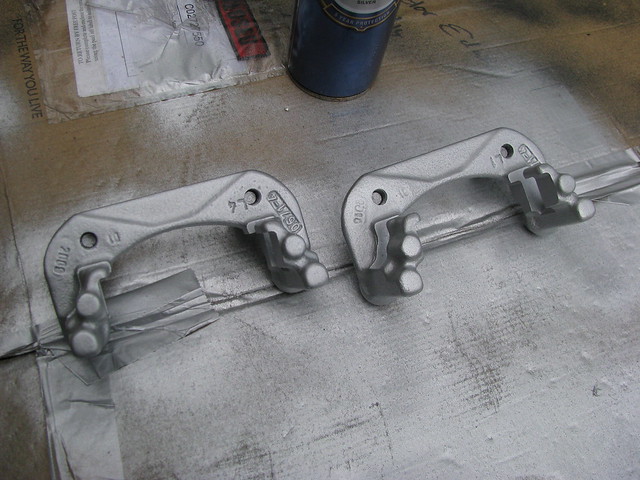 Rear brake caliper carriers Rear brake caliper carriers by marlinpeter, on Flickr
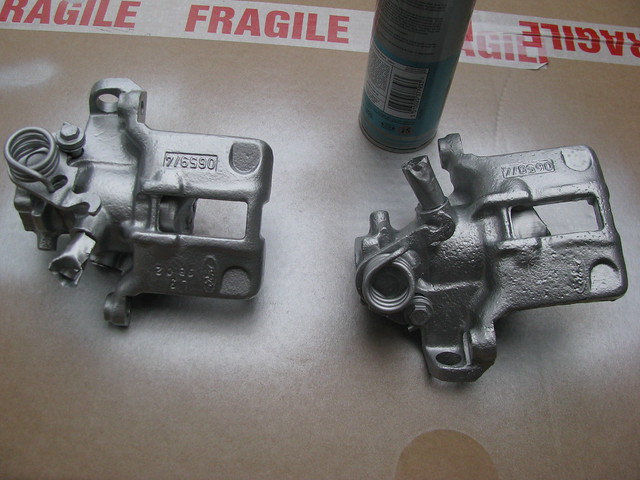
I have bought some Pagid recon brake calipers as I didn't fancy rebuilding the old ones because the Sierra calipers have a fiendishly complicated handbrake mechanism which, despite being well described in the Haynes manual, still looked like a potential nightmare. The calipers are very pitted and must have been very rusty before being recond but do have new pistons fitted. They came painted but a bit thin so I couldn't resist giving them an extra coat of paint.
 Rear brake calipers Rear brake calipers by marlinpeter, on Flickr
And I bought a new set of sliders and dust covers....
 Rear brake caliper sliders Rear brake caliper sliders by marlinpeter, on Flickr
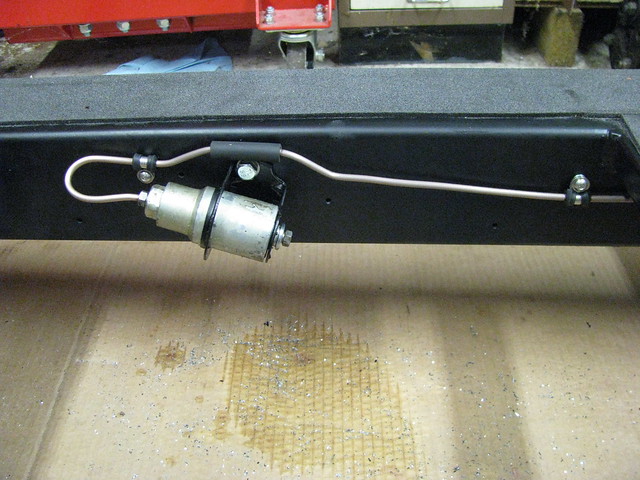
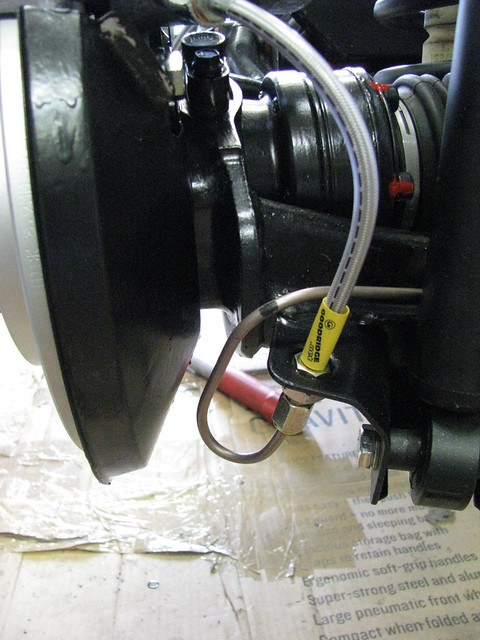
I've also started installing the brake lines. I'm using Automec Cupro Nickel tubing. I was worried that this would be more difficult to flare than pure copper but it turns out is very easy to bend and flare.
It sounds strange but I started in the middle of the car and will work back and forward from this point. First up to be fitted was the Ford rear brake deceleration valve.
 Sierra deceleration valve Sierra deceleration valve by marlinpeter, on Flickr
The rear brake deceleration valve reduces brake pressure to the rear brakes under deceleration force. It's supposed to stop the rear brakes locking up when braking hard. There is a heavy weight inside that slides forward shutting off the supply to the rear brakes. The short rubber hose is just for protection.
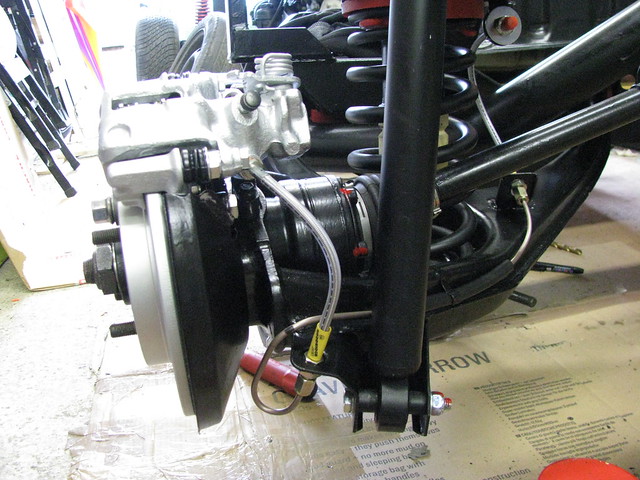
I then had the challenging task of bending a length of tubing to follow the path back to the two way splitter that divides to the two rear brake calipers.
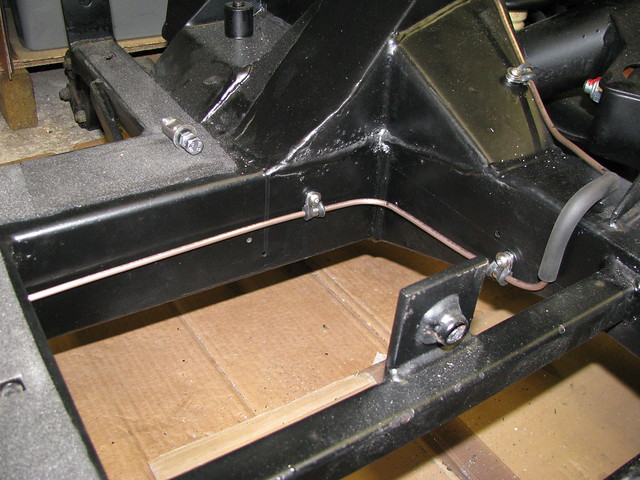 Rear Brake line routing Rear Brake line routing by marlinpeter, on Flickr
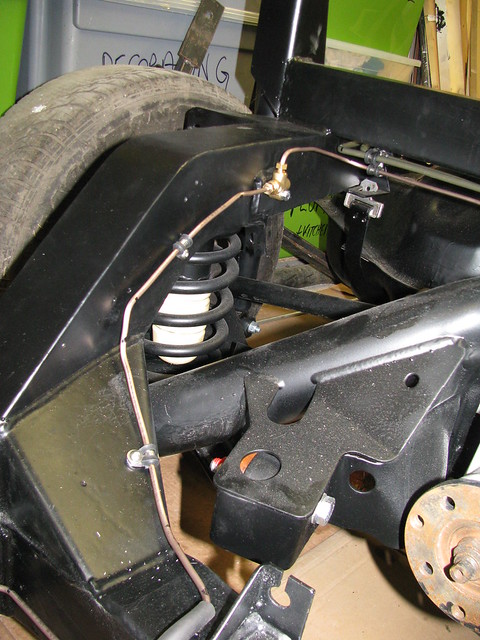 Rear brake line to splitter Rear brake line to splitter by marlinpeter, on Flickr
The original builder's mounting position was a bit high and made the right angle out of the top a bit challenging. (Having now studied this photo, I think I'm going to move the splitter down a bit.)
Well that's all for now and unfortunately I've embarked on repainting all the window frames on our 17c cottage, so car building will be limited to spare time when it's raining 
...peter
|
13th August 2015, 19:53
|
 |
Senior Member
Enthusiast
|
|
Join Date: Sep 2005
Location: Northampton, UK
Posts: 1,891
|
|
Looks like you'll have plenty of time on the car this weekend then, Peter. |
26th August 2015, 21:22
|
|
Senior Member
Enthusiast
|
|
Join Date: Mar 2005
Posts: 3,079
|
|
Progress report....
Quote:
Originally Posted by GreatOldOne
Looks like you'll have plenty of time on the car this weekend then, Peter. |
Yeah, the rain over the past few days means I've been able to crack on with the brake installation.
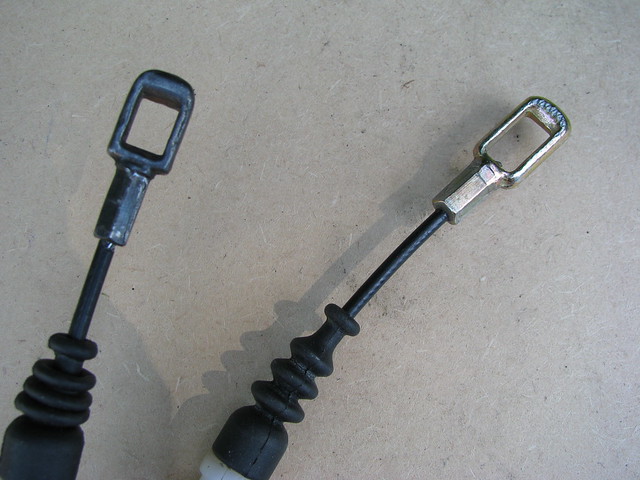
But firstly, I've had a new handbrake cable shortened by Speedograph Richfield. Excellent fast service including test certificate (COC). I've had it shortened by 750mm as specified in the RMC build manual for a Sierra cable.
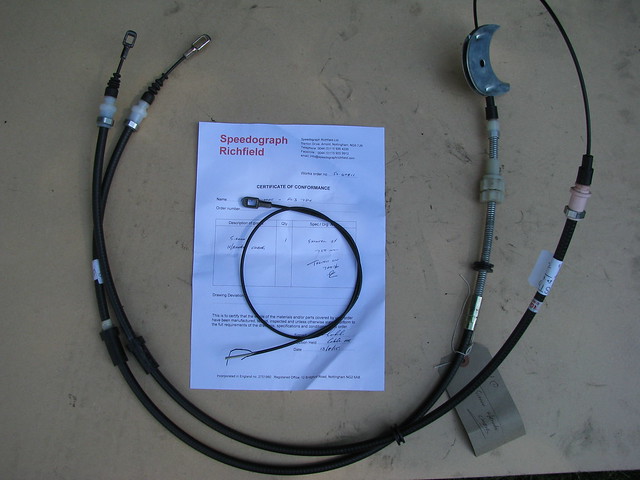 Shortened handbrake Shortened handbrake by marlinpeter, on Flickr
The new termination is slightly different to the original but seems to fit and work OK.
 Shortened handbrake Shortened handbrake by marlinpeter, on Flickr
So on with the rear brakes...
 Carrier, slide pins and new disc Carrier, slide pins and new disc by marlinpeter, on Flickr
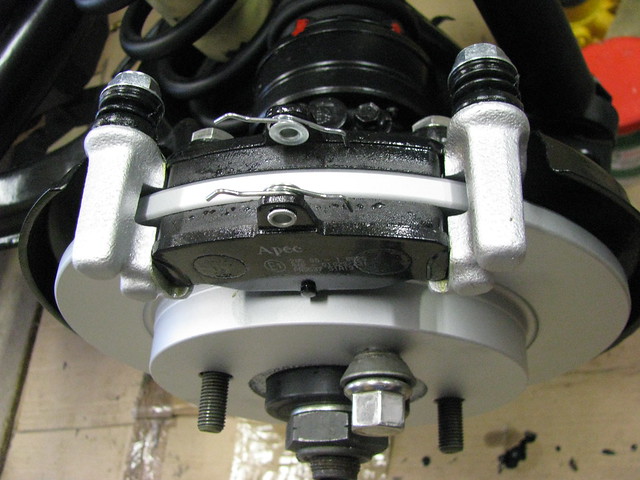 Brake pads Brake pads by marlinpeter, on Flickr
 Caliper installed Caliper installed by marlinpeter, on Flickr
 Rear nearside brake Rear nearside brake by marlinpeter, on Flickr
 Rear nearside brake line Rear nearside brake line by marlinpeter, on Flickr
 Rear nearside wishbone hard line Rear nearside wishbone hard line by marlinpeter, on Flickr
Now it's back to the house painting....
...peter |
11th October 2015, 19:44
|
|
Senior Member
Enthusiast
|
|
Join Date: Mar 2005
Posts: 3,079
|
|
Update....
My earlier pedal box trials centered around replacing the original Ford Sierra pedal box with a pedal box from a BMW e46. These are nicely designed assemblies but required the modification of the Sabre mounting cross member and the pedal positioning was not ideal. Whilst pondering one day and looking at all the pedal boxes and pedals I have accumulated it occurred to me that it might be possible to mount a BMW clutch master cylinder to the original Sierrra pedal box which was designed for a clutch cable operation. I first removed all the parts associated with the cable connection and some parts of the pedal. I was then able to mount the BMW M/c on two 6mm spacers. (the box section spacers are temporary as I didn't have any suitable round tubing to hand). I also need to make and fit some nylon spacers each side of the m/c piston
eyelet.
 Clutch Master Cylinder Clutch Master Cylinder by marlinpeter, on Flickr
My first trial was using the hole you can see furthest from the pivot (red bush) but this resulted in about 5" pedal movement so I drilled another mounting hole nearer the pivot and this gives me about 6" pedal movement which is more in line with a BMW pedal box. Shown hear in the fully depressed mode.
 Clutch Master Cylinder(down) Clutch Master Cylinder(down) by marlinpeter, on Flickr
Here the pedal is shown in the rest position. I need to devise and fit some upper and lower mechanical stops to avoid damaging the master cylinder and find a way of adding a return spring but the overall concept does seems to work ok.
 Clutch Master Cylinder(up) Clutch Master Cylinder(up) by marlinpeter, on Flickr
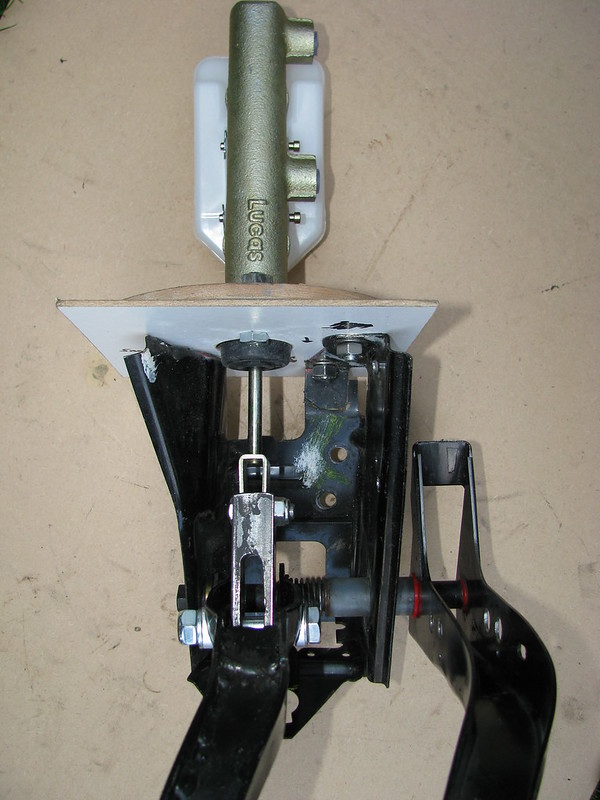
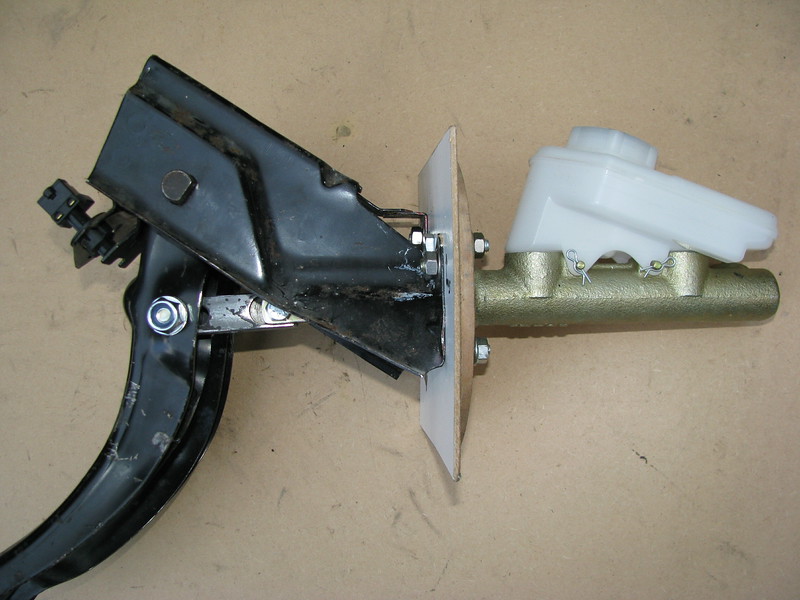
Because I'm using a remote dual circuit brake servo I needed to find a master cylinder with a fixed pushrod to attach to the brake pedal. This one seems to fit the bill and is from a Triumph Spitfire 1500.
 Dual circuit master cylinder Dual circuit master cylinder by marlinpeter, on Flickr
This pushrod extension was provided by Marlin to extend a Metro servo pushrod. I plan to use it to extend the Spitfire master cylinder pushrod and attach it to the Sierra brake pedal.
 Master cylinder push rod extension Master cylinder push rod extension by marlinpeter, on Flickr
And like the clutch, I need to add a return spring, etc.
Totally unrelated, I've bought some more seats.....
Slight change of direction. I had already bought a pair of Mk1 MX5 seats but they don't have the shoulder high seat belt supports. My Sabre chassis has rather low seat belt mounting positions that would fail the IVA regulations. The Mk3 MX5 seats have seat belt supports that raise the turning point. I believe the IVA will accept this as a solution as long as the seats are designed to take the forces.
 Mazda MX5 Mk3 seats Mazda MX5 Mk3 seats by marlinpeter, on Flickr
On first look they look like they will fit OK but I'm not sure the design suits the car?
I've also been able to source a new Granada fuel tank locking ring from a parts supplier in the Ukraine! (autopartmaster)
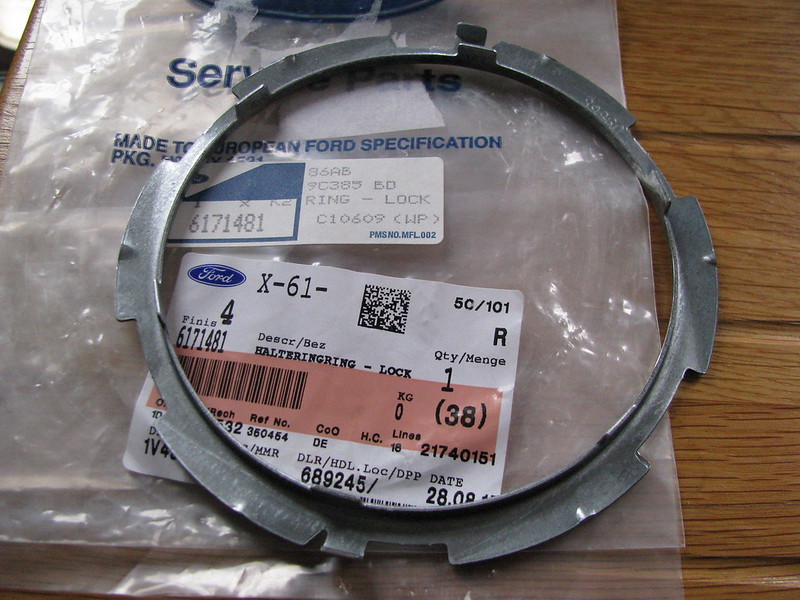 New fuel tank lock ring New fuel tank lock ring by marlinpeter, on Flickr
Isn't the internet a wonderful thing!!
....peter
|
24th October 2015, 20:36
|
|
Senior Member
Enthusiast
|
|
Join Date: Mar 2005
Posts: 3,079
|
|
Pedaling along.....
I've finished work on the pedal box.......
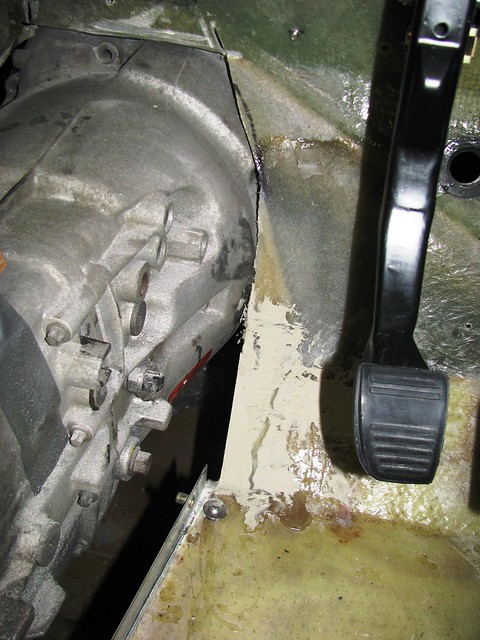
The brake master cylinder has been lengthened with the Marlin supplied extension.The Sierra pedal box needs a good clean up and repaint.Pivot bolt needs to be 10mm longer.
 Sierra Pedal box and master cylinder Sierra Pedal box and master cylinder by marlinpeter, on Flickr
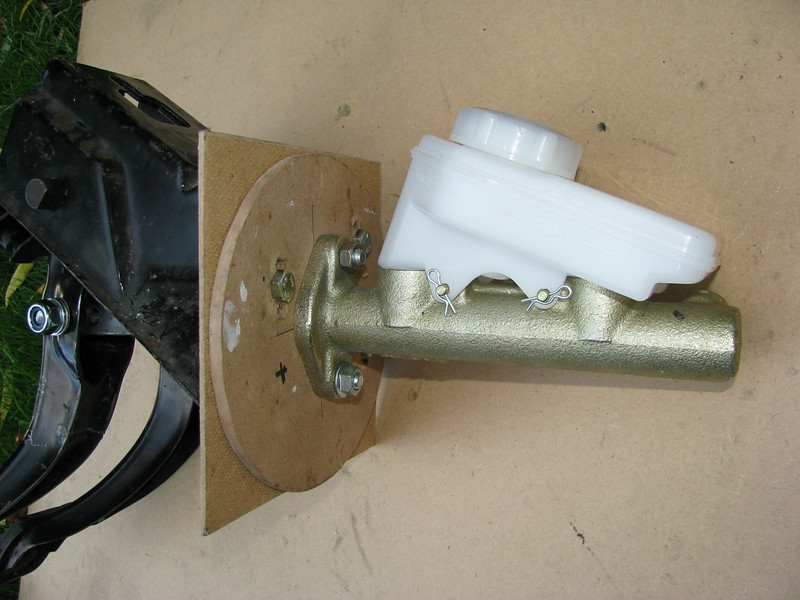
This is the Triumph Spitfire 1500 brake master cylinder mounted to the Sierra pedal box. The 3.5 mm hardboard is simulating the GRP bulkhead on the Sabre body tub. The 6mm thick MDF disc will be replaced with a 6mm steel disc.
 Brake Master cylinder Brake Master cylinder by marlinpeter, on Flickr
 Sierra Pedal box and master cylinder Sierra Pedal box and master cylinder by marlinpeter, on Flickr
Alignment is looking good but the pedal box could do with moving up about 5mm in the final solution.
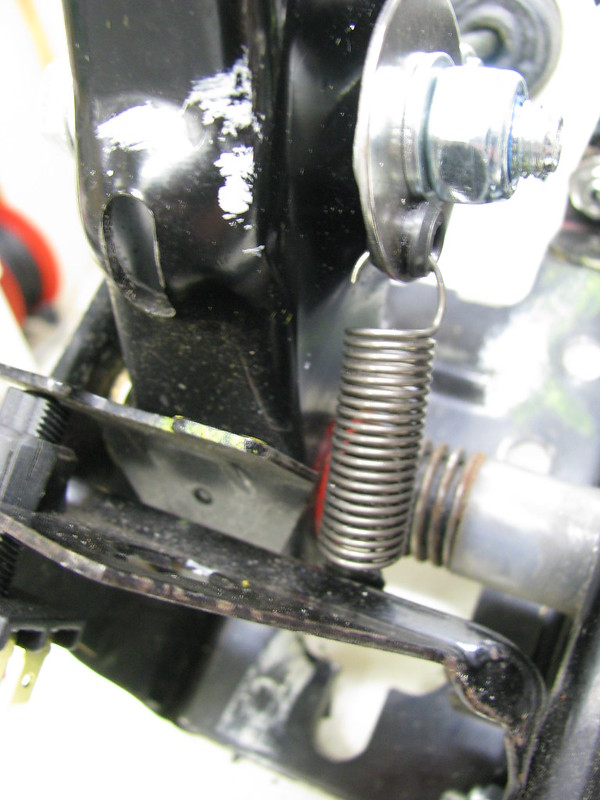
If fitted return springs to both the clutch and brake pedal.
This is the brake pedal with a BMW spring.
 Brake Pedal Return spring Brake Pedal Return spring by marlinpeter, on Flickr
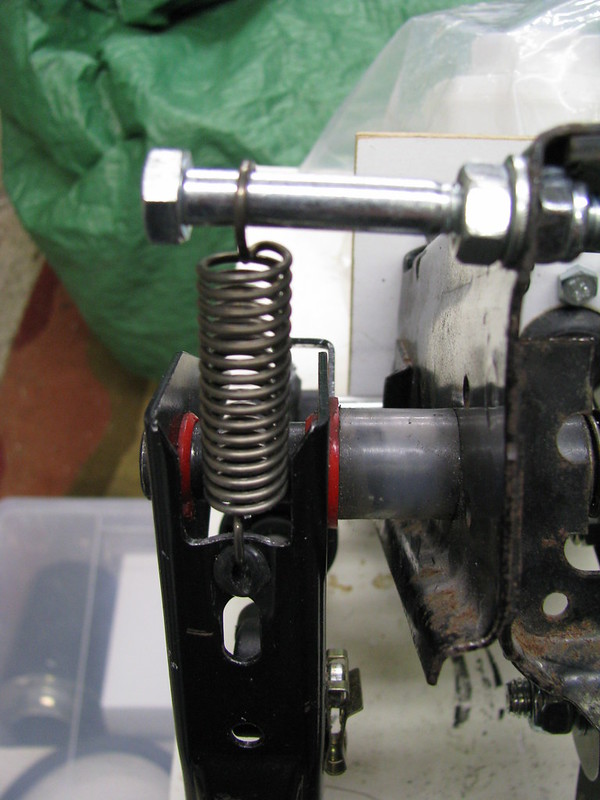 Clutch Pedal return spring Clutch Pedal return spring by marlinpeter, on Flickr
The clutch spring is a Rover part found in my box of bits.
Modifications to the Sierra pedal box are now complete so it's now stripped down for a repaint.
 Pedal box painting Pedal box painting by marlinpeter, on Flickr
....peter
|
14th April 2017, 19:09
|
|
Senior Member
Enthusiast
|
|
Join Date: Mar 2005
Posts: 3,079
|
|
Quote:
Originally Posted by peterux
I had already bought a pair of Mk1 MX5 seats but they don't have the shoulder high seat belt supports. My Sabre chassis has rather low seat belt mounting positions that would fail the IVA regulations. The Mk3 MX5 seats have seat belt supports that raise the turning point. I believe the IVA will accept this as a solution as long as the seats are designed to take the forces.
Mazda MX5 Mk3 seats by marlinpeter, on Flickr
....peter |
Having further looked into the IVA rules for using seats with built-in seat belt supports I have decided against them. To use these seats I would need to have structurally strong base supports welded to the chassis rails. I now think it will be much easier to raise the original shoulder height supports and use the Mk 1 seats.
On the upside, I bought these seats for £50 and sold them for £155 |
15th May 2017, 19:30
|
|
Senior Member
Enthusiast
|
|
Join Date: Mar 2005
Posts: 3,079
|
|
Sorry for the lack of updates but I've been busy with other projects for most of the winter and spring. The only real progress has been reconstructing the gearbox tunnel to fit around the BMW gearbox which has actually taken more time than I would have liked but I'm nearing completion now.
It's not terribly exciting so I'll mostly let the pictures tell the story....
(you can click on any of the photo's for more details )
 Gear change support Gear change support by Sabrebuilder, on Flickr
 Gearbox Tunnel mods Gearbox Tunnel mods by Sabrebuilder, on Flickr
 Gearbox Tunnel Mods Gearbox Tunnel Mods by Sabrebuilder, on Flickr
 Gearbox Tunnel Mods Gearbox Tunnel Mods by Sabrebuilder, on Flickr
 Gearbox Tunnel Mods Gearbox Tunnel Mods by Sabrebuilder, on Flickr
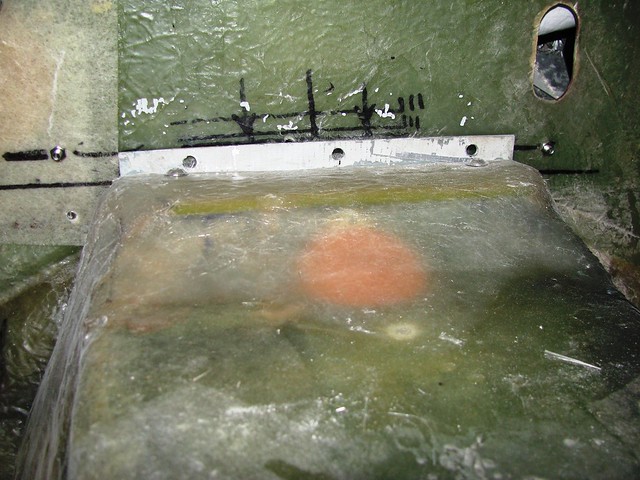
Steel flange added to left-hand side. All flanges are spaced off the bulkhead by about 3mm. The gap will be filled with Neoprene foam sealing strip.
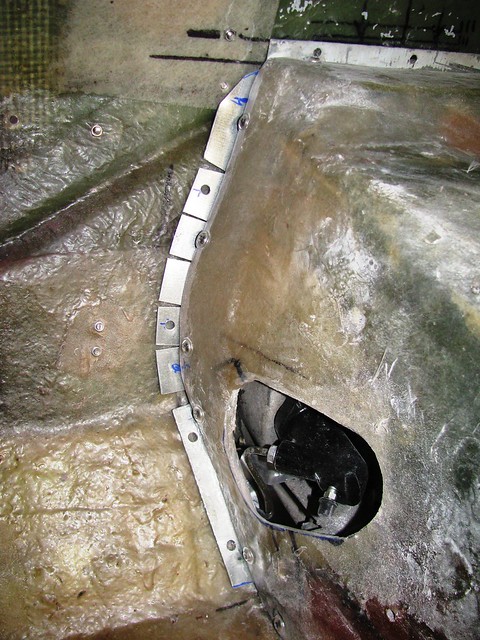 Gearbox Tunnel Mods Gearbox Tunnel Mods by Sabrebuilder, on Flickr
 Gearbox Tunnel Mods Gearbox Tunnel Mods by Sabrebuilder, on Flickr
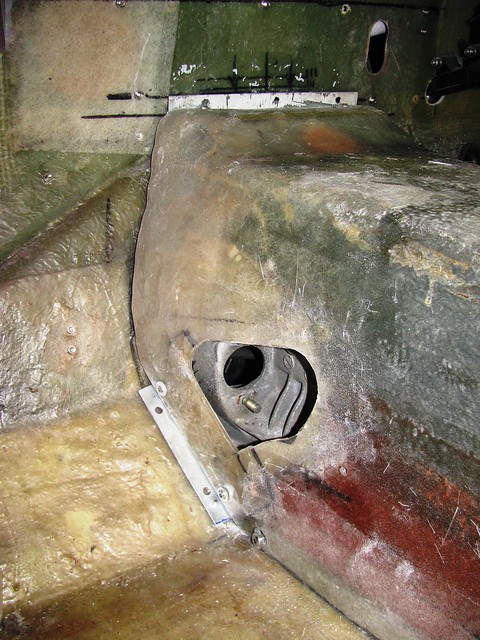
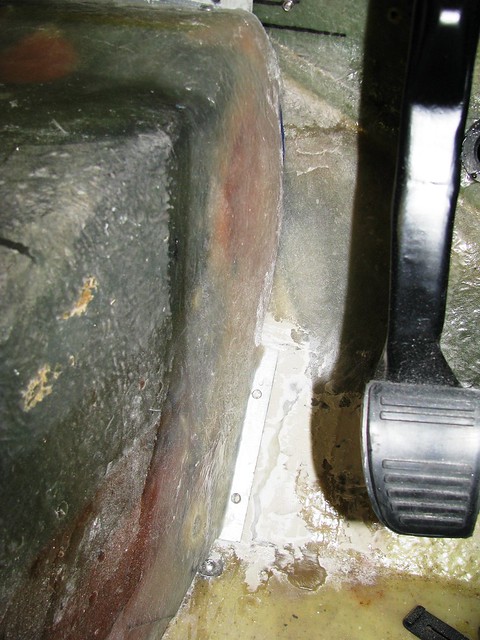
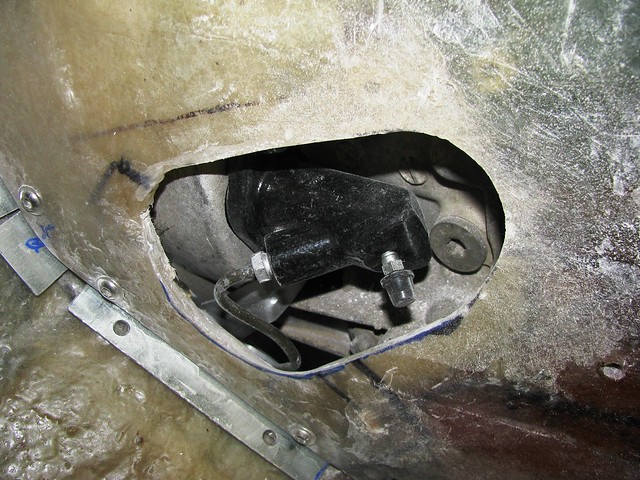
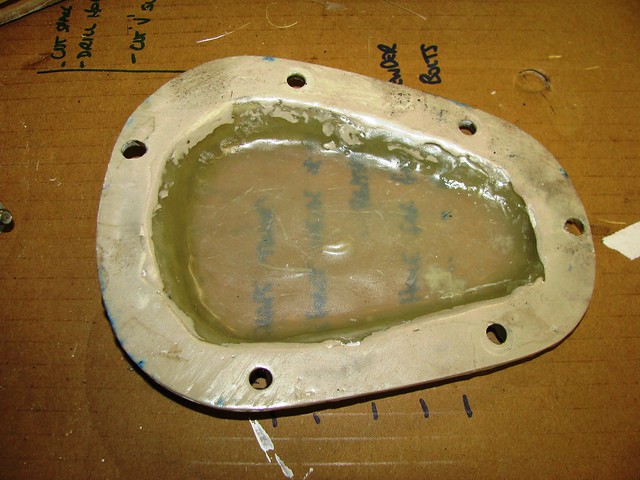
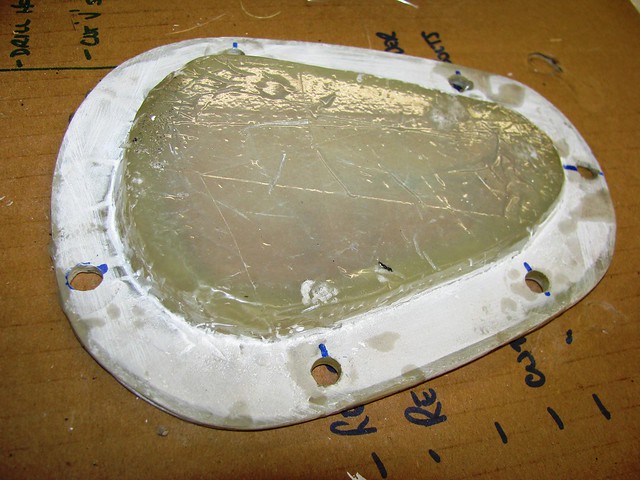
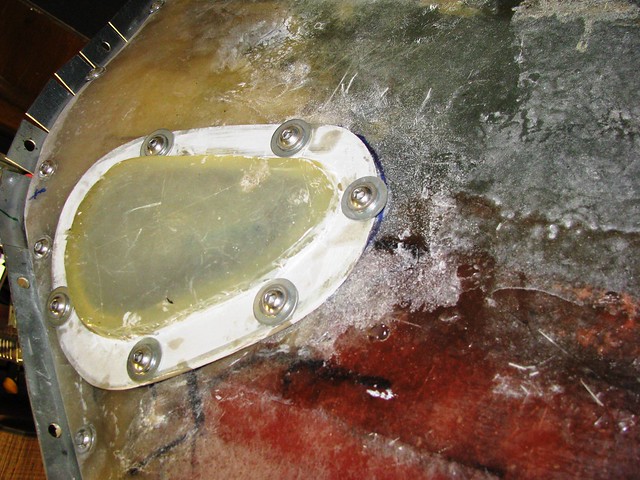
I needed to make a small access panel to go over the clutch slave cylinder which is accessed through a hole in the side of the gearbox tunnel. The clutch hydraulic pipe is slightly proud of the tunnel side so the cover needed to be raised. I made this mould out of artists foam board and packing tape. (This picture was taken after the mould had been used.)
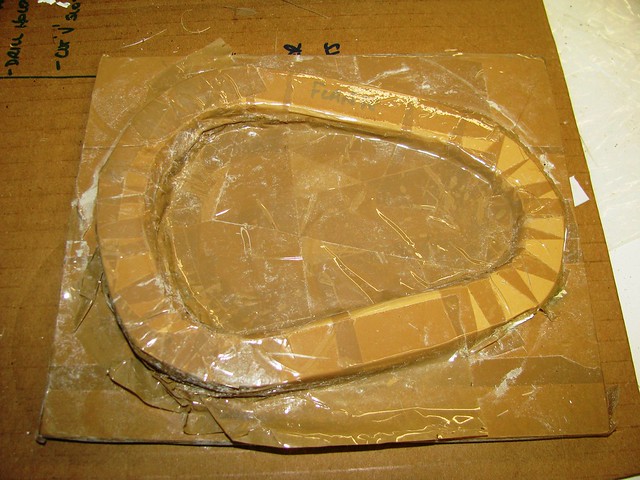 Clutch Slave cylinder gearbox tunnel cover Clutch Slave cylinder gearbox tunnel cover by Sabrebuilder, on Flickr
 Clutch Slave cylinder gearbox tunnel cover Clutch Slave cylinder gearbox tunnel cover by Sabrebuilder, on Flickr
 Clutch Slave cylinder gearbox tunnel cover Clutch Slave cylinder gearbox tunnel cover by Sabrebuilder, on Flickr
I used m6 flanged screws and nutserts (rivnuts) to fix it to the tunnel. I will probably seal around the flange with RTV silicone when the car is finished. The panel will be hidden by the carpet and underlay.
 Clutch Slave cylinder gearbox tunnel cover Clutch Slave cylinder gearbox tunnel cover by Sabrebuilder, on Flickr
Next update will follow when time permits.... 
|
|
Currently Active Users Viewing This Thread: 2643 (0 members and 2643 guests)
|
|
|
 Posting Rules
|
You may not post new threads
You may not post replies
You may not post attachments
You may not edit your posts
HTML code is Off
|
|
|
All times are GMT +0. The time now is 01:39.
|


 Hybrid Mode
