|
|
| Marlin Sportster, Cabrio, Berlinetta and Roadster builds Enthused or Confused about your vintage Marlin build? Ask away here or show off your build. |

3rd April 2012, 15:12
|
|
Senior Member
|
|
Join Date: Aug 2011
Location: Sleaford, Lincolnshire
Posts: 209
|
|
I agree, it should not be difficult to fashion something rubbery to fill the gap!
I am more worried about me bloody half shafts!
|
4th April 2012, 21:10
|
|
Senior Member
|
|
Join Date: Aug 2011
Location: Sleaford, Lincolnshire
Posts: 209
|
|
 Outer CV boot
Sorry to keep banging on about this but its a worry! Here is a better pic of the "rebuilt" outer CV showing the boot and the gap between the casting and the CV that it plus some sort of clip has to reside in.... clearly this one won't!
[IMG]  IMG_0623
 by oldpropuk, on Flickr[/IMG]
Last edited by oaktree11; 4th April 2012 at 21:16..
|
5th April 2012, 07:50
|
|
Senior Member
|
|
Join Date: Aug 2011
Location: Sleaford, Lincolnshire
Posts: 209
|
|
Jason, thanks for those, I should have searched your blog more carefully! hmmmm there is something wrong here. In a hurry this morning but I will have a good look at mine compared to yours later or tomorrow. it looks to me like the whole outer CV joint is different.....ARGHHHHH!!!
|
5th April 2012, 09:07
|
|
Senior Member
|
|
Join Date: Aug 2011
Location: Sleaford, Lincolnshire
Posts: 209
|
|
Just had a quick look before dashing off and there is definitely something amiss. Does anyone know if the halfshafts are standard E30 parts or are they modified by Marlin? I have another pair on my "other" donor....
|
5th April 2012, 10:09
|
 |
Senior Member
Enthusiast
|
|
Join Date: Sep 2005
Location: Northampton, UK
Posts: 1,891
|
|
John - the shafts are unmolested by Marlin... Standard BMW parts.
Looking at your photo again, you may be able to cut the boot off at the correct place for it to be connected, and then use a stainless tie to clamp it on to the shaft.
If you cut off the portion that has the larger diameter that was incorrectly clamped to the top portion of the shaft, it should fall to the same place as where my original boots are

I can't see that your shafts are different to mine. But if all else fails, whip the ones off your other donor and have a look. |
5th April 2012, 18:00
|
|
Senior Member
|
|
Join Date: Aug 2011
Location: Sleaford, Lincolnshire
Posts: 209
|
|
Jason,
You are right. Shafts are the same. I am of the same mind about trying to cut down the old boot but I am not sure it will play ball because its an odd design. Worst case is I remove them and fit proper boots. I want to avoid this because unlike most of you it seems mine were hard to pull into the hub splines. If I DO take them off I might drill and tap a small hole in the end of the shaft to make a small puller up
|
9th April 2012, 10:23
|
|
Senior Member
|
|
Join Date: Aug 2011
Location: Sleaford, Lincolnshire
Posts: 209
|
|
Easter woes! Halfshafts and another wretched car....
Well, not much achieved this Easter and I had such high hopes! the halfshafts continue to annoy. I tries cutting the boots down but they are not designed for it and the min diameter is not small enough. So, the halfshafts will need to be removed. The ones on donor II look ok so I will make use of them, or their boots. Problem: donor II is in the wrong place and I don't want to immobilise it until I have it in its final resting place so halfshafts on hold temporarily.
Another distraction is yet another car! I have bought a very sad Toylander Geepstar for my Grandson! it is in terrible condition but with a new body (all wood) it will be like new. Toylander are the "Rolls Royce" of childrens electric vehicles - take a look at their website. It was a brilliant £100 buy. Oh dear, so much to do, so little time!
[IMG] 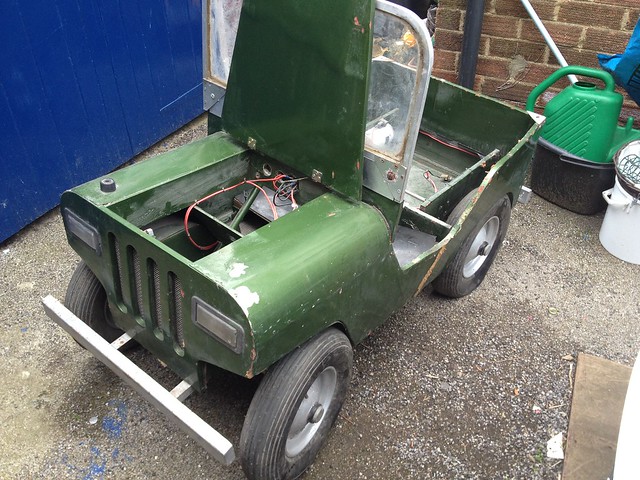 IMG_0644 IMG_0644 by oldpropuk, on Flickr[/IMG]
[IMG] 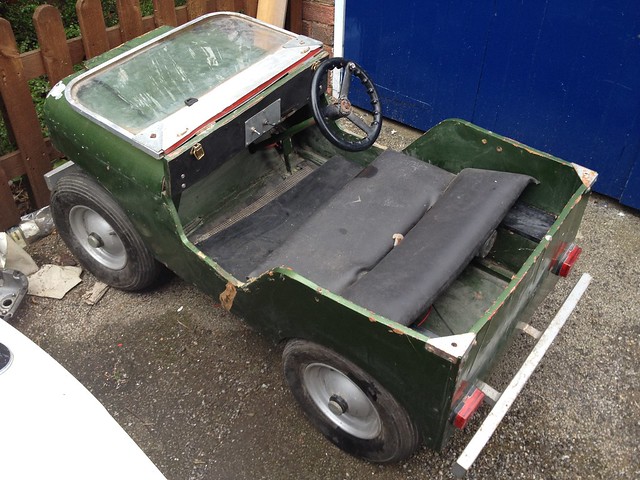 IMG_0633 IMG_0633 by oldpropuk, on Flickr[/IMG] |
9th April 2012, 10:47
|
 |
Senior Member
|
|
Join Date: May 2011
Location: Somerset
Posts: 1,671
|
|
Good timing that man!
I've just finished my Sammio i was just starting to look at one of those toylanders as my next project for the summer for my two young sons. I'd be interested to hear what you think of it and how you get on with it  |
9th April 2012, 10:49
|
|
Senior Member
|
|
Join Date: Aug 2011
Location: Sleaford, Lincolnshire
Posts: 209
|
|
Dave,
I will pm you my thoughts so far - all positive except the price if you are buying new! Probably good value but quite a lot! - John
ps the Sammio looks cool!
|
9th April 2012, 17:06
|
 |
Senior Member
Enthusiast
|
|
Join Date: Mar 2005
Posts: 3,077
|
|
I love that folding windscreen! Just like the latest Sportster  |
13th April 2012, 07:30
|
|
Senior Member
|
|
Join Date: Aug 2011
Location: Sleaford, Lincolnshire
Posts: 209
|
|
Jason,
That would certainly do it. I have been looking at others on ebay but the dimensions of this one are ideal.
Looking at my outer CV, there is the large diameter (where my current boots are incorrectly mounted) then it steps down to another (about 62mm) which does not look flat enough to seat a boot on, then down again to about 52mm which is not a flat either but sort of "troughed", ie a concave surface. I am oing to wait until I pull the original ones out of donor 2 to compare...
Thanks for the help! I need it....
|
13th April 2012, 21:24
|
|
Senior Member
Enthusiast
|
|
Join Date: Mar 2005
Posts: 3,077
|
|
Quote:
Originally Posted by oaktree11

Looking at my outer CV, there is the large diameter (where my current boots are incorrectly mounted) then it steps down to another (about 62mm) which does not look flat enough to seat a boot on, then down again to about 52mm which is not a flat either but sort of "troughed", ie a concave surface. I am oing to wait until I pull the original ones out of donor 2 to compare...
|
From this FirstLine diagram in this eBay advert the 52mm diameter 'trough' looks like the right sealing point.
http://www.ebay.co.uk/itm/BMW-325i-2...#ht_684wt_1139
For what its worth, I've bought many FirstLine parts, for various family cars, from my local motor factor and they are good quality products and come with the correct clips.
I've recently changed my steering rack gaiters with FirstLine parts which were very high quality mouldings and fitted perfectly. |
1st August 2012, 13:03
|
|
Senior Member
|
|
Join Date: Aug 2011
Location: Sleaford, Lincolnshire
Posts: 209
|
|
Hello all! This is a kind of "holding" post just to reassure you all that I have not died or fallen by the wayside!
Yesterday I visited Marlin and collected all the proprietary bits that I will need to finish the build, ie all the aluminium and composite parts from their kits 2 & 3 and a windscreen. I also got the front wishbones to replace the ones that GOO had. There was a used Sportster there that they have just re-sold
[IMG]  IMG_0028 IMG_0028 by oldpropuk, on Flickr[/IMG]
I am in my office in Warrington right now with my car stuffed with Marlin bits!
I am still a bit stuffed by building the Toylander for my Grandson which is blocking access to the Marlin but that should be complete this weekend.
I have decided to resolve the halfshaft gaiter conundrum by pulling the halfshafts off donor 2 and tidying them up or at least using the gaiters from them.
In this pic you can see the Toylander and donor 2! I will take some pics of the Marlin bits at the weekend!
[IMG]  IMG_0023 IMG_0023 by oldpropuk, on Flickr[/IMG]

|
5th August 2012, 15:57
|
|
Senior Member
|
|
Join Date: Aug 2011
Location: Sleaford, Lincolnshire
Posts: 209
|
|
work has recommenced!!!
OK well a good weekend, not that much achieved but it feels good to have started again.
So, as you all know, I have been trying to finish the model jeep because it is in the way. I have given up on that for a short while because it is essentially finished and striped for painting (my least favourite bit) it will be red and black, I have started but it will go on hold now - Dougie is too young yet so I have time.
 IMG_0052 IMG_0052 by oldpropuk, on Flickr[/IMG]
So as well as painting I have finally resolved the halfshaft gaiter conundrum. The recon halfshafts I got with the car definitely have the wrong gaiter on which is attached in the wrong place.
I spent the afternoon in the gentle rain removing the halfshaftes from the donor I bought. It went pretty smoothly but thank goodness I have the right tools. Both the hub nuts came off ok but the shaft splines were very tight. I have a heavy duty 3 leg puller which pushed them out fine. They look good with all four gaiters in good nick. I will clean them up and repack the bearings and fit these.
 IMG_0048 IMG_0048 by oldpropuk, on Flickr[/IMG]
 IMG_0049 IMG_0049 by oldpropuk, on Flickr[/IMG]
This is where the gaiter is located on my recon halfshafts - on the larger diameter which does not clear the hub casting
 IMG_0607[1] IMG_0607[1] by oldpropuk, on Flickr[/IMG]
I also learned how to press the wishbone bushes in - many thanks for the help guys - i screwed one but then learnt!
One problem is that Marlin have made a very scrappy job of tapping the arm so the bush carrier won screw in on one side. I have just ordered a 20mm tap to sort this.
 IMG_0051 IMG_0051 by oldpropuk, on Flickr[/IMG]
G]All in all I am a happy bunny!
Last edited by oaktree11; 8th August 2012 at 11:17..
Reason: remove duplicate photo
|
13th August 2012, 14:55
|
|
Senior Member
|
|
Join Date: Aug 2011
Location: Sleaford, Lincolnshire
Posts: 209
|
|
another half step back.....
Well, I spoke too soon. It is now obvious that the outer CV's on the "recon" halfshafts were also taken apart. This is very bad news and became apparent when one of the covers broke the silicon that was holding it on and came away! Oh well, a weekend spent doing up the ones that came off donor 2 and at last I really DO have the rear driveline sorted! I hate those CV boot clips btw.
I also got the handbrake linings etc sorted and mounted and actually mounted the spring and damper on one side so it would be ready to mount a wheel if I had hydraulics!
I got the new tap and tapped out the threads on the upper wishbone, now the bush carriers screw in fine. The new wishbones are not a brilliant fit and needed some fettling to get on...
Two problems!
1. Handbrake cables. I got two with the car, identical length (already shortened) one BMW looking one, black sheath with brass endcaps, one thinner plastic sheathed one with plastic endcaps. Although the setup looks symmetrical one outer cable needs to be about 25mm longer than the other! No idea why but its not an issue because I dont want to fit the plasticky one anyway. Has anyone else noticed this?
2. My bump stops dont line up. I know this was common with this vintage chassis. I intend to get it sorted but have left it for now. Actually the spring mounts really well and I am not sure that the job is essential - any thoughts?
Thanks all - John
Last edited by oaktree11; 13th August 2012 at 15:14..
|
13th August 2012, 18:43
|
|
Senior Member
Enthusiast
|
|
Join Date: Mar 2005
Posts: 3,077
|
|
Quote:
Originally Posted by oaktree11
Two problems!
1. Handbrake cables. I got two with the car, identical length (already shortened) one BMW looking one, black sheath with brass endcaps, one thinner plastic sheathed one with plastic endcaps. Although the setup looks symmetrical one outer cable needs to be about 25mm longer than the other! No idea why but its not an issue because I dont want to fit the plasticky one anyway. Has anyone else noticed this?
2. My bump stops dont line up. I know this was common with this vintage chassis. I intend to get it sorted but have left it for now. Actually the spring mounts really well and I am not sure that the job is essential - any thoughts?
Thanks all - John
|
Hi John,
when I built my car, Marlin didn't supply the handbrake cables so it was up to the builder to buy some cables and shorten them. I bought a pair of cables from GSF and used the shortening instructions in the Marlin build manual. (But do be careful when you cut the cable with a cold chisel!!)
It sounds like the previous owner bought two different types?
My bump stop alignment seemed OK so I didn't modify my wishbones.
...peter
|
13th August 2012, 19:34
|
 |
Senior Member
Enthusiast
|
|
Join Date: Sep 2004
Posts: 1,892
|
|
Quote:
Originally Posted by oaktree11
2. My bump stops dont line up. I know this was common with this vintage chassis. I intend to get it sorted but have left it for now. Actually the spring mounts really well and I am not sure that the job is essential - any thoughts?
Thanks all - John
|
I had the same problem. I removed the spring plates on the lower arms by drilling out the spot welds. I made some new spring plates and had them welded on to the lower arms so they lined up with the bump stops. Much easier than it sounds as long as you are reasonably handy with a hacksaw and know a friendly welder.

I suspect it may well fail the IVA if the bump stops don't line up as well as affecting the correct operation of the springs.
Cheers, Robin |
14th August 2012, 22:16
|
|
Senior Member
|
|
Join Date: Aug 2011
Location: Sleaford, Lincolnshire
Posts: 209
|
|
Peter and Robin, first of all, thanks for the advice it is so reassuring to have people like you out there willing to help.
I have ordered two new handbrake cables and will mod them.
I will definitely have to correct the bumpstop alignment. Because the trailing arms are nicely powder coated I think I might cut the top stud off and have it welded to a plate which I can bolt into rivnuts set into the chassis. I am leaving it for now so I can get all the welding bits done in one hit. John
|
|
Currently Active Users Viewing This Thread: 1 (0 members and 1 guests)
|
|
|
 Posting Rules
|
You may not post new threads
You may not post replies
You may not post attachments
You may not edit your posts
HTML code is Off
|
|
|
All times are GMT +0. The time now is 13:24.
|


 Linear Mode

