|
|
| Marlin Sportster, Cabrio, Berlinetta and Roadster builds Enthused or Confused about your vintage Marlin build? Ask away here or show off your build. |

10th June 2009, 10:23
|
|
Senior Member
Enthusiast
|
|
Join Date: Jan 2007
Posts: 932
|
|
 Update on Progress
Just a quick update for anyone following my build - very presumptious that there is anyone interested , but I follow as many other Marlin builds as I can for ideas.

Fopllowing Chris Cussens problem with proving he has built his own car as an amateur build, I have decided to start to include me in some of the photos as well as the garage/house to try to "prove" I am the builder.
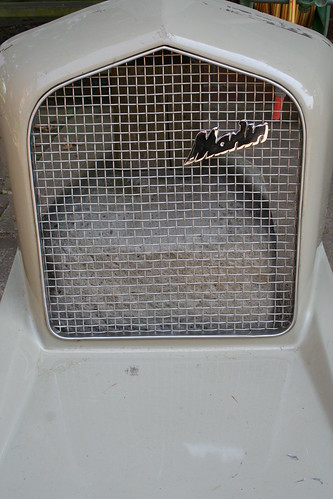
I am currently working on my grille as I have located some stainless profile and mesh - and really I am putting off the next step - The Electrics - as this is the one area that I do not fully understand.
Still its always good to learn.................  |
10th June 2009, 10:38
|
 |
Senior Member
Enthusiast
|
|
Join Date: Feb 2005
Location: Hampshire
Posts: 2,496
|
|
We're still reading  Electrics were easy for me, Richard did them   |
10th June 2009, 10:49
|
|
Senior Member
Enthusiast
|
|
Join Date: Feb 2005
Location: Hampshire
Posts: 2,496
|
|
Dunno, I get this image on all my own posts so I can edit it:
 |
10th June 2009, 11:42
|
|
Senior Member
Enthusiast
|
|
Join Date: Jan 2007
Posts: 932
|
|
Quote:
Originally Posted by Patrick

Dunno, I get this image on all my own posts so I can edit it:
|
Patrick
I do too, but when I try to use it , it throws me back to the log in page - user access is denied - so I log in again and it throws me back to the login page again!!
What can Bigcheese tell me?
Mike |
10th June 2009, 11:51
|
 |
Senior Member
Enthusiast
|
|
Join Date: Sep 2005
Location: Northampton, UK
Posts: 1,891
|
|
Looks good Mike. Must be nice having all that room in the garage...
Double garage? Luxury! We used t' dream of 'aving a double garage. We had to make do with t' shoebox...  |
10th June 2009, 12:11
|
 |
Senior Member
Enthusiast
|
|
Join Date: Sep 2004
Posts: 1,891
|
|
Quote:
Originally Posted by Mike
I am currently working on my grille as I have located some stainless profile and mesh - and really I am putting off the next step - The Electrics - as this is the one area that I do not fully understand.
Still its always good to learn................. |
Plenty of people on the forum that have already done their electrics so I am sure you will always get an answer if you have a problem. My best tips would be:
Take it one step at a time
Use the proper tools and materials (Don't use sticky electricians tape!)
Write down what you have done for future reference.
Robin |
10th June 2009, 17:33
|
 |
Senior Member
Enthusiast
|
|
Join Date: Mar 2005
Posts: 3,075
|
|
Quote:
Originally Posted by Mike
Following Chris Cussens problem with proving he has built his own car as an amateur build, I have decided to start to include me in some of the photos as well as the garage/house to try to "prove" I am the builder.
|
Hey Mike, you need to get an action shot like this one..........
http://www.msportster.co.uk/data/lon...hton09_008.jpg
Keep the updates comming, we all like reading the updates.... |
14th June 2009, 22:03
|
|
Senior Member
Enthusiast
|
|
Join Date: Jan 2007
Posts: 932
|
|
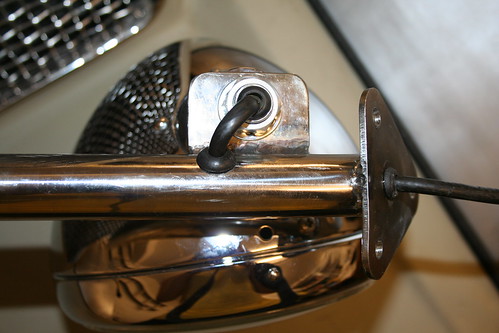
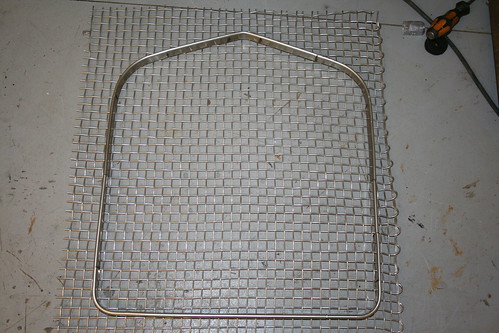
 Grille Surround
Since it has taken me two full days to make a partially finished grille surround I feel entitled to post my efforts for all to see!! Two whole days....crazy or what?!!
http://www.flickr.com/photos/mikes_bmw_marlin_cabrio/
Mike |
15th June 2009, 08:47
|
|
Senior Member
Enthusiast
|
|
Join Date: Feb 2005
Location: Hampshire
Posts: 2,496
|
|
that looks like a lot of work, nice results |
15th June 2009, 10:07
|
|
Senior Member
Enthusiast
|
|
Join Date: Jan 2007
Posts: 932
|
|
Grille Surround
|
15th June 2009, 10:19
|
|
Senior Member
Enthusiast
|
|
Join Date: Jan 2007
Posts: 932
|
|
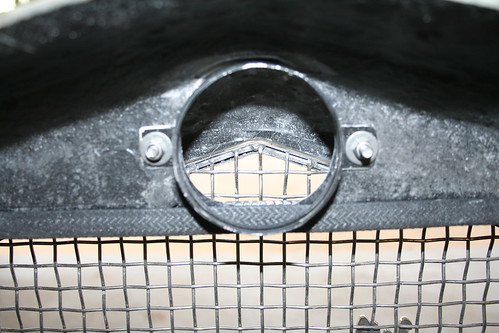
 Radiator Grille Surround
Quote:
Originally Posted by Mike
|
One day I'll understand how to use this site......
[IMG] 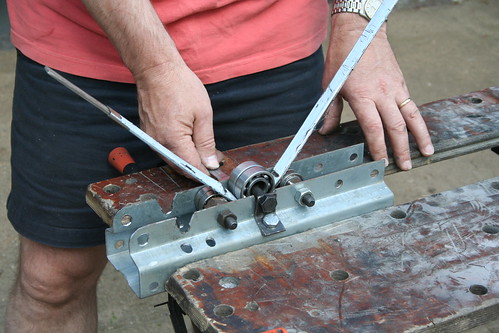 [/IMG] |
11th October 2011, 20:35
|
|
Senior Member
Enthusiast
|
|
Join Date: Jan 2007
Posts: 932
|
|
|
11th October 2011, 20:40
|
|
Senior Member
Enthusiast
|
|
Join Date: Jan 2007
Posts: 932
|
|
|
13th October 2011, 21:54
|
|
Senior Member
|
|
Join Date: Jun 2010
Location: Reading
Posts: 229
|
|
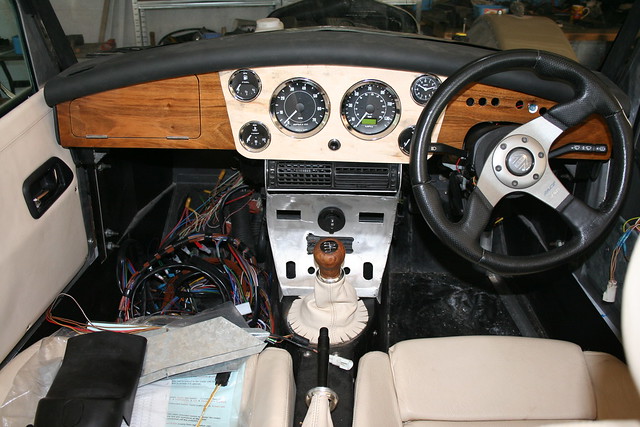
Hi Mike,
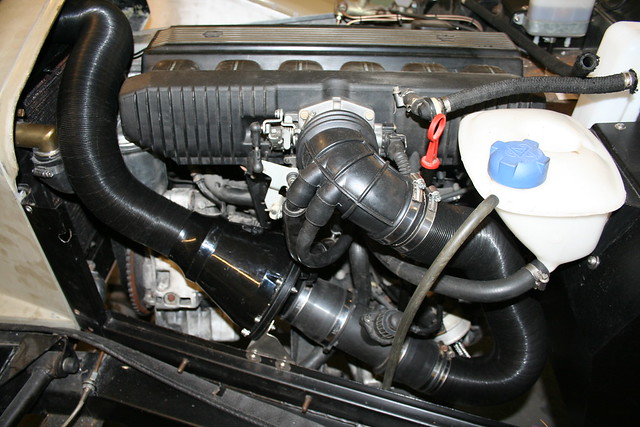
I'm still cogitating on the inlet ducting. I like your solution and I hadn't thought of seperating the AFM from the inlet elbow. That may provide a few more options but I don't think I have room to take the ducting into the nose cone as you have done. At the moment I'm thinking of a canister type air filter mounted low down and aft of the throttle body with an air intake cut into the engine bay side panel. But it will probably need some sort of scoop to ensure that Mr. Bernoulli's principle doesn't give me any power sucking negative air pressure in the inlet manifold!!.
I like the wooden dash. I plan to have an oak or cherry dash with a dark mahogoney stain that should work well with my white faced instruments. My worry has been the need to create a 19mm radius on the bottom edge to meet IVA requirements. How are you planning to overcome that. Have you got a seperate IVA dashboard as a tempoary fit..............!!
How are the electrics coming along. I have found it a lot less of a problem than I thought. (But I may change my mind when I connect a battery). I have left the ECU loom untouched except for a change in a couple of cable to accomodate the new position for the alternator. I have sussed the pin out for the X20 connector ( the interface between the ECU loom and the main vehicle loom) and I have made up the vehicle loom wire by wire from basic principles - supply - switch - load - earth. I needed to sort out a few relays and provide some permanent live and swithced live power supplies, but it has been fairly straight forward. I hope to connect a battery in the next few weeks. I'll make sure that all the fuses are removed and then put them back one by one. (with one hand on a fire extinguisher.................!!)Then I'll really find out how straight forward it's been!!
But it's looking like a really nice car with some great progress. Any thoughs about an IVA booking yet??
Cheers
Nigel

|
13th October 2011, 22:20
|
|
Senior Member
Enthusiast
|
|
Join Date: Mar 2005
Posts: 3,075
|
|
Quote:
Originally Posted by NigelB
Hi Mike,
My worry has been the need to create a 19mm radius on the bottom edge to meet IVA requirements. How are you planning to overcome that. Have you got a seperate IVA dashboard as a tempoary fit..............!!
Nigel
|
The IVA manual says...(and was very similar on the old SVA)
7. The instrument panel lower edge within the “specified zone” must have a
radius of curvature not less than 19mm or 5mm and covered with a nonrigid material.
I used some soft rubber 'u' channel stuck to the bottom edge.
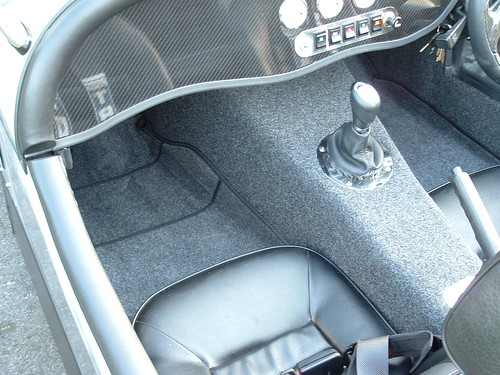 Passenger foot well
 by marlinpeter, on Flickr
But I guess this might not look to pretty on a wooden dashboard? |
14th October 2011, 07:55
|
|
Senior Member
Enthusiast
|
|
Join Date: Feb 2008
Location: Bristol
Posts: 272
|
|
I used some cheap pipe insulation stuff made from foam and covered in vinyl, glued to bottom of dash. No questions asked at IVA. But as Peter says, it would look odd with a wooden dash. Guess it might accidentally fall off later though??
My air intake is in the passenger footwell - solution courtesy of Mark. Does give out a few sucking noises when you put your foot down, which can be a surprise to your passenger
Tim |
14th October 2011, 08:35
|
|
Senior Member
Enthusiast
|
|
Join Date: Sep 2005
Location: Northampton, UK
Posts: 1,891
|
|
Mike - looking good. One thing to note though - it looks as if your instruments have a non IVA friendly ring on them:
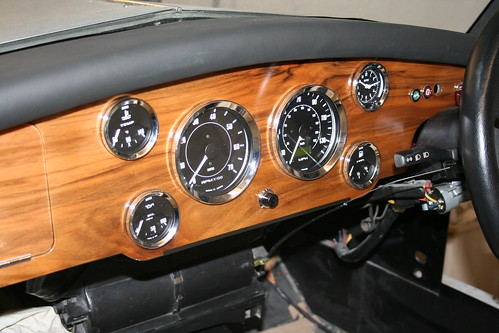
They need to be radiused, and it looks as if yours have a V profile. |
14th October 2011, 12:37
|
|
Senior Member
Enthusiast
|
|
Join Date: Jan 2007
Posts: 932
|
|
Quote:
Originally Posted by GreatOldOne
Mike - looking good. One thing to note though - it looks as if your instruments have a non IVA friendly ring on them:
They need to be radiused, and it looks as if yours have a V profile.
|
Hi Goo
I have a gash dash template to go over the instruments.
I do not want to put a lot of work into the template, but I guess its too obviously a temporary IVA fix at the moment!
Nigel
Once the centre console is complete I will only have the passenger edge to deal with, and plan to do something like Tim has suggested with a foam collar trimmed in black vinyl and attached to the underside of the dash. And yes I fully expect it remain only until its passes the test. |
|
Currently Active Users Viewing This Thread: 1 (0 members and 1 guests)
|
|
|
| Thread Tools |
|
|
| Display Modes |
 Linear Mode Linear Mode
|
 Posting Rules
|
You may not post new threads
You may not post replies
You may not post attachments
You may not edit your posts
HTML code is Off
|
|
|
All times are GMT +0. The time now is 14:36.
|