|
|
| Marlin Sportster, Cabrio, Berlinetta and Roadster builds Enthused or Confused about your vintage Marlin build? Ask away here or show off your build. |

9th September 2016, 20:23
|
 |
Senior Member
Enthusiast
|
|
Join Date: Feb 2005
Location: Hampshire
Posts: 2,497
|
|
Clutch master fits on the 3D prototype print, there needs to be a bit more clearance for the fluid feed pipe, and it needs to be extended forward to make use of my second scuttle mount hole. I can probably add more re-enforcement.


Fits into the car too!

Added a hole for the scuttle mount:

A few cm forward of it is the second mount hole.

Need to make a few design tweaks then figure out how to make it out of metal. |
10th September 2016, 08:02
|
 |
Senior Member
Enthusiast
|
|
Join Date: Mar 2005
Posts: 3,079
|
|
Hi Patrick,
That 3d modelling and printing is amazing technology!!
It's a long time ago but I remember fitting a pedal stop on my clutch to prevent over extending the master cylinder. Not sure if you did the same?
Just a bolt with a couple of nuts each side of the bulkhead.
 Pedals installed Pedals installed by marlinpeter, on Flickr
Might be worth adding if you haven't got one?
...peter |
10th September 2016, 10:50
|
|
Senior Member
Enthusiast
|
|
Join Date: Feb 2005
Location: Hampshire
Posts: 2,497
|
|
Thanks Peter  I'll see where the bite points end up with this setup - would be a good idea to add. With the worn out/broken setup the bite point was right at the bottom of the pedal which made it very difficult to drive, especially when the gearbox was cold.
We've got an Ultimaker 2+ the precision you get out of it is astounding - I modelled the the bolt holes 50mm apart and it fit perfectly. Not sure any of the materials we can print with would be strong enough for this application sadly - that would be perfect otherwise.
EDIT: hmm colorfabb have carbon fibre reinforced material, wonder how strong that is http://colorfabb.com/xt-cf20 |
10th September 2016, 14:09
|
|
Senior Member
Enthusiast
|
|
Join Date: Feb 2005
Location: Hampshire
Posts: 2,497
|
|
|
10th September 2016, 19:57
|
|
Senior Member
Enthusiast
|
|
Join Date: Mar 2005
Posts: 3,079
|
|
Wow, this is getting exciting.
Are you planning to print it in wax and then create a plaster mould to make an alloy one?? (the age old 'lost wax' process)
|
10th September 2016, 20:16
|
|
Senior Member
Enthusiast
|
|
Join Date: Feb 2005
Location: Hampshire
Posts: 2,497
|
|
Going to try a 3D printed one using ColorFabb HT, we've got a little bit left from another project, but I may need to order some new.
http://colorfabb.com/co-polyesters
Added a load of extra structure to strengthen the part were it’s bolted.

The print is sliced like this giving the most strength in the direction the force of pushing the clutch would go through the part.:

The yellow lines are the movement of the print head, the black cylinder is the print head, it's shown with the top 1/4 left to go, the corrigated stuff is support material - without it gravity can take effect and the runs of plastic can sag. It's set to print with 100% fill so that it's as strong as it can be. The prototype had less fill which saves both print time and plastic but is not as strong.
If it doesn't work I can still make a metal one! |
11th September 2016, 08:47
|
|
Senior Member
Enthusiast
|
|
Join Date: Feb 2005
Location: Hampshire
Posts: 2,497
|
|
3D printing does take ages, especially with 100% fill, 10 hours in, 18 to go. With less fill it would print much faster, but then it would be a weaker piece (the yellow on the print bed is Kapton tape - printing this stuff to the glass will cause the glass to chip):
 |
11th September 2016, 21:03
|
|
Senior Member
Enthusiast
|
|
Join Date: Jan 2007
Posts: 932
|
|
Patrick
I snapped the head off my first clutch master cylinder input shaft (genuine donor BMW) before I ever got my car on the road, due to poor alignment with the clutch pedal.
What I eventually found was that master cylinder input shaft has a limited ability to accept the change in angle created by the clutch pedal passing through an arc. After 3/4 pedal travel the m/c input shaft began to bind on its own casing and further pedal movement generated a lateral force on the shaft which very quickly failed.
By trial and error I eventually found a new location where the master cylinder input shaft always remained within its own arc limits as the clutch pedal went through its full movement.
Since changing the alignment (touch wood!) it seems to operate really well, and I've had no more problems.
Mike
|
11th September 2016, 21:51
|
|
Senior Member
Enthusiast
|
|
Join Date: Feb 2005
Location: Hampshire
Posts: 2,497
|
|
Thanks Mike - I'll check it out when it test fit the printed part. Unfortunately I ran out of filament before it was done but shoud be enough for testing. Need to order some more.
|
12th September 2016, 20:58
|
|
Senior Member
Enthusiast
|
|
Join Date: Feb 2005
Location: Hampshire
Posts: 2,497
|
|
Ran out of ColorFabb HT with a bit to go on the print unfortunately, however this is a great strength test piece. It’s very strong already with 2/3 of the triangulation structure missing. This part will work in the car, no need to remake in metal.
I may make a few more design tweaks before starting another print. More material is due at the end of the week.

 |
16th September 2016, 08:38
|
|
Senior Member
Enthusiast
|
|
Join Date: Feb 2005
Location: Hampshire
Posts: 2,497
|
|
3rd design set for the clutch bracket. As we ran out of ColorFabb HT filament it gave me a few more days to consider the design so I’ve revised some angles:


Mid print:

All 3 versions, note the middle one didnt finish printing:

Extra support structures

The first layer is a bit loose here due to gravity & the supports not quote hold it up - not an issue I'll trim those off as there's a lot more layers anyway.

Clearance for the fluid fill. You can see the layers don't look very smooth - that's by design as it makes the print stronger by having thicker layers. For a display piece we'd print with much finer layers that which would look a lot smoother. As this is a functional piece you can't see it doesn't matter.

Watch the print!
https://youtu.be/8UykB-97xgE |
18th September 2016, 17:15
|
|
Senior Member
Enthusiast
|
|
Join Date: Feb 2005
Location: Hampshire
Posts: 2,497
|
|

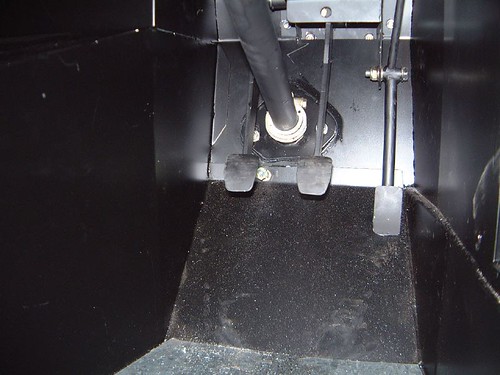
Turned a suitable bushing on the lathe for the clutch to pivot around on to the pedal:

Assemebled and in place, the 3d printed part feels very solid. First time I bolted up the pipe to the front the banjo joint didnt’ seal up enough – lots of fluid everywhere… added an extra washer and it’s all good now:

The clutch is now quite similar to how it was originally, but without lots of movement of the master cylinder. It’s now much nicer to drive again.
Engine service has made a big difference, it’s a lot smoother and quieter again now. Setting the valve clearances as reduced the M2o rattle by quite a lot.
I can also recommend the ATE pads, they bite much better than the jurid ones that were on there.
It was also a good opportunity to re-glue a lot of carpet in the footwell where the spray mount glue had failed over the years.
A few minor things need doing before the MOT – one ball joints rubber cover is rotting away and the upper control arms need some extra large washers adding on the inside – there’s a bit of movement on the drivers side.
I had help today – nothing like being upside down with your feet in the air in the foot well with a cat wandering over you:


|
18th September 2016, 19:28
|
|
Member
|
|
Join Date: Nov 2011
Posts: 47
|
|
How many cats on your exhaust ?
If your washers are copper get them heated up to blood red and then drop them in some water. But I'm sure you knew that all reddy. ho ho
Last edited by phil.coyle; 18th September 2016 at 19:31..
|
18th September 2016, 21:00
|
|
Senior Member
Enthusiast
|
|
Join Date: Feb 2005
Location: Hampshire
Posts: 2,497
|
|
4 potentially - those two up there are my parents cats (I use their garage as I don't have the space), then there are my two:

One for each exhaust hole! 
What benefit does annealing the copper washers have? |
19th September 2016, 10:12
|
|
Member
|
|
Join Date: Nov 2011
Posts: 47
|
|
If you know about annealing then you know it makes the copper softer and it seals better.
Those cats look like civets, and!, they have their OWN garage.
Someone gave me a book once called a hundred and one uses for a dead cat, they forgot about weighing them in at the scrap yard, 102. 
Phil |
19th September 2016, 18:13
|
|
Senior Member
Enthusiast
|
|
Join Date: Feb 2005
Location: Hampshire
Posts: 2,497
|
|
The issue I had was spacing - the copper never got compressed - you could move the banjo around with it done all the way up. If it leaks again I'll soften the copper.
|
19th September 2016, 22:24
|
|
Member
|
|
Join Date: Nov 2011
Posts: 47
|
|
I'm leaning on the lampost....
Sounds like the banjo bolt is bottoming out in the fitting or there is a discrepancy in the thread length and the banjo thickness, time to get out the measuring sticks or a Vernier gauge .
|
20th September 2016, 05:22
|
|
Senior Member
Enthusiast
|
|
Join Date: Feb 2005
Location: Hampshire
Posts: 2,497
|
|
Yeah that's exactly what happened the thread doesn't go in as deep in the BMW master cylinder as it did in the willwood one. The extra washer did the trick.
|
20th September 2016, 08:41
|
|
Member
|
|
Join Date: Nov 2011
Posts: 47
|
|
Oh well at least you are aware of the problem should it pop up again, one less thing to worry about, and you can always file a bit off the bottom of the thread if it starts to weep.
|
24th September 2016, 21:02
|
|
Senior Member
Enthusiast
|
|
Join Date: Feb 2005
Location: Hampshire
Posts: 2,497
|
|
Clutch is still fine, took it for another drive today. Engine is so much quieter / smoother since the tune up - it was really worth it.
eBayed and old Pioneer CD-IB100ii – now I can hook and iPod or phone up to the headunit. This is pretty old tech now as it comes with a 30 pin iPod connector. With a lighting adapter I can get sat nav instructions over the speakers along with music, however it needs an extra adapter to make charging work – that’s on it’s way. It hooks in between the 30pin input and the lighting adapter with a micro USB input to supply extra power.

All tucked away. The carpet was coming off the whole unit here so it was a good opportunity to re-do the glue and add staples.
 |
|
Currently Active Users Viewing This Thread: 1 (0 members and 1 guests)
|
|
|
 Posting Rules
|
You may not post new threads
You may not post replies
You may not post attachments
You may not edit your posts
HTML code is Off
|
|
|
All times are GMT +0. The time now is 02:12.
|


 Linear Mode

