|
|
| Vintage and Classic Roadster Kit Car Builds For Vintage and Classic era kit cars. Post your build reports, problems and progress here |

14th October 2019, 19:39
|
 |
Senior Member
Enthusiast
|
|
Join Date: Mar 2005
Posts: 3,079
|
|
 Cooling and powering on...
Sorry for the lack of updates but holidays and garden clearance have taken priority over the last few weeks but all this rain recently means I have been inside the garage for the odd hour here and there.
I'm getting ever closer to restarting my engine.
I've completed the cooling system and filled it with G13 coolant.
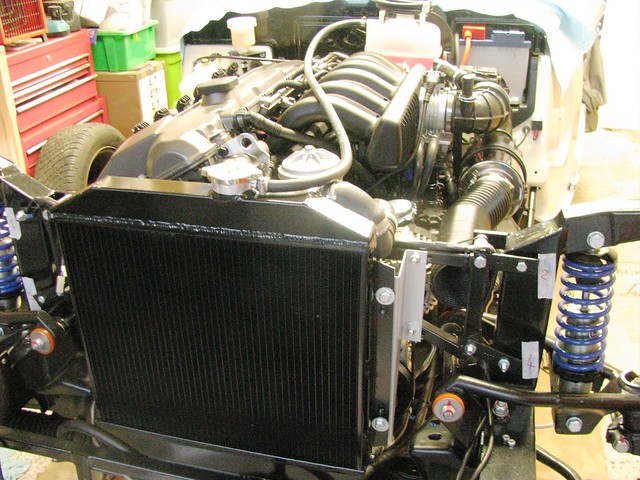 Cooling System Cooling System by Sabrebuilder, on Flickr
The radiator has been fitted with a valveless cap and the hose between the radiator and the header tank is temporary until I have worked out its best routing.
Here's the top hose. I'm using the original BMW sensor to trigger the electric radiator fan.
 Radiator Fan Sensor Radiator Fan Sensor by Sabrebuilder, on Flickr
For the record here's the bottom hose.
 Bottom Radiator hose Bottom Radiator hose by Sabrebuilder, on Flickr
Upper part is BMW and lower part is Ford Escort.
 Header Tank Header Tank by Sabrebuilder, on Flickr
The hose coiled up on top of the header tank is the windscreen washer hose.
I've also nearly completed the air intake. Just need to add a duct flange at the front.
 Air Intake Air Intake by Sabrebuilder, on Flickr
I've also finished 99% of the wiring loom so I was able to connect up the battery and install the dashboard.
 Dashboard Dashboard by Sabrebuilder, on Flickr
Not sure yet about the colour of the surround it will depend on the interior trimming.
And powered up it looks like this...
 Dashboard powered up Dashboard powered up by Sabrebuilder, on Flickr
One fault found, so far. Oil pressure light was wired to ground instead of +12v.
I'm now moving on to the preparation for the engine start. I've put a new oil filter in and filled the engine with fresh oil. After removing the old spark plugs I cranked the engine to get some oil pressure.
Next job will be to put some fuel in the tank and prime the fuel pumps.
I'll then be ready to install the coil packs and wiring and see if it will start!!
I hope to have her running before we leave the EU 
....peter

|
19th October 2019, 19:48
|
|
Senior Member
Enthusiast
|
|
Join Date: Mar 2005
Posts: 3,079
|
|
Not a good week....
Sometimes things just don't go well......
It started off OK and I was looking forward to re-starting my engine. Before that there was just a few things to complete.
I made this cover from aluminium mesh to stop things falling into the alternator cooling duct.
 Alternator air duct cover Alternator air duct cover by Sabrebuilder, on Flickr
Also, since fibreglass is flammable I have fitted a heatshield above the catalytic converter. I used Cirrus GIIIX 3 Layer Heat Shield from Demon Tweeks. I mounted it with a 10mm gap from the body to allow air to flow both sides of the shield.
 Exhaust Heat Shield Exhaust Heat Shield by Sabrebuilder, on Flickr
But then things turned bad.....
Whilst under the car fitting the exhaust heatshield I noticed a brake fluid leak from the rear brake deceleration valve.
 Brake fluid leak Brake fluid leak by Sabrebuilder, on Flickr
I think it is just a case of not tightening up the front joint enough but the brake fluid had damaged the paint on the bracket so I had to remove the valve to clean it up.
After finding this brake fluid leak I thoroughly inspected every other brake line joint. I then found brake fluid weeping from both rear calipers where the flexi line enters the caliper.
 Brake caliper leak Brake caliper leak by Sabrebuilder, on Flickr
After dismantling the hose I found that the copper washer had not been crushed, even though the joint was very tight. I found that this was because the fitting had bottomed out in the hole before crushing the washer.
 Brake caliper leak Brake caliper leak by Sabrebuilder, on Flickr
I have now cleaned everything up and refitted the hoses each with two copper washers.
I then moved on the fuel system hoping for better luck.
I put 10 litres of fuel in the fuel tank and proceeded to prime the fuel lines. I disconnected the supply line from the ECU to the fuel pumps and temporarily connected a wire from the battery to the fuel pumps. Hmmm, just a click from the HP pump but not the whirring noise I was expecting. I then noticed the temp wire was getting hot, not good!! 
Long story short, I worked out that the low pressure lift pump in the tank was working fine and drawing about 1.5 amps.
But the HP pump was jammed solid, not pumping and drawing more that 20 amps. I bought the pump (a cheap Chinese copy of a Bosch pump) from Rally Designs and a call to there technical department was less than helpful. Basically as it was out of warranty they weren't interested.  That was yesterday.
This morning I removed the HP pump and mounted it on my bench. I reconnected it to the battery but still had very high current and only the click noise. With nothing to loose I gave it a good talking to with a rubber mallet and after a few more clicks it started to run but sounded very rough.
A new genuine Bosch pump is now on order!!
So I have a brake system in pieces and a fuel system in pieces as well. 
Hopefully next week will go better........ 
...peter
|
19th October 2019, 22:10
|
|
Senior Member
|
|
Join Date: Jun 2015
Posts: 1,401
|
|
I know how that feels. One day you are the dog, and the next a lamp post.
|
20th October 2019, 10:06
|
 |
Senior Member
|
|
Join Date: Nov 2011
Location: Exeter
Posts: 187
|
|
Copper washers
I have had problems recently with copper washers on brake lines not sealing properly. The first instance was a classic car banjo connection to the rear brake cylinder. The second instance was the Goodridge banjo connections on the front calipers on my Marlin Hunter / Cabrio.
Not all copper washers are the same! I had used after market ones that were in a multi pack from a well known local parts shop. These are too thin and the outer diameter is too large. The result is that they are too strong and do not deform (crush) enough, hence the leakage. This is especially important for the Goodridge banjos which have a raised ridge to assist the seal. Another factor affecting “crushability” is the hardness of the copper. The thin ones seem quite hard whereas the Goodridge ones are softer and the copper is a more pinky annealed colour.
Attached photo shows both types of washer. The correct Goodridge one is on the right.
The Goodridge ones were obtained from Demon Tweeks, link below:-
https://www.demon-tweeks.com/uk/good...washers-243438
Also available from Merlin Motorsport
https://www.merlinmotorsport.co.uk/p...1-8bsp-g-44516
A final comment is that these washers should never be reused. Fit new every time the joint is separated.
Meantime keep up the good work. The high standard is a credit to you. Peter. |
20th October 2019, 15:55
|
|
Senior Member
Enthusiast
|
|
Join Date: Mar 2005
Posts: 3,079
|
|
Thanks Peter for the feedback on copper washers.
Those Goodridge seals do look nice and thick. The originals I used were the ones that came with my Goodridge SS braided hoses but I don't think they were as thick as those.
Even though I have now refitted the hoses again with two soft cooper seals (supplied by HEL Performance) I'm now thinking that this is the wrong approach on these calipers. The area around the threaded hole has not been machined flat and is just the rough casting finish suggesting the seal should at the bottom of hole. But the Goodridge hose fitting is the wrong shape to seal with the concave seat in the caliper and being Stainless Steel it doesn't deform when tightened up.
Looking back at my dismantling photos I can see the original builder used traditional rubber brake hoses which were simply screwed into the caliper without a copper crush washer.
 Front brakes, hubs, etc Front brakes, hubs, etc by Sabrebuilder, on Flickr
EDIT: This is the wrong photo, please see post #408 below
A bit of a retrograde step but i'm thinking of reverting back to rubber hoses. 
Last edited by peterux; 21st October 2019 at 09:12..
Reason: wrong photo posted
|
20th October 2019, 20:19
|
|
Senior Member
|
|
Join Date: Nov 2011
Location: Exeter
Posts: 187
|
|
It would be a shame to go back to rubber hoses as the Goodridge braided hoses are so much better and give a really firm pedal feel.
As you say, for the copper washers to work there should be a spot faced area around the threaded hole, not a rough cast surface. Those calipers and front hubs look like the Ford Sierra brakes that I am currently overhauling on my Marlin Hunter. The cast round boss on mine is for the bleed nipple that is designed to seal on the angled face at the bottom of the hole. The copper washer and banjo fitting on mine are on the spot faced lug on the square angled boss that projects from the end of the caliper piston. Just a thought but have your connections been reversed in error? The angled spot faced boss should face inwards and upwards. The bleed nipple is above this and facing upwards and angled towards the rear. You may have to separate the calipers from the support brackets and swap the calipers to the other side of the car and turn them up the other way to achieve this. The support brackets are handed so should be fitted on the correct side of the car. As mine is stripped down at present I can post photos to clarify this if it helps. Peter.
|
20th October 2019, 20:41
|
|
Senior Member
|
|
Join Date: Nov 2011
Location: Exeter
Posts: 187
|
|
This photo shows my off side caliper. Peter.
|
21st October 2019, 09:09
|
|
Senior Member
Enthusiast
|
|
Join Date: Mar 2005
Posts: 3,079
|
|
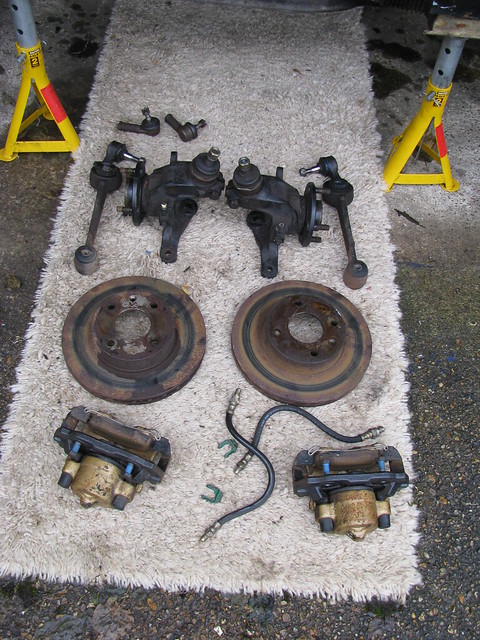
Hi Peter,
thanks again for your suggestions but I think I have confused matters by posting the wrong picture above. It should have been a picture of my rear brakes which is where I'm having the issues.
Here is the correct picture......
 Parts removed today Parts removed today by Sabrebuilder, on Flickr
Sorry for wasting your time. |
21st October 2019, 20:40
|
|
Senior Member
|
|
Join Date: Nov 2011
Location: Exeter
Posts: 187
|
|
No problem. Others on the forum may find the photos useful anyway.
Once the front brake overhaul is finished (too many interruptions lately!) I will be working on the rears, so in a couple of days I will check and photo my rear calipers. Peter.
|
25th October 2019, 14:15
|
|
Senior Member
|
|
Join Date: Nov 2011
Location: Exeter
Posts: 187
|
|
Attached photos show my near side rear caliper brake pipe connection. Hope they help.
I have never taken this joint apart on my car so I can’t comment on the type of sealing method. However I have a feeling that there shouldn’t be a washer present, especially if clamping against an uneven cast surface. Without the washer the hose union would normally seal at the bottom of the hole.
Check what the seal surface at the bottom of the hole looks like. From the hoses you have I would expect it to be a concave conical surface. However I have seen fittings where the bottom of the hole has a raised conical surface. That is normally designed to mate up with a double flared brake line, clamped in place with a pipe nut. Peter.
|
26th October 2019, 19:14
|
|
Senior Member
Enthusiast
|
|
Join Date: Mar 2005
Posts: 3,079
|
|
Thanks for the photo's.
I have bought some Borg and Beck traditional hoses. Here are some comparison photo's.
 Goodridge v. Borg and Beck hoses Goodridge v. Borg and Beck hoses by Sabrebuilder, on Flickr
 Goodridge v. Borg and Beck hoses Goodridge v. Borg and Beck hoses by Sabrebuilder, on Flickr
And they are clearly not designed to use copper washers.....
 Borg and Beck brake hose Borg and Beck brake hose by Sabrebuilder, on Flickr
When you tighten them up you can feel them deform and create a good seal. No leaks so far!
With hindsight I'm thinking that it was actually the copper washer that was preventing the original Goodridge hoses sealing properly.
On my front calipers I did not fit copper washers and no leaks.
Last edited by peterux; 26th October 2019 at 19:15..
Reason: reworded last sentence
|
1st November 2019, 19:18
|
|
Senior Member
Enthusiast
|
|
Join Date: Mar 2005
Posts: 3,079
|
|
Engine running....
Today was a momentous day in my somewhat protracted build.
Last week I spent a day troubleshooting a strange electrical fault. I thought there was a fault with my ignition switch but I eventually worked out that a light green wire for the heater was swapped with a normal green wire for the dashboard instruments. I have no idea how they got mixed up but easy to fix.
Yesterday, I fitted my new Bosch HP fuel pump so today I primed the pumps, and then re-installed and connected up the ignition coil packs.
That only left one thing to do and that was to turn the key and see if it would start.
It started first time but immediately died and then wouldn't start again. I quick check over and I found I had left the fuel pump fuse out after priming the pumps
After re-inserting the missing fuse I then restarted and it ran fine albeit a bit clattery while the oil filled the tappets, etc.
After a spot of lunch and a quick check over, I then ran the engine at 2000rpm for 20 minutes to 'set' the catalytic converter. (Recommended by the supplier)
Everything seemed fine with the electric fan cutting in and out at the set temperature. 
Here is the obligatory video ....
 BMW Engine running again BMW Engine running again by Sabrebuilder, on Flickr
I last ran the engine in the BMW donor car in October 2014 and can't believe it's taken 5 years to get to this stage! I installed the painted body tub this time last year on the 3rd November 2018.
I am very pleased that the engine is running smoothly with no rattles or noises.
Further checking showed the Tacho, Oil pressure, Coolant temperature, Fuel gauge and Clock all working fine. The car is still raised on jacks so I was able to test the clutch, prop, rear drive which all work fine but the Speedo has so far refused to budge? 
I also checked the engine with my fault code reader and there were no fault codes bar the EVAP purge valve which is not fitted.
Once I get the Speedo working I can think about refitting the wheels and driving out of the garage for the first time. 
Happy days.............
Peter
Last edited by peterux; 1st November 2019 at 19:21..
Reason: video added
|
1st November 2019, 19:45
|
|
Senior Member
|
|
Join Date: Jun 2015
Posts: 1,401
|
|
Happy days indeed Peter! Congrats.
|
2nd November 2019, 06:04
|
|
Member
|
|
Join Date: Jul 2014
Location: Ealing London
Posts: 54
|
|
Congratulations Peter for a job very well done. Looking forward to see the completed car which I am sure everyone would fall in love with.
|
2nd November 2019, 16:48
|
|
Senior Member
Enthusiast
|
|
Join Date: Mar 2005
Posts: 3,079
|
|
Speedo fixed
Amir and Jack - thanks for the feedback.
----------------------------------------------------
I have fixed my speedo today. After removing the dashboard (again!) and checking all the connections I moved on the looking at the sensor mounting.
It's almost impossible to reach from below the car and I needed to adjust the gap between the speedo sensor and gearbox lobes. I couldn't face the job of removing the whole gearbox tunnel so I cut a hole in the side which will be plated later. The manufacturing instructions say that the gap should be set at 1-2mm and I had set it up at 2mm when I installed the sensor. Reducing this to approx 1mm fixed the problem.
 Speed Sensor adjustment Speed Sensor adjustment by Sabrebuilder, on Flickr
With 4th Gear selected the speedo is registering just over 10 mph at idle. I seem to have clocked up 1.8 miles already during testing. Final calibration will be done once I have selected my tyre size which is still TBD.
 Speedo working Speedo working by Sabrebuilder, on Flickr
Happy days.........
Peter |
2nd November 2019, 17:08
|
|
Senior Member
|
|
Join Date: Jun 2015
Posts: 1,401
|
|
Congrats! I'm becoming expert at cutting great holes and re-plating them. Actually made another big hole today.
|
3rd November 2019, 10:28
|
 |
Senior Member
Enthusiast
|
|
Join Date: Sep 2004
Posts: 1,895
|
|
Awesome! But it's gving me that itchy finger feeling (again....)
Cheers, Robin
|
3rd November 2019, 11:18
|
|
Senior Member
|
|
Join Date: Jun 2015
Posts: 1,401
|
|
Quote:
Originally Posted by MartinClan

Awesome! But it's gving me that itchy finger feeling (again....)
Cheers, Robin
|
Sure does! |
10th November 2019, 17:11
|
|
Senior Member
Enthusiast
|
|
Join Date: Mar 2005
Posts: 3,079
|
|
Noisy Fuel Pump - fixed!
Thanks Jack and Robin.
-----------------------------------------------------------------------------
During my engine starting trials I noticed that my very expensive brand new Bosch '044' high performance fuel pump was very noisy. It sounded like it was straining to pump enough fuel through the system. Looking at the pump's spec I feared I had over spec'd the pump as it is rated at 285 litres/hour whereas the Ford lift pump is rated at only 120 litres/hour. Clearly a poor mismatch and a silly mistake.
Here is a picture of the Ford in-tank lift pump.
 BMW Fuel Pump trial BMW Fuel Pump trial by Sabrebuilder, on Flickr
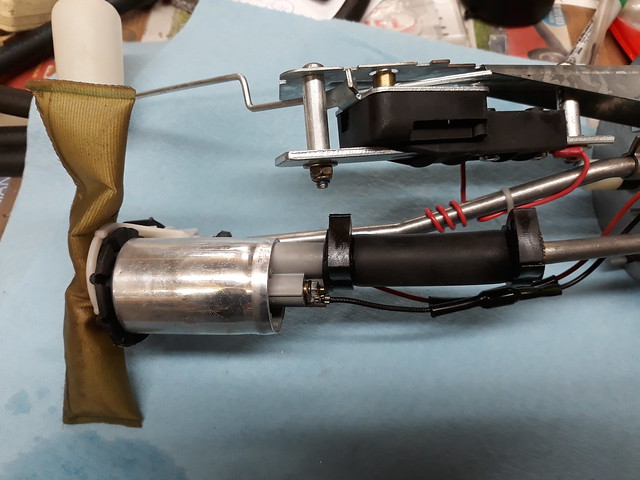
Now I remembered that Mike Garner who built a Marlin Cabrio a few years back had suffered with a noisy HP pump so I asked Mike to comment. As the Granada fuel tank has a built in sump Mike suggested ditching the external Bosch pump altogether and using a BMW HP pump in the tank.
I really liked the simplicity of this idea so bought a used BMW pump to see if it would fit in the Granada tank unit. (I had to buy another BMW pump as my original donor car's one was sold long ago)
 BMW Fuel Pump trial BMW Fuel Pump trial by Sabrebuilder, on Flickr
Comparing the two pumps It certainly looked feasible so it didn't take me long to remove both pumps. The BMW HP pump is about 4cm diameter and 12 cm long and a bit bigger than the Ford lift pump.
 BMW Fuel Pump trial BMW Fuel Pump trial by Sabrebuilder, on Flickr
The BMW pump neatly fits in the Ford pump support cradle but is just a few mm to long.
 BMW Fuel Pump trial BMW Fuel Pump trial by Sabrebuilder, on Flickr
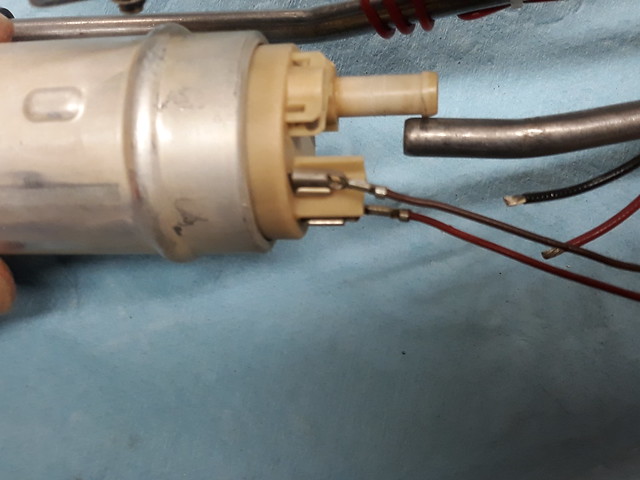
So I used my mini tube cutter to remove a short piece of the steel feed pipe. I used a new piece of suitable rubber hose as the old Ford hose had been softened and swelled by the fuel.
 BMW Fuel Pump trial BMW Fuel Pump trial by Sabrebuilder, on Flickr
Here's the BMW HP pump fitted and connected with a short piece of 'in-tank' compatible fuel hose.
 BMW fuel pump in Ford unit BMW fuel pump in Ford unit by Sabrebuilder, on Flickr
The result is everything seems to run fine. I've only run the engine for about 10 minutes but no issues.
I need to run a thicker cable from the fuel pump relay to the pump in the boot as the Sabre loom is only 1.0mm (BMW loom is spec'd at 2.5mm) and I’m going to remove the LP pre-filter as it is no longer required. I’ll also have to put an extra couple of p-clips on the hoses where I’ve bypassed the filter and the external HP pump.
Thanks again to Mike for such an elegant solution and probably more reliable as the pump exactly matches the BMW design and engine requirements.
I just wish I’d thought of it at the outset! 😊
It's been a 're-work' week rather than progress but I'm really happy with this solution.
...peter
P.S. anybody want to buy a very slightly used Bosch 044 HP pump?? 
|
15th November 2019, 18:19
|
|
Senior Member
Enthusiast
|
|
Join Date: Mar 2005
Posts: 3,079
|
|
Bling bling..........
After years of being stored outside, the Sabre's front quarter bumpers and light plinths had gone rusty so I have had them stripped and re-chromed.
 Bling Bling by Sabrebuilder, on Flickr
Needless to say but, I am delighted with the results. 
 Bling Bling by Sabrebuilder, on Flickr
Re-chromed by Vehicle and General Polishers and Platers Ltd, Arlesey, Bedfordshire.
 |
|
Currently Active Users Viewing This Thread: 2460 (0 members and 2460 guests)
|
|
|
 Posting Rules
|
You may not post new threads
You may not post replies
You may not post attachments
You may not edit your posts
HTML code is Off
|
|
|
All times are GMT +0. The time now is 13:40.
|


 Linear Mode

