|
|
| Sammio Builds and discussions Sammio bodied car builds and specials |

24th March 2012, 07:42
|
 |
Senior Member
|
|
Join Date: May 2009
Location: POOLE , DORSET
Posts: 2,200
|
|
sounds really cool....won't do any harm for us to infiltrate those circles !!
Do they have a body already ?
|
24th March 2012, 07:53
|
 |
Senior Member
|
|
Join Date: Jul 2011
Posts: 5,328
|
|
Yes, he has another body to build the race car with but you'll have to ask Phil for further details as I feel a little out of my depth answering questions about his next project. Seeing how industrious Phil is though I'm sure it won't be long before he needs another one.  |
25th March 2012, 07:35
|
|
Senior Member
|
|
Join Date: Mar 2012
Posts: 745
|
|
just to help you guys i am going to build a out&out racer.... got some bits running round in my head but as yet i have not got body ..but have a good engine and lot's of dreams looks like i be on my way to pool again... but got to get barry car done first just dreams at mo but they do come true as all sammio builds no.
|
25th March 2012, 07:53
|
 |
Senior Member
|
|
Join Date: Jan 2011
Location: Cullompton, Devon
Posts: 328
|
|
Phil, I know where your coming from, I've had similar thoughts for hillclimbs sprints and track days, but not many circuits down, I've got a rolling chassis and a head of ideas and the possability to get it street legal but I must finish Skippy (paint) and a few alterations next winter hense the slow application of paint thats it with the Sammio's loads of options, PAT
|
25th March 2012, 08:49
|
|
Senior Member
|
|
Join Date: Mar 2012
Posts: 745
|
|
it all take's time and money but u got to do it , life is to short .. think in of a space frame and move in engine back a bit have had a word with gary about a one peace body and poss /a roof but its a little way off yet.
|
25th March 2012, 09:31
|
|
Senior Member
|
|
Join Date: Jul 2011
Posts: 5,328
|
|
Oops, sorry Phil, I thought I saw a third body in you garage. I guess I need my eyesight testing!  |
25th March 2012, 10:53
|
|
Senior Member
|
|
Join Date: Mar 2012
Posts: 745
|
|
no prob its the bonnet at the back just have in a meg/ tidy up to day was out in car with barry yest/day around sandringham took so video try i put it on how u geting on
|
25th March 2012, 12:32
|
|
Senior Member
|
|
Join Date: Jul 2011
Posts: 5,328
|
|

Quote:
Originally Posted by phil9

no prob its the bonnet at the back just have in a meg/ tidy up to day was out in car with barry yest/day around sandringham took so video try i put it on how u geting on
|
Wow, jealous as... Hope the video uploads ok.
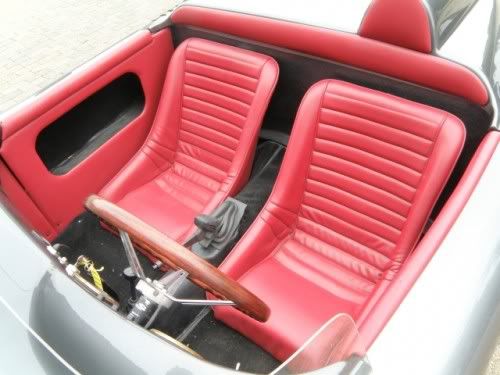
Been working myself so no more progress since the setback on the seat front.  I'm currently awaiting info on exact dimensions for some Cobra style seats and/or shells that're on ebay at the moment, and I can't finish the dropped floors until I know how high my replacement seats are going to be.
http://www.ebay.co.uk/itm/3208728534...84.m1423.l2649
http://www.ebay.co.uk/itm/1306216372...84.m1423.l2649
I'm leaning towards buying the shells (if they'll fit) and having them trimmed locally. As luck would have it I put an old push-bike out the front of my house last week with a note saying 'Free, please take me away' and the chap who politely knocked and asked if he could take it is a classic car trimmer from Fincham. Can't find his business card at the moment but I did find him on 'Yell'
http://www.yell.com/s/car+and+vehicl...s-fincham.html
I'll be taking this picture with me when I visit and asking if he can do something similar in dark red leather, maybe with a row of eyelets down the middle -
Anyway, enjoy the sunshine today Phil and feel free to drop in for a cuppa and a chat any time, especially if you're in your Spyder. I'm off until Thursday now so will be putting some hours in on my project with any luck. 

|
25th March 2012, 15:12
|
 |
Senior Member
|
|
Join Date: Jan 2012
Location: Poole, Dorset
Posts: 615
|
|
Quote:
Originally Posted by Mister Towed
|
I LOVE this interior Mr T. |
25th March 2012, 17:47
|
|
Senior Member
|
|
Join Date: Jul 2011
Posts: 5,328
|
|
Yep, me too. It's a Porsche 718 RSK Spyder - the car that inspired me to want to build a kit car when I saw a GP Spyder over thirty years ago. I'm hoping to achieve the same luxury race car look on mine.
Oh, and it says a lot for Gary's design that the Sammio Spyder is the first kit car I've seen in more than thirty years that could seduce me away from my beloved 718.
|
25th March 2012, 18:05
|
|
Senior Member
|
|
Join Date: Jul 2011
Posts: 5,328
|
|
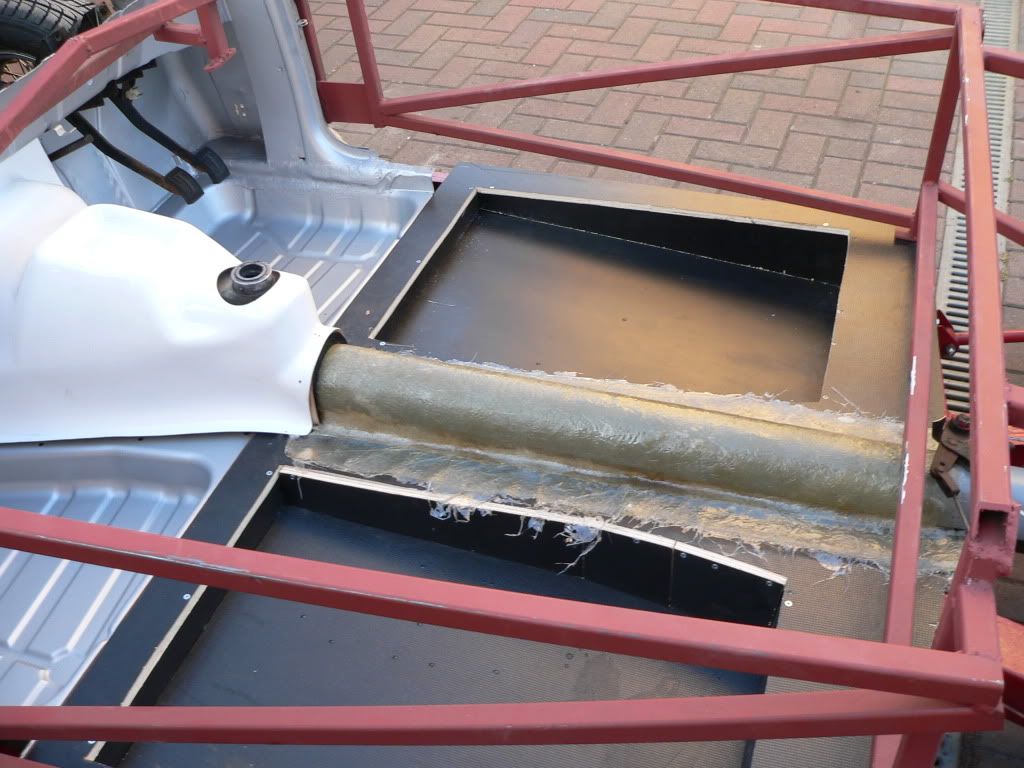
Just a couple of hours working on my low-profile centre tunnel today due to being tired and grumpy after getting by on just four hours sleep a night for the last few days. 
Started with a bit of old plastic gutter, some ply and glass fibre materials.
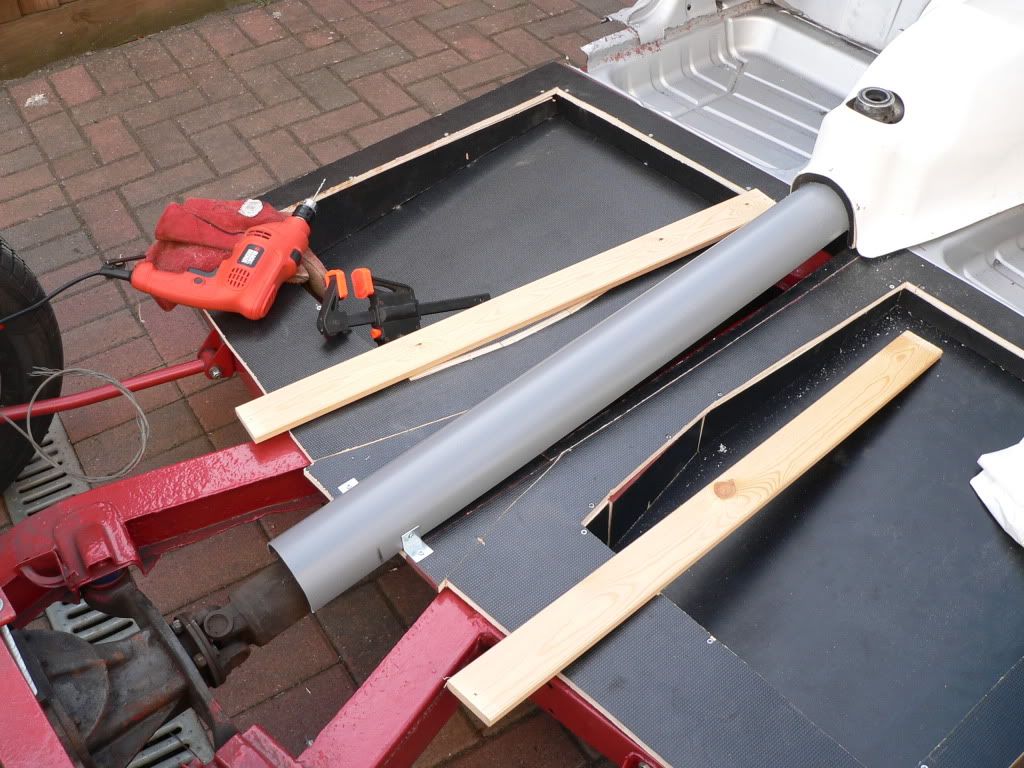
Then fixed the gutter in place with a couple of well placed screws and some left over kitchen brackets before screwing some timber rails to the floor to contain the edges.
Then plopped the glass matting and resin mix over the top.
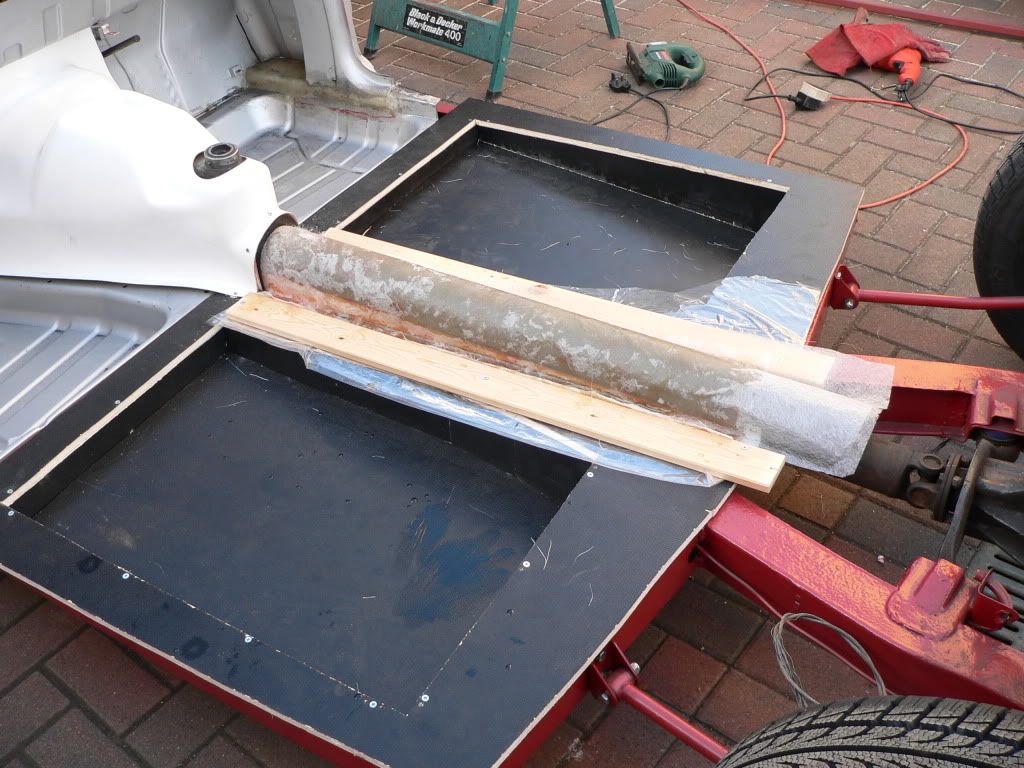
Hopefully I'll have a nice strong prop tunnel in the morning... |
25th March 2012, 19:17
|
|
Senior Member
|
|
Join Date: Jan 2012
Location: Poole, Dorset
Posts: 615
|
|
Very nice Mr T. Coming along well.
Will the handbrake cable run inside or are you putting that on the drivers side and running along the side?
|
25th March 2012, 19:38
|
|
Senior Member
|
|
Join Date: Jul 2011
Posts: 5,328
|
|
It's going to run inside a polished copper tube inside the cockpit alongside the tunnel. That's the plan, anyway.
|
26th March 2012, 18:48
|
|
Senior Member
|
|
Join Date: Jul 2011
Posts: 5,328
|
|
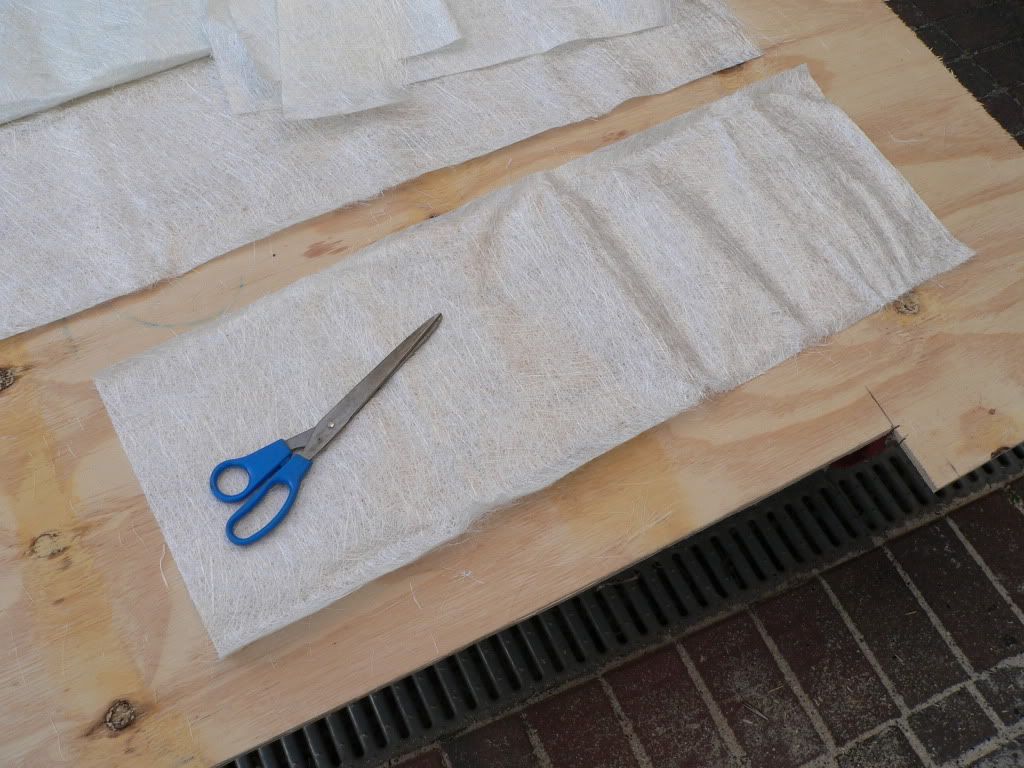
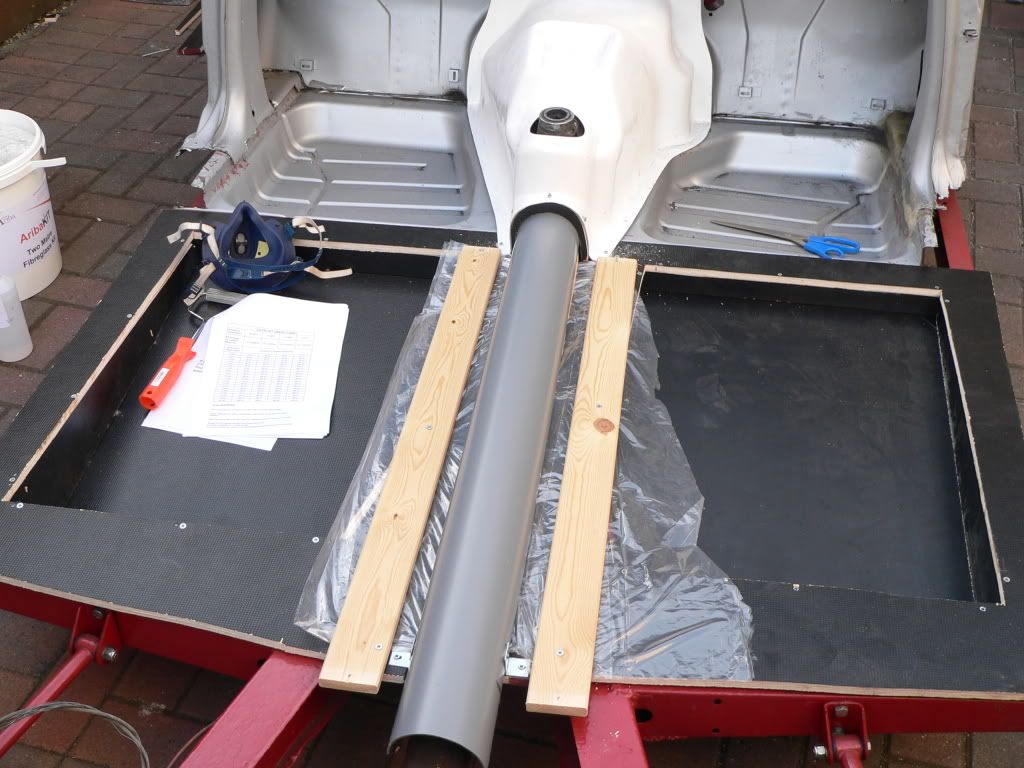
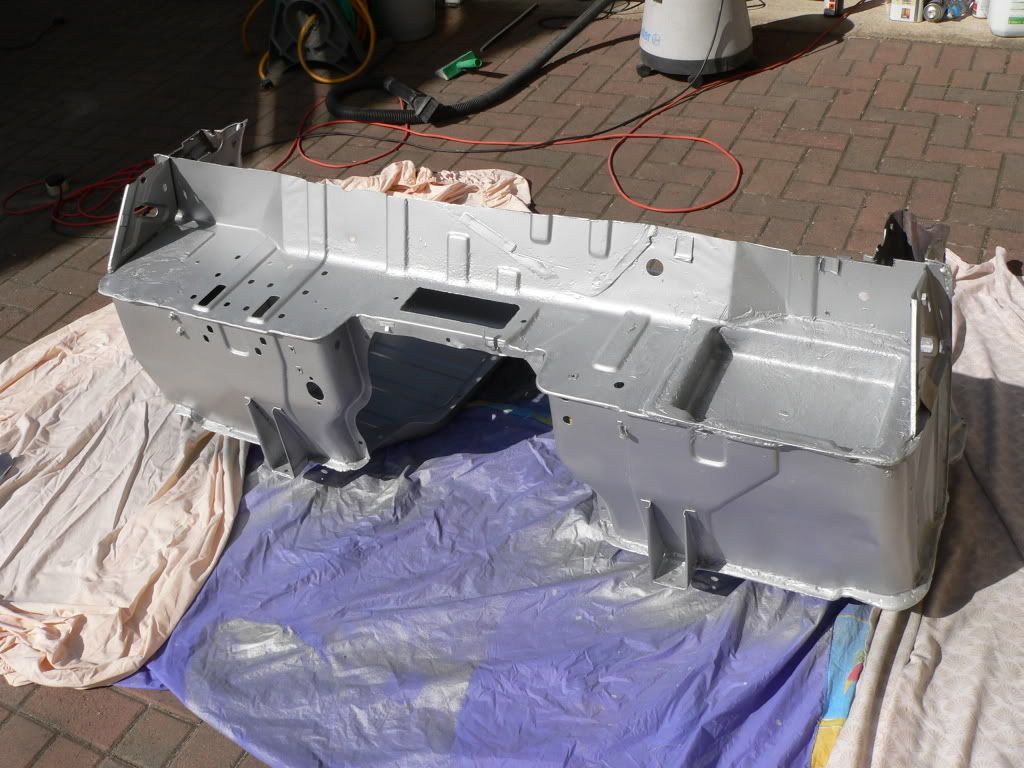
Success! I now have a nice, home made fibreglass centre tunnel. It needs another coat of resin as I tried adding the 'tissue paper' (?) that came with the kit after coating the glass matting with resin this time and it didn't all stick down.
Although I'm happy with the bits of fibreglassing I've done so far I am rather pi$$ing in the wind as far as how you're supposed to do it due to the main focus of the instructions that came with the kit being geared towards ensuring you don't poison yourself whilst using the rather toxic materials.
If anyone out there has any hints and tips they could pass on regarding the best way to lay up fibreglass I for one would be an avid reader. 
I've also cut in the lowered battery tray, plastered filler into the remaining holes in the bulkhead and given some of the chassis another coat of red Hammerite today. It all looks a bit of a mess at the moment and has been completely disassembled so I can work on the individual bits. Will be doing some sanding and painting tomorrow so there should be something worth photographing by the evening.
One slight fly in the ointment that's reared its head is that the bonding paste I bought from Glasplies doesn't seem to be what I actually ordered. I went for white special -
http://www.glasplies.co.uk/2-5-Kg-Bo...white2.5kg.htm
but what I got is blue and doesn't set even after a week. I'll be giving glassplies a ring in the morning... 
|
26th March 2012, 20:04
|
|
Senior Member
|
|
Join Date: Mar 2012
Posts: 745
|
|
u can all way pop round to mine and take detalls of what i used i am here all week
|
26th March 2012, 20:06
|
|
Senior Member
|
|
Join Date: Jul 2011
Posts: 5,328
|
|
Thanks Phil, will drop in for a chat.
|
27th March 2012, 18:42
|
|
Senior Member
|
|
Join Date: Jul 2011
Posts: 5,328
|
|
Lowered battery tray now blended in and sprayed. Also sanded down and painted my fibreglass repair in the driver's footwell -
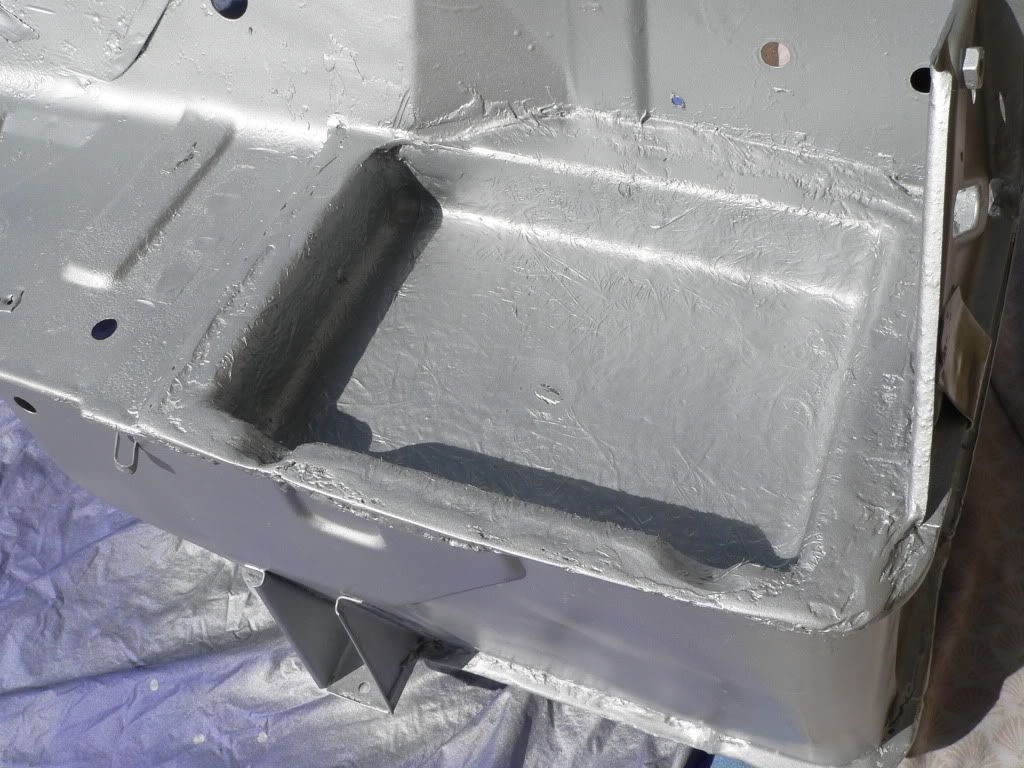

Having a rethink on the seats at the moment, I can't seem to find any that I like that will fit and not cost a fortune. I can find reasonably priced ones that I don't like. I can find ones I like that won't fit. I can find ones that I like and will fit but cost seven hundred quid a pair so it's looking likely that I'll be making my own seats... |
27th March 2012, 19:16
|
|
Senior Member
|
|
Join Date: May 2009
Location: POOLE , DORSET
Posts: 2,200
|
|
I can take some pics tomorrow of some fibreglass shells we can offer ....might be a bit of you , might not...we used them in the 550's and I still have the mould.
|
27th March 2012, 19:26
|
|
Senior Member
|
|
Join Date: Jul 2011
Posts: 5,328
|
|
I might just be interested at the right price Gary. What are the dimensions and are they a similar shape to these RSK ones? Also I'd be looking for them to be ready a bit quicker than the tonneau... 
Oops, just noticed your pm Gary. Looking forward to getting my tonneau at last.
Last edited by Mister Towed; 27th March 2012 at 19:48..
|
28th March 2012, 19:27
|
|
Senior Member
|
|
Join Date: Jul 2011
Posts: 5,328
|
|
Hooray! Found some suitable seats, well, shells anyway:
http://www.ebay.co.uk/itm/1306216372...84.m1423.l2649
Message with the dimensions came back today saying that they're 18" high, 30" deep and 16" wide at the front of the seat opening out to 17" at the back. That means that they'll fit the Spyder cockpit without needing to lower the floors if you bolt them straight down. I'm going to use runners so I'll modify my dropped pans to suit.
Spent today tackling some of the boring little details that soak up the time but need doing anyway, like fitting the new handbrake cable and rear brake hoses. This took so long I didn't get the chance to drop in and see how Phil9 is getting on with his second Spyder build. I will find the time to do that next week though, assuming you can still buy petrol then...
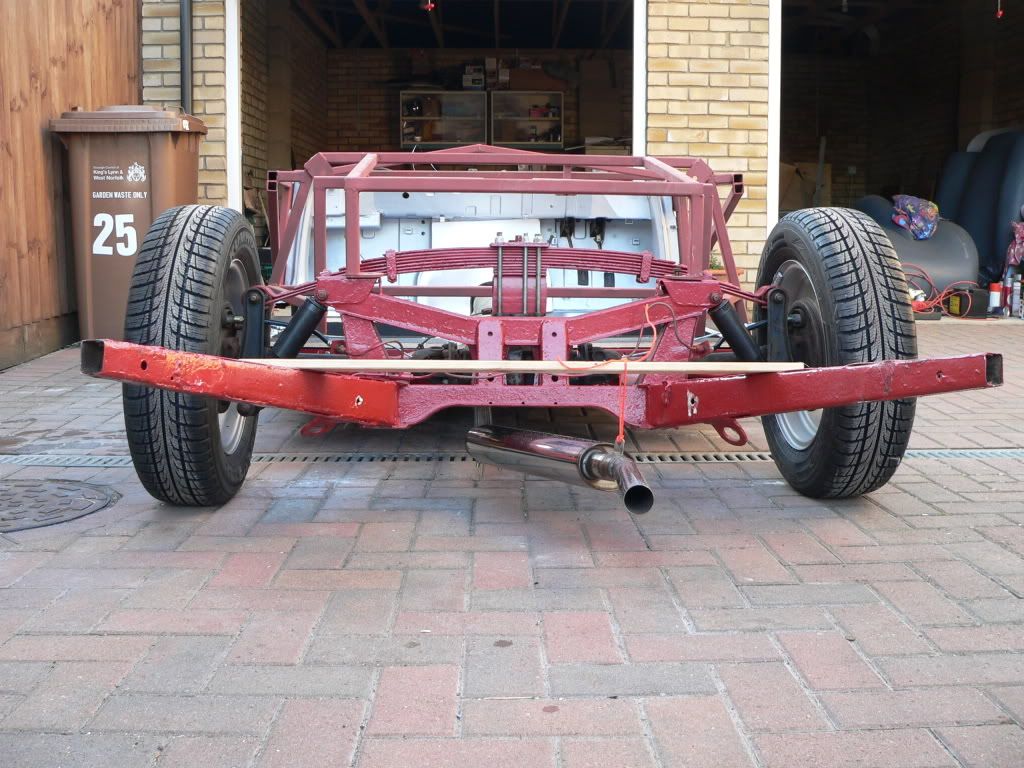
Other jobs I got done today were spraying the underside of the floorpans with underseal and having a play with the exhaust, cutting out the kink and shortening it. I had hoped to rotate the back box through 90 degrees leaving the tail pipe coming out of the centre of the body at the back where most people have their number plate. It quickly transpired that the chassis is in the way so It's going to be a bit more conventional after all, sticking out under the rear just off centre. I might be able to raise it slightly so it's cut into the rear 'valance' slightly which would be nice.
On a more positive note I'm very pleased with my centre tunnel which has now had a second layer of glass matting added to give it more strength. While laying up the fibreglass yesterday evening a medium sized black beetle landed smack in the middle of the bit I was working on and sank slowly into the resin. There wasn't anything I could do to save it and I guess it'll surface on a beach somewhere in about 70 million years time in an amber bead stylee.
Back to work tomorrow so no more progress for a day or two I'm afraid. It's all coming together though, slowly but surely. 
|
|
Currently Active Users Viewing This Thread: 1 (0 members and 1 guests)
|
|
|
 Posting Rules
|
You may not post new threads
You may not post replies
You may not post attachments
You may not edit your posts
HTML code is Off
|
|
|
All times are GMT +0. The time now is 20:34.
|


 Linear Mode

