Are you madabout kit cars      
 "We've Got Kit Cars Covered" Information about Madabout-Kitcars.com Contact Madabout-Kitcars.com         Home of UK kit cars - madabout-kitcars.com Various kit car write ups All the latest kit car news Kit car related and general discussion

Search
Manufacturers
Kit Cars
Kit Car Data sheets
Picture Gallery
SVA Knowledgebase
Clubs & Communities
Build cost estimator
Kit cars for sale
Knowledge Base 
KitcarUSA.com
Classic-Kitcars.com
 

Go Back   Madabout Kitcars Forum > Mad Build Area > Sammio Builds and discussions

Sammio Builds and discussions Sammio bodied car builds and specials

Reply
 
Thread Tools Display Modes
  #141  
Old 12th November 2012, 19:27
oxford1360 oxford1360 is offline
Senior Member
 
Join Date: Mar 2012
Posts: 1,152
oxford1360 is on a distinguished road
Default

Yup, kids and a new puppy. The children are quite useful helpers but they are 13 and 15 rather than "little". My daughter helped me to lift a short engine into the boot and was very proud. The workshop is in the woods, but I usually get one day a week when they are at school and occasionally pop down there when they are at cadets or doing sport or whatever it is they do. The dog on the other hand has slowed things of late. I convince my wife that it is important for them to see that I have a passion.........yeah, yeah.
Reply With Quote
  #142  
Old 12th November 2012, 19:31
Mister Towed's Avatar
Mister Towed Mister Towed is offline
Senior Member
 
Join Date: Jul 2011
Posts: 5,328
Mister Towed is on a distinguished road
Default

I have an eleven year old son and a very demanding wife myself. I had hoped No.1 son would be able to help me with the build but he's still a bit young. Wife's been very tolerant these last eighteen months, but she really wants me to finish it now.

Current plan is to buy a shabby classic (mini, moggie or herald) in a couple of years, restore it with his help as a way of passing on some of the engineering skills and present it to him as his first car on his seventeenth birthday. My thinking is that if he's worked hard to rebuild the thing he won't drive it like he stole it. Should be a lot cheaper on the insurance and look pretty cool too. Just don't tell his mum...
Reply With Quote
  #143  
Old 12th November 2012, 19:39
seanick's Avatar
seanick seanick is offline
Senior Member
 
Join Date: Nov 2011
Location: Emsworth
Posts: 810
seanick is on a distinguished road
Default

Mine are 3 and 5, so they are in bed by 7.30.
I guess we all have
Very lovely and understanding wives/partners, and we are very very lucky!
Reply With Quote
  #144  
Old 12th November 2012, 19:43
Mister Towed's Avatar
Mister Towed Mister Towed is offline
Senior Member
 
Join Date: Jul 2011
Posts: 5,328
Mister Towed is on a distinguished road
Default

Quote:
Originally Posted by seanick View Post
Mine are 3 and 5, so they are in bed by 7.30.
I guess we all have
Very lovely and understanding wives/partners, and we are very very lucky!
WHY YES, MY WIFE IS JUST PERFECT AND NEVER LOOKS OVER MY SHOULDER WHEN I'M TYPING...
Reply With Quote
  #145  
Old 12th November 2012, 19:59
seanick's Avatar
seanick seanick is offline
Senior Member
 
Join Date: Nov 2011
Location: Emsworth
Posts: 810
seanick is on a distinguished road
Default

Well I dont know where you found a font that big!
Reply With Quote
  #146  
Old 13th November 2012, 19:21
Paul L's Avatar
Paul L Paul L is offline
Senior Member
 
Join Date: Feb 2012
Location: Wembley, London
Posts: 5,056
Paul L is on a distinguished road
Default

Family Time:
Cheers SeaNick, Oxford1360 & Mr T.
Clearly trying to build a car & maintain a family life is a juggling act that a few of us are attempting.
So I'm prepared to take longer to finish the build rather than spend too much time away from my family.

My daughters are 12 & 10 and have helped with frame painting, cleaning parts for Ebay & other odd jobs.
It is nice they show an interest & that they will be able to say they helped when the car is finally finished.

I've also thought about doing a project with them as a first car, but would definitely want a garage for that!
Either way, I'd like them to have a basic understanding of how a car works, be able to change a wheel, etc.

Lowered Floor Pans - More Thoughts...
I think I'm beginning to have nightmares about getting these floors to fit in the right place.

The back of my seats already have a fixed reclined angle built into them when the seat base is horizontal.
But the seat base will sit in the reclined angle built into the lowered floor pans, effectively tipped backwards.
So now, when the back of the seat hits the rear of the cockpit, the front of the seat will be further forward.

See this rough (and I mean very rough) sketch...


Clearly there is a limit to how far forward the "drop" in the floor can go before it hits the frame work.
Also, as the floor edges need to be trimmed to fit around the frame, I can't really start adjusting in situ.

So I need to get my tape measure out again and really get my head around the space I have to play with.

Until then, take care, Paul.

Last edited by Paul L; 10th September 2019 at 10:36..
Reply With Quote
  #147  
Old 13th November 2012, 19:37
Mister Towed's Avatar
Mister Towed Mister Towed is offline
Senior Member
 
Join Date: Jul 2011
Posts: 5,328
Mister Towed is on a distinguished road
Default

You're absolutely right about the seat having to move forward when you fit sloping lowered floors. It's not a problem though, if you look at mine the front edges are near enough in line with the back edges of the front floorpans -


I find that to be a very comfortable driving position and keeps my swede out of the slipstream. As an alternative, if you lower the floors at the front as well, then the seats will be more upright so you would be able to fit them a bit further back. The only downside there is that it would make it much harder to fit runners. No problem if you're happy with a fixed seating position, not so good if you want someone much shorter to drive it.
Reply With Quote
  #148  
Old 13th November 2012, 20:59
Paul L's Avatar
Paul L Paul L is offline
Senior Member
 
Join Date: Feb 2012
Location: Wembley, London
Posts: 5,056
Paul L is on a distinguished road
Default

Another first class reply Mr T.

I'll take a print of your photo with me when I am trying to figure this out.

As I'd like to keep working runners if I could.

Cheers, Paul.
Reply With Quote
  #149  
Old 18th November 2012, 18:10
Paul L's Avatar
Paul L Paul L is offline
Senior Member
 
Join Date: Feb 2012
Location: Wembley, London
Posts: 5,056
Paul L is on a distinguished road
Default

Another Cordite Is Born ...

Only got a few hours in today, just as the sun was setting so I finished in the dark.

Lowered Floor Pan - Passenger Side:
I figured it was better to start with the passenger side and see what I was up against.
But before I tried to fit the lowered floor pan I simply lay a section on plywood on the frame.
This came me a better idea of how high the seat would be with a flat floor.


Obviously I could make the floor flush with the frame, but it would need to go lower still.
As there was quite a bit of seat sticking over the top of the body work.


So I pressed ahead with cutting out a few sections to get around the frame.
However, it was proving difficult to get the rear and outside edges to slot into place.


So I started to cut a series of "steps" out of the sides to give me the "wiggle" room I needed.
I took the time consuming approach of taking little bits off at a time & seeing what fouled next.
In the end this involved quite a lot of cutting with my jigsaw.


But thankfully it finally went in...


This position has the start of the lowered floor section butting up to the front frame.
So this is a far forward as the floor will go and the seat looks like this in place...


The top of the seat is definitely in a better position height wise...


But the outside top corner is fouling the edge of the body work a little.
Also it seems the seat runners can't work as there is no room for the handle to move.
Not such a problem on the passenger side, but may be an issue on the drivers side.

I'll have another look at what is going on in daylight before tackling the other side.
As I think I could have trimmed more off the rear of the floor before fitting it.
Which in turn would have made it easier to slot into place.

Until next time, take care, Paul.
Reply With Quote
  #150  
Old 18th November 2012, 18:27
davecymru's Avatar
davecymru davecymru is offline
Senior Member
 
Join Date: May 2011
Location: Somerset
Posts: 1,671
davecymru is on a distinguished road
Default

Good positioning height wise! Although you now know why i squared off the corners of my cockpit!
Reply With Quote
  #151  
Old 22nd November 2012, 20:23
Paul L's Avatar
Paul L Paul L is offline
Senior Member
 
Join Date: Feb 2012
Location: Wembley, London
Posts: 5,056
Paul L is on a distinguished road
Default

Lowered Floor Pans - More Thoughts & Photos...
Finally got a chance to take a few more photos of the passenger floor in place.
Although you'll have to excuse the photos as taking them at night is hardly ideal.

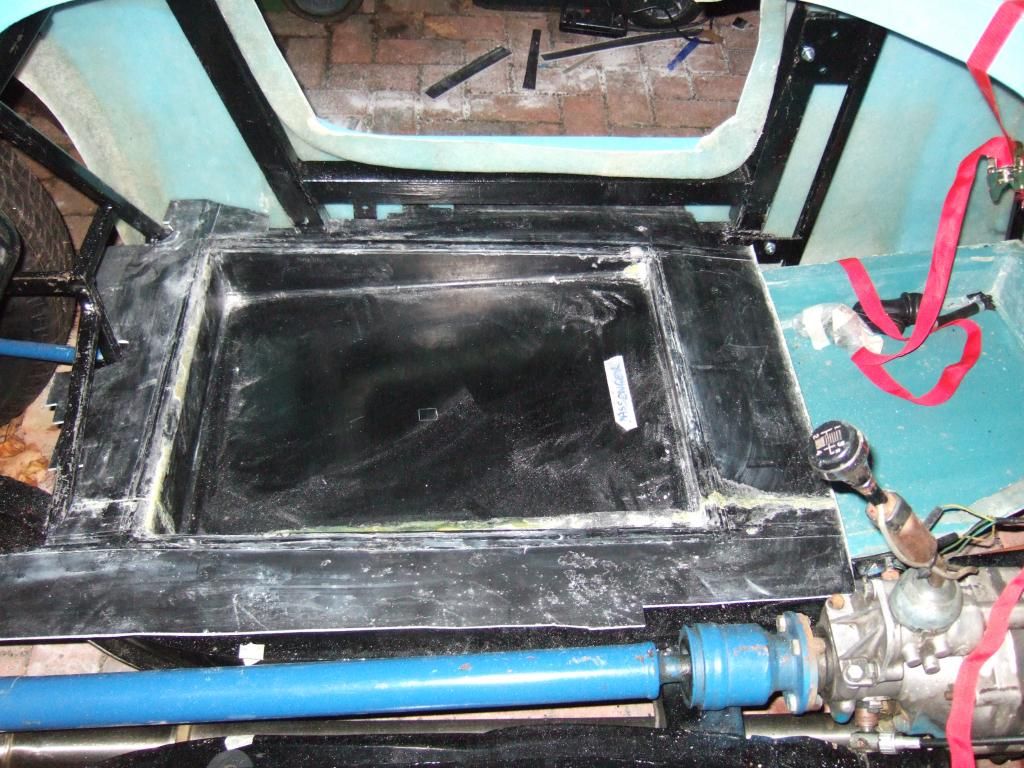
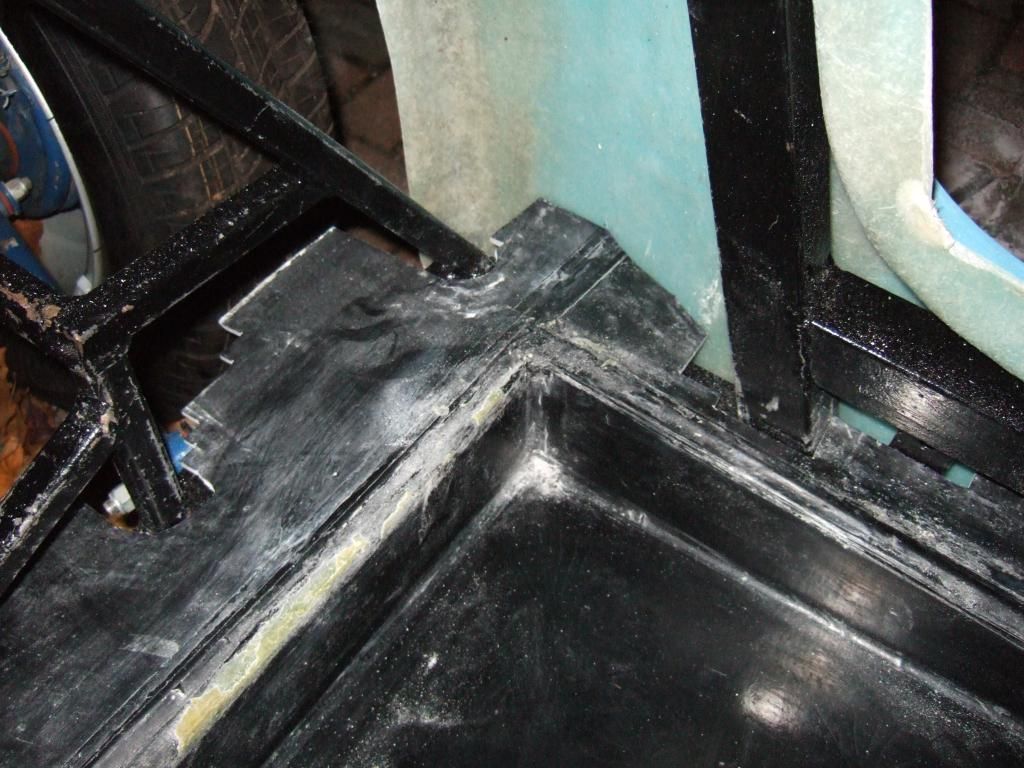
The space available inside the frame work means there is a limit to where the lowered section will fit.
I have started with the front edge of the lowered section at the front edge of the frame work.


So clearly the floor can not go much further forward than this, but it could be moved backwards.
However, unless I get different seats, moving the floor backwards wouldn't help me much.
I'd also want to leave enough space for access to the radius arm mounting bracket.


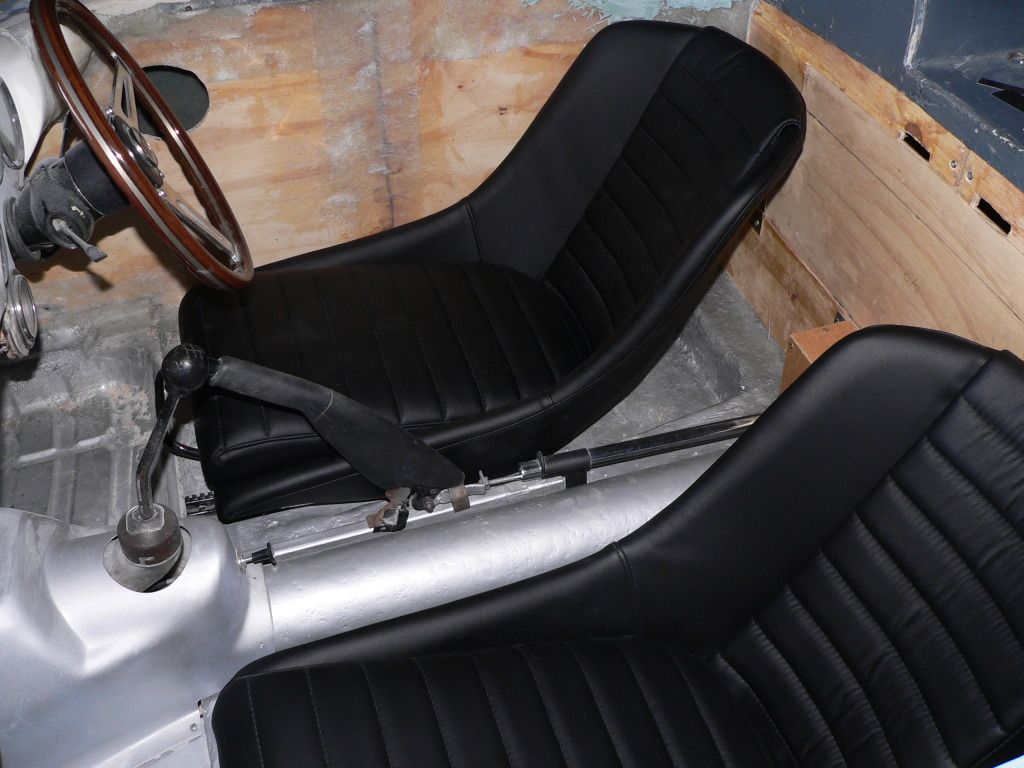
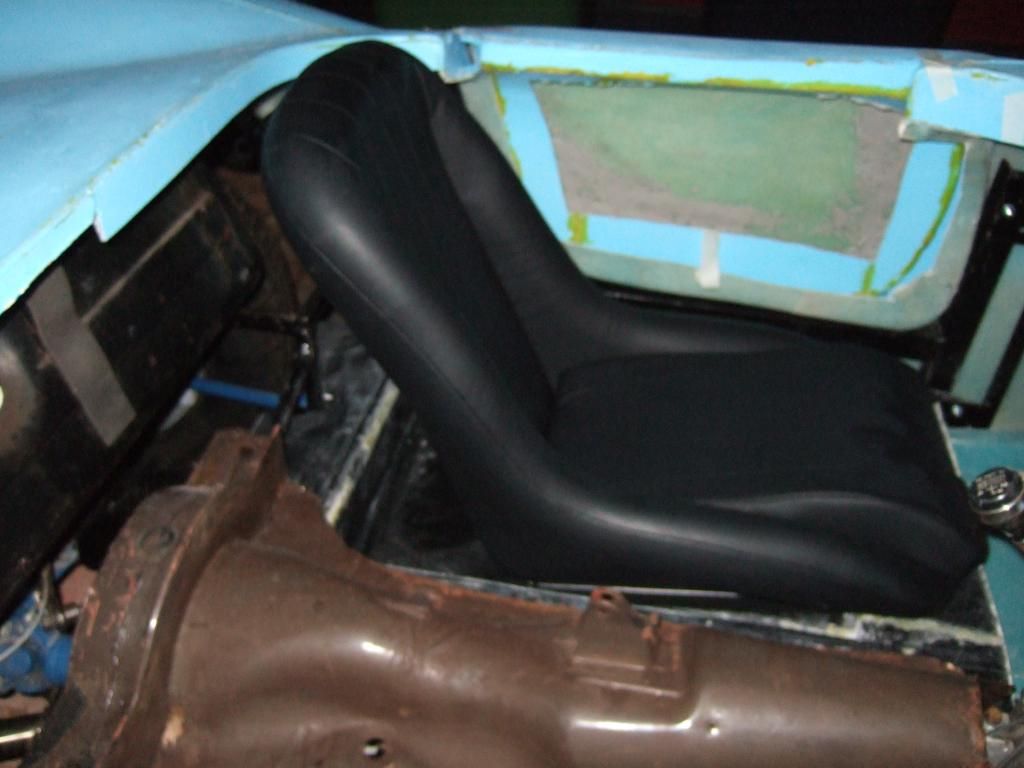
Based on my initial seat fitting test, I'd say the lowered section could do with moving inwards a bit.
As this would allow the top, outside edge of the seat to clear the cockpit bodywork.
Towards the front of the floor, there looks like there is room to move inwards.


But at the rear of the floor, the curve of the frame will stop the floor moving any further inwards.


The other thing that occurs to me is that if the seat rails will not work, I'll have to remove them.
As I will not be able to bolt them in place if I can't get the seats out of the way of the mounting points.
This will actually lower the seat by the height of the rails, as it would be bolted directly to the floor.
This in turn would mean the seat would probably clear the bodywork even if it stayed where it was.

So I should be able to get both the passenger side floor & seat fitted in a way that works well.
But before I confirm that, I need to test fit my seat belts to ensure they work around the seat position.

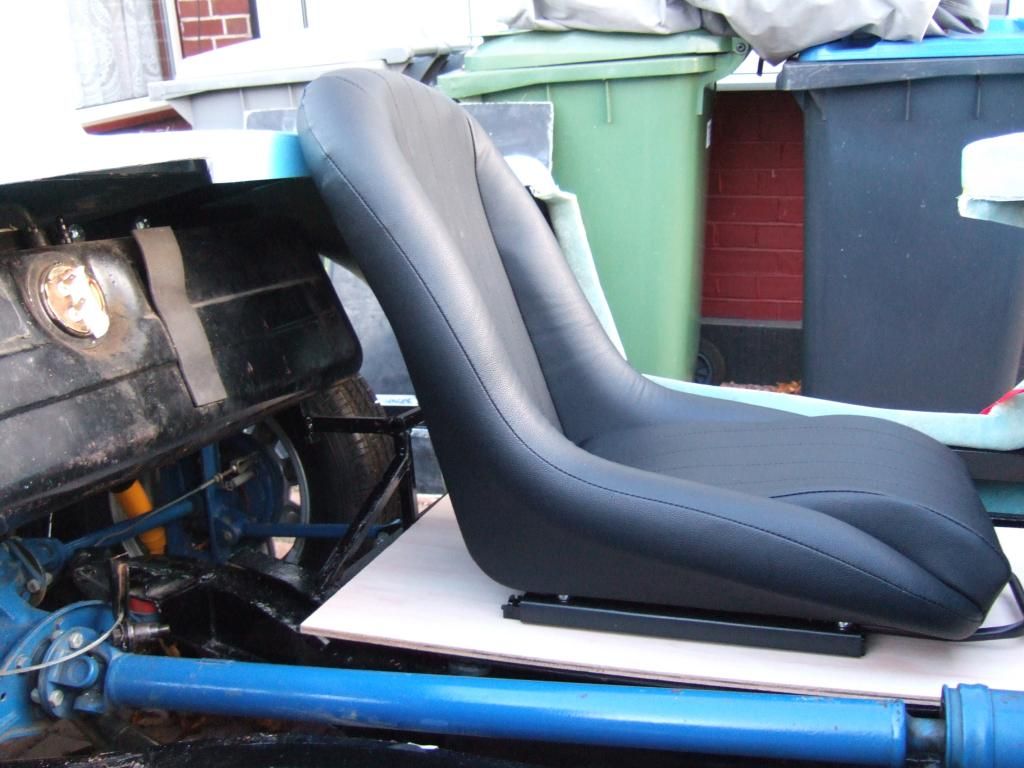
My main concern is the floor for the driver's side, as I would like the seat to remain adjustable.
I think it is the small vertical "lip" where the floor starts to lower that is causing the problem.
My initial thoughts are to remove this lip & extend the slope to meet the horizontal floor level.
This should provide a straight run for the seat adjustment handle and the runners themselves to work.

I just need to check how much extra space extending the slope in this way would take up.
As the start of this extended slope would be the first part of the floor to hit the front frame rail.
So the rear of the existing slope would effectively be pushed back towards the rear cockpit.

See another of my "not so technical" drawings...


So clearly a bit of thinking still required, as I do want to get the driver's side right.

Welding Lessons:
Met my mate for a beer last night and had a brief chat about when he would be free to teach me to weld.
He has some time off work over Christmas / New Years, so it looks like we will try to get together then.

In the mean time I will need to order some of the same box section tubing used in the Cordite frame.
Some of this will be incorporated into the existing frame and some will be to practise my welding on.
My mate will order all the parts he needs to bring his welding gar back to working order & I'll refund him.
He also has small sections of "left over" metal which might be handy for the odd bracket, or bracing.

I'm really looking forward to this, as I think it will remove some of my fears about work I know needs doing.
It will also mark the step up from assembling my kit, to building my car, something Mr T has mentioned.
Whilst I never intended to touch my chassis, I am kind of jealous of those builders who have restored theirs.

Shopping Update:
I decided to replace the rubber seals from my donor I had for my headlight shells as they had seen better days.
Given the time I spend restoring all the damage done by water getting past them in the past, it made sense.
Got a new pair from Ebay with outstanding service, ordered them one afternoon & they arrived the next day.


http://www.ebay.co.uk/itm/2710192954...84.m1497.l2649

Until next time, take care, Paul.

Replies:
DaveCymru - Cheers, I'll re-read your build thread to see how you squared the corners.
It's funny how certain things make more sense when you reach the same part of your own build.


Last edited by Paul L; 10th September 2019 at 10:40..
Reply With Quote
  #152  
Old 25th November 2012, 18:07
Paul L's Avatar
Paul L Paul L is offline
Senior Member
 
Join Date: Feb 2012
Location: Wembley, London
Posts: 5,056
Paul L is on a distinguished road
Default

Some of the last two weekends has been taking up with shopping not involving car parts as...

Christmas is coming...
We traditionally host the family Christmas day meal at our house & this will be for at least 10 this year.
Obviously there is quite a bit of preparation involved with this and the dining room has to look the part.
So my recent bad habit of leaving car parts, tools, etc. in there will have to stop for the festive period.


But before I could clear the dining room, I had to tackle the summer house which was even worse...


There was also car stuff in the utility room (see story before).

So a few hours of tidying up left the dining & utility rooms clear & the summer house looking like this...


Engine Re-Start:
I was hoping to re-connect a few parts so I could attempt to re-start the engine today.
However I lost some time to the tidy up & then I had to log in remotely & do some work!
Unfortunately, the run up to Christmas is my busiest time in the office too.

Thankfully I was able to "tidy up" my twin silencers by temporarily pushing them back into place.
Which was one of the jobs I needed to do before the engine re-start anyway.
( Working out how to mount these permanently is on my beard scratching list. )

I must say the length of pipe sticking out at the back is growing on me.
So I might just stick to KISS principles and not shorten the exhaust at all.


Domestic Appliances Threaten Build...
As if I didn't have enough problems with the weather, our white goods are out to get me too!

Last weekend it was the washing machine which wasn't draining after a wash cycle.
After bailing out the water in the drum, I found the filter was seriously blocked.
It needed to be unclogged in two places, but the final bit sent water flooding everywhere.

Unfortunately, all my exterior plywood was temporarily stacked in the utility room.
So in the best heroic builder tradition I put myself between the water and the wood.
By the time my wife arrived with some more newspaper & towels my clothes were soaked...
...but the wood was dry.

Then today, just after I'd moved all the plywood down to the summer house, the drier went.
Another blockage leading to more water everywhere and this time some skin off my finger too.
Still there are some brownie points in the bag for keep the washing machine & drier in use.

Until next time, take care, Paul.

Last edited by Paul L; 10th September 2019 at 10:42..
Reply With Quote
  #153  
Old 26th November 2012, 07:53
Mister Towed's Avatar
Mister Towed Mister Towed is offline
Senior Member
 
Join Date: Jul 2011
Posts: 5,328
Mister Towed is on a distinguished road
Default

Work and domestic commitments are all part of the trials and tribulations of Sammio ownership, welcome to the club.

As for the exhaust mounting issue, I welded a length of 1" box section between the boot outriggers and bolted a short rubber strap hanger to it. I don't appear to have taken any photos of the finished version, but here's the early mock up using an old expanding curtain rail rod I had laying around in the garage -


Oh, and it didn't affect the rebody registration process as the reg's allow for brackets etc to be added (and the nice chap at Peterborough didn't actually look under the back end).

Good luck getting your pipes where you want them
Reply With Quote
  #154  
Old 26th November 2012, 07:56
AndyP57's Avatar
AndyP57 AndyP57 is offline
Senior Member
 
Join Date: Dec 2011
Posts: 656
AndyP57 is on a distinguished road
Default

Trouble with the Cordite is that the Spitfire doesn't have rear outriggers so there's nothing to hang the bar on (I've done similar to my Spyder). I'm fairly close to this problem myself so when I figure a solution I'll be sure to post photos.
Reply With Quote
  #155  
Old 26th November 2012, 18:40
Paul L's Avatar
Paul L Paul L is offline
Senior Member
 
Join Date: Feb 2012
Location: Wembley, London
Posts: 5,056
Paul L is on a distinguished road
Default

Mister Towed & Andy - Thanks for the replies.

As Andy said there is currently thin air where the Heralds have outriggers.

This is the best photo I have to hand...


You can just see the string holding the exhaust pipes in place (temporarily ).

I've pushed the silencers over those pipes and the mounting brackets are just inside the rear of the body shell.
( There were originally bolted into the Spitfire's boot floor. )

So I'd be interested to see how you have over come this Andy.

Cheers, Paul.

Last edited by Paul L; 10th September 2019 at 10:43..
Reply With Quote
  #156  
Old 27th November 2012, 08:52
Mister Towed's Avatar
Mister Towed Mister Towed is offline
Senior Member
 
Join Date: Jul 2011
Posts: 5,328
Mister Towed is on a distinguished road
Default

Do the Herald boot outriggers fit the Spitfire chassis?

The back end looks pretty much the same to me apart from the outriggers - a bit like the difference between a tailed cat and a Manx.

They're under £25 each from Canley Classics -

http://www.canleyclassics.com/?xhtml...sl=diagram.xsl

£50 for an exhaust hanger is a bit steep though, so I'd be inclined to weld some lengths of 1" box section steel in their place with a cross bar to hang the exhaust from. You might even get away with a single length of box section welded on pointing straight backwards above the exhaust.

Good luck finding a solution.
Reply With Quote
  #157  
Old 27th November 2012, 08:59
Mister Towed's Avatar
Mister Towed Mister Towed is offline
Senior Member
 
Join Date: Jul 2011
Posts: 5,328
Mister Towed is on a distinguished road
Default

Just noticed this diagram of the Spitfire 1500 chassis on one of Paul L's posts. Hope it copies across...


Are they stubby boot outriggers on the back? I don't seem to be able to find them on Canley's web site though.
Reply With Quote
  #158  
Old 27th November 2012, 12:42
MoriniMan's Avatar
MoriniMan MoriniMan is offline
Senior Member
 
Join Date: Jun 2012
Location: Luton
Posts: 133
MoriniMan is on a distinguished road
Default

Quote:
Originally Posted by Mister Towed View Post
Are they stubby boot outriggers on the back? I don't seem to be able to find them on Canley's web site though.
Only fitted for later North American cars I think.
Reply With Quote
  #159  
Old 27th November 2012, 18:10
Paul L's Avatar
Paul L Paul L is offline
Senior Member
 
Join Date: Feb 2012
Location: Wembley, London
Posts: 5,056
Paul L is on a distinguished road
Default

Oops, looks like I took a photo of the wrong page of the Spitfire manual.

Mind you, I did the same thing when I initially photo copied the wrong wiring diagram.

I was also considering welding on some box section support (following my lessons at Christmas).

Another solution was taken by DonnySoutherner who re-used a section of bodywork.
The silencers would then simply bolt back in their original position.
(With the added benefit of inner rear arches too.)


So, lots to think about, cheers, Paul.

Last edited by Paul L; 8th September 2019 at 09:27..
Reply With Quote
  #160  
Old 1st December 2012, 12:04
Paul L's Avatar
Paul L Paul L is offline
Senior Member
 
Join Date: Feb 2012
Location: Wembley, London
Posts: 5,056
Paul L is on a distinguished road
Default

Frosty The Sammio...


Well I guess it makes a change to remove the ice from the cover instead of the water.


"Cold in the garage my ar$e."

Christmas Opening Hours:
I've spent the morning shopping for Christmas pressies & stocking up for our Christmas day meal.
So it is clear that I am going to have even less time available than usual over the next few weeks.

But Christmas is one of those times where the family comes first and car building comes second.
I have no problem with that at all and will lower my car building expectations accordingly.

There is only one job that I would really like to get done before Christmas and that is start the engine.
As it has now been 4 months since I had it running and I had hoped to do this last weekend.
We have a family trip to the cinema this afternoon ("Nativity 2") so this might have to wait until Sunday.

In the mean time, here is something I wrote earlier...

Door Hinges:
Ages ago I posted a question on the "Ask Mike" thread (here) about fitting the door hinges.
But I keep forgetting to go through his very helpful answers here....

Quote:
Originally Posted by mikmiglia View Post
... You need to look on the inside of the hinges as they are sided, and top and bottom. As you look the shape of the hinge, they camber from top to bottom. Basically to fit a lightly curved door, I found the flatter area the better. Get yourself a spirit level and mark a straight and level line across the door to a panel. Then work the next hinge position of that, so basically the hinges work together without fighting each other...
The hinges didn't come with any instructions, but after reading the above I had another look.
Sure enough, the insides of the hinges were marked left & right + top & bottom (RHT, RHB, etc.).
I'm pretty sure I would have missed this completely as they all looked the same to me.


Mike also made another good point about access requirements...

Quote:
Originally Posted by mikmiglia View Post
... maybe cut an access hatch, at the end of the day, the car is fibreglass and things can come loose and at least you can re-tighten the bolts if needed...
I was planning to follow the Spyder tradition of using simple plywood panels around the cockpit sides.
I understood that bonding / fibre glassing the panels in place was key to strengthening the whole car.
So clearly making the whole panels removable for access would kind of defeat the object a bit.

However, the hinge bolts will be in awkward to reach places anyway (behind frame & inside door inner skin).
So I may need to put quite sizeable 'removable' sections in the fixed panelling to ensure they can be reached.
You can just about make out the bolts in the doors in this photo.


And this was my earlier mock up of where the hinges would go through my own doors.


One option would be to cut through the inner door skin to leave just the outer skin where the bolts are.
Then build up and box in the rest of the door to make that a single solid item.
See another of my poor sketches below, which would leave the hinge bolts permanently on view.


I also know AndyP57 has been working on fitting the doors to his Cordite Demonstrator.
I look forward to seeing what he has done, but fear he'll have to cut holes in his lovely alloy panels.


If the worst comes to the worst, I can always go for my drastic, last resort, 'non functioning' doors option.
Thankfully I don't have to make a final decision just yet, so there is more beard scratching time available.

Hopefully I'll be back again tomorrow, cheers, Paul.

Last edited by Paul L; 10th September 2019 at 11:12.. Reason: Fixing Photo Link
Reply With Quote
Reply


Currently Active Users Viewing This Thread: 4 (0 members and 4 guests)
 

Posting Rules
You may not post new threads
You may not post replies
You may not post attachments
You may not edit your posts

BB code is On
Smilies are On
[IMG] code is On
HTML code is Off

Forum Jump


All times are GMT +0. The time now is 17:30.

copyright © madabout-kitcars.com 2000-2024
terms and conditions | privacy policy