|
|
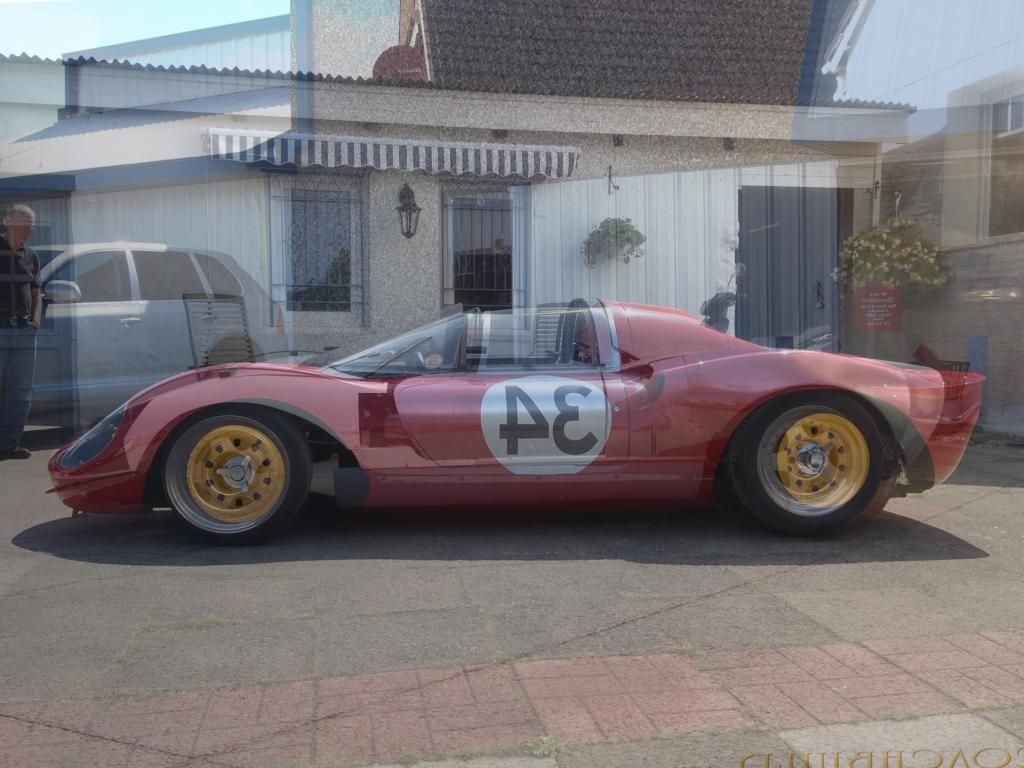
| Dino 246 Builds and Discussion Da da da da daaa daa da da, ohoho Dino |

5th May 2014, 18:45
|
|
Senior Member
|
|
Join Date: Jan 2014
Location: Hamburg
Posts: 174
|
|
Thanks Gary
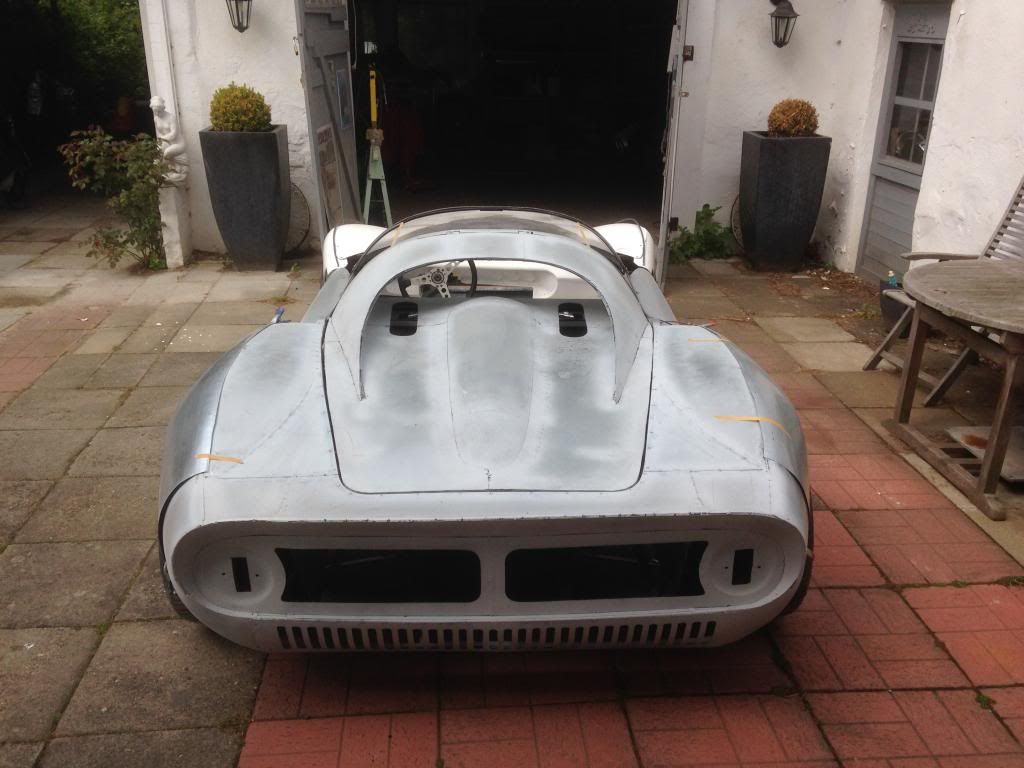
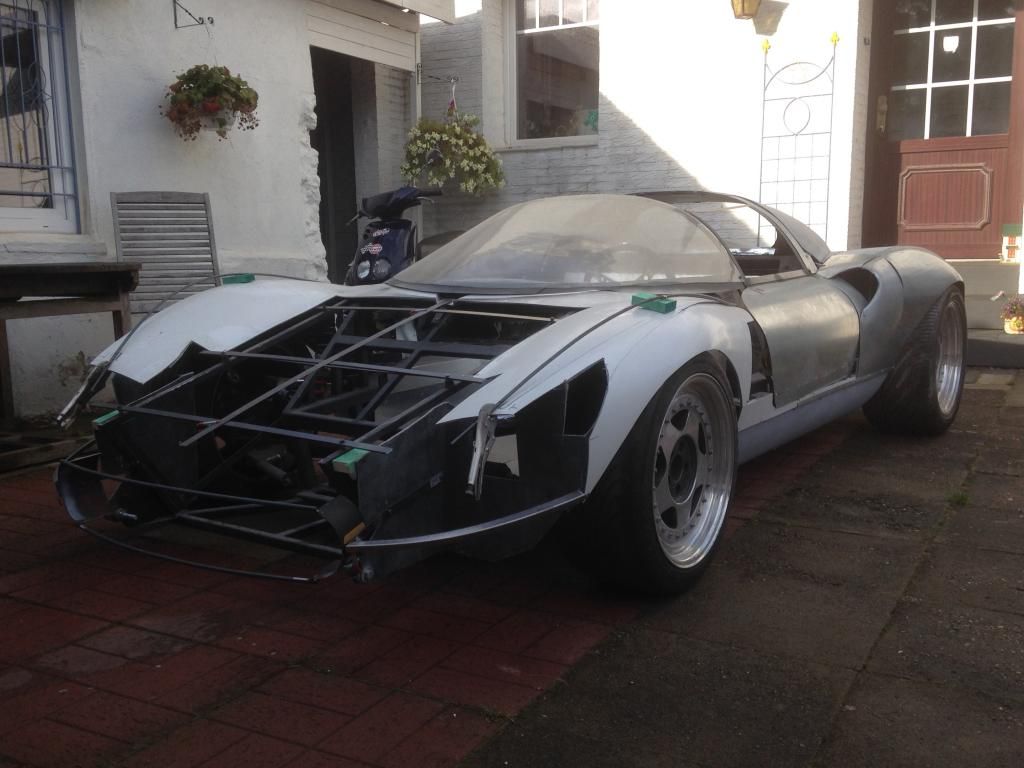
I will keep fragments of the fiberglassbody as a supporting structure, it worked fine with the bonnet and will hopefully work with the body as well...
|
6th May 2014, 07:45
|
|
Senior Member
|
|
Join Date: Jun 2011
Location: birchington, kent
Posts: 1,769
|
|
So,do you bond the li to the fibreglass?
|
6th May 2014, 09:07
|
|
Senior Member
|
|
Join Date: Jan 2014
Location: Hamburg
Posts: 174
|
|
Yes, I use Sikaflex, a very strong glue for automotive purpose, and the metal body is also partially screwed to the fiberglass substructure!
|
24th July 2014, 11:57
|
|
Senior Member
|
|
Join Date: Jun 2011
Location: birchington, kent
Posts: 1,769
|
|
Whats happening Axel, on holiday?
|
25th July 2014, 06:28
|
|
Senior Member
|
|
Join Date: Jan 2014
Location: Hamburg
Posts: 174
|
|
Hi Gary, thanks for asking, my time is more for gardenwork now and my 8 months old son of course, such a cute little boy who makes me happy every day.
But I have some updates:
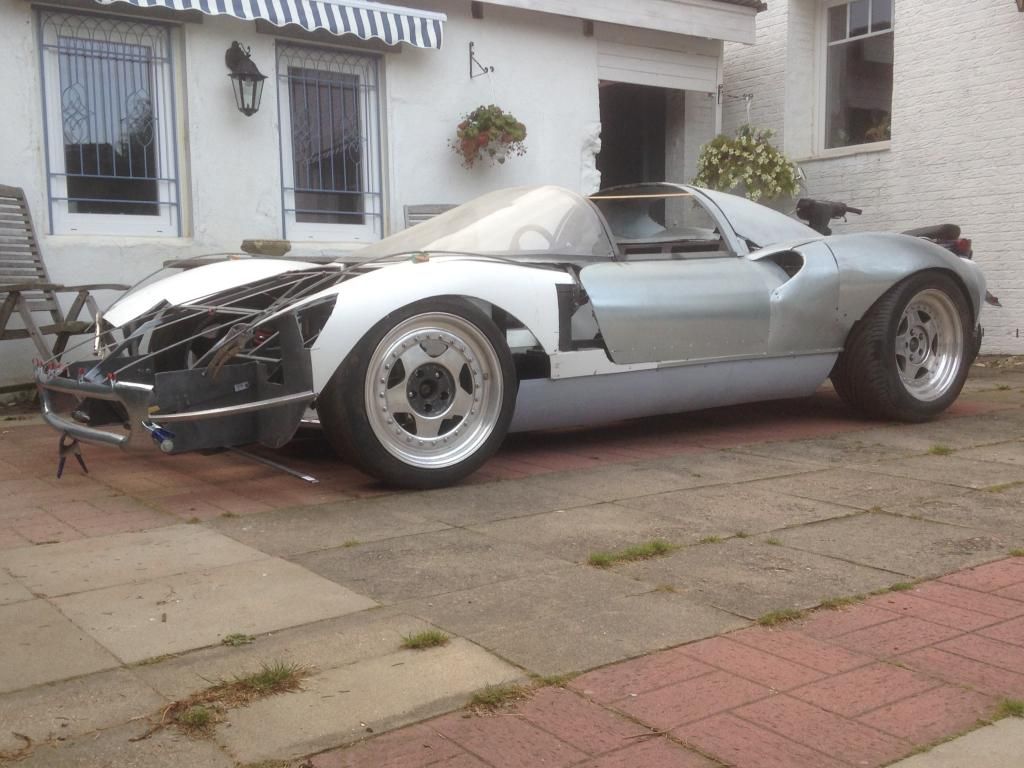
I managed to do the rear fenders and I was playing around with the airintakes, and I am still not happy with their shape, but I am getting to it.
Here are some pics:
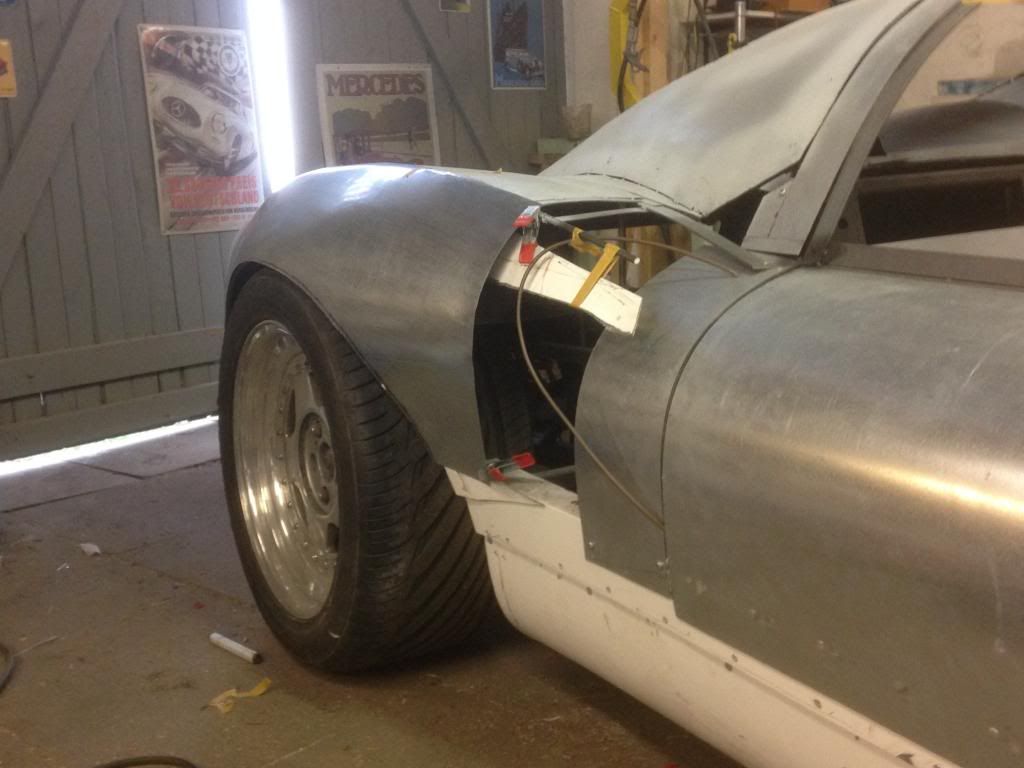
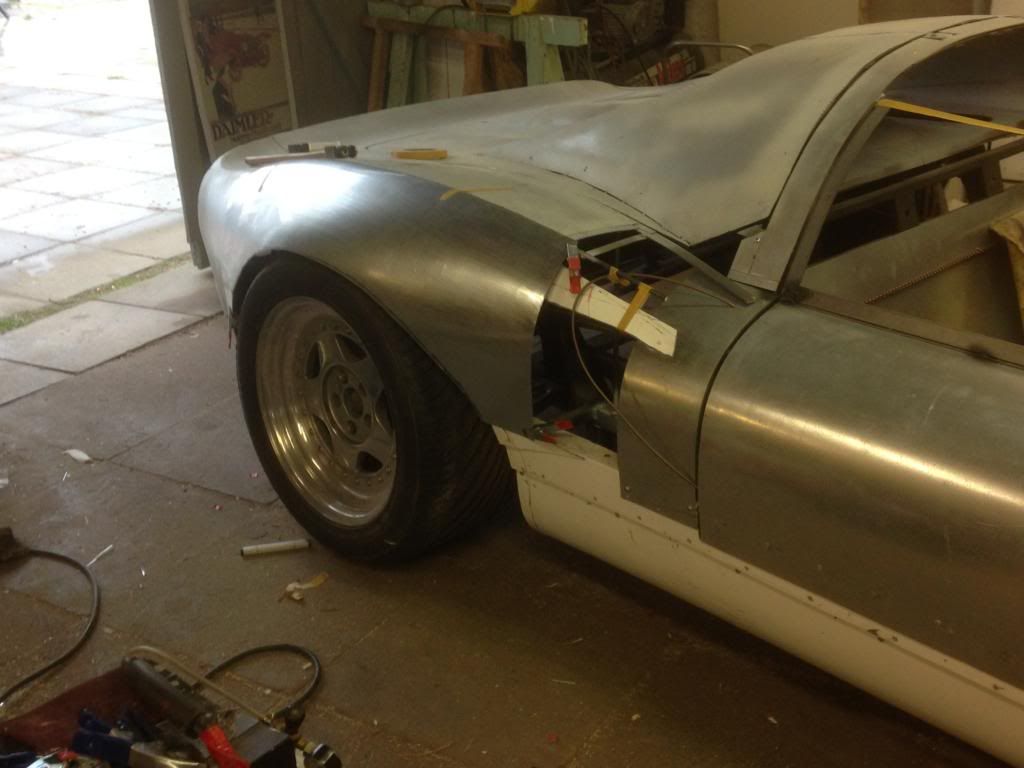
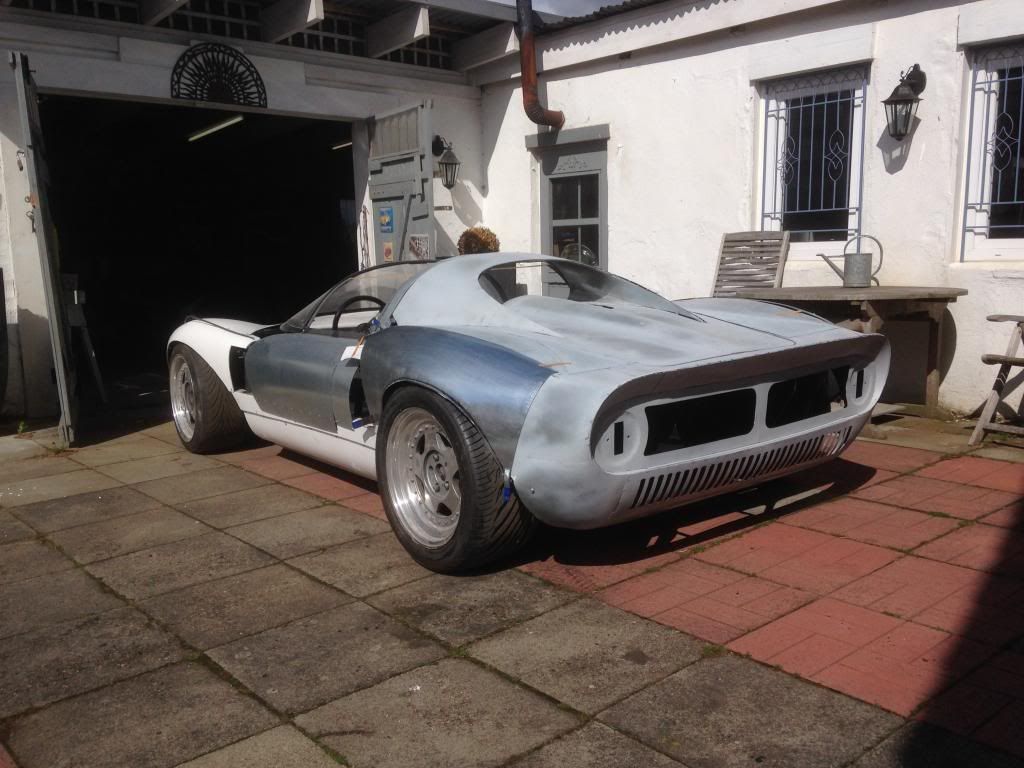
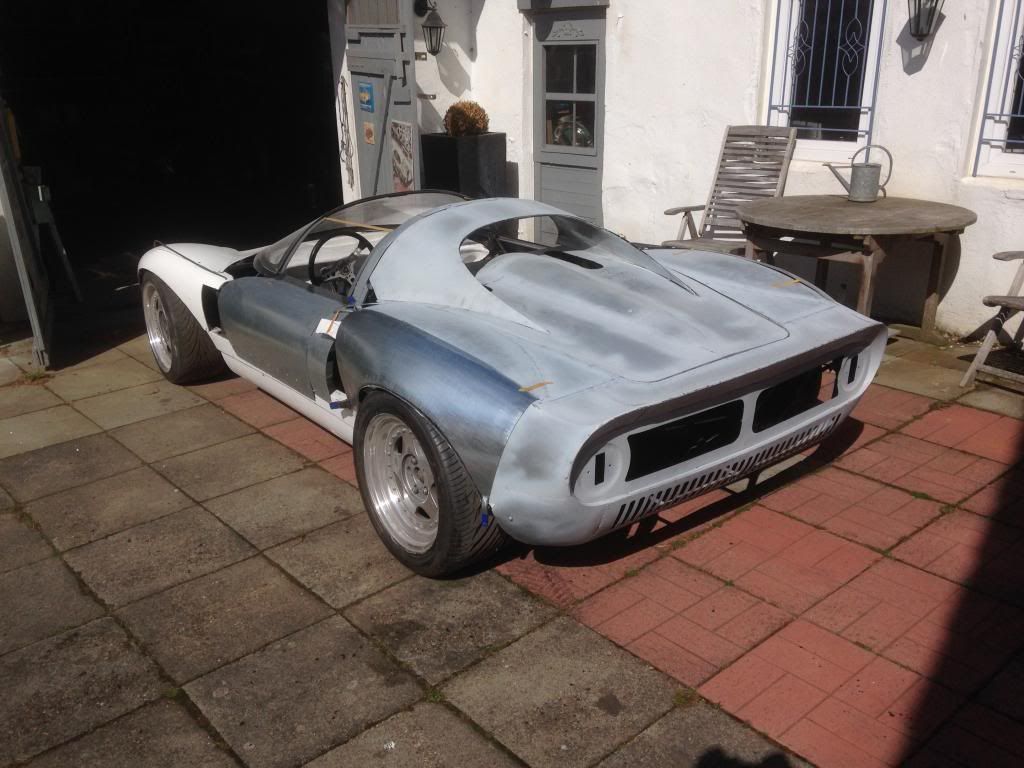

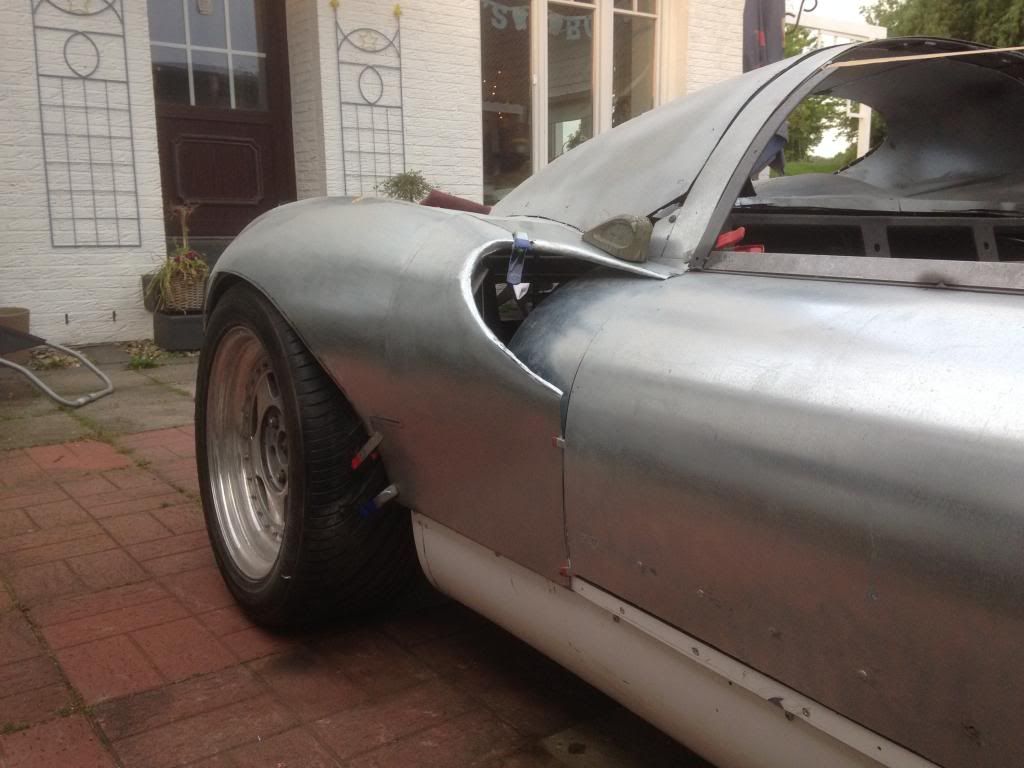
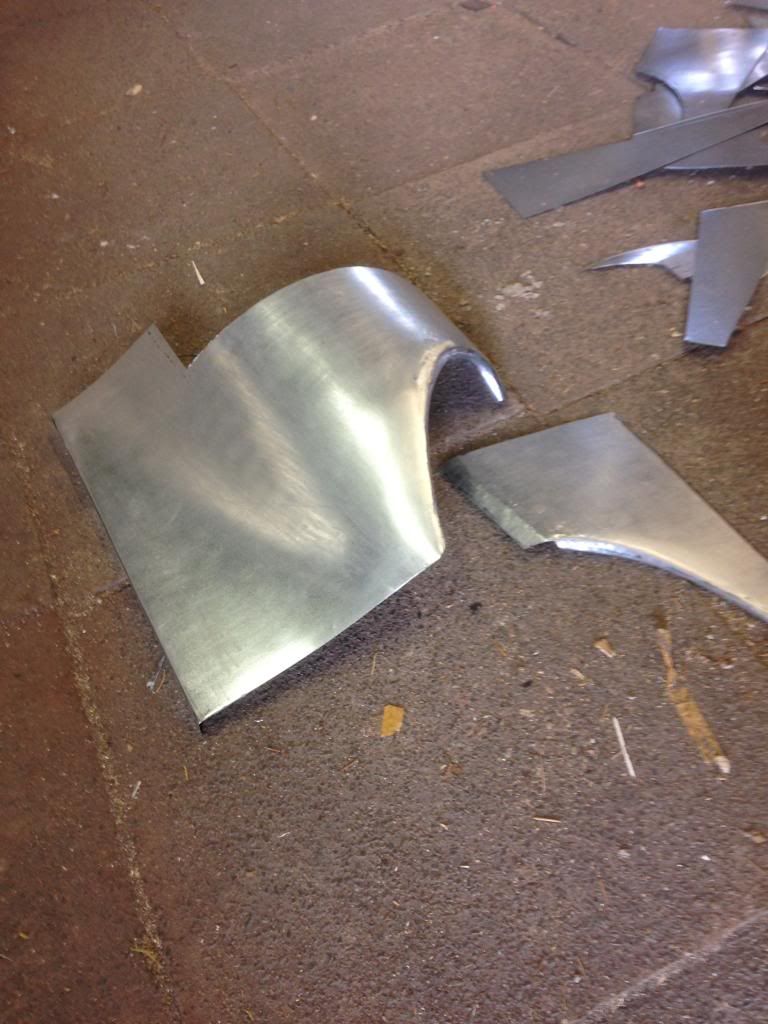
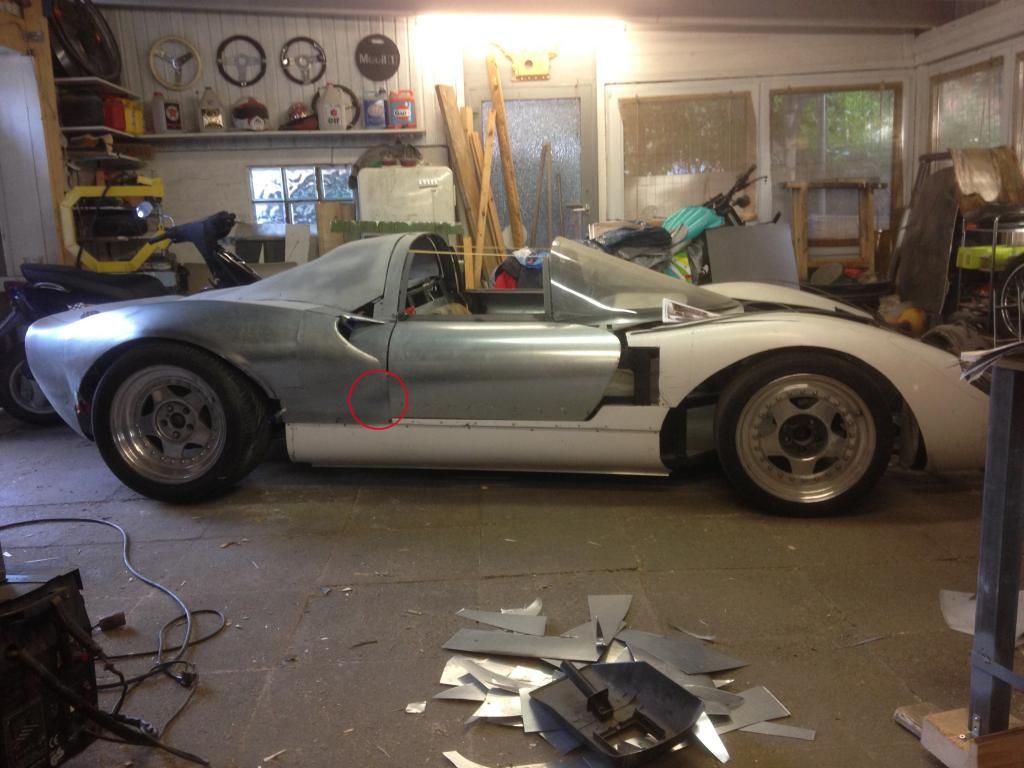
I still have a little bump in the red circle, it needs some shrinking in that area to fix it, and then I need to transfer it to the left side. The intake was to big at my first attempt, and it did touch the cutline of the door, I made it smaller now and its getting better, but judge yourself!
Last edited by Axel; 25th July 2014 at 06:41..
|
25th July 2014, 08:05
|
|
Senior Member
|
|
Join Date: Jun 2011
Location: birchington, kent
Posts: 1,769
|
|
Great work Axel, when your shaping those rear wings do you change the size of the anvil or have you just used the same one?
I can see the scoops take a lot of work, what bit are you not happy with/ is the return lip.
|
25th July 2014, 09:34
|
|
Senior Member
|
|
Join Date: Jan 2014
Location: Hamburg
Posts: 174
|
|

Quote:
Originally Posted by garyh

Great work Axel, when your shaping those rear wings do you change the size of the anvil or have you just used the same one?
I can see the scoops take a lot of work, what bit are you not happy with/ is the return lip.
|
Thanks Gary, the wings were done with the english wheel, no hammering at all. I used the anvil with the most curvature at the beginning, and smoothed it out with lower anvils and used the most straight one at the end. I added the most curvature at the cutout for the wheel, the cutout was smaller at the beginning, and I cut it to tire size at the end after the most wheeling was done with the EW. Then I used the shrinker to bend it more in over the wheel, and smoothed it with the EW again. This process I did several times.
The upper flange was done with the shrinker/stretcher, and wheeled afterwards to smooth it.
Yes, the return lip was a pain in the a....still not smooth enough, the double curvature of the panel at all turned out pretty nice in fact...after some panels went in the bin ;-)

|
21st August 2014, 06:38
|
|
Senior Member
|
|
Join Date: Jan 2014
Location: Hamburg
Posts: 174
|
|
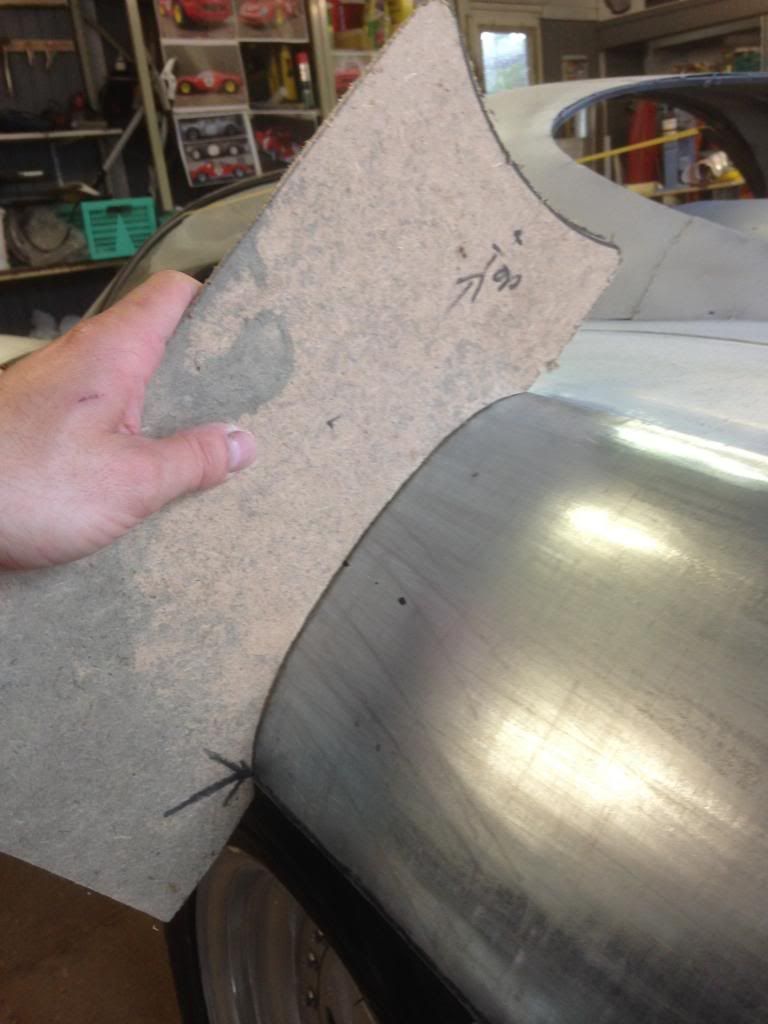
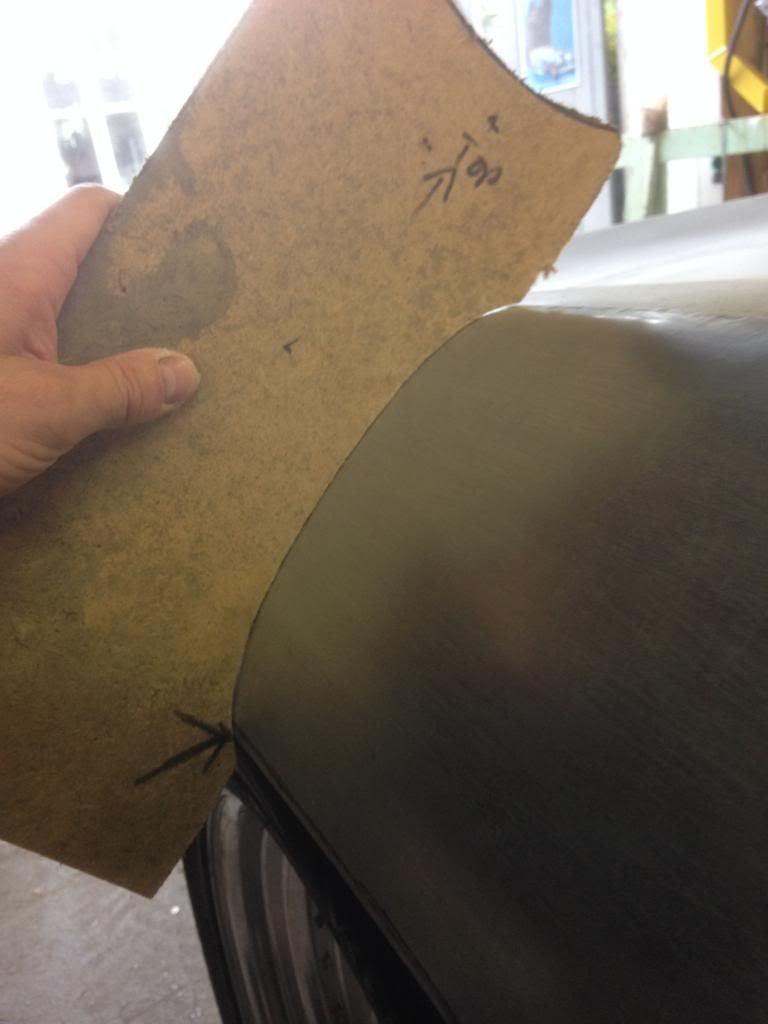
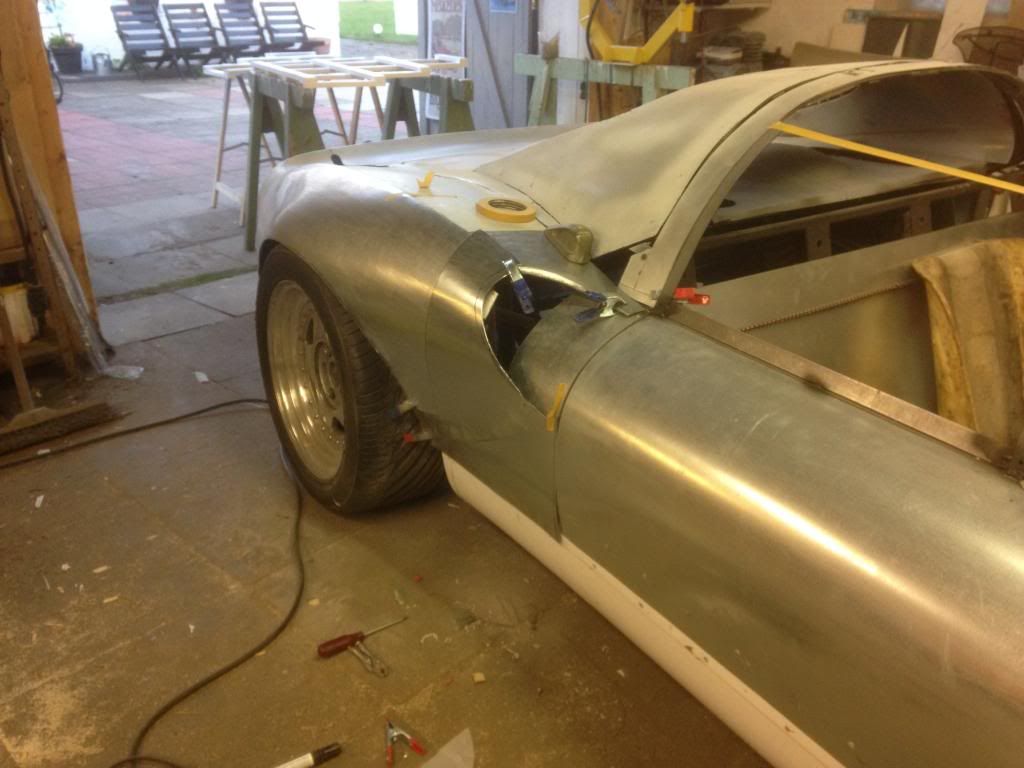
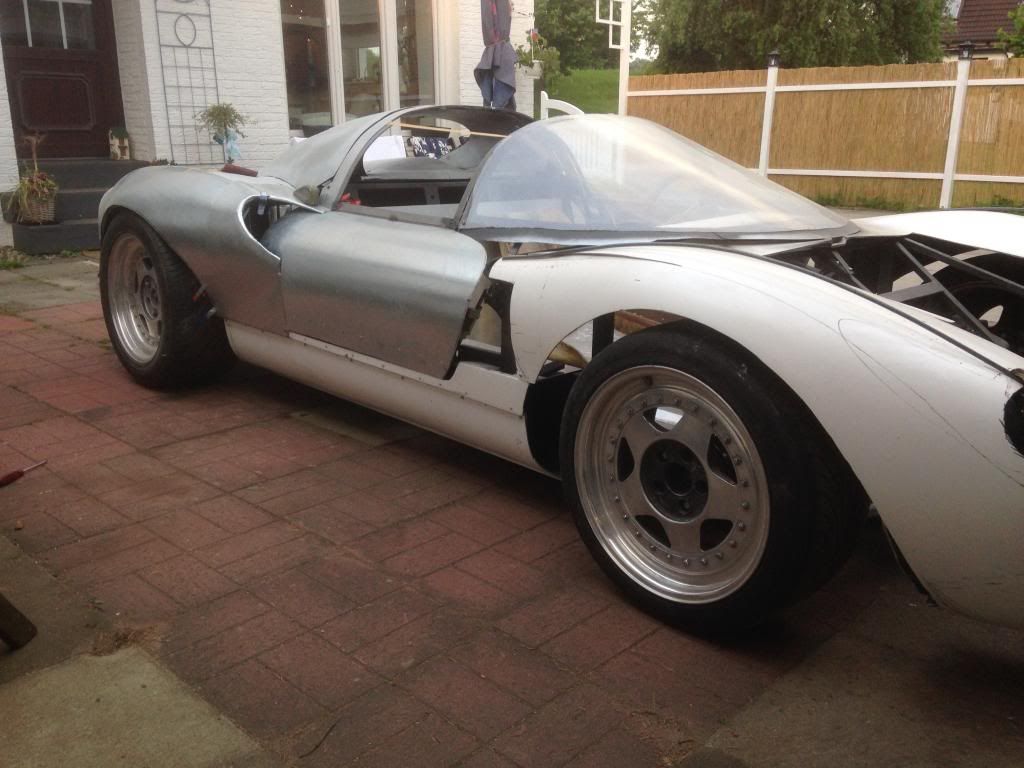
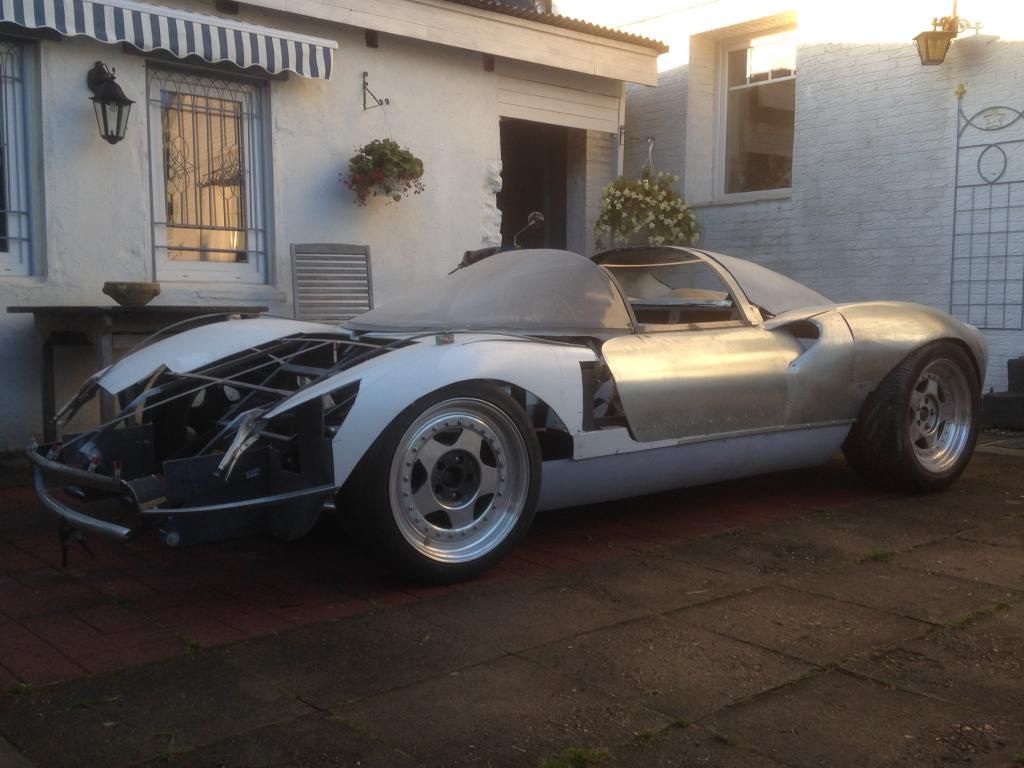
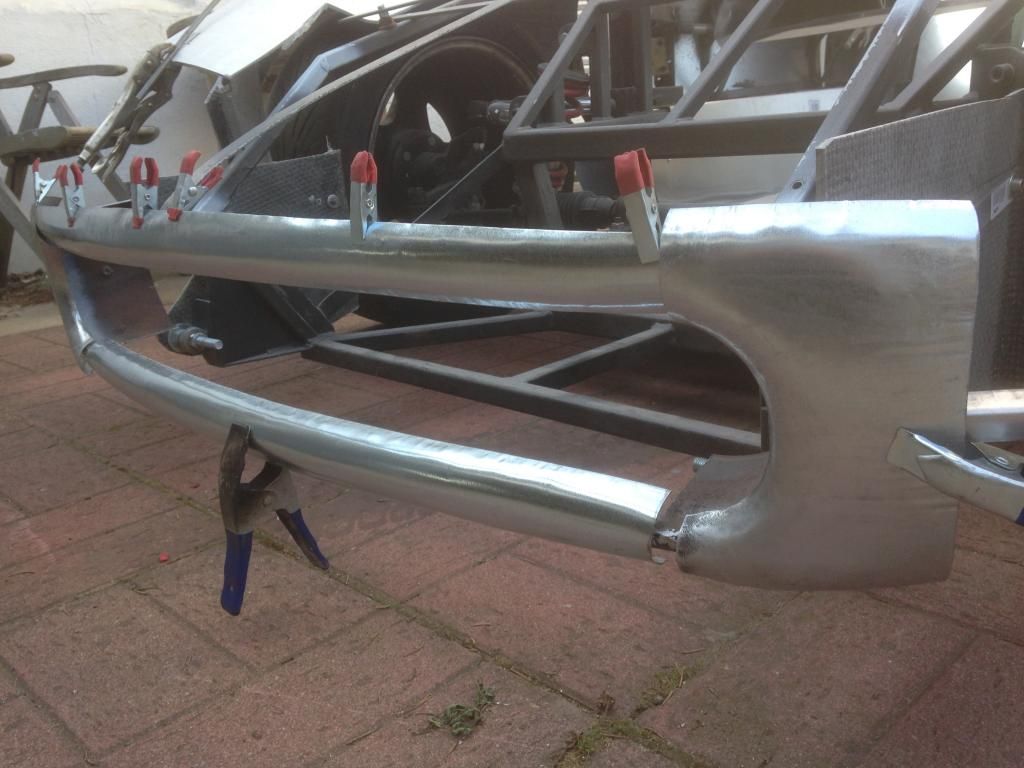
Ok, wife and kid are on vacation til tomorrow, so I had some time to continue with my car.
(You might notice I changed the airintakes panel again)
I removed the plastic sills first
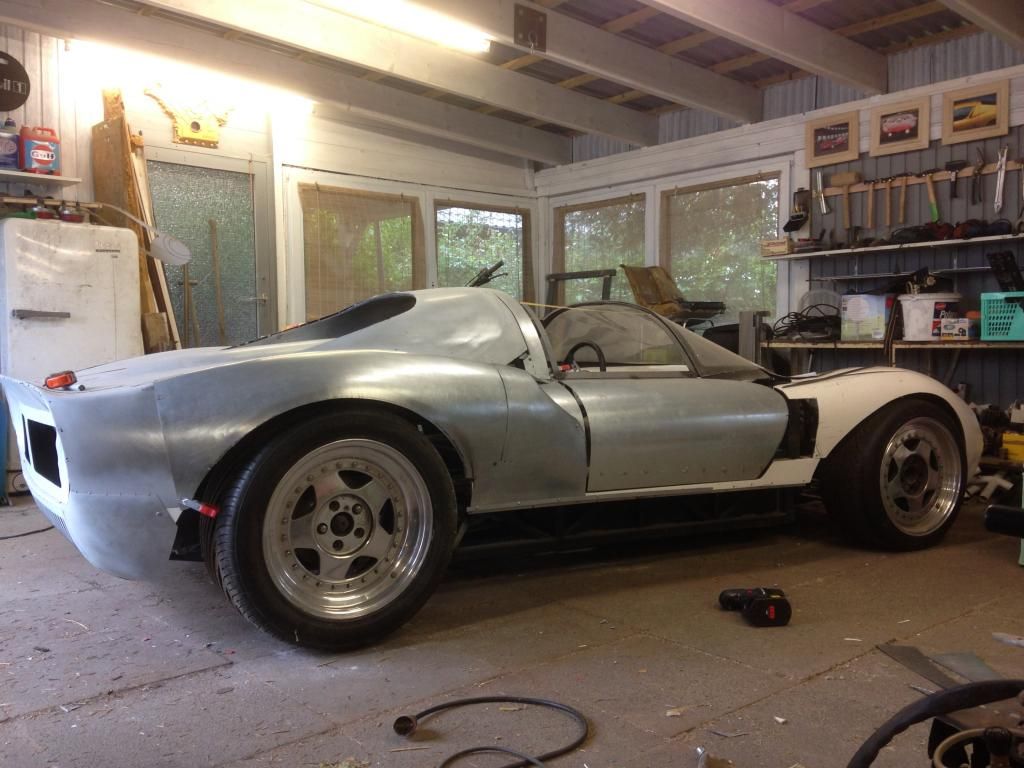
the Dino sills have a 25mm flange, so I took some sheet metal, fixed a 25mm flat bar under the sheet, and rolled it with a soft upper with my EW, result is a pretty nice flange.
The sills are made in two pieces and welded together to get the needed length and the radius is rolled with a soft upper.
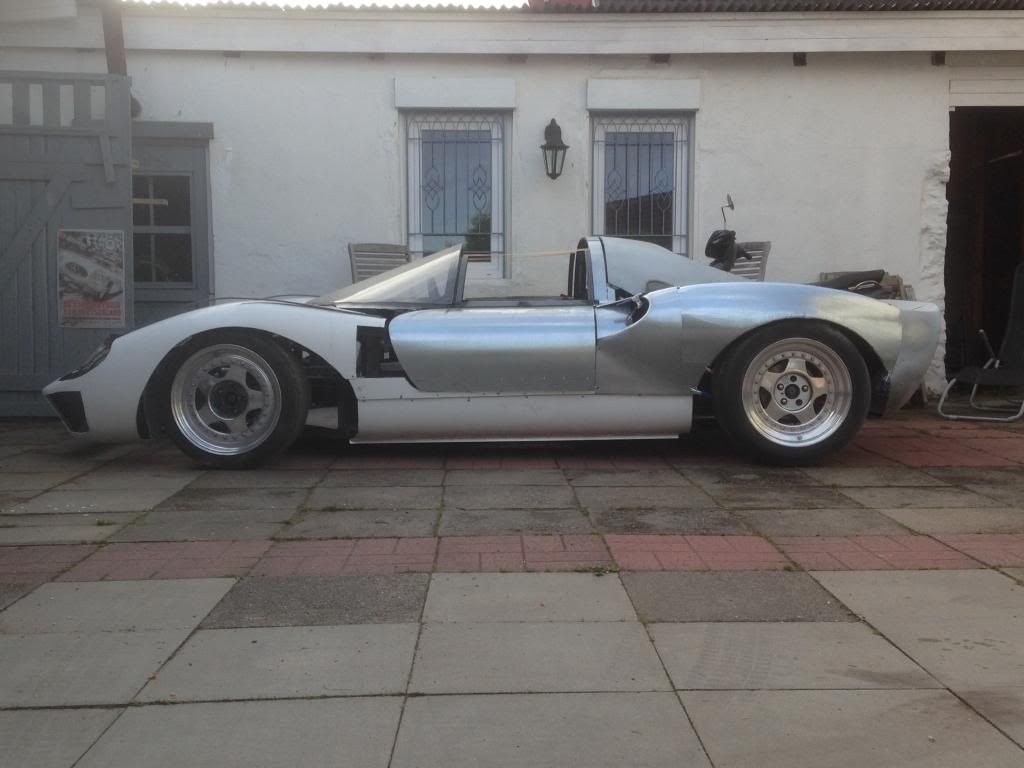
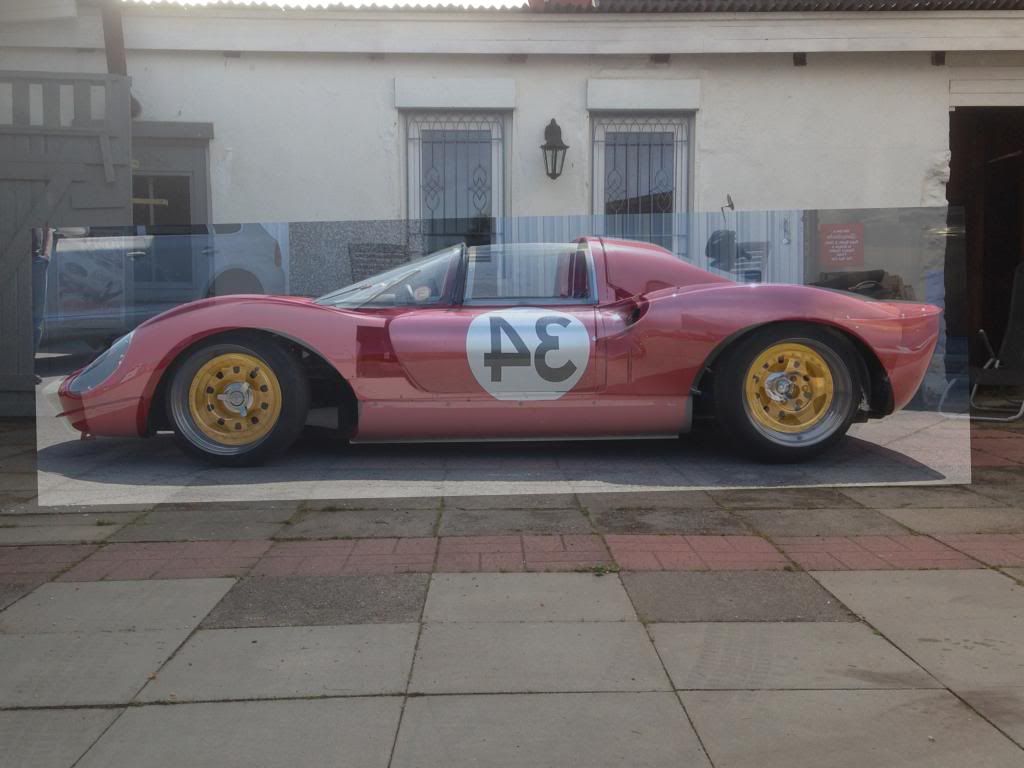
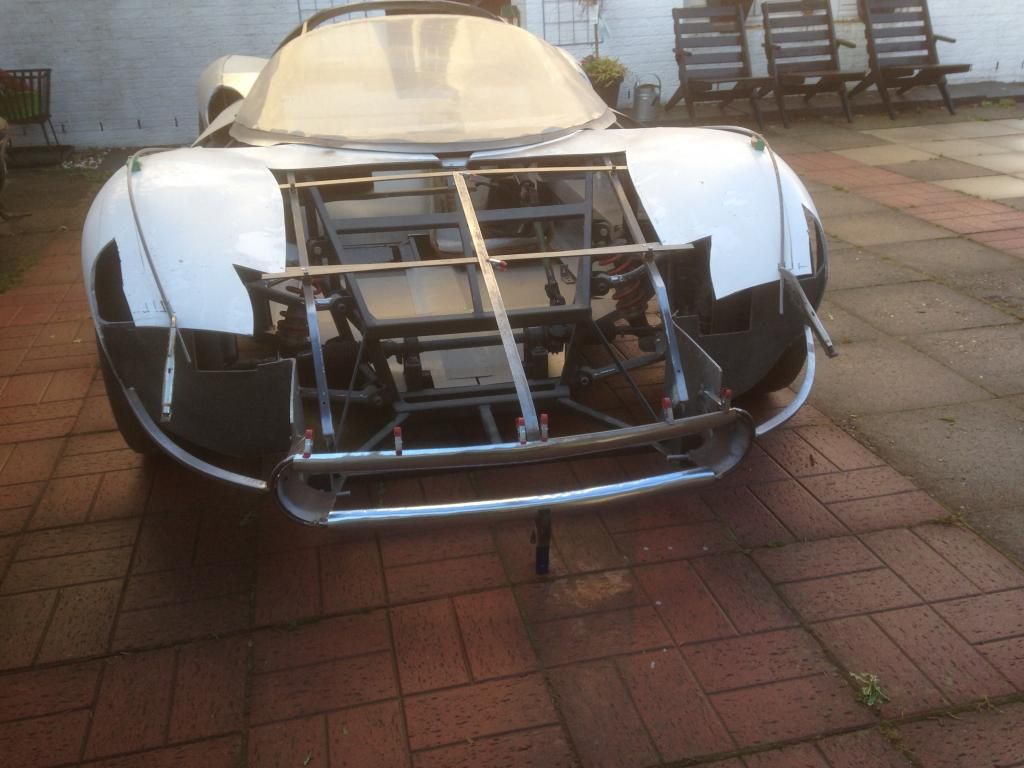
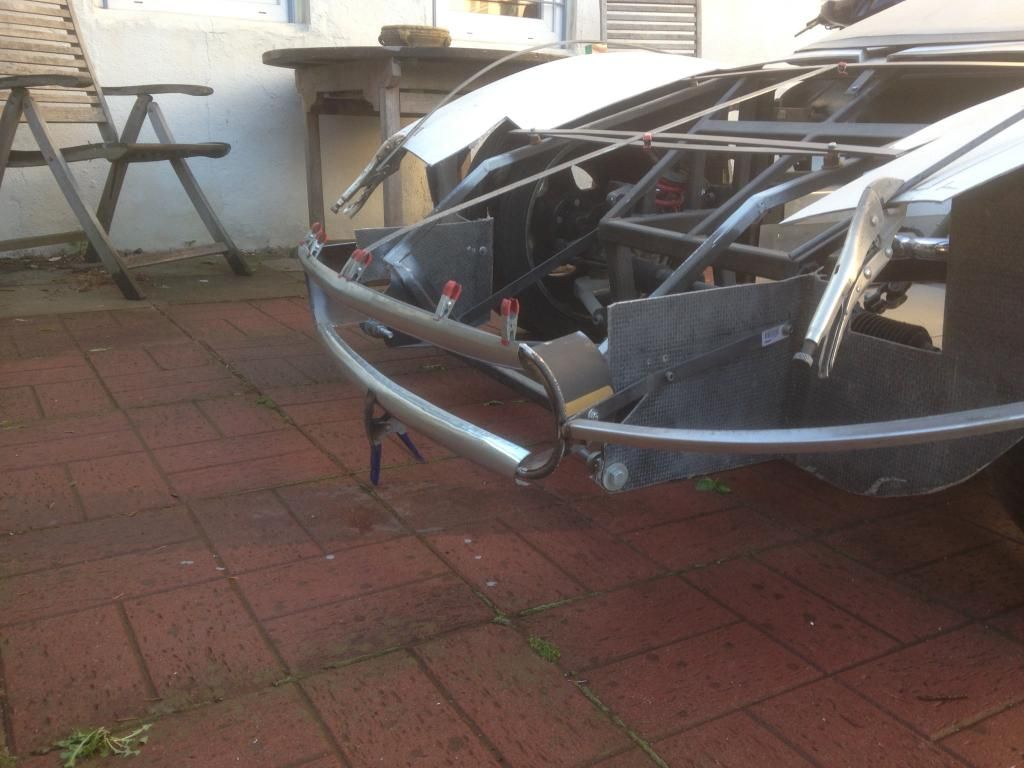
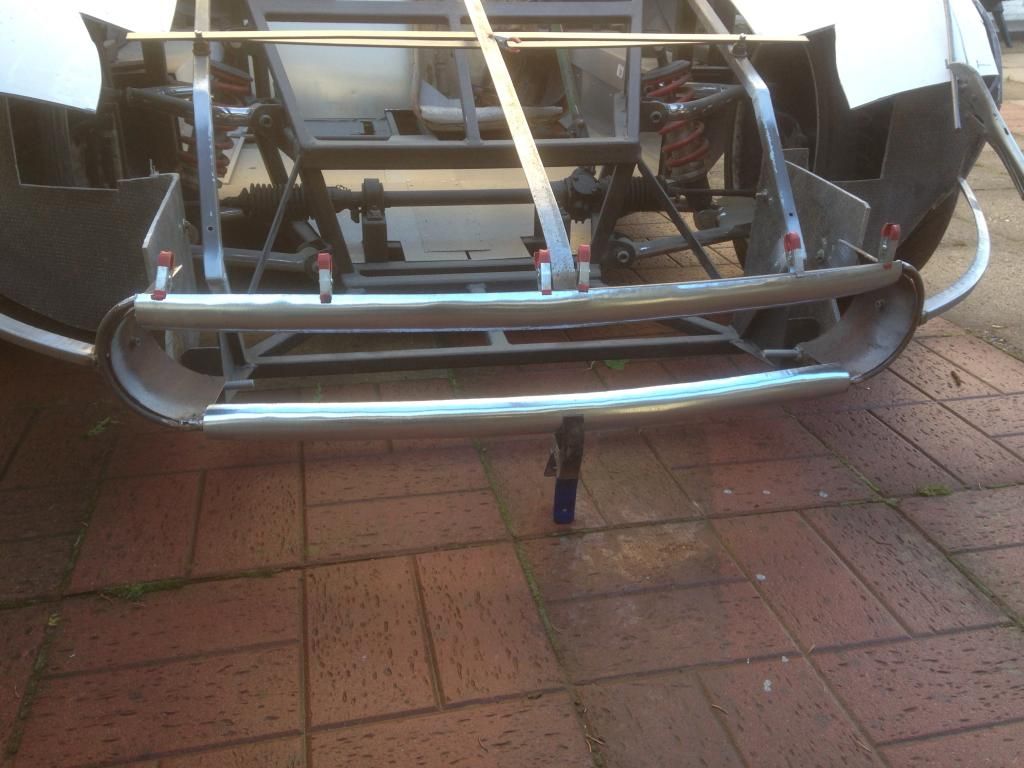
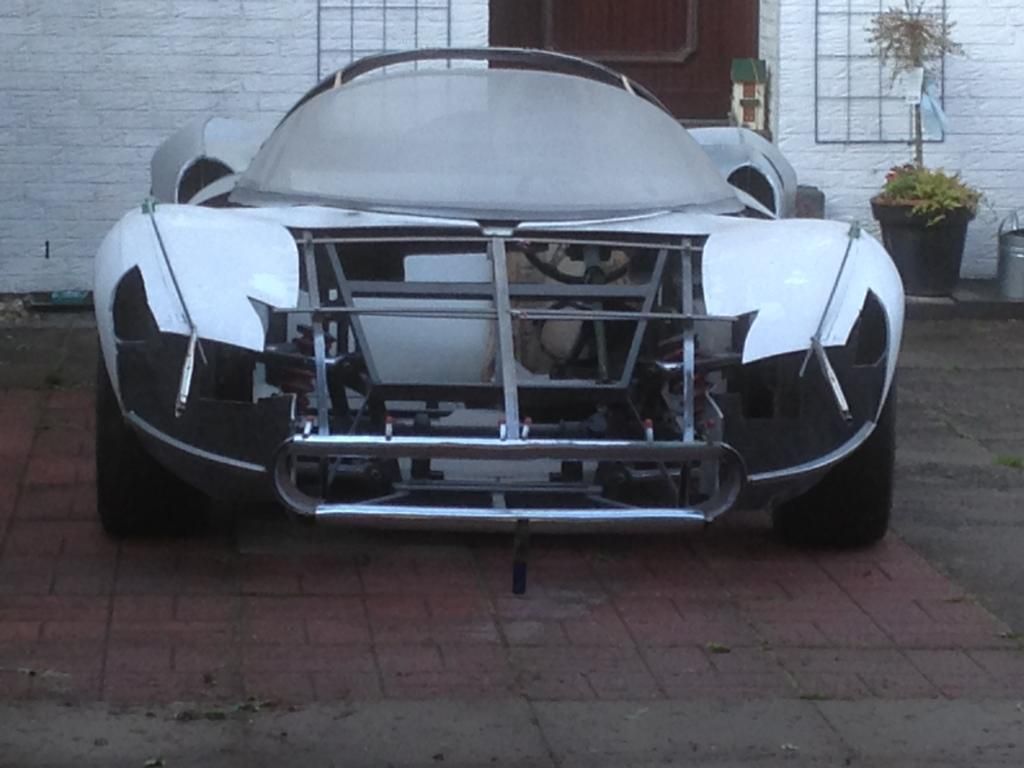
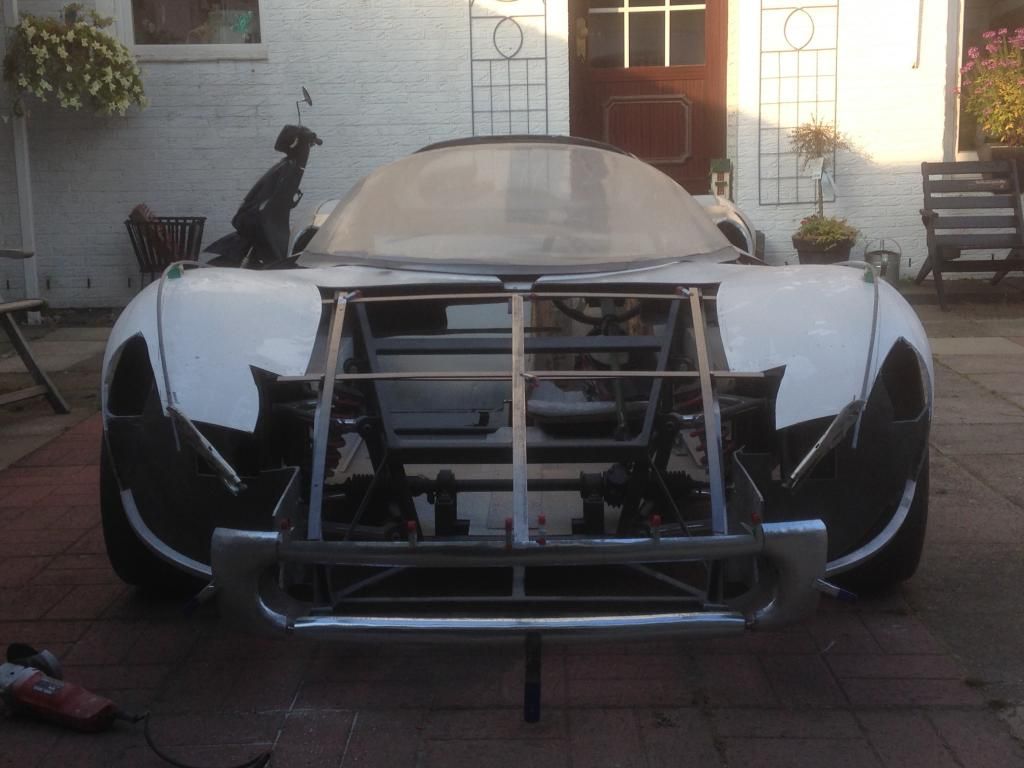
Then I started the front end with a metal "subframe". It was pretty difficult to find the right proportions, but it is getting closer and closer.
Because I don't have any measurements of the original car I had to do photo comparisons with photoshop...pretty helpful:


You can see it is getting pretty close. Unfortunately I have to modify the spaceframe at the upper front, it is too high, but I did it yesterday evening.
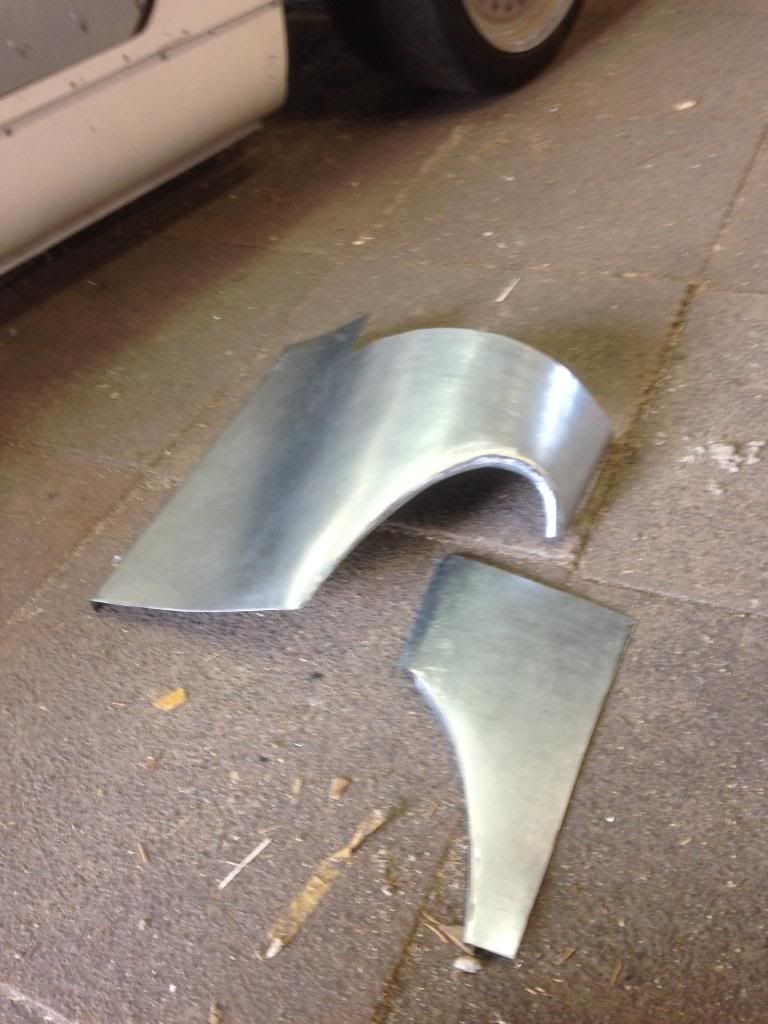
I would like to weld a 40mm half circle tube around the front airintake, but I have no bead roller, so I took a tube from an old party tent, cut it quickly in half, and modified it with the shrinker, pretty good result!
I have to do it again with an exact cut, and I think I have a good base for the rounded front air intake (I am pretty sure it is done a different way, and you experts have many other ideas ;-)).
I really like this very low perspective:

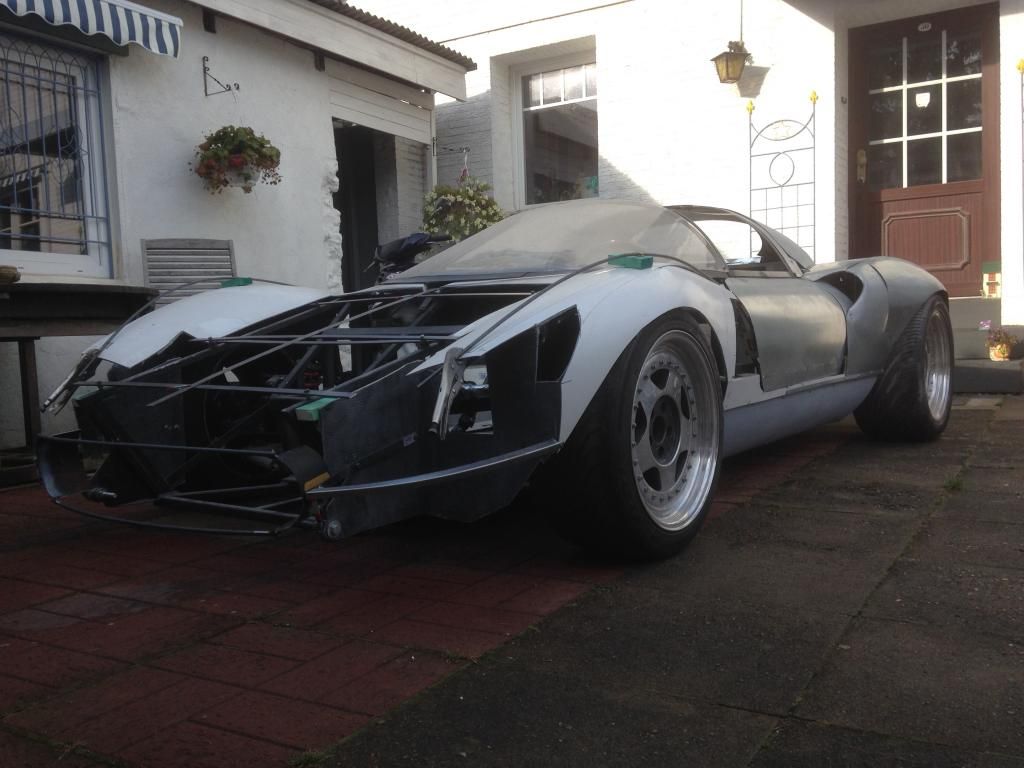
...thanks for watching! Any comments or help is much appreciated!
|
21st August 2014, 06:41
|
|
Senior Member
|
|
Join Date: Jan 2014
Location: Hamburg
Posts: 174
|
|
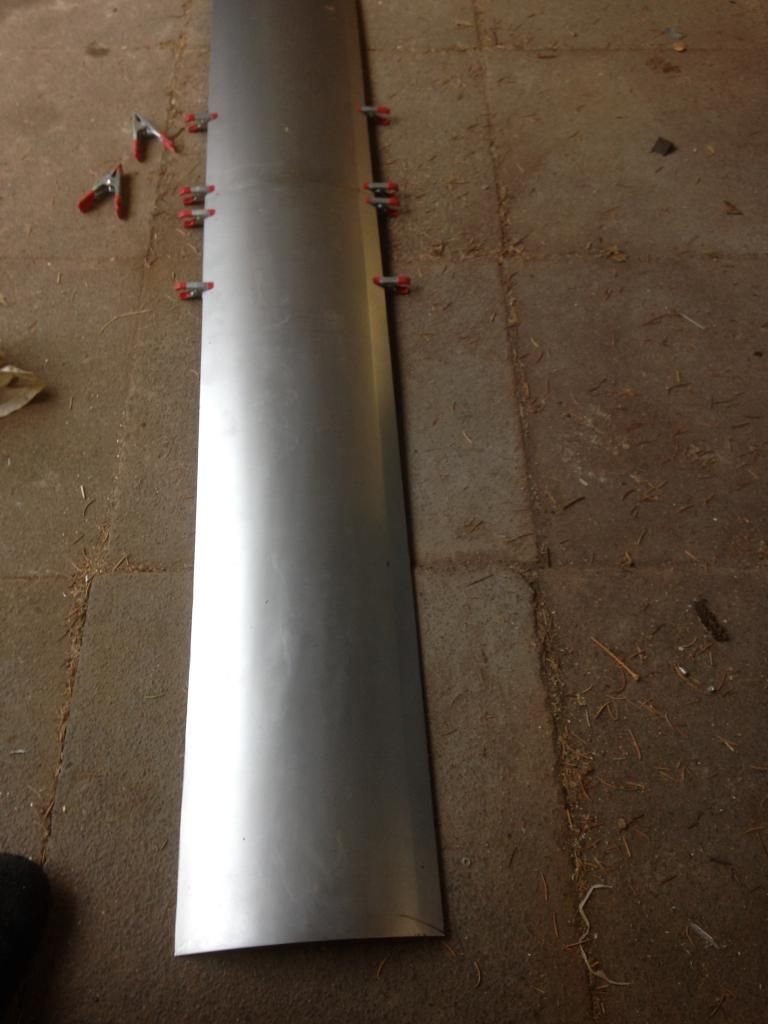
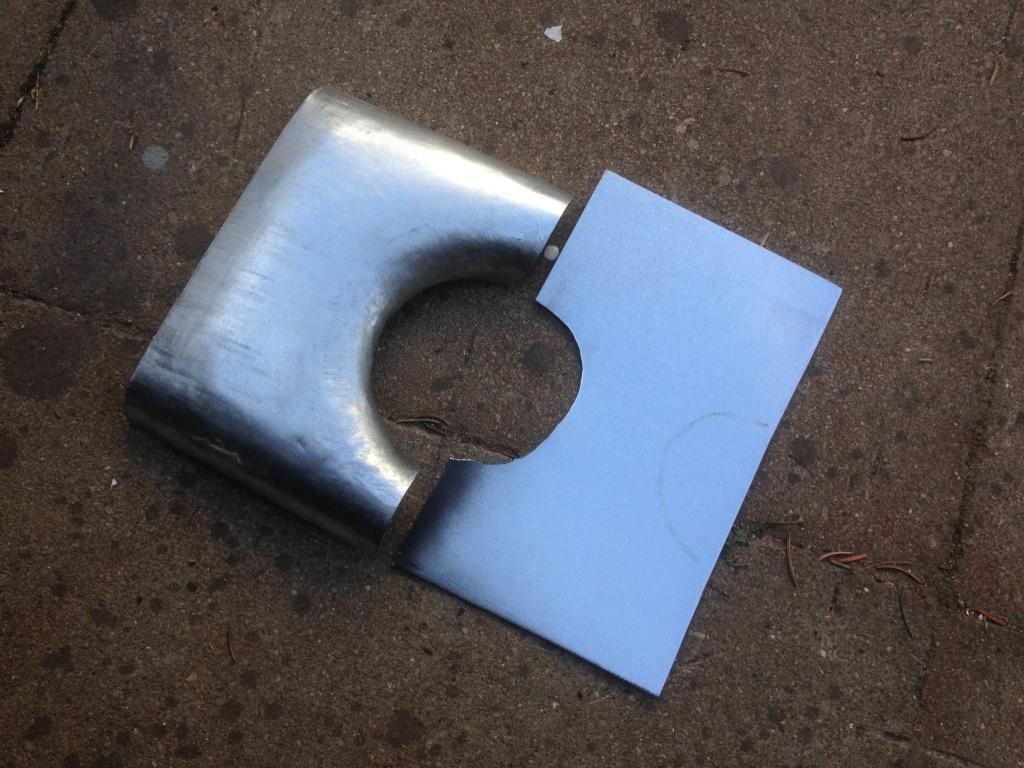
Here you can see my unprofessional try to make the round profiles for the front-intake.
I hammered 2" wide sheet metal around my tent pole with a rubber hammer, and it worked!
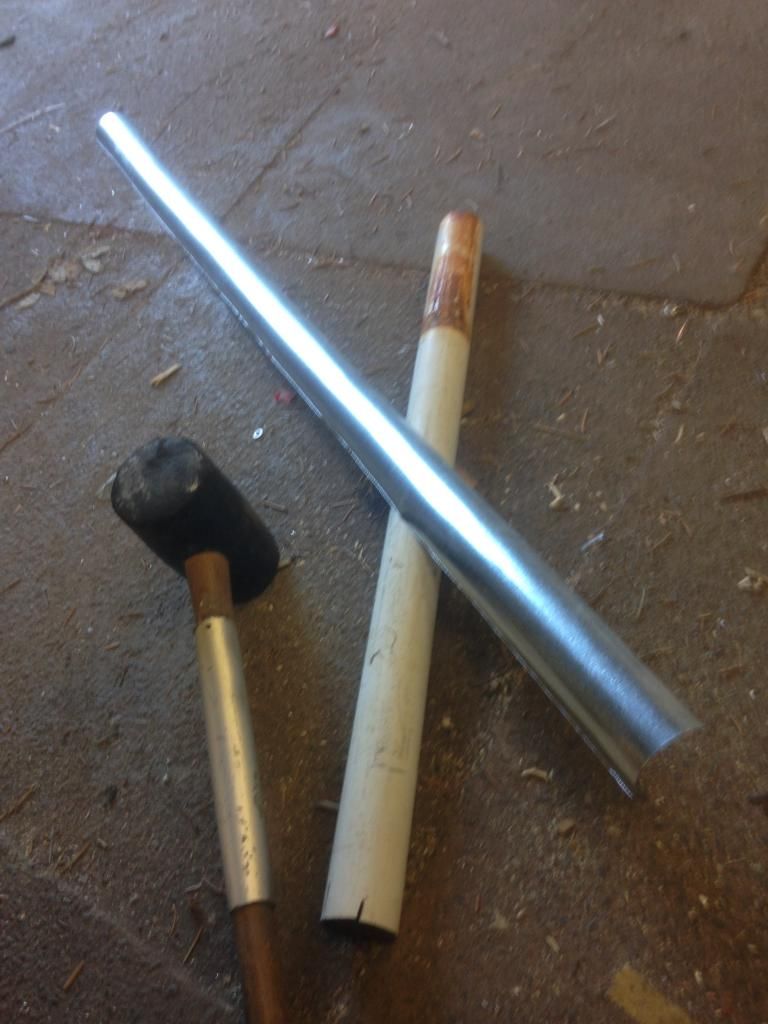
Then I added curvature with the shrinker on both sides, and atfterwards just one side to get the desired curvature in both directions
I need to smooth them out, guess I'll take the planishing hammer with low pressure for smoothing, but for the first try it looks pretty good!
Thanks for watching! |
21st August 2014, 08:17
|
|
Senior Member
|
|
Join Date: Jun 2011
Location: birchington, kent
Posts: 1,769
|
|
Carry on Axel, its one of the builds that gives me inspiration to keep building. I have a week in september to start on my build again... if i finish painting!
|
22nd August 2014, 06:36
|
|
Senior Member
|
|
Join Date: Jan 2014
Location: Hamburg
Posts: 174
|
|
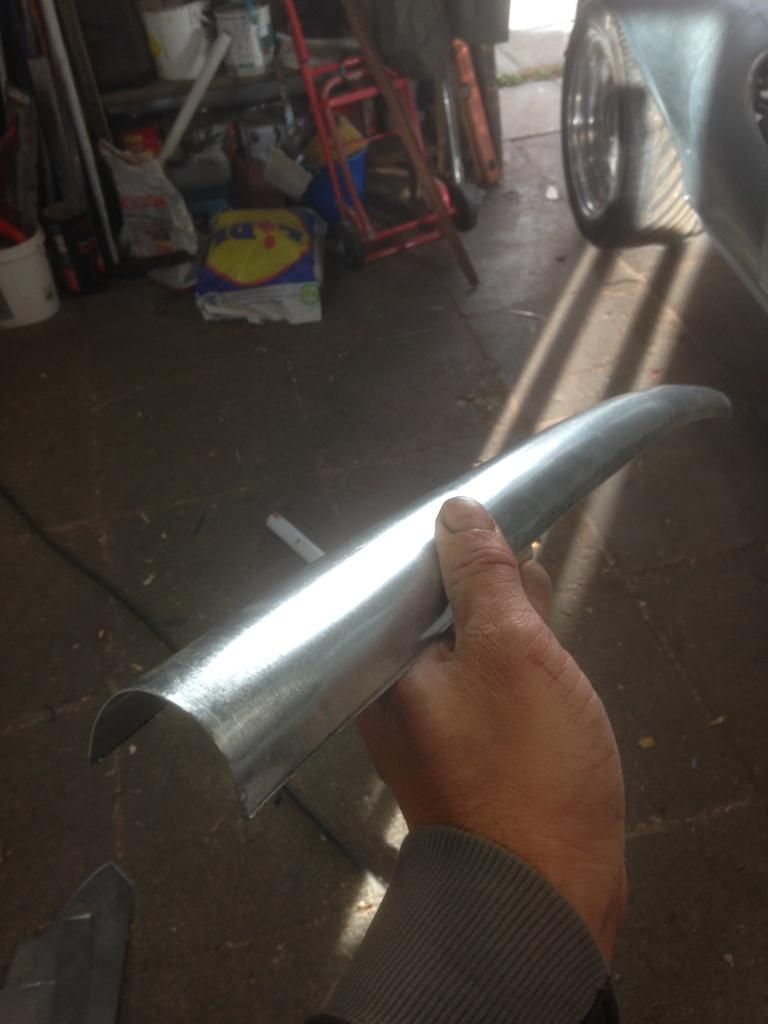
Thanks Gary! Keep on Building! I am 52 years old now, and I guess I will never stop!
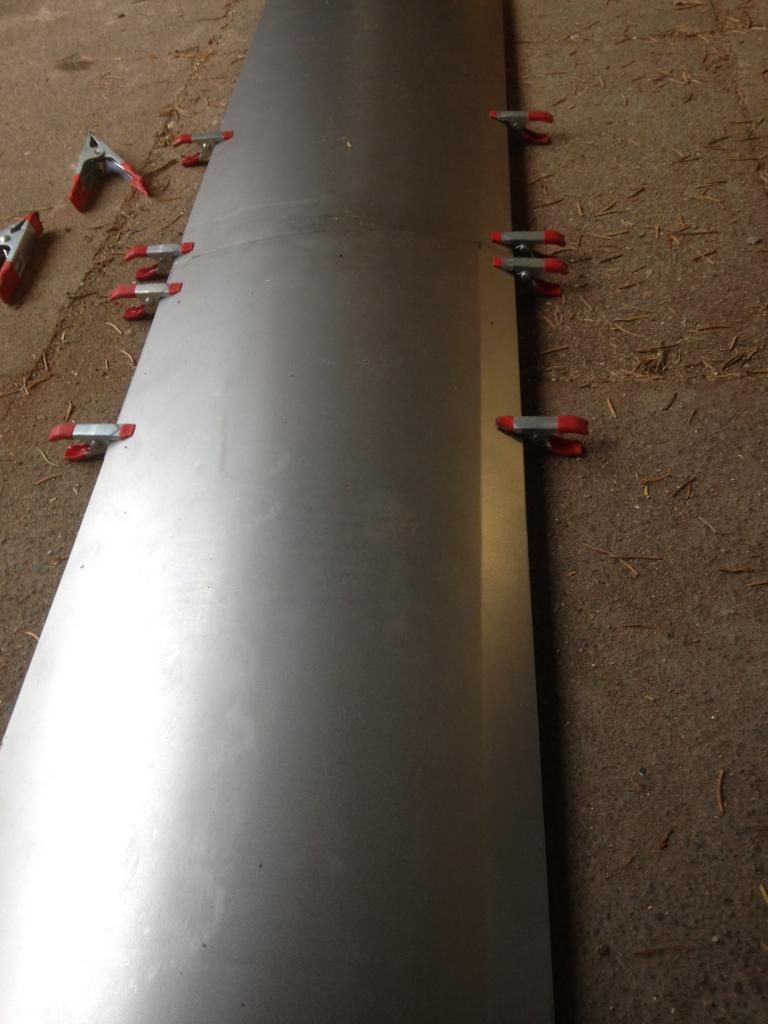
Yesterday I worked on the front-intkake again. I did the corners.
Right is were I started with, left is the result after using the planishing hammer and the shrinker.
The result is quite good, still some little dents, but I will smooth that out.
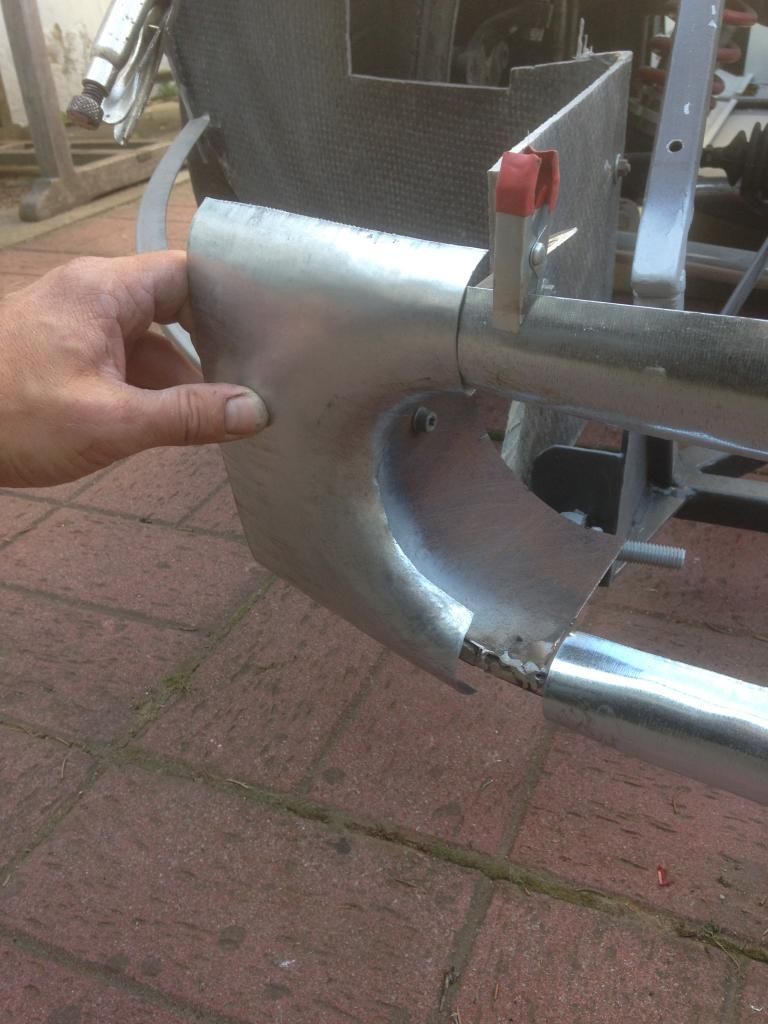
for the other side I just needed half the time, once you have figured out how it can be done, you are 200% faster.
Thanks for watching! |
22nd August 2014, 06:37
|
|
Senior Member
|
|
Join Date: Jan 2014
Location: Hamburg
Posts: 174
|
|
Thanks Gary! Keep on Building! I am 52 years old now, and I guess I will never stop!
Yesterday I worked on the front-intkake again. I did the corners.
Right is were I started with, left is the result after using the planishing hammer and the shrinker.
The result is quite good, still some little dents, but I will smooth that out.
for the other side I just needed half the time, once you have figured out how it can be done, you are 200% faster.
Thanks for watching! |
22nd August 2014, 07:56
|
 |
Senior Member
|
|
Join Date: Feb 2012
Location: Wembley, London
Posts: 5,058
|
|
Alex - I am another big fan of your build.
It is going to be a really special car when it is finished. 
Good luck, Paul. 
|
23rd October 2014, 04:00
|
|
Junior Member
|
|
Join Date: Apr 2013
Posts: 3
|
|
Best thread on the forum! Way to go Axel! Keep those updates coming.
 |
27th October 2014, 06:15
|
|
Senior Member
|
|
Join Date: Jan 2014
Location: Hamburg
Posts: 174
|
|
Thanks! Yes, updates will come soon, I had a lot to do at house and garden this year and my 11 months old son is really taking a lot of my free time, but summer is over now and very soon I will be in my workshop again...!!
|
27th October 2014, 07:52
|
|
Senior Member
|
|
Join Date: Jun 2011
Location: birchington, kent
Posts: 1,769
|
|
Me too, can't wait.
|
27th November 2014, 10:39
|
|
Senior Member
|
|
Join Date: Jan 2014
Location: Hamburg
Posts: 174
|
|
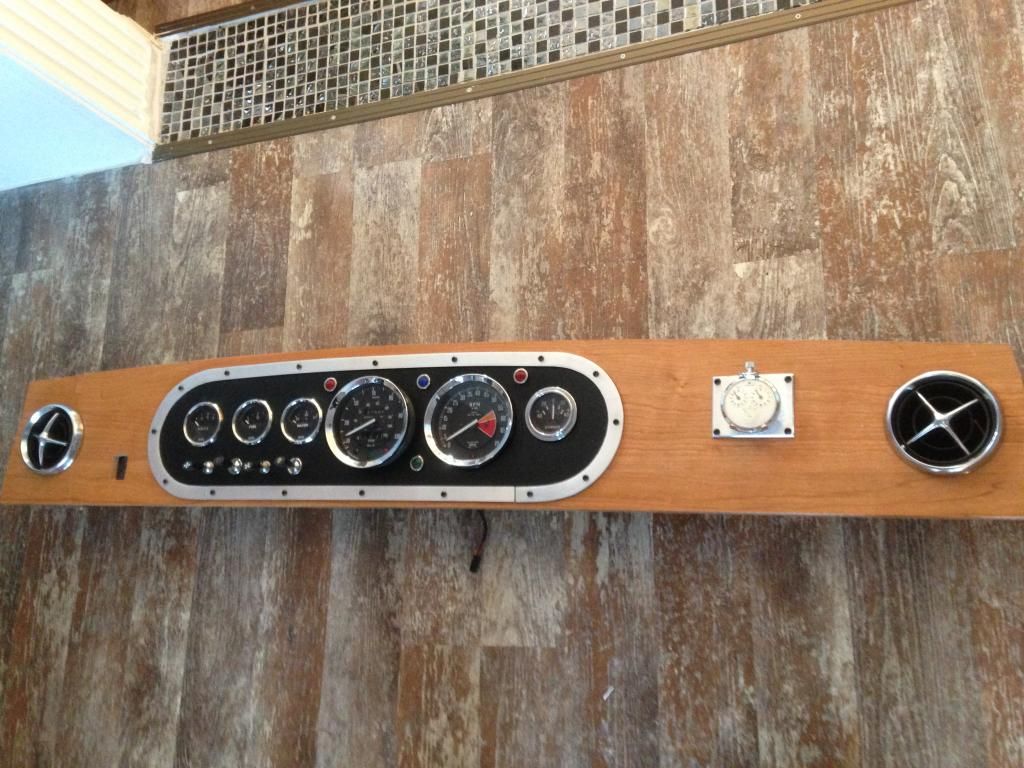
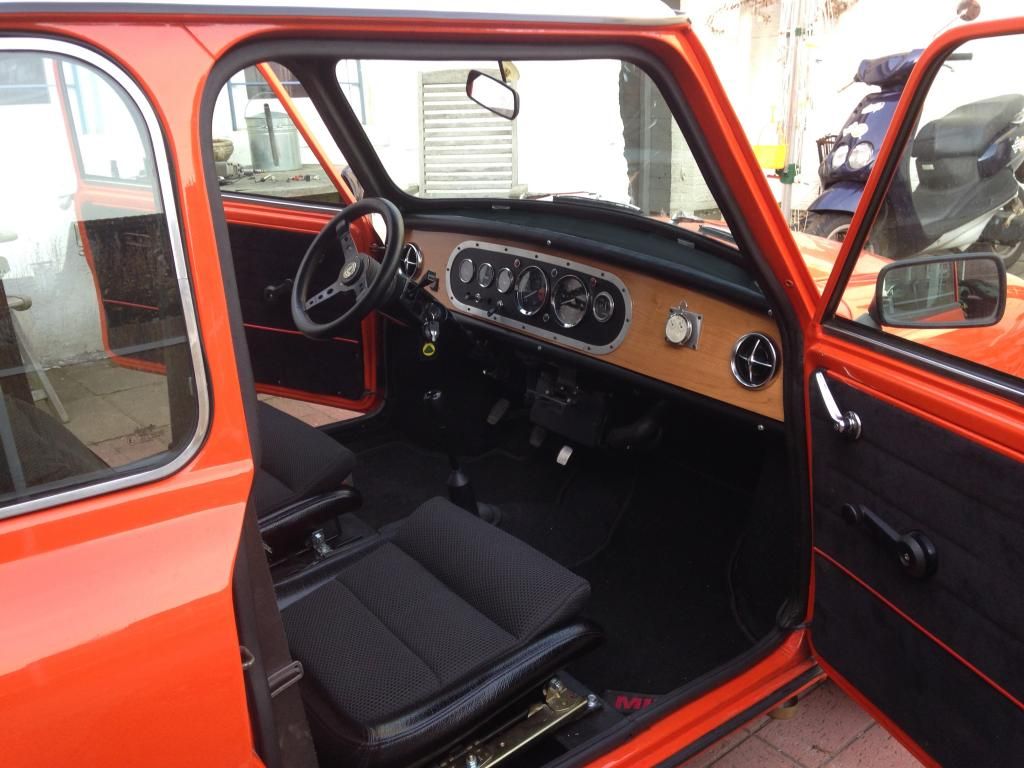
dash for my 100hp16V Mini. I wanted to get rid of the plastic 3-clock-instrumentpanel so I took it off.
I installed two metal tubes in the Mini, the upper is bended slightly, and between the two bars I put a wooden panel sprayed with clear coat.
I made an aluminum panel sprayed matte black for my Smiths gauges, installed my Alfa switches which were originally planned for the Dino, and built an 10mm aluminum frame with the shrinker, which I grinded to a matte finish.
The overall look is pretty nice after I installed it in the car, so I thought I share with you, even if it is just a very little project...
I am keeping this car in running condition to have some fun beside all my unfinished projects in my workshop ;-) but those plastic clocks were annoying me all the time...
 |
28th November 2014, 17:30
|
|
Senior Member
|
|
Join Date: Feb 2012
Location: Wembley, London
Posts: 5,058
|
|
Axel - Nice job on the dash & I love the stopwatch.
|
28th November 2014, 20:28
|
|
Senior Member
|
|
Join Date: Jun 2011
Location: birchington, kent
Posts: 1,769
|
|
I'm impressed with what you did with the shrinker.
|
29th November 2014, 09:39
|
|
Senior Member
|
|
Join Date: Jan 2014
Location: Hamburg
Posts: 174
|
|
Thanks guys!
The shrinker/stretcher is an excellent Tool!
Since I have it so much more is possible and it works so easy and quick!
Check some youtube vids for shrinker/stretcher tool and you will be even more impressed!
Even a very tight Radius can be done in Minutes if you look at my alloy frame for the dash.
|
|
Currently Active Users Viewing This Thread: 1 (0 members and 1 guests)
|
|
|
 Posting Rules
|
You may not post new threads
You may not post replies
You may not post attachments
You may not edit your posts
HTML code is Off
|
|
|
All times are GMT +0. The time now is 12:39.
|


 Hybrid Mode
