|
|
| Sammio Builds and discussions Sammio bodied car builds and specials |

17th October 2014, 06:02
|
 |
Senior Member
|
|
Join Date: Feb 2012
Location: Wembley, London
Posts: 5,056
|
|
Swifty - I know Mac also shortened his steering column in order to make it work.
Which put it in the too complicated to copy category for me. 
However, you can follow the adjustments he made from Post #336 on this page:
http://www.madabout-kitcars.com/foru...t=3501&page=17
Good luck, Paul. 
|
17th October 2014, 07:53
|
|
Senior Member
|
|
Join Date: Apr 2012
Posts: 1,163
|
|
Swifty,
Yep one UJ won't do it, as Paul has pointed out i shortened the column drastically and have used 2 UJ's
Mac
|
20th October 2014, 20:51
|
|
Senior Member
|
|
Join Date: Apr 2012
Posts: 1,163
|
|
Bit of a lull I proceedings as I did a deal to clear out the home workshop of an old chap in Birmingham for his family, 3 transit loads later!!!
Anyway back at it tonight
Need to get the rear light plinths done as they are the last item on the body tub before its ready for paint.
I have changed my approach as it was difficult to get the shape right just using the lamp as a template. I used the rubber gasket I bought for the lamp to trace out a 1mm Ali template that was then screw to the body after liberally slathering the back of it with Fibreglass filler.

And the plate screwed in place.

The grey stuff is stopper to just fill the last pinholes around the edge.

This approach has worked very well and allowed me to sand right up to the edge of the Ali plate.
TTFN
Mac |
20th October 2014, 20:53
|
|
Senior Member
|
|
Join Date: Apr 2012
Posts: 1,163
|
|
And a couple of extra pics more pics


Should be able to final sand tomorrow night and get a good portion of the twin on the nearside done, hopefully back onto the bonnet on Wednesday!
TTFN
Mac |
21st October 2014, 16:21
|
|
Senior Member
|
|
Join Date: Feb 2012
Location: Wembley, London
Posts: 5,056
|
|
Mac - You must be glad to have reached the point where you are nearly ready for paint. 
Good luck, Paul.
|
21st October 2014, 16:40
|
|
Senior Member
|
|
Join Date: Apr 2012
Posts: 1,163
|
|
So about an hour of sanding, (stopper sucks as it clogs fine paper horribly!) and a couple of coats of primer and voila!


Will let it go right off tonight then hit it with a couple of coats of high build tomorrow followed by a final flat back with wet 320 grit and it'll be done.
In the mean while the second plinth is in place and I'm typing this as the first hit of fibreglass filler is going off. Using the Ali templates is definitely something I should have done to begin with, you live and learn. Possibly more pictures in an hour or so.
TTFN
Mac |
22nd October 2014, 16:57
|
|
Senior Member
|
|
Join Date: Apr 2012
Posts: 1,163
|
|
Couple of pinholes that need stopper but the nearside rear lamp plinth is pretty much done


And for the first time both at once! I'm pretty happy with the symmetry


TTFN
Mac |
22nd October 2014, 20:59
|
|
Senior Member
|
|
Join Date: Apr 2012
Posts: 1,163
|
|
Got one of my new FOBCO drills set up tonight. Used it to tackle the problem I had with the threaded rods turning in the front hinge mechanism.
Clamped it up in the compound table that came with the drill which allowed me to dial in the positioning exactly, no more off centre holes for me :-)
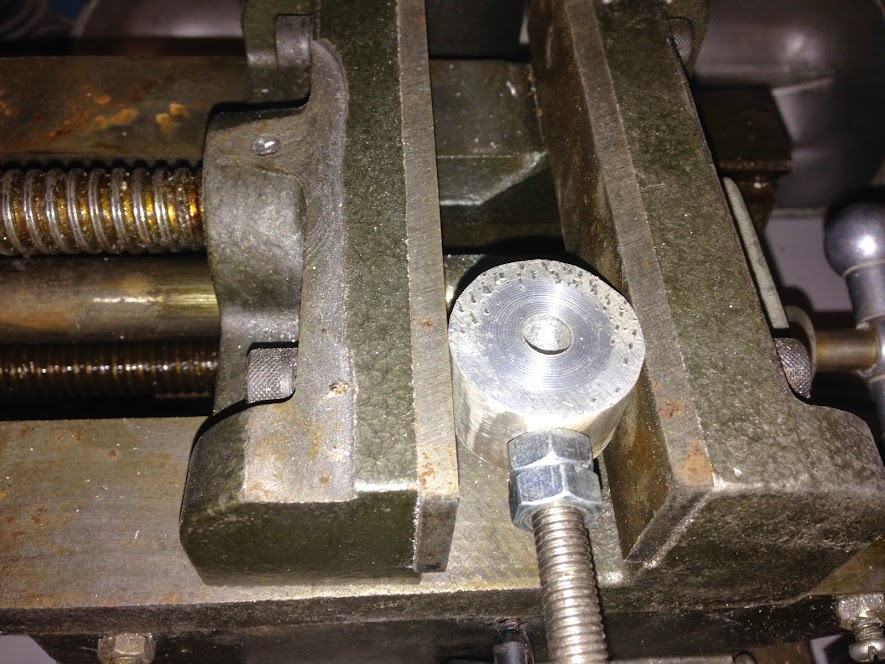

Drilled a 2mm hole through the Ali boss and through the stainless threaded portion, didn't snap the drill and it drilled where I wanted it, have I mentioned how much I love my new drill?

Drifted in a 2mm Roll Pin
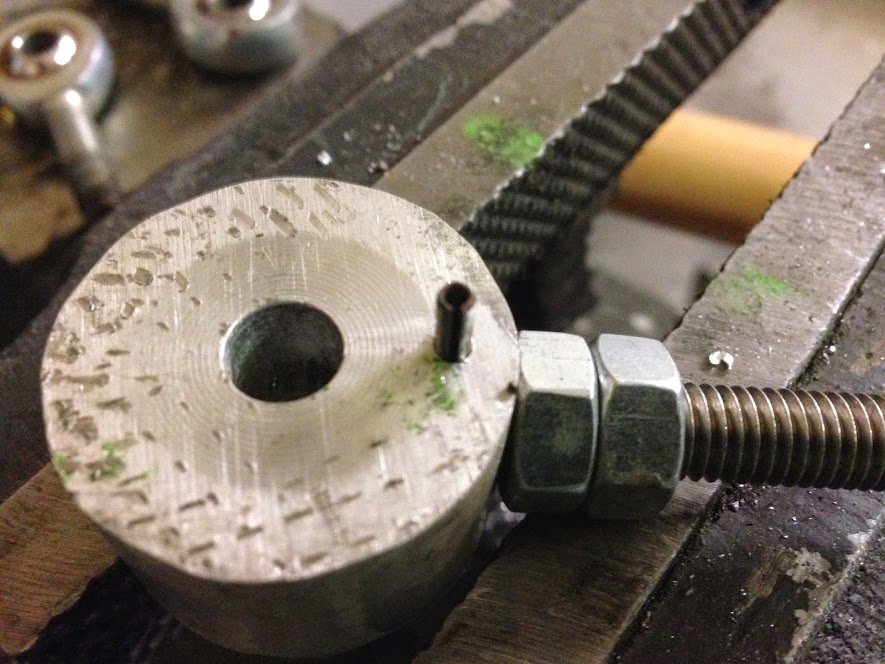
Trimmed the excess off and job done, repeated for the other side and now the last hiccup on the bonnet hinge is sorted, bonnet goes on for real tomorrow!

TTFN
Mac |
23rd October 2014, 16:56
|
|
Senior Member
|
|
Join Date: Apr 2012
Posts: 1,163
|
|
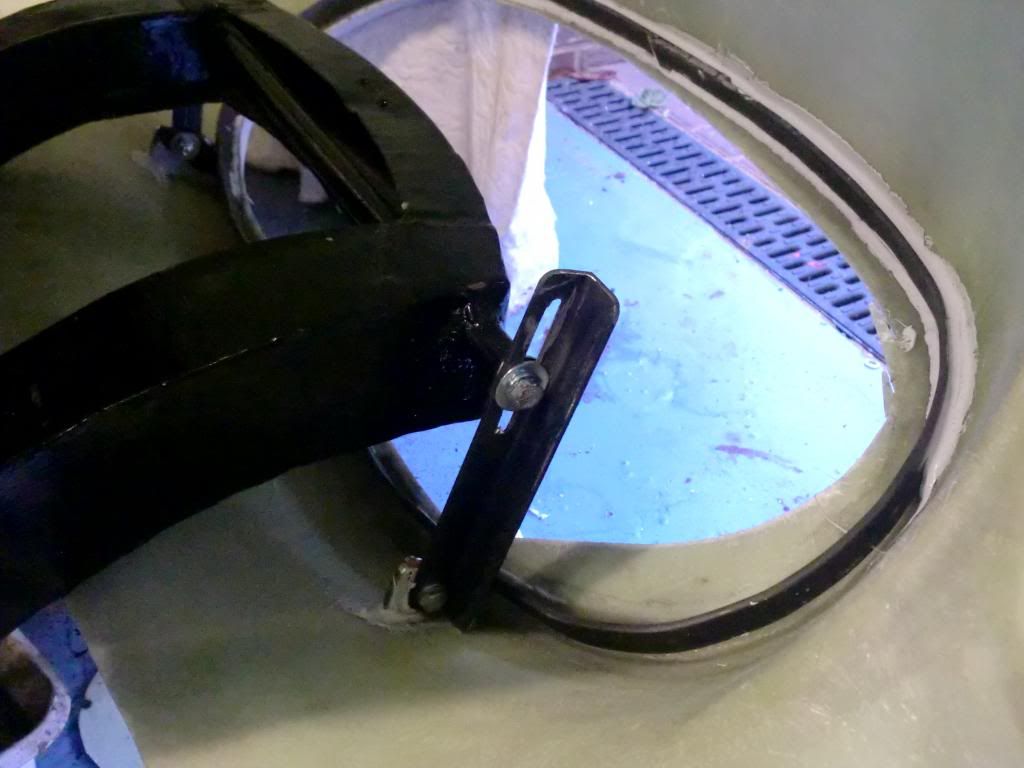
So the bonnet is on and the hinge is adjusted up, it was a bit of a pain as it was a case of fit, remove adjust, repeat about 8 times till everything lined up, at least all the lock nits are now tight so removal and refitting should be a 10 minute job.

Close up of the passenger side hinge

Looks like the tin worms made a visit overnight and removed the outer portions of the front bumper rails.......

Although their visit did allow the bonnet to go forward a little more it still wasn't enough to allow the bonnet to tilt to 90 degrees to the floor so a built in bonnet prop of some type looks to be on the cards

TTFN
Mac |
24th October 2014, 07:19
|
|
Senior Member
|
|
Join Date: Feb 2012
Location: Wembley, London
Posts: 5,056
|
|
Mac - Thanks for all the detail on how you got your bonnet to work.
Although I'm leaving my bonnet in the "too difficult/come back later" pile of things to do for now. 
However, I did have another quick look at a bonnet photo of the red Ribble Navigator.
( Which has been sold according to Ebay. )

Now you mention it, it looks like there is a bonnet prop attached to it.
I never saw a photo of the bonnet open from a distance, so I guess it tilts about as far as yours.
I also went back and looked at Simon's ( donnysoutherner) build thread and found this.
Loop and hinge home made, not quite right as the bonnet does not really open far enough, but is at least adjustable for length and height....
Looking at this photo with fresh eyes, it appears the tin worm really went to town on his build. 
Good luck, Paul.
|
24th October 2014, 08:25
|
|
Senior Member
|
|
Join Date: Apr 2012
Posts: 1,163
|
|

Paul, unfortunately my victory is short lived as I'm off to Devon this afternoon to start a job on Saturday morning that will last until next Monday including both weekends so workshop time until then will be nil :-(
My plan is to use 2 different methods to keep the bonnet closed securely.
The first is to use these to keep the sides strapped down.

But I suspect that the rear edge of the bonnet may "flap" a little if not secured so have bought a pair of these

I will fit one either side of the hump but to do so I will need a couple of brackets to fit the pins to. So raided the "bits o steel" pile and knocked a couple up.

Note the use of some lovely vintage tools from my recent haul :-)

The plate was a little thinner than I would have liked so welded a thick washer on the top to beef it up.
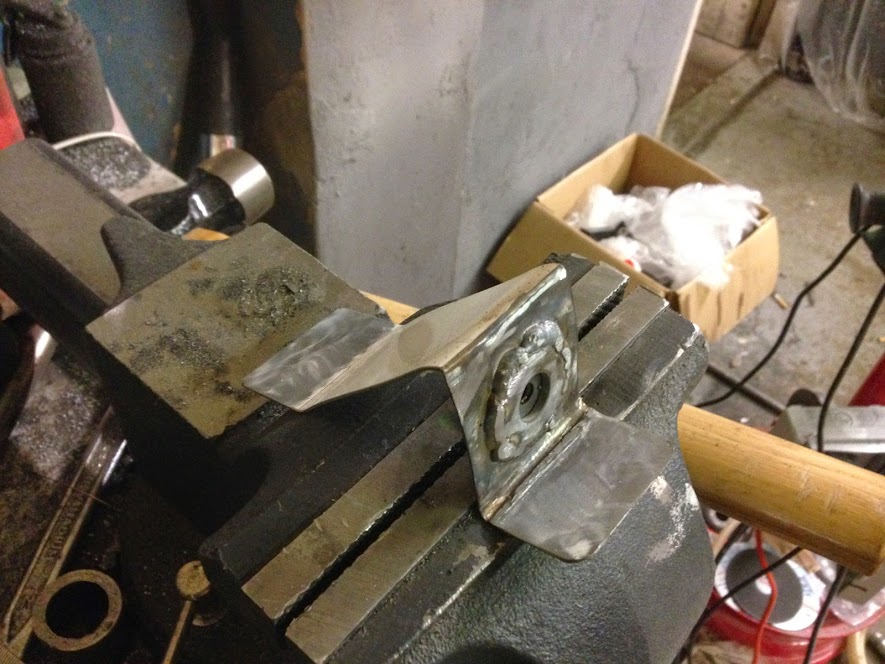
And then also added some side braces.

these will be riveted to the bulk head for the pins to screw into, you cant really see but a nut is welded to the underneath of the washer surface so I can wind the pins in and out for fine adjustment then lock the position off with another nut nipped up to the washer surface.
Well that's it for now
TTFN
Mac

|
24th October 2014, 14:16
|
|
Senior Member
|
|
Join Date: May 2013
Posts: 2,161
|
|
A neat idea Mac, should work a treat!
Do you have a link to those round headed pins?
May be useful for me too.
|
25th October 2014, 08:07
|
|
Senior Member
|
|
Join Date: Apr 2012
Posts: 1,163
|
|
|
25th October 2014, 10:02
|
|
Senior Member
|
|
Join Date: May 2013
Posts: 2,161
|
|
Thanks Mac.
|
1st November 2014, 17:32
|
|
Senior Member
|
|
Join Date: Apr 2012
Posts: 1,163
|
|
Got the quick Latches fitted today


Then spent the rest of the day still sorting through the workshop clearance piles! but ended well as I sold 2 old Smiths Tachos for £375!!!
TTFN
Mac |
3rd November 2014, 15:48
|
|
Senior Member
|
|
Join Date: Feb 2012
Location: Wembley, London
Posts: 5,056
|
|
Mac - Nice job on the bonnet pins.
Good luck, Paul.
|
4th November 2014, 19:01
|
|
Senior Member
|
|
Join Date: Apr 2012
Posts: 1,163
|
|
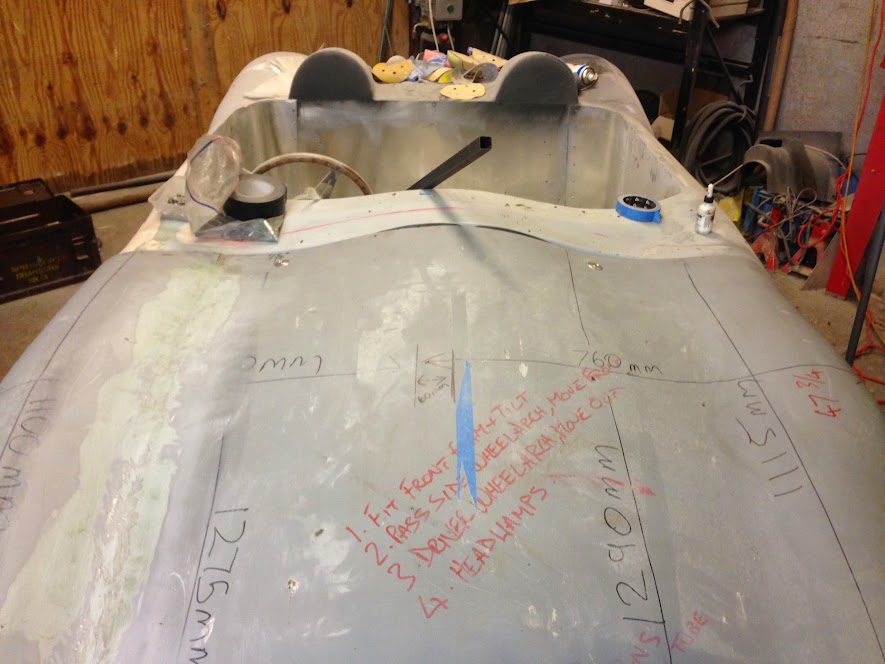
Tonight's job is to sort the front of the nearside front wheel arch. it needs moving forward about 3/4" to clear the tyre and look similar to the offside one. Quick marking session followed by some action with the angry grinder:

Only needed one small plate riveting on to hold it in position. Then hit the inside with about 3 layers of 350 gsm glass matting

And another very exciting shot of some curing fibreglass, don't get too excited.....

TTFN
Mac |
4th November 2014, 19:26
|
|
Senior Member
|
|
Join Date: May 2013
Posts: 2,161
|
|
Nice job Mac!
|
15th November 2014, 16:41
|
|
Senior Member
|
|
Join Date: Apr 2012
Posts: 1,163
|
|
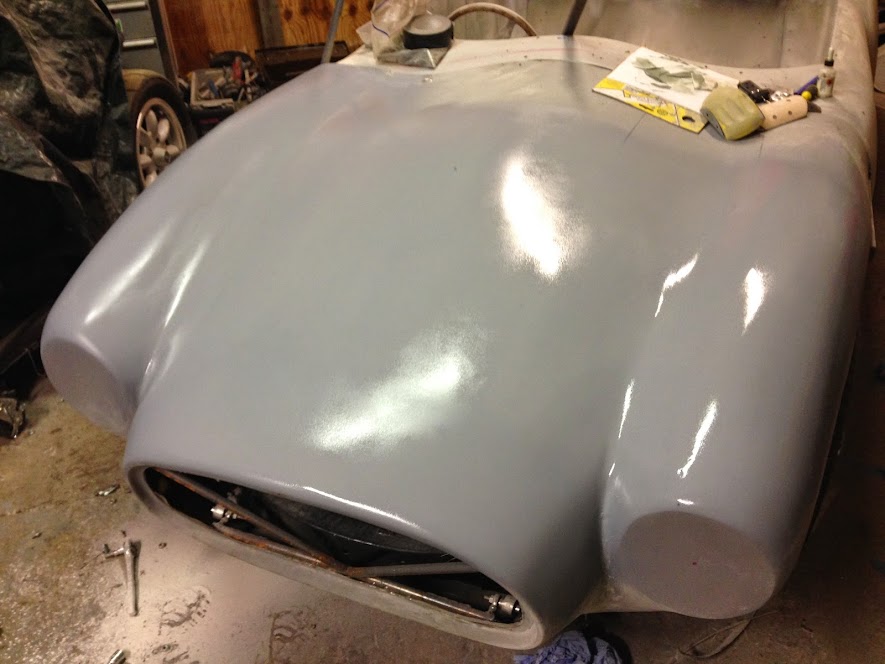
Been a bit tom and dick again but have managed to make progress. am planning a full day up the cave tomorrow so am sort of hoping I may be laying down a first full coat of primer!
Blew the bonnet over with some old rattle cans of primer just to highlight any imperfections
And found plenty, typically the one below, its not the black blob but the wrinkle is just north of it.

First skim of the moved front wheel arch

Patch filling of fine filler to address the flaws the primer showed up.
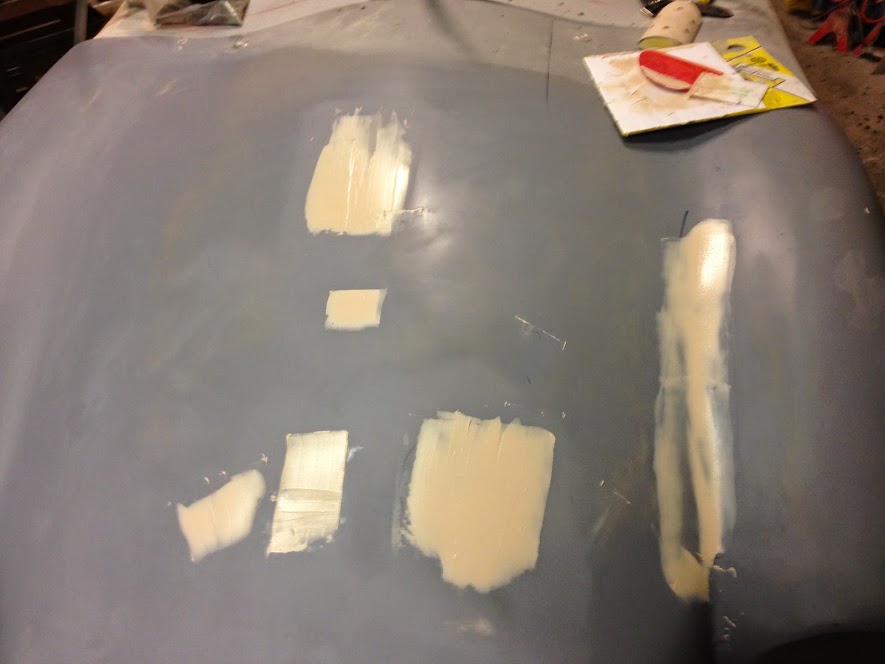
And final fill of the wheel arch

And a bit of a momentous moment,
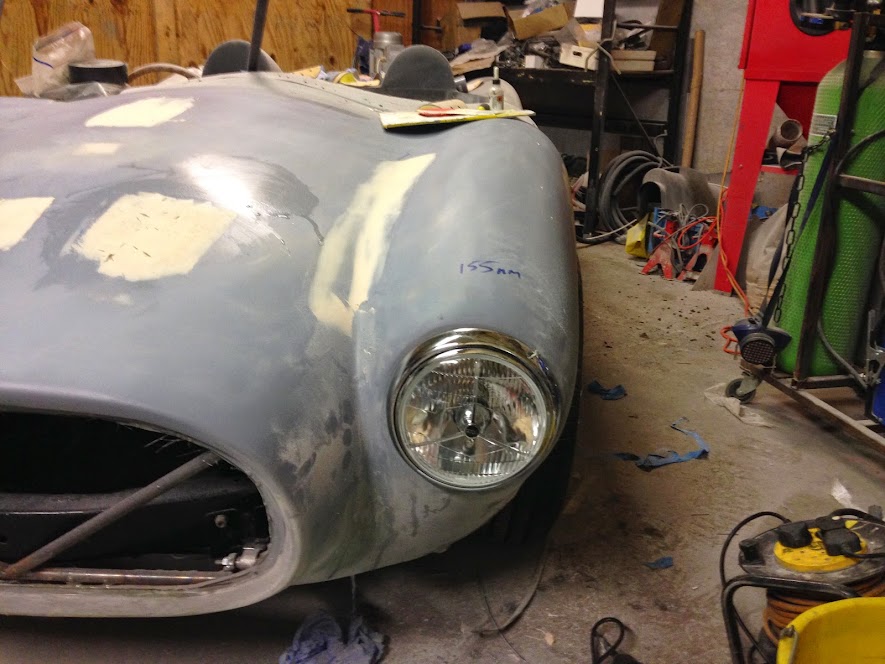

First shaping session for the return where the bonnet meets the winglets.

Looks a real mess but one thing that all this bodywork has taught me is that it always looks worse before it looks better.

Hardware going on!

Final layer of filler on the drivers side win return.

And the dip in the drivers side gets its last coat of fine filler.

So the plan for tomorrow is to finish the drivers side front quarter and fit the drivers side headlight then remove the bonnet and give the inside a coat of truck bed liner. whilst that is drying I will make a start on masking up the cockpit area and maybe just maybe get the main tub all in one coat of primer filler....hmmmmm we'll see.
TTFN
Mac
|
15th November 2014, 17:27
|
 |
Senior Member
|
|
Join Date: Jul 2011
Posts: 5,328
|
|
Shame you couldn't find any BIG leather bonnet straps...
|
|
Currently Active Users Viewing This Thread: 1 (0 members and 1 guests)
|
|
|
| Thread Tools |
|
|
| Display Modes |
 Linear Mode Linear Mode
|
 Posting Rules
|
You may not post new threads
You may not post replies
You may not post attachments
You may not edit your posts
HTML code is Off
|
|
|
All times are GMT +0. The time now is 07:40.
|


