|
|
| Marlin Sportster, Cabrio, Berlinetta and Roadster builds Enthused or Confused about your vintage Marlin build? Ask away here or show off your build. |

13th August 2011, 22:10
|
 |
Senior Member
Enthusiast
|
|
Join Date: Mar 2005
Posts: 3,076
|
|
 M20B28 Engine rebuild
I have a question about rebuild of my BMW M20B28 custom engine.
It's clear in all the manuals that, when rebuilding, you should use new Cylinder head bolts and Conrod bolts as the are 'stretch' bolts and cannot be reused.
My question is about Main Bearing casing bolts. Do these need to be replaced?
I've seen conflicting advice and the original bolts look like bog standard 10.9 high tensile bolts. They are listed on Realoem at only 93 cents which also suggests they are nothing special (especially as conrod bolts are listed at $6.32 each!)
Anybody seen anything definitive from BMW?
|
13th August 2011, 22:24
|
 |
Senior Member
Enthusiast
|
|
Join Date: Feb 2005
Location: Hampshire
Posts: 2,496
|
|
Everything I've read says head bolts and rod bolts. Big end shell bolts don't stretch so I reused those, they look like standard bolts to me.
|
14th November 2011, 19:55
|
|
Senior Member
Enthusiast
|
|
Join Date: Mar 2005
Posts: 3,076
|
|
Main bearing puzzle
I've hit a problem with my new lower bearing shells......
(The uppers went in just fine)
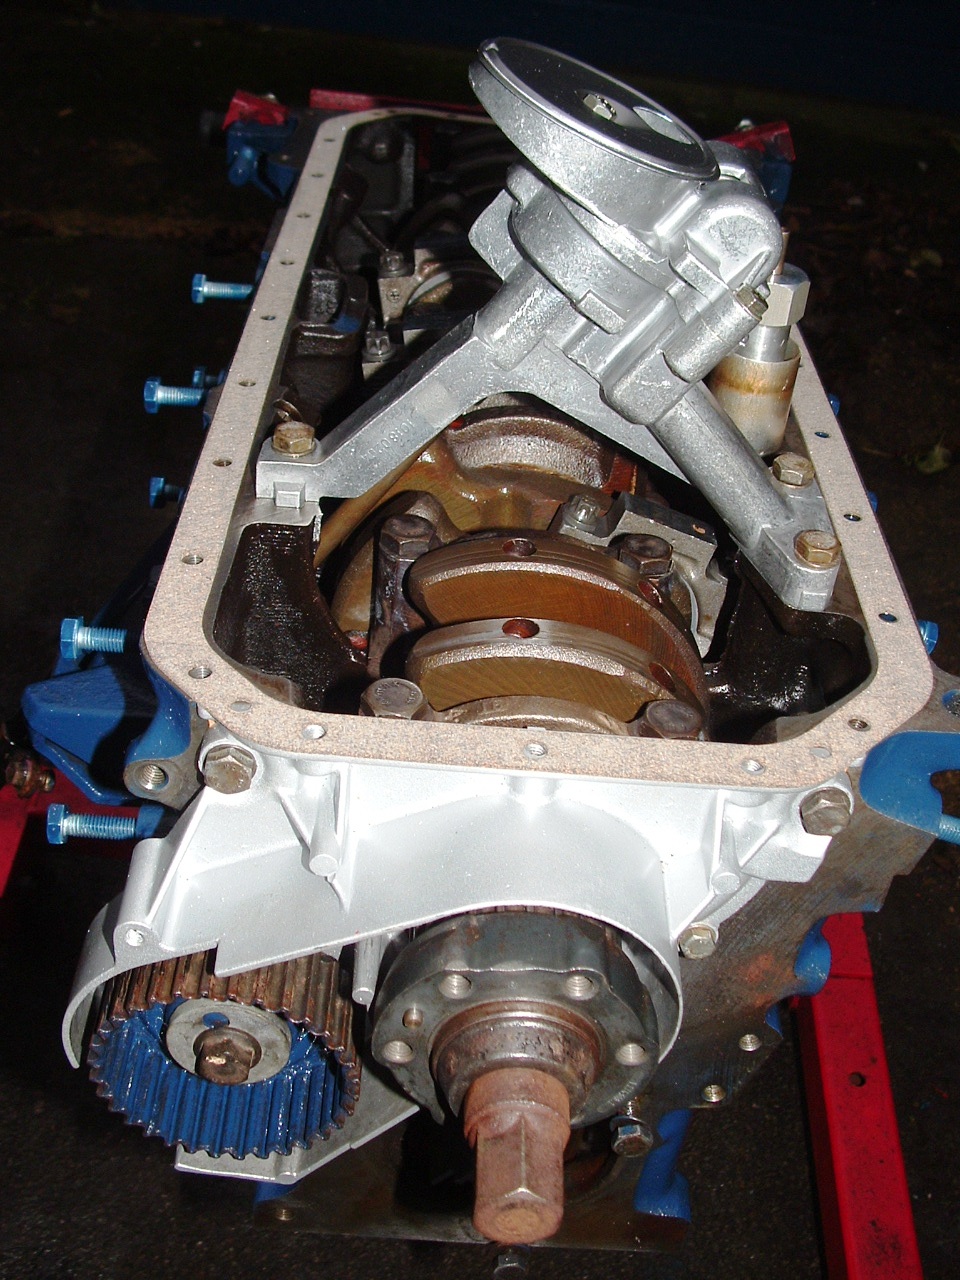
 Main bearing puzzle
 by marlinpeter, on Flickr
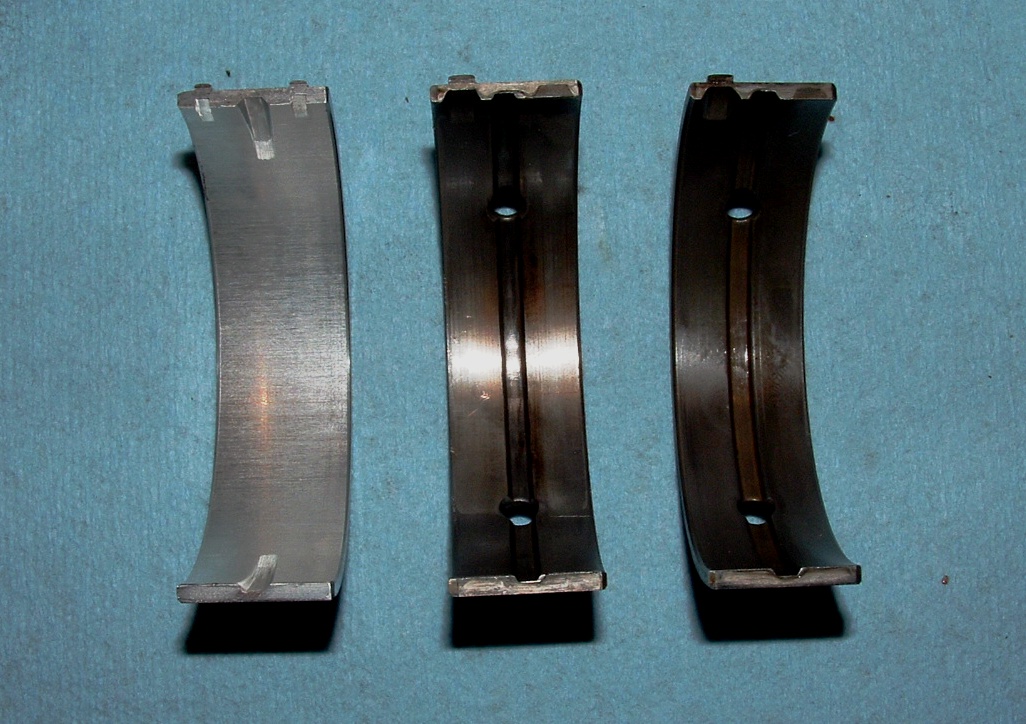
On the left is one of my new lower main bearing shells. You'll see it is not grooved or has any holes.It also has two indents at the top so won't actually fit in my bearing caps which only have one indent.
In the centre is one of the original lower shells that is grooved and has a single indent.
On the right is an original upper shell. So on my engine both top and bottom shells have exactly the same BMW part numbers.
According to my bearing suppliers website and Realoem, the top and bottom shells should be different part numbers.
(To add to the confusion, the lower bearing shells that came with my 328 crank are also smooth with double indents?)
I see I have two options...
1. Buy some more Main bearing shells so that I can replace top and bottom that are the same with grooves and single indents. (expensive)
2. Use the bearing caps that came with my 328 crank and the new bearings I have already purchased (no further cost) but will the bearing caps from one engine align with the another?
Going back to the bearing shell supplier is probably a non-starter since they don't list an option for a set with identical top and bottom shells.
Any ideas or other options before I fork out more money on some more shells.

|
14th November 2011, 22:16
|
|
Senior Member
Enthusiast
|
|
Join Date: Mar 2005
Posts: 3,076
|
|
Been doing a bit of homework on bearings and found an interesting article by Mahle.
It states....
" Many early engines used full grooved bearings and some even used multiple grooves. Those choices were based on what engineers knew at the time. As engine and bearing technology developed, the negative effect of grooving was recognized and bearing grooving was removed from modern lower main bearings. The result is in a thicker film of oil for the shaft to ride on. This provides a greater safety margin and improved bearing life. Upper main shells, which see
lower loads than the lowers, and hence don’t apply the same load to the oil film, have retained a groove to supply the connecting rods with oil. "
So I presume BMW built engines with grooved lower bearings and then moved to smooth shells. I seem to have the early version.
I've thought of Option 3 - very carefully grind or file off the extra indent on the new smooth bearings. And grind slowly to avoid any build up of heat?
Any downsides to this option?
|
15th November 2011, 08:40
|
|
Senior Member
Enthusiast
|
|
Join Date: Jan 2007
Posts: 932
|
|
Quote:
Originally Posted by peterux

I've hit a problem with my new lower bearing shells......
(The uppers went in just fine)
Main bearing puzzle by marlinpeter, on Flickr
I see I have two options...
1. Buy some more Main bearing shells so that I can replace top and bottom that are the same with grooves and single indents. (expensive)
2. Use the bearing caps that came with my 328 crank and the new bearings I have already purchased (no further cost) but will the bearing caps from one engine align with the another?
Going back to the bearing shell supplier is probably a non-starter since they don't list an option for a set with identical top and bottom shells.
Any ideas or other options before I fork out more money on some more shells. |
Peter
My understanding of engine building is that the main bearings are line bored with the mains attached to the block, which is why it is important to keep the mains in the same position when rebuilding. I think mixing and matching mains from one engine with a block from another is not good practice and could cause problems later on.
You could try talking to a local engine re-conditioners and ask their advice?
|
16th November 2011, 23:09
|
|
Senior Member
Enthusiast
|
|
Join Date: Mar 2005
Posts: 3,076
|
|
On consideration of the options, i'm going for Option 1. (The other ideas were not really worth the risk).
So.....
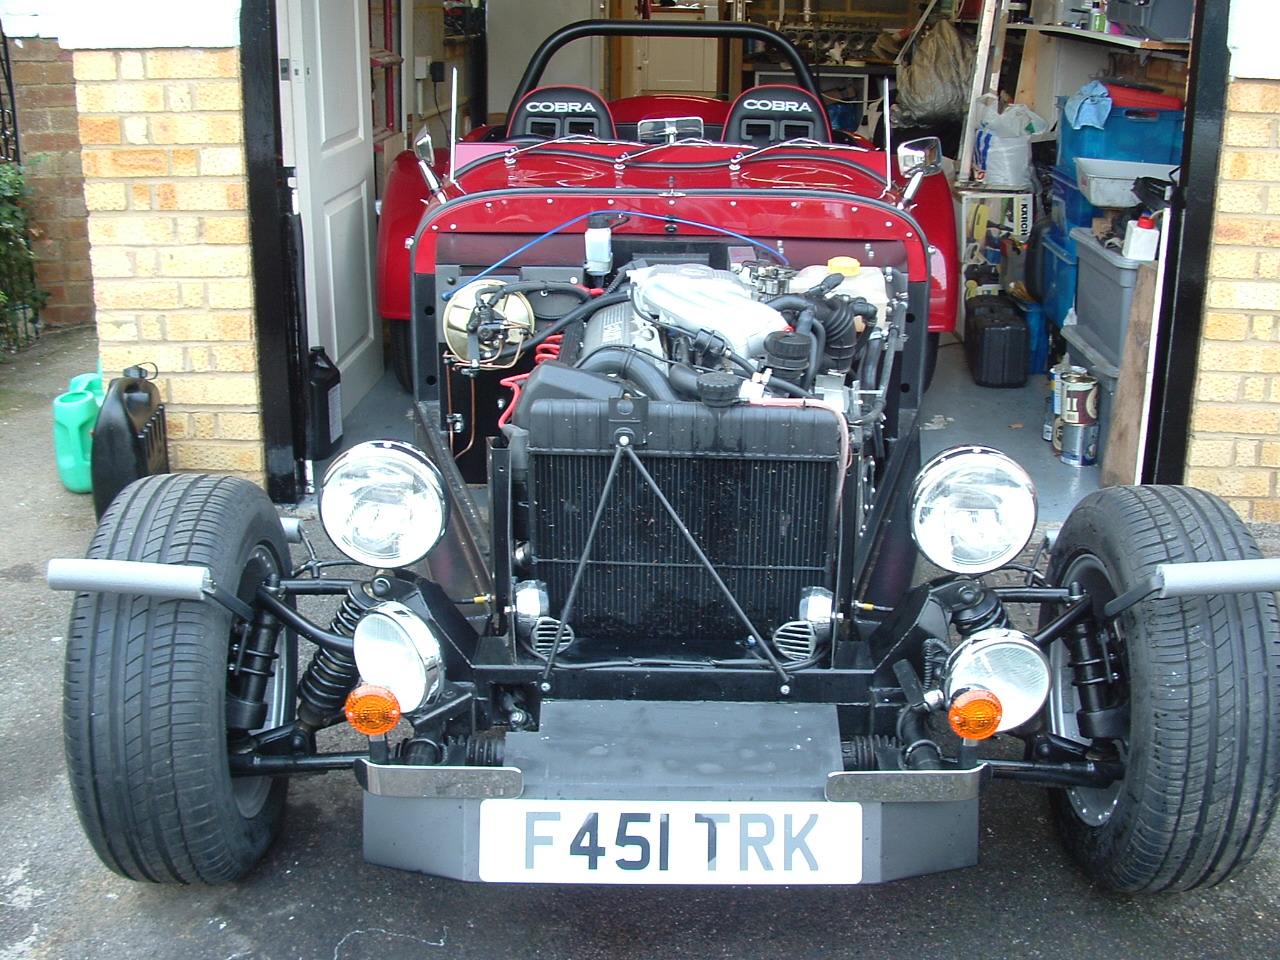 Preparation for engine removal
 by marlinpeter, on Flickr
All the front body panels have been removed and safely wrapped and stored away. Engine oil and coolant drained. My poor car does look sad!
Lots of dead flies on the radiator!!
I also noticed during the strip down that I have a split in one of my steering rack gaiters and both top front ball joint rubbers are completely perished.
BTW, the windscreen is off, as it's away have a new piece of glass fitted.
Ho, hum.... |
17th November 2011, 03:15
|
 |
Senior Member
Enthusiast
|
|
Join Date: Sep 2005
Location: Northampton, UK
Posts: 1,891
|
|
Pete,
There is indeed two bearing types. I found that out when I was rebuilding Vikki's engine. The ones you have look like mine, early upto '85/'86 shells
With your engine being younger, you'd need the later post '86 ones.
If you speak with motormec they should be to provide the correct ones if you give them your donor chassis number or engine number
|
17th November 2011, 07:48
|
 |
Senior Member
Enthusiast
|
|
Join Date: Sep 2004
Posts: 1,891
|
|
Quote:
Originally Posted by peterux
...
1. Buy some more Main bearing shells so that I can replace top and bottom that are the same with grooves and single indents. (expensive)
2. Use the bearing caps that came with my 328 crank and the new bearings I have already purchased (no further cost) but will the bearing caps from one engine align with the another?
Going back to the bearing shell supplier is probably a non-starter since they don't list an option for a set with identical top and bottom shells.
Any ideas or other options before I fork out more money on some more shells.
|
You absolutley MUST NOt mix bearing caps from one engine in another. They are reamed in position. How do I know? Broke one once. Had to buy a new unfinished one and go through the process of having it reamed by a local engine remanufacturer. £££'s
Cheers
Robin
PS If you want to borrow the engine hoist again you know where I am.... |
17th November 2011, 13:45
|
|
Senior Member
Enthusiast
|
|
Join Date: Mar 2005
Posts: 3,076
|
|
Thanks Mike,Jason and Robin.
I knew that it was not recommended to mix and match bearing caps but I didn't know why.
I'm now sorted with the right bearing shells thanks to a 'very nice man' at http://www.enginepartsuk.net/. Very knowledgeable and highly recommended!!
If you register on their website you can pull up drawings, etc of the parts and he gave me trade price.
I think I have a bit of an oddity with this engine. It's most definitely from a Feb. 1988 car because I have the 'birth certificate' from BMW but it seems to be of the older M20 design. It has these older type shells, it had long skirt pistons and it also has an old design of the ECU with the two PCB's. Either there was some reason why the registration of the original car was delayed or the engine was lurking in the factory until it got fitted.
Anyway, I'm sorted now so on with the rebuild...
P.S. and thanks again Robin, I know where you are.... |
17th November 2011, 19:47
|
|
Senior Member
Enthusiast
|
|
Join Date: Mar 2005
Posts: 3,076
|
|
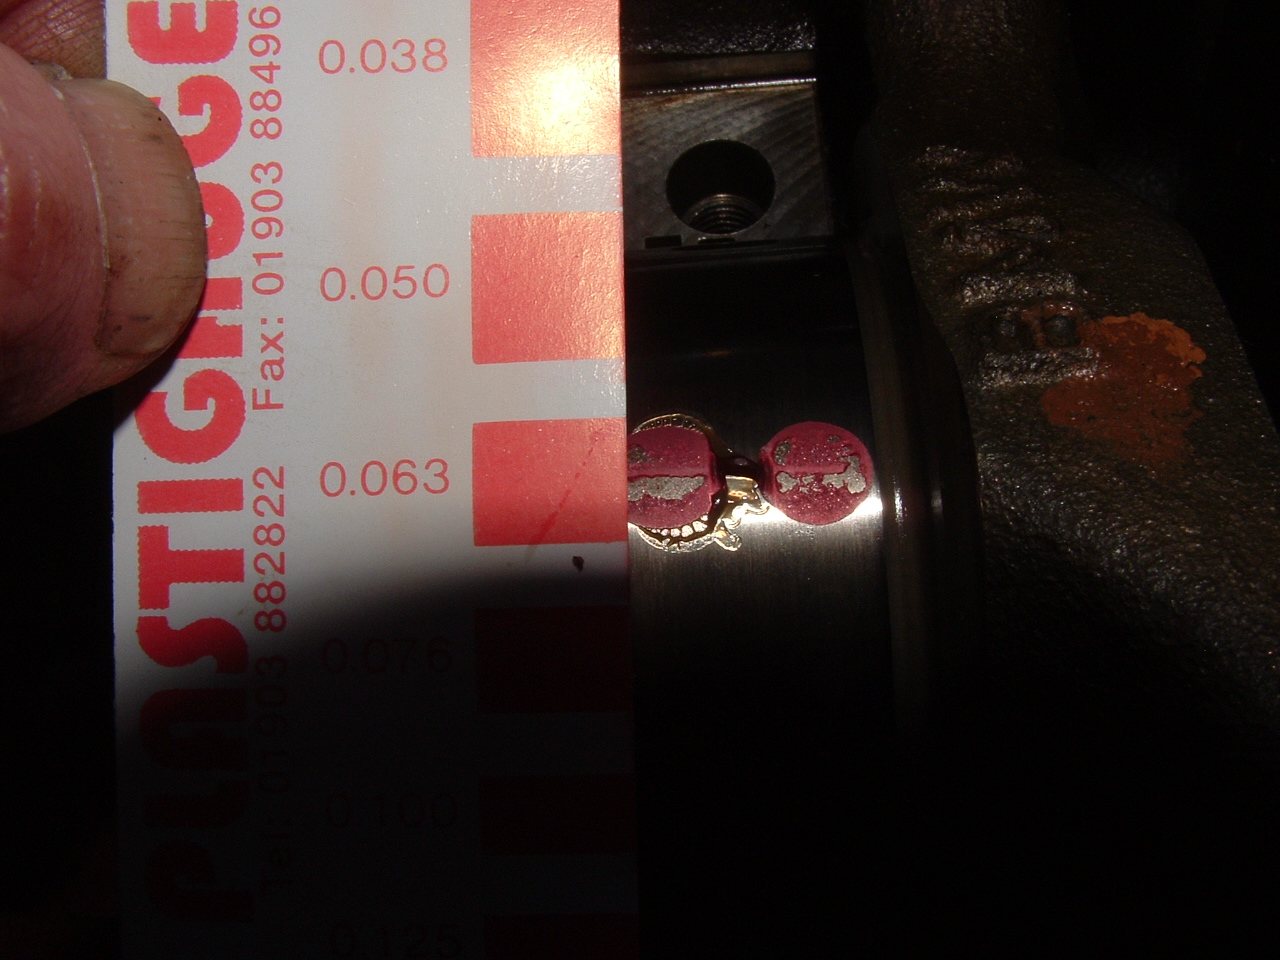
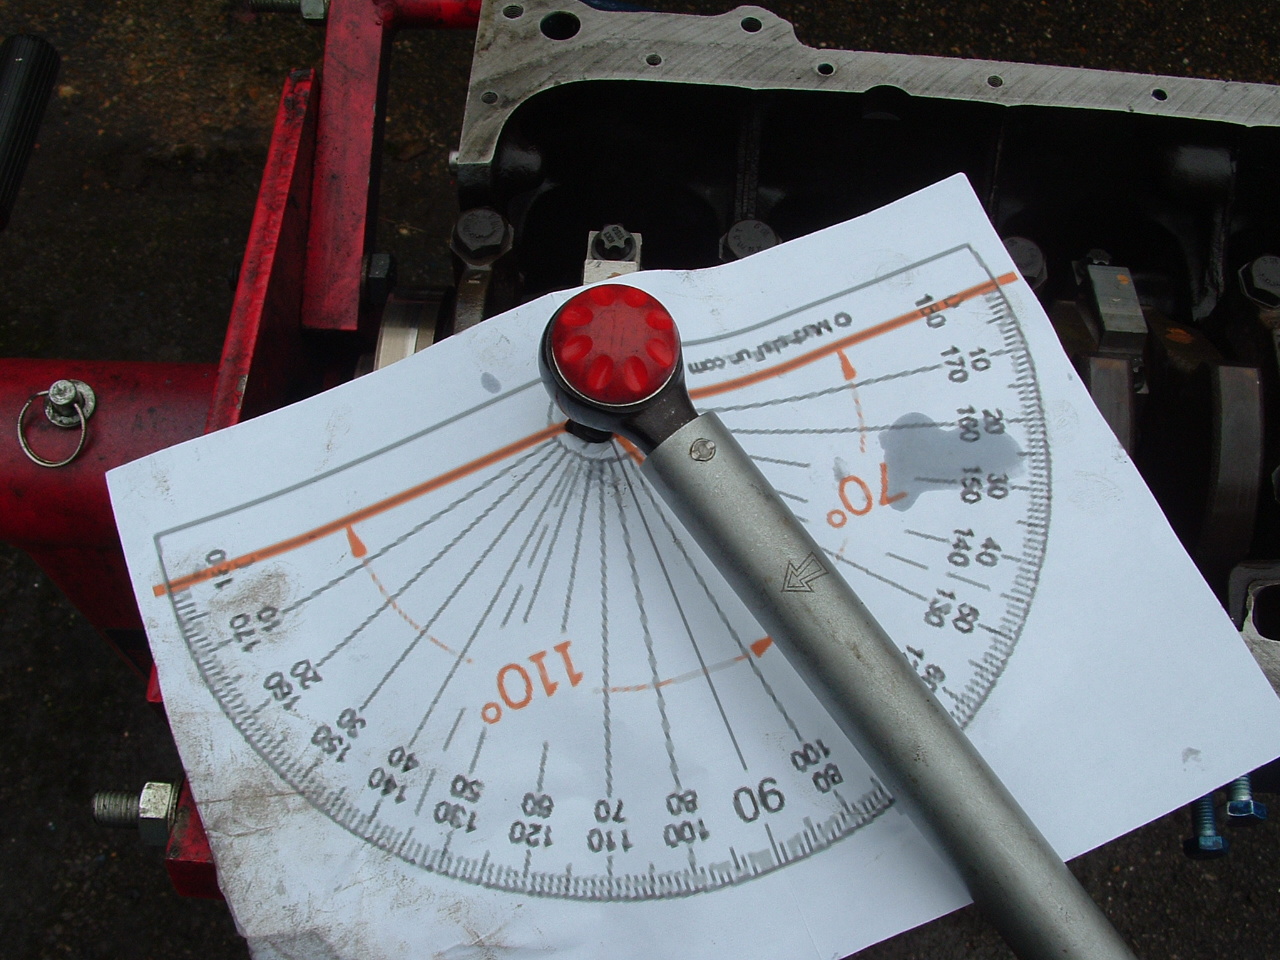
Checking Crankshaft Main bearing radial clearance
More fun in the lock-up garage today...
More for peace of mind (and because I've never rebuilt an engine before) I thought I'd have a go at measuring my crank radial clearance today.
I used Plastigauge to check the radial clearance on my M50 328 crank when fitted in the 325 block with the new bearing shells.
As you all probably know, Plastigauge works by compressing a thin strip of plastic and then measuring how much it is spread when flattened by the crank main bearings.
Mine came out about 0.060mm which is good because the tolerance range specified is 0.030 - 0.070mm. (It looks more in this photo because the gauge is closer to the camera)
So we are good to go ahead!
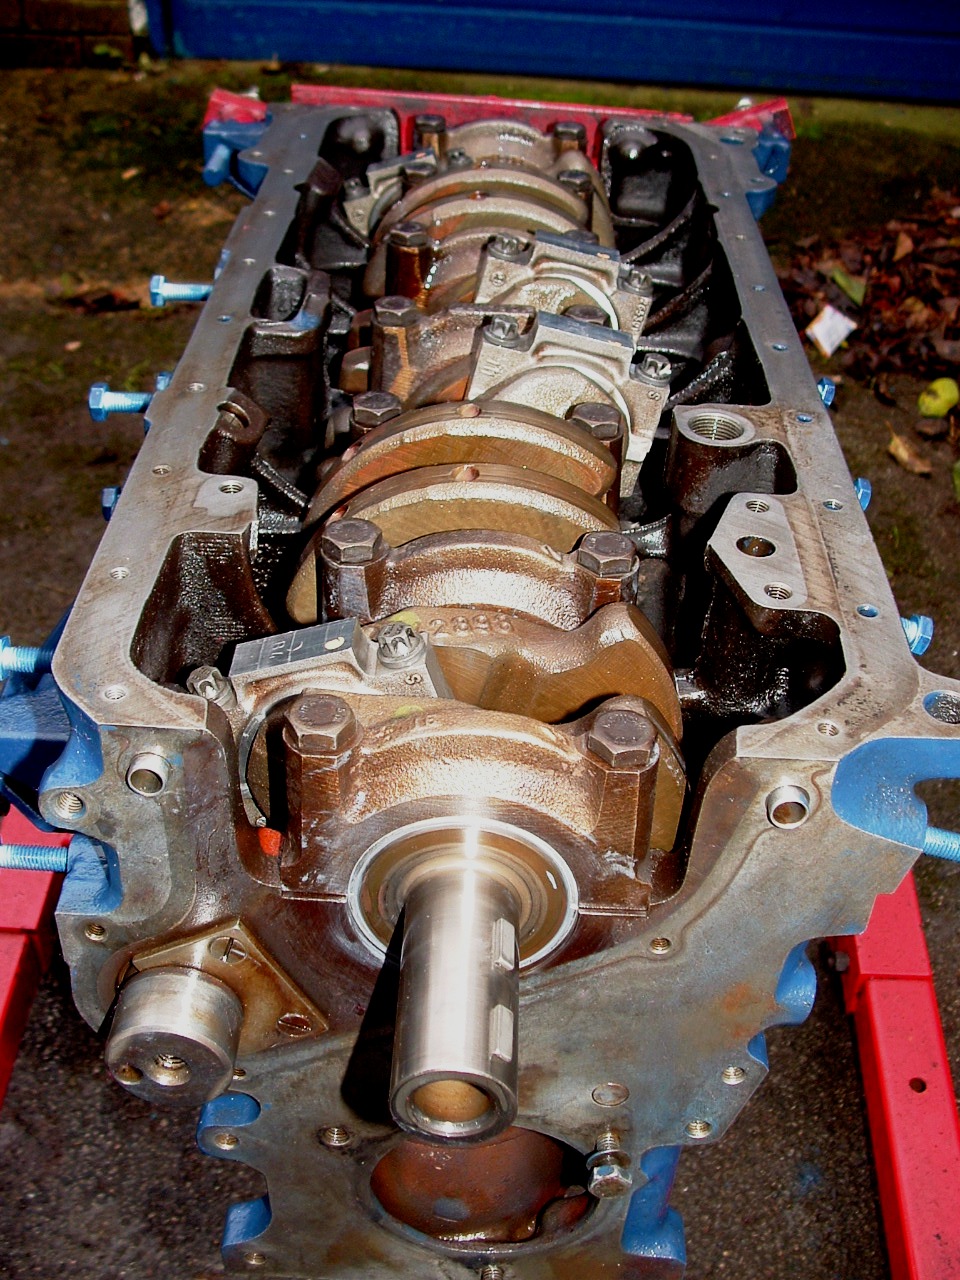
 Checking Cranshaft Main bearing clearance
 by marlinpeter, on Flickr
Here's a shot of the gauge before its been flattened...
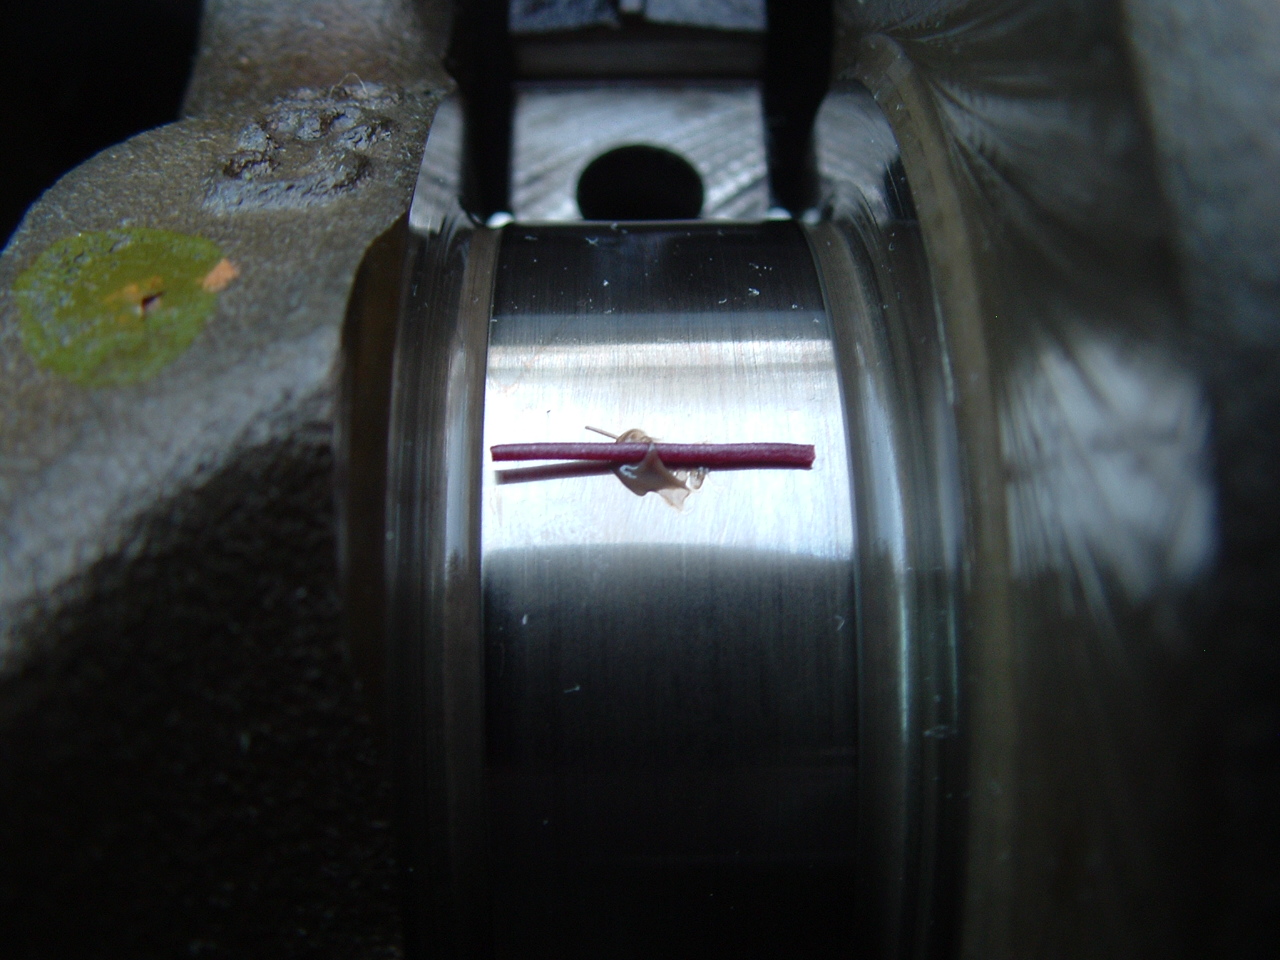 Checking Cranshaft Main bearing clearance
 by marlinpeter, on Flickr
And after.....
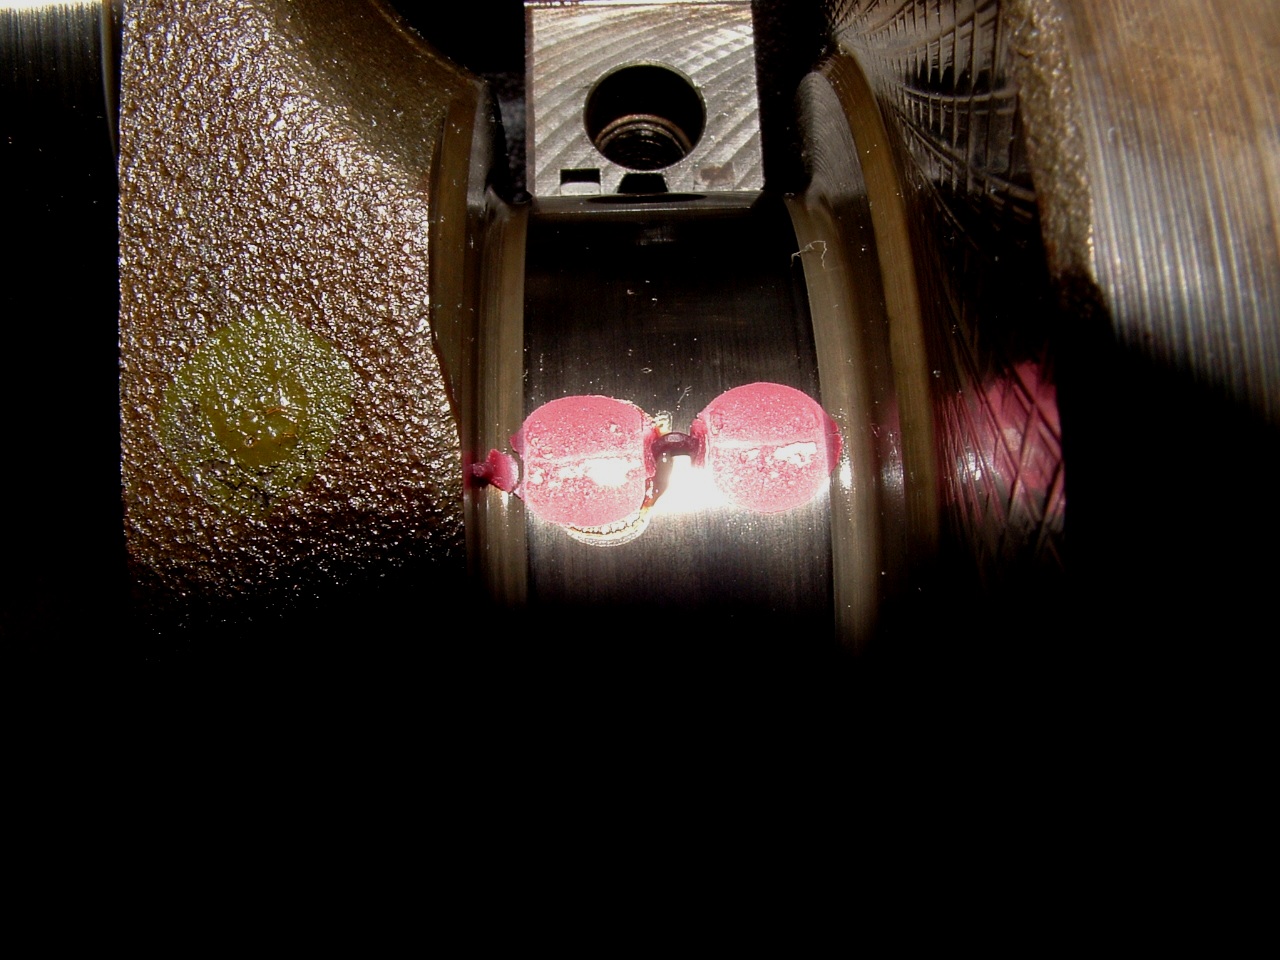 Checking Cranshaft Main bearing clearance
 by marlinpeter, on Flickr
It's two blobs because my bearings have 360 degree channels. There was also very little variation across all seven bearings which was also good news.
It doesn't make any difference to the rebuild but it's good to know that the 328 crank is a good match for the 325 block. 
|
22nd November 2011, 16:07
|
|
Senior Member
Enthusiast
|
|
Join Date: Mar 2005
Posts: 3,076
|
|
More fun down at the lock-up.....
|
26th November 2011, 21:39
|
|
Senior Member
Enthusiast
|
|
Join Date: Mar 2005
Posts: 3,076
|
|
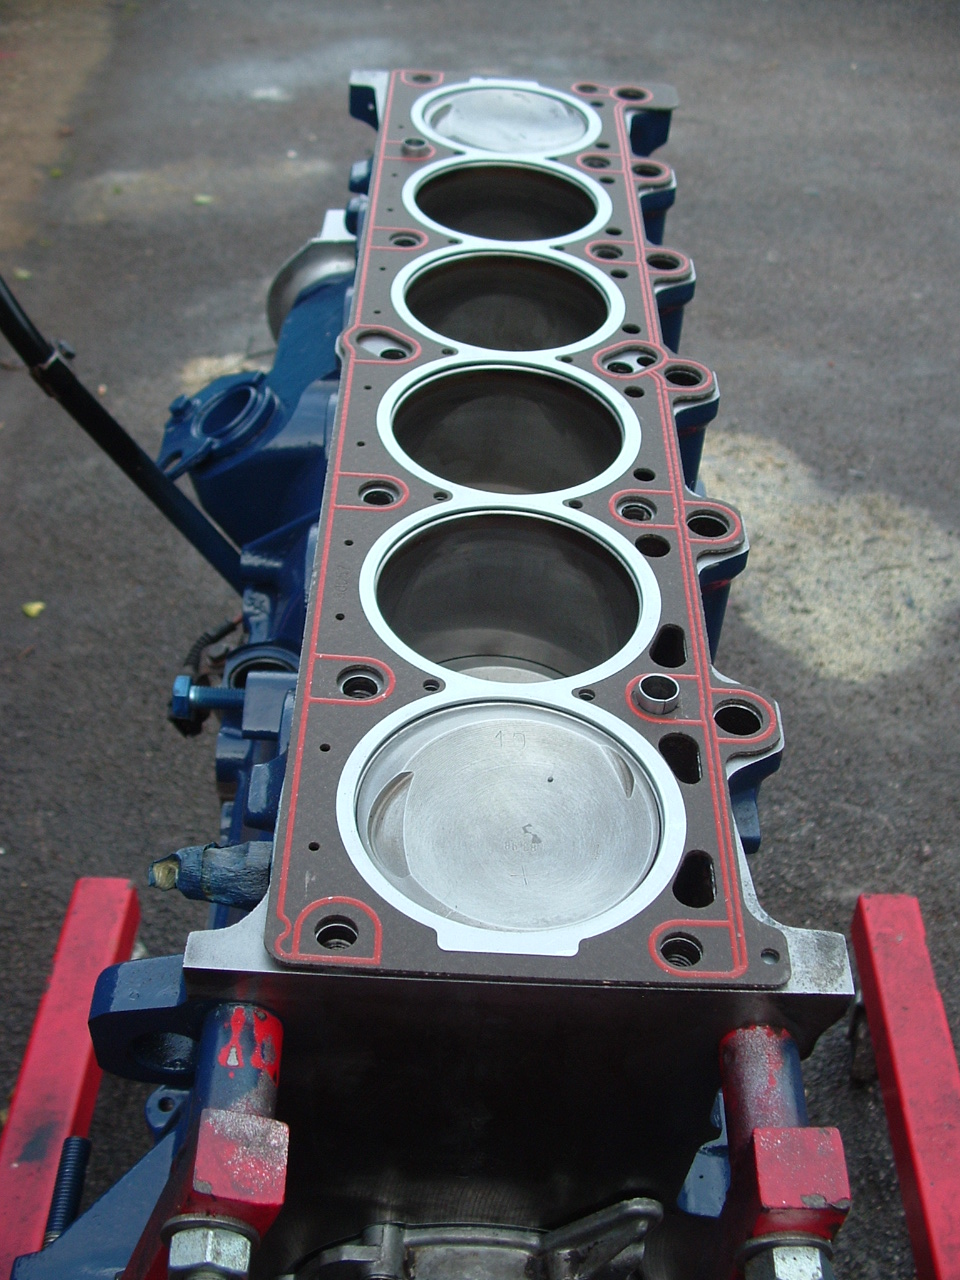 Preparing to re-install the cylinder head
 by marlinpeter, on Flickr
Crank set to TDC before fitting the head so the valves don't hit the pistons. Finally, its all coming together again.
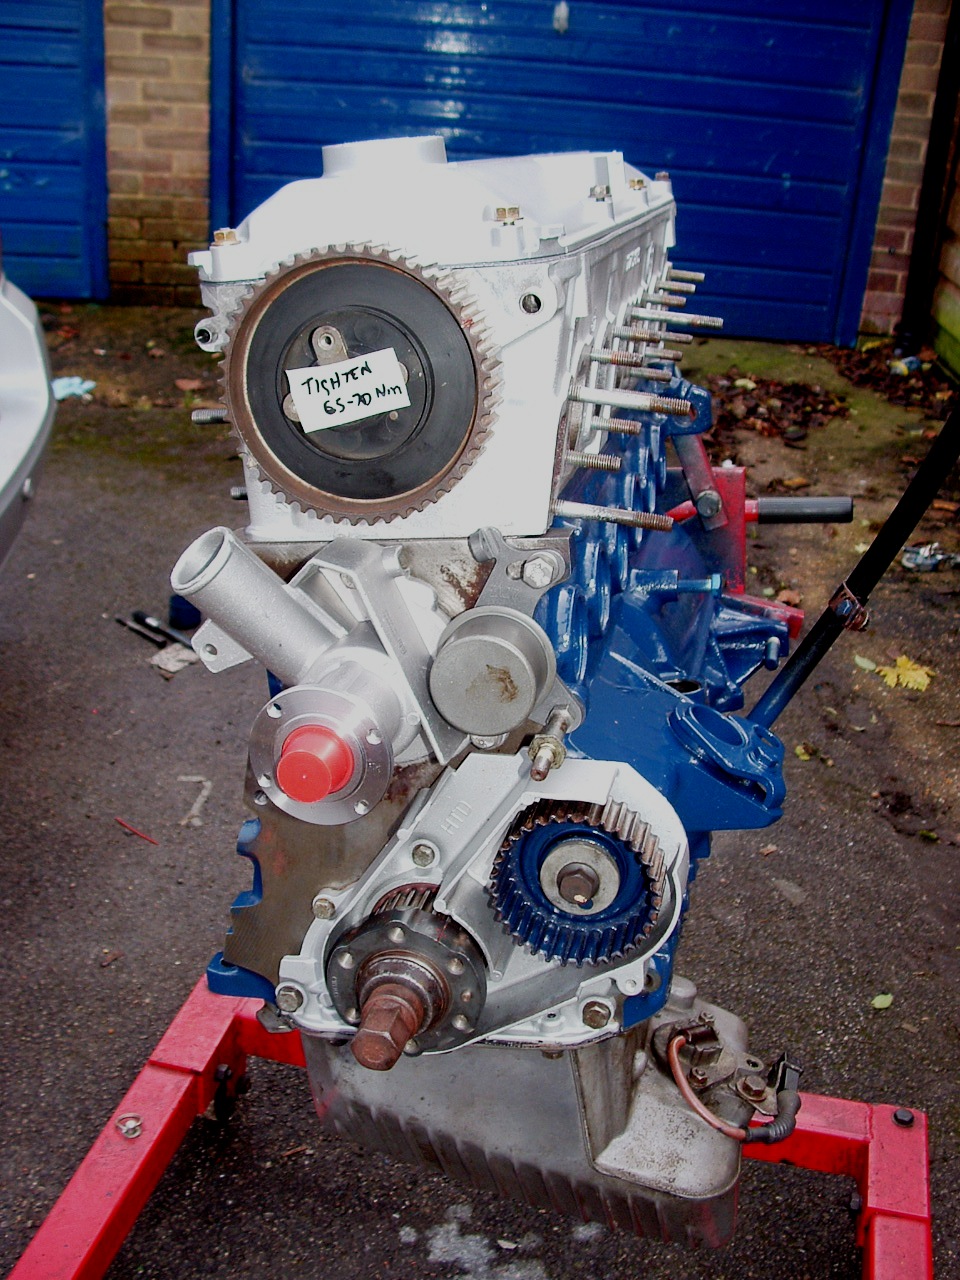 Assembly continues...
 by marlinpeter, on Flickr
Cylinder head, water pump, rear crankshaft seal and sump now all bolted up.
Next step will be to fit the new timming belt and tensioner. |
26th November 2011, 22:42
|
|
Senior Member
Enthusiast
|
|
Join Date: Feb 2005
Location: Hampshire
Posts: 2,496
|
|
Looking good  |
7th December 2011, 16:57
|
|
Senior Member
Enthusiast
|
|
Join Date: Mar 2005
Posts: 3,076
|
|
New Radiator fitting
I've removed all the old radiator and fittings in preparation for a new alloy radiator and oil cooler to cope with the extra heat from the M20B28 engine. (Note: this is still my old engine)
I wanted to get the new fittings and mounting brackets made ready while the old engine is in the car.
 Old radiator removed
 by marlinpeter, on Flickr
Here's my new alloy Radiator. It's a thicker core and being alloy suposed to be 20% more efficient. It fits nicely in the space, like it was made for the car but actually it's a Ford Escort radiator! (I don't like the name across it so will have too spray over it)
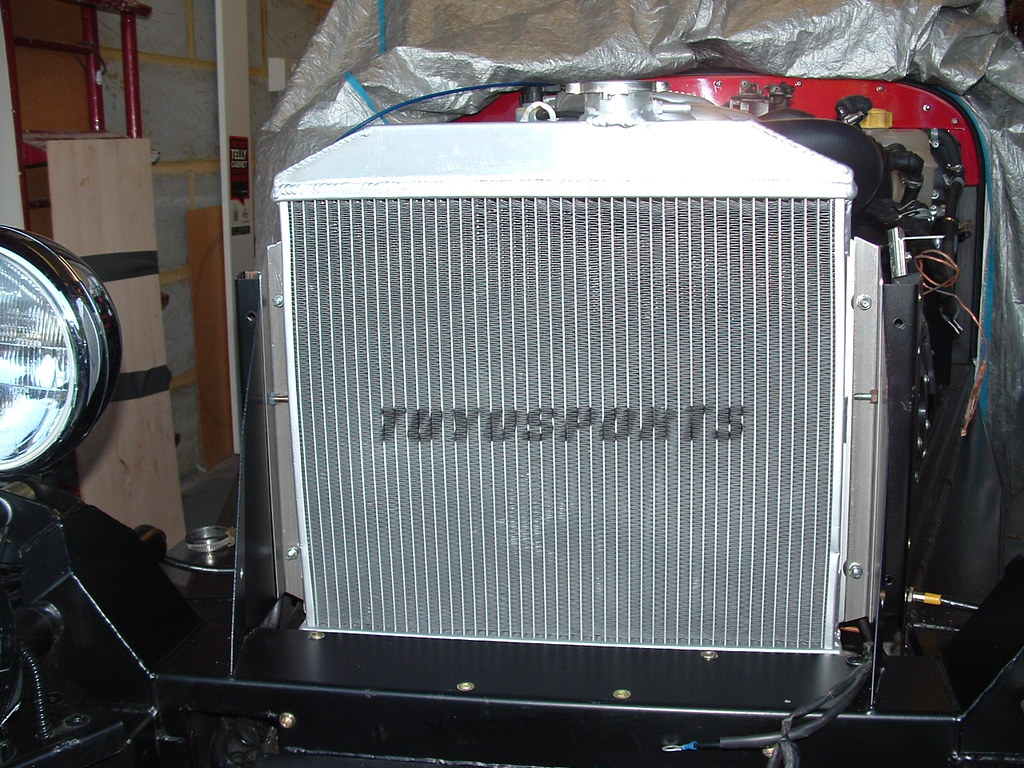 New Alloy Radiator
 by marlinpeter, on Flickr
Here I'm fabricating the new brackets to mount the alloy radiator. I've done awy with the old Marlin mounting and i'm using rubber insulated angle strips each side.
 New Alloy Radiator
 by marlinpeter, on Flickr
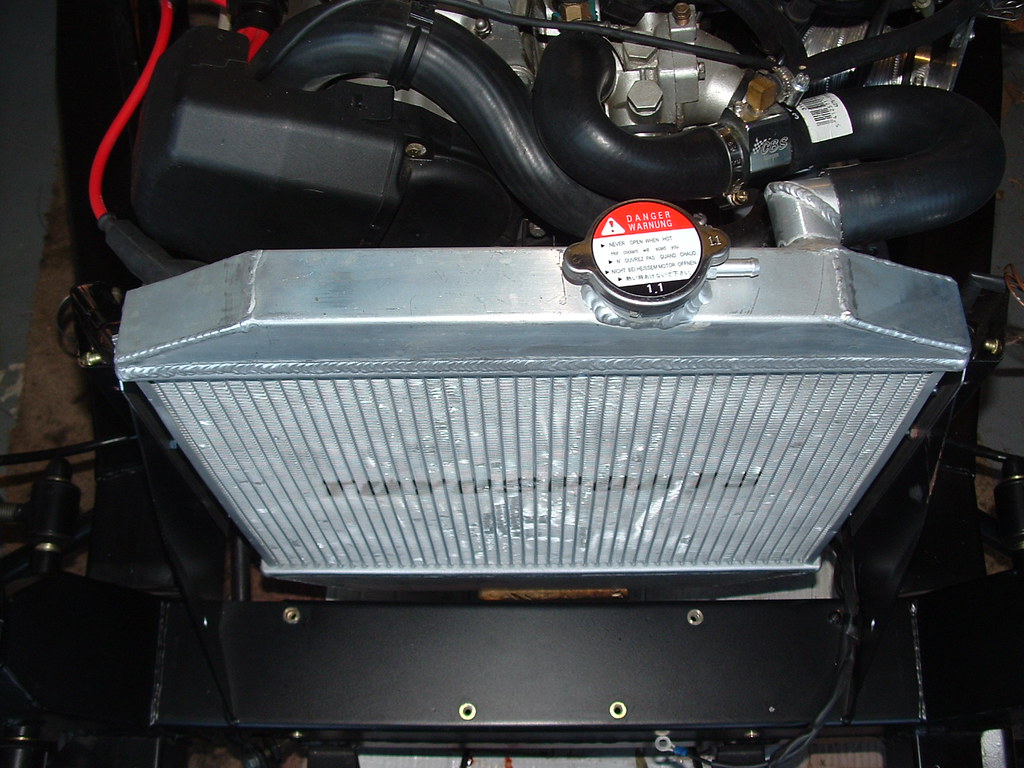
 New Alloy radiator
 by marlinpeter, on Flickr
 Checking it all still fits
 by marlinpeter, on Flickr
For those interested there is more details of the hoses on my Flickr site.
Next job is to mount the oil cooler...
|
7th December 2011, 17:50
|
 |
Senior Member
|
|
Join Date: Jan 2011
Location: South Wales
Posts: 378
|
|
Peter, that rad looks like it was custom made for the sportster rather than an escort, looks great
had a look on the toyosports web site but couldn't see it for sale, was it an ebay find?
|
7th December 2011, 19:37
|
|
Senior Member
Enthusiast
|
|
Join Date: Mar 2005
Posts: 3,076
|
|
Quote:
Originally Posted by morris
Peter, that rad looks like it was custom made for the sportster rather than an escort, looks great
had a look on the toyosports web site but couldn't see it for sale, was it an ebay find?
|
Yes, they're on eBay. It does seem to fit surprisingly well.
http://www.ebay.co.uk/itm/FORD-ESCOR...#ht_777wt_1110
But DON'T buy that one because they have mistyped the price. I paid £113 plus P&P
I think they come from China and to be honest there not the best quality but seem very rugged and good value.
Obviously its too early for me to comment on how well it performs. |
7th December 2011, 20:08
|
|
Senior Member
|
|
Join Date: Jan 2011
Location: South Wales
Posts: 378
|
|
Yep, I saw those on ebay and thought it was highly unlikely that you spent over a grand on a radiator
There are some others around, also for an escort that are ali but for about £250 which is still quite a lot but as most people seem to experience cooling problems with the small rad on a big engine, it may be worth spending more money on product intended for rally/racing. They also seem to come pre threaded for fan sensors and with the fan mountings designed in.
http://www.ebay.co.uk/itm/Big-Header...item3a6cbaad52 |
7th December 2011, 20:43
|
|
Senior Member
Enthusiast
|
|
Join Date: Mar 2005
Posts: 3,076
|
|
Quote:
Originally Posted by morris
Yep, I saw those on ebay and thought it was highly unlikely that you spent over a grand on a radiator
There are some others around, also for an escort that are ali but for about £250 which is still quite a lot but as most people seem to experience cooling problems with the small rad on a big engine, it may be worth spending more money on product intended for rally/racing. They also seem to come pre threaded for fan sensors and with the fan mountings designed in.
http://www.ebay.co.uk/itm/Big-Header...item3a6cbaad52 |
That looks the business but not sure how thick it is?
I imagine with the M50 engine you may be a bit tight on space for such a thick radiator and the fan is raised off the core, adding a bit more thickness. My advice would be to wait until you've got your engine installed and then have a measure up. Also, the top corners are a bit more squared off so you may have to mount it a bit lower.
(P.S. not sure what those prices of the toyosports are on eBay??  )
|
8th December 2011, 07:14
|
|
Senior Member
Enthusiast
|
|
Join Date: Sep 2005
Location: Northampton, UK
Posts: 1,891
|
|
I think they've hiked the prices to keep the ad open, but to warn people off as they're waiting on new stock.
As for overheating, I have an M10 rad and a Pacet 13" fan - and I've never seen my temp go higher than 85-90 degrees.
I can't believe that an M50 kicks out so much more heat than an M20...
having said that, I do like the look of the escort rad. |
|
Currently Active Users Viewing This Thread: 1 (0 members and 1 guests)
|
|
|
 Posting Rules
|
You may not post new threads
You may not post replies
You may not post attachments
You may not edit your posts
HTML code is Off
|
|
|
All times are GMT +0. The time now is 15:54.
|


 Linear Mode

