|
|
| Tribute Automotive Builds Discuss your Tribute kit build |

13th March 2014, 09:10
|
|
Senior Member
|
|
Join Date: May 2013
Posts: 2,161
|
|
Thank you everyone for your support and words of comfort, I do appreciate it.
Axel, do spend more time with them, eventually it will happen to you too!
As Mr Towed said quite rightly, when things of this nature happen, it brings to the fore how short life is for us all, so we should all do more, spend more time with the family, and generally try to live what we have to the full.
|
13th March 2014, 14:26
|
|
Senior Member
|
|
Join Date: May 2013
Posts: 2,161
|
|
 Moving on
Right!
Enough of that stuff, I am making an effort to move on, here are some pictures to change the current mood:
[IMG]  [/IMG]
[IMG]  [/IMG]
[IMG]  [/IMG]
|
13th March 2014, 14:36
|
|
Senior Member
|
|
Join Date: Mar 2012
Posts: 1,152
|
|
Perhaps that first Miglia that was sold in Germany used to belong to Steve McQueen as well................
|
13th March 2014, 14:47
|
|
Senior Member
|
|
Join Date: Jun 2011
Location: birchington, kent
Posts: 1,769
|
|
Scottie, what screen did the Ram use?
|
13th March 2014, 15:05
|
|
Senior Member
|
|
Join Date: May 2013
Posts: 2,161
|
|
Screen
When Ram were making the kits, the screen was offered as part of it I believe Gary.
Ram were bought out by Realm Engineering which still offer all the parts, but the screen and screen surround are expensive at around £1500 I think.
Pilkington Glass still make, or will make a glass screen at around £600 or £700 as far as I know.
Are you after one then?
|
14th March 2014, 20:18
|
 |
Senior Member
|
|
Join Date: Oct 2010
Posts: 1,622
|
|
Hi Scottie
Sorry to hear your sad news, anyone who has lost a loved one will know what you are going through.
Your car is looking great, the windscreen works well. It would be good to be the first to make it to Stoneleigh in an A352.
|
15th March 2014, 18:08
|
|
Senior Member
|
|
Join Date: May 2013
Posts: 2,161
|
|
Seats
Today I started to nail the leather seats together.
I like to use a hand machine wherever possible, as it is much more accurate.
But the really thick padded Jaguar seats need the bigger machine.
I was a bit peed off when the bumpy bits on the foam showed through the leather, so I was forced to recover the seat base with thin foam to rectify the problem, more unwanted work, but its sorted now.
here are some pics:
[IMG]  [/IMG]
[IMG]  [/IMG]
[IMG] 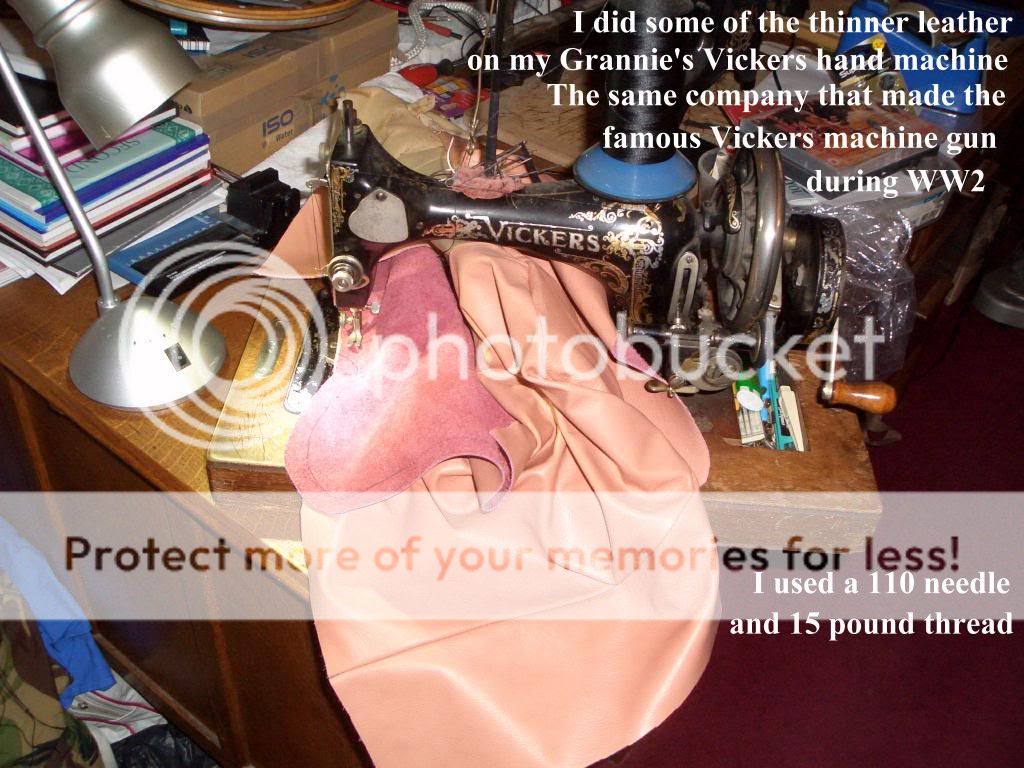 [/IMG]
[IMG]  [/IMG]
[IMG] 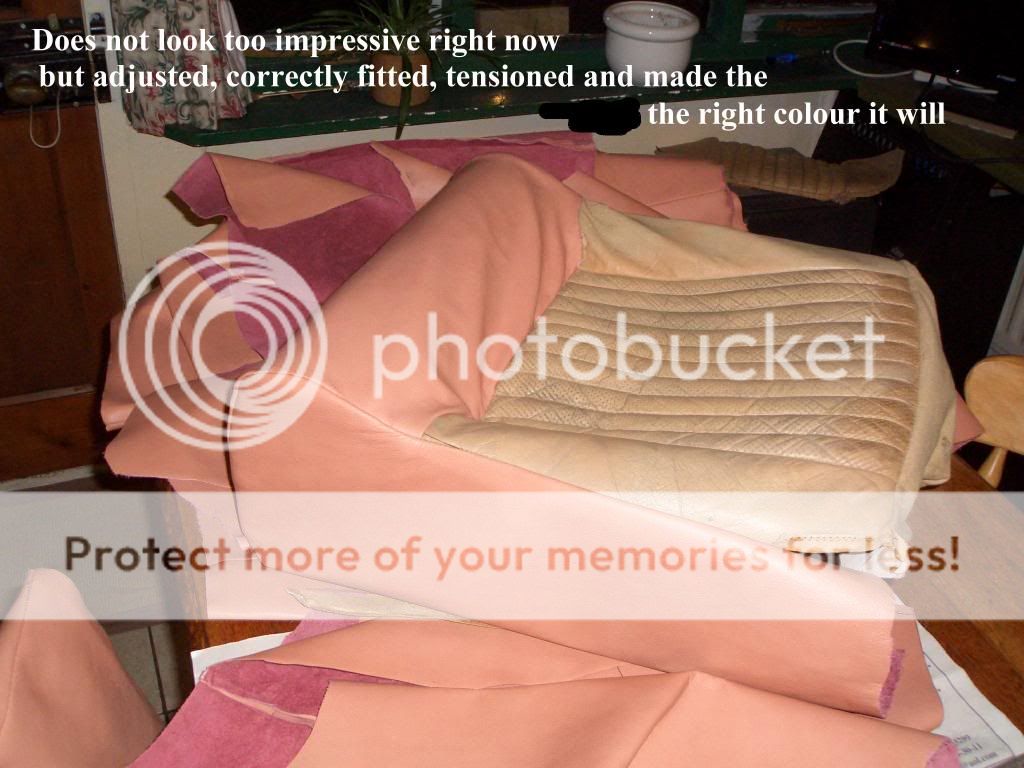 [/IMG] |
15th March 2014, 18:20
|
|
Junior Member
|
|
Join Date: Feb 2014
Posts: 7
|
|
The secret to cutting foam is to use an electric carving knife,makes a nice smoothe Finnish
|
15th March 2014, 18:44
|
 |
Senior Member
|
|
Join Date: Jan 2014
Location: Egham, Surrey
Posts: 1,780
|
|
After rough shaping with an electric carving knife you can shape then with an angle grinder with an 80 grit sanding disc. I also use a small belt sander that is easier and more forgiving. Works best on closed cell foam which also has the advantage of not soaking up water so if you have left your roof down and it rains it won't waterlog your seats.
|
16th March 2014, 06:50
|
|
Senior Member
|
|
Join Date: May 2013
Posts: 2,161
|
|
Thanks for the tips fellas, I don't have a leccie carver, but I do have a hot knife, which I used ti try to finish the foam.
What a mistake that was! The toxic fumes that released were really TOXIC!
I took it outside in the end, and wore a mask.
I think the only way now is to cover the other seat in the same foam and copy the one I've done.
|
16th March 2014, 06:54
|
 |
Senior Member
|
|
Join Date: Feb 2012
Location: Wembley, London
Posts: 5,056
|
|
Scottie - Even if I had a sewing machine to play with, I still wouldn't know what to do with it! 
Given the fact that the RAM kit took 5 years to build, you are really making great progress.
Especially when you are making a lot of the parts required yourself.
Good luck, Paul. 
|
16th March 2014, 08:10
|
|
Senior Member
|
|
Join Date: May 2013
Posts: 2,161
|
|
Paul,
Quote
"Scottie - Even if I had a sewing machine to play with, I still wouldn't know what to do with it! "
I would put money on the fact that not long ago you said
"If I had a Mig welder, I wouldn't know what to do with it"
Now look at you! "Mr MIG 2013"
If you had a sewing machine it wouldn't take you long........... :-)
|
16th March 2014, 21:11
|
|
Senior Member
|
|
Join Date: Feb 2012
Location: Wembley, London
Posts: 5,056
|
|
Scottie - Thanks, your reply did make me laugh. 
So here's to learning new skills whilst building a car. 
Good luck, Paul.
|
17th March 2014, 08:03
|
|
Senior Member
|
|
Join Date: May 2013
Posts: 2,161
|
|
Seats
I worked out how I am going to tension the seat leather on my bases.
I have made a U shaped simple frame out of brazing rod,
(Brass, so it won't rust( and fixed it to the bottom of the leather.
There will be nylon ties going from it, through the foam and plywood base.
After I have fixed the leather in place as well as I can, I will then pull each of the ties through holes in the plywood, and get the correct tension on each one, to make the leather look taut and crease free.
Watch this space!
[IMG]  [/IMG]
[IMG] 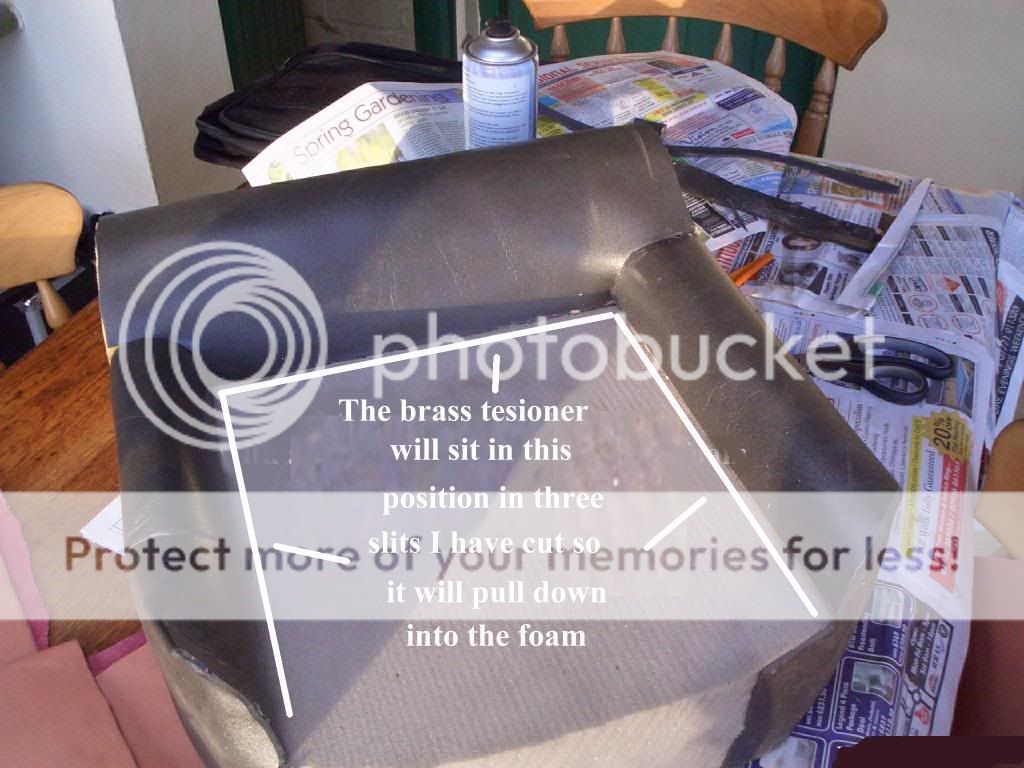 [/IMG] |
21st March 2014, 17:21
|
|
Senior Member
|
|
Join Date: May 2013
Posts: 2,161
|
|
Back in business
I have been away for a few days, Mum's funeral, sorting out the house and other admin tasks.
I am not fishing for sympathy, just explaining the lack of posting!
Today I got the passengers seat base sorted out, it is ready to be re-coloured (when all the rest is ready, that is)
It does not look too bad, I have the option to re-tension at any time, but after the dyeing process, it should tighten the leather even more, but I am happy as it is for now.
[IMG] 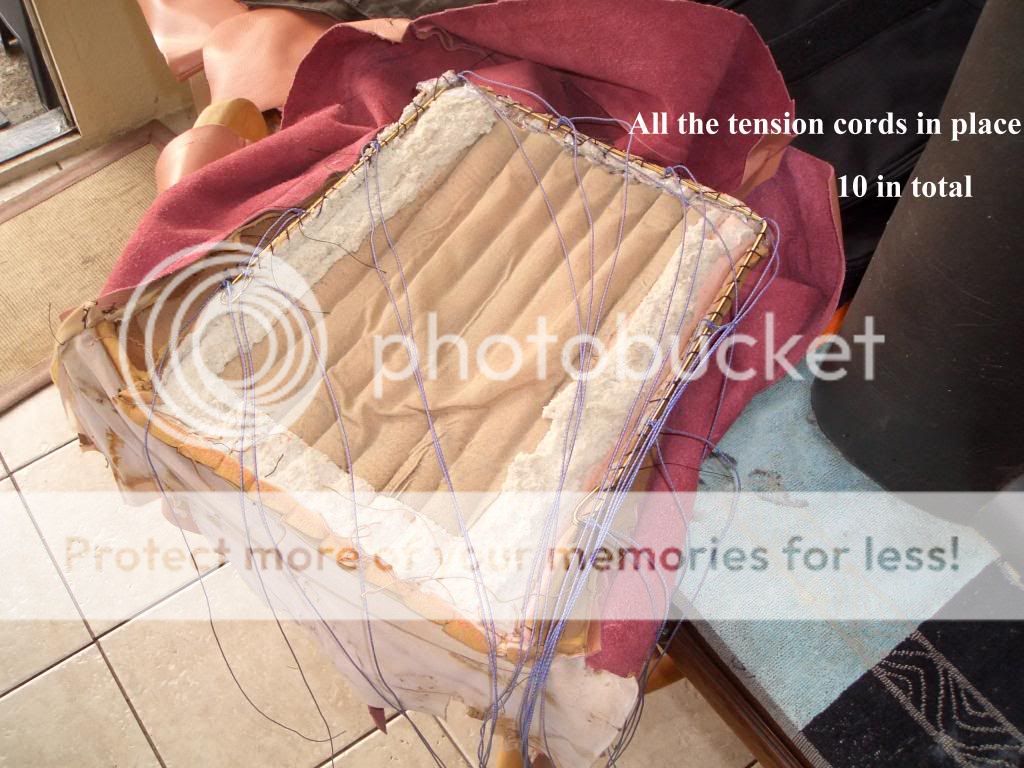 [/IMG]
[IMG]  [/IMG]
[IMG]  [/IMG]
[IMG]  [/IMG] |
22nd March 2014, 21:14
|
|
Senior Member
|
|
Join Date: May 2013
Posts: 2,161
|
|
Drivers seat
Today I worked all day stitching up the drivers leather seat base cover, using the Jaguar base and leather from the setee, and fitting it to the foam.
It is now ready to re-colour.
When making two identicle seats, having completed one, you always have the thought:
" I wonder if I can make the other one as good"
Its always a challenge, but it usually seems to work out right.
Because I knew it was the one I would be sitting on, as opposed to the passengers one, I put more effort into it, and I thinks its better because of it.
Only I know the little f**ck-ups I've made!!!
I now have to make the seat backs, but that will be easier I think.
I may have a go at re-colouring the seat bases before I tackle the seat backs, as I cannot wait to see the results, as I am an impatient bastard.
Pics:
[IMG]  [/IMG]
[IMG]  [/IMG]
[IMG]  [/IMG]
[IMG] 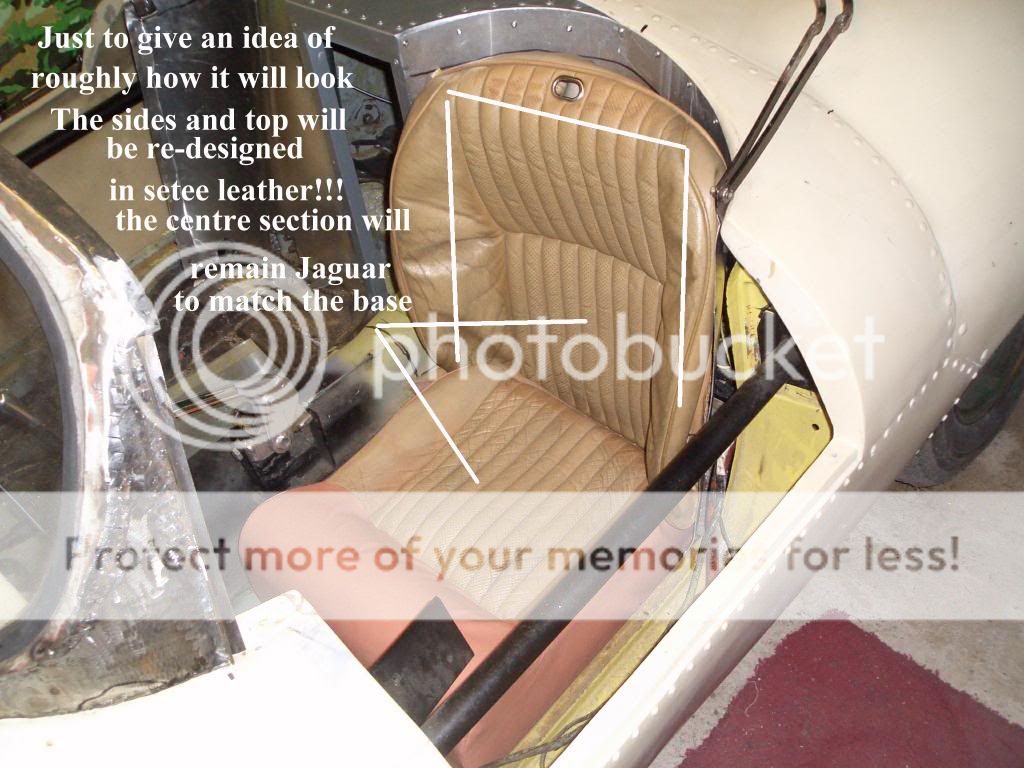 [/IMG]
|
22nd March 2014, 21:51
|
|
Senior Member
|
|
Join Date: Feb 2012
Location: Wembley, London
Posts: 5,056
|
|
You are doing a great job on those seats and I think they are going to look first class in red.
Good luck, Paul. |
23rd March 2014, 17:10
|
|
Senior Member
|
|
Join Date: Feb 2014
Location: Sweden
Posts: 140
|
|
Terrific work Scottie! It will get that genuine vintage feeling with red leather! You will end up with a really nice car!
|
23rd March 2014, 17:36
|
|
Senior Member
|
|
Join Date: May 2013
Posts: 2,161
|
|
Seats
Well I finally cracked! I just could not wait, I had to colour the seats.
As I had not ordered any leather dye, I did a bit of experimenting on the leather seat bits I had spare.
I decided to use a spray paint made by a company called "Tetrosyl"
As I said earlier, with leather colour change, the preparation is everything.
I spent two hours preparing the seats.
I sprayed the paint into the seams first, and then worked it in with a toothbrush, The same deal for all the creases and cracks, then several thin coats over the finished surface.
I was not actually "painting" the leather, but rather using the paint as a dye and colourant.
I chose red because it contrasts so nicely with bare aluminium, it also is a colour that Jaguar used a lot with BRG cars.
I am pleased with the results,and it looks as gpod as the expensive colouring agents I have used before, except this time the can cost me £5.99 and there is enough left to do a lot more!![IMG]  [/IMG]
[IMG] 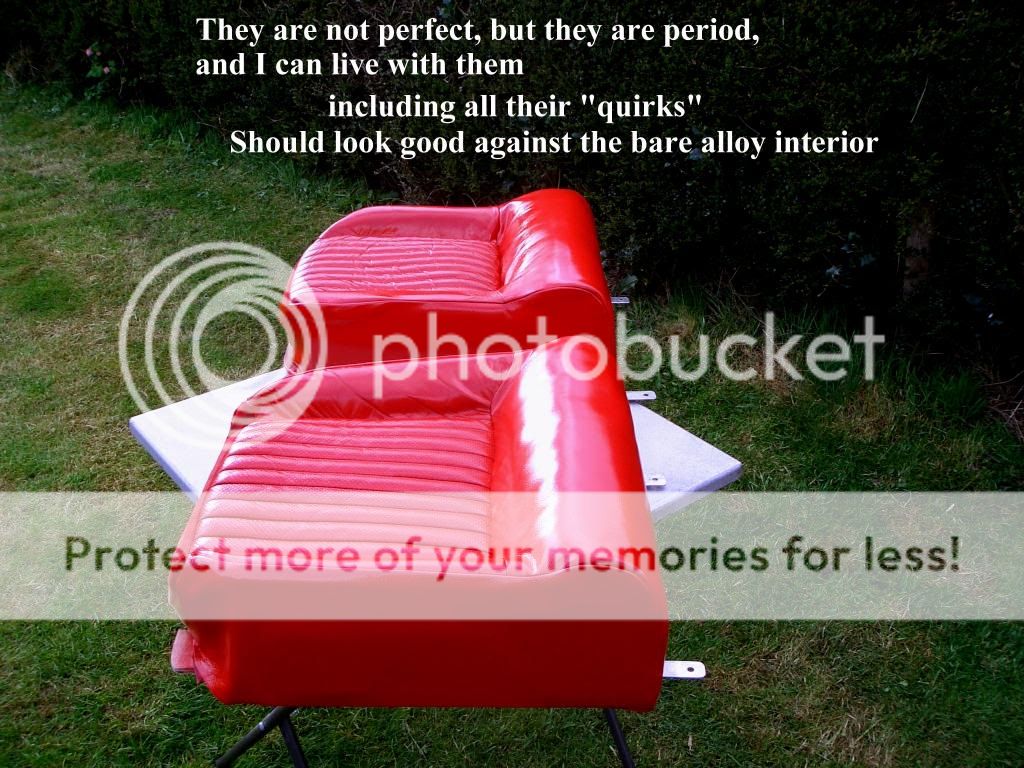 [/IMG]
[IMG]  [/IMG]
[IMG]  [/IMG]
see pics:

|
23rd March 2014, 17:41
|
|
Senior Member
|
|
Join Date: Feb 2014
Location: Sweden
Posts: 140
|
|
OMG! They look just perfect, because of "all the creases and cracks"! Looks so genuine! Will look so good in that car!
|
|
Currently Active Users Viewing This Thread: 2 (0 members and 2 guests)
|
|
|
| Thread Tools |
|
|
| Display Modes |
 Linear Mode Linear Mode
|
 Posting Rules
|
You may not post new threads
You may not post replies
You may not post attachments
You may not edit your posts
HTML code is Off
|
|
|
All times are GMT +0. The time now is 01:18.
|


