|
|
| Vintage and Classic Roadster Kit Car Builds For Vintage and Classic era kit cars. Post your build reports, problems and progress here |

13th March 2022, 07:36
|
 |
Senior Member
Enthusiast
|
|
Join Date: Mar 2005
Posts: 3,077
|
|
Quote:
Originally Posted by Mitchelkitman

Maybe bicycle plastic tyre lever(s) used (in preference to steel ones) for removing tyres from aluminium cycle rims!
|
Great idea, I'll try one, thanks.
EDIT: I've tried one now and it works a treat. |
13th March 2022, 14:13
|
 |
Senior Member
|
|
Join Date: Nov 2011
Location: Exeter
Posts: 187
|
|
Good to see the continuing high standard of workmanship.
Just a suggestion gleaned from my Classic car. If you lift the pry lever to remove the hub cap then any scuffing will be from the tip of the tool, so on the paint that is hidden under the cap when it is refitted. If you push down on the lever then any scuffing will probably be visible.
|
13th March 2022, 17:23
|
|
Senior Member
|
|
Join Date: Oct 2013
Location: norfolk
Posts: 691
|
|
Quote:
Originally Posted by peterux
Great idea, I'll try one, thanks.
EDIT: I've tried one now and it works a treat.
|
I'm pleased at the success. The old-style tyre levers aren't entirely redundant as they are good for opening paint tins...... the lids of which seem to get thinner every time I buy a new tin! |
4th April 2022, 18:37
|
|
Senior Member
Enthusiast
|
|
Join Date: Mar 2005
Posts: 3,077
|
|

Well, the gates are fitted but not a lot of progress on my Sabre but here are some bits and pieces I've done.
Going back to the door lock electronics, once you've connected all the wires up, there ends up with quite a jungle of wires between the two door locking control modules so I have mounted them on this small panel and hard wired the connections between the two.
 Remote door locking control Remote door locking control by Sabrebuilder, on Flickr
The small one is for the door locks and the larger one is for the remote radio fobs. With hindsight I should have mounted the fuses further downstream where they will be more accessible, so I'll probably end up changing that. The panel is just a piece of thin plywood that has been coated in exterior stain to seal it.
You can't see it, but the control panel sits out of harms way here between the inner and out door sills here.........
 Remote door locking control Remote door locking control by Sabrebuilder, on Flickr
I had some more bits chromium plated as the original plating was either worn, tarnished or in poor condition. Technically, I didn't need to get the door stays chromed but it was cheaper than zinc plating for just those two bits. The hood locking escutcheons weren't plated at all originally.
 Chromed parts Chromed parts by Sabrebuilder, on Flickr
I've loosely fitted the door lock striker. To be adjusted when the door is fitted.
 Door lock striker Door lock striker by Sabrebuilder, on Flickr
For those who may be interested, this is the back of the door lock striker showing how the bracket is fixed to the chassis 'B' post.
 Door lock striker Door lock striker by Sabrebuilder, on Flickr
That's all for now..................
................peter

|
5th April 2022, 08:09
|
 |
Senior Member
|
|
Join Date: Jul 2011
Posts: 5,328
|
|
Looking good, Peter, I now have a similar control box for the locks on my Speedster so thanks for the tip.
If you don't mind me asking, how much did it cost to have your small parts chromed? (ooh-er, missus...)
I've been watching classic car restoration programmes like Car SOS and Vintage Voltage and they typically pay around a grand to have a couple of bumpers prepped and chromed. I know it's a complex process but that sounds awfully expensive to me.
Last edited by Mister Towed; 5th April 2022 at 08:10..
Reason: remove pound sign
|
5th April 2022, 16:22
|
|
Senior Member
Enthusiast
|
|
Join Date: Mar 2005
Posts: 3,077
|
|
Quote:
Originally Posted by Mister Towed
If you don't mind me asking, how much did it cost to have your small parts chromed? (ooh-er, missus...)
|
No I don't mind you asking. The collection of small parts (shown above) cost me 140 GB pounds plus VAT. The door parts were previously zinc plated but had rusted so it must have been poor. The bar at the bottom is the chrome strip off the boot and is about 2 foot long. It sounds expensive but these parts had to be stripped and then polished before the chrome plating. The quote process is interesting as the guy stares at the parts and then does some mental arithmetic before coming up with the price.
Previously, I had two quarter bumpers (that had rusted badly) and four light plinths re-plated and that cost 260 GB pounds plus VAT.
 Bling Bling by Sabrebuilder, on Flickr
I've been very pleased with the quality of both jobs. |
6th April 2022, 08:29
|
 |
Senior Member
Enthusiast
|
|
Join Date: Sep 2004
Posts: 1,892
|
|
Quote:
Originally Posted by peterux
Bling by Sabrebuilder, on Flickr
I've been very pleased with the quality of both jobs.
|
They do look immaculate!
Cheers, Robin |
6th April 2022, 13:22
|
|
Senior Member
|
|
Join Date: Jul 2011
Posts: 5,328
|
|
Thanks for the update and they do look fantastic.
That's a lot less than I thought it would be based on what the professional telly restorers usually get charged. I have a Mk2 Spitfire waiting in the wings for a rebuild and its bumpers are original and rare but quite pitted, so I'll be looking to have them stripped and chromed when the time comes. Hopefully that will be cheaper than an aftermarket set of stainless steel bumpers (about 800gbp) and look much more authentic.
|
6th April 2022, 18:46
|
|
Senior Member
|
|
Join Date: Oct 2013
Location: norfolk
Posts: 691
|
|
Years ago... It must have been about 1985 I attended a Classic car show in London (Earl's court?). Anyway, there were lots of gadgets there. I recall an automatic battery (2 xAA ) dipping mirror, and more pertinently a liquid chrome that could be applied with a cloth! I was (as you'd expect) highly sceptical - I offered the guy a 2p coin, and he coated half of one side. It looked good and 'chromey' to my eyes at the time, maybe it was more like nickel? but it looked good. I kept the coin in my pocket for several months, and it still looked good, never tarnished. I put water on it etc, and it stayed good. The liquid (which I don't recall being a ridiculous price at the time) could now prove useful. Brass or copper bumpers on a DIY basis, and coated with 'chrome'. Did the product disappeared?
|
19th May 2022, 18:30
|
|
Senior Member
Enthusiast
|
|
Join Date: Mar 2005
Posts: 3,077
|
|
Here's a clue....
Here's a clue why there has been no updates lately.......... 
 My other project My other project by Sabrebuilder, on Flickr
New art studio for my wife. |
20th May 2022, 08:03
|
|
Senior Member
|
|
Join Date: Nov 2017
Posts: 109
|
|
you got stuck on the roof? that's rough, the weather's been miserable. glad to see they keep bringing you tea at least  |
20th May 2022, 18:28
|
|
Senior Member
Enthusiast
|
|
Join Date: Mar 2005
Posts: 3,077
|
|
|
20th May 2022, 18:54
|
|
Senior Member
|
|
Join Date: Nov 2011
Location: Exeter
Posts: 187
|
|
That’s a smart bit of (wooden) kit you have built there! Looks like the same high quality of construction that you demonstrate on the Sabre build! A man cave and now a wife cave! The ultimate bliss! Looking forward to the next car update! Peter.
|
24th May 2022, 20:36
|
|
Senior Member
|
|
Join Date: Mar 2012
Posts: 1,152
|
|
That looks like a Dunster House.
|
25th May 2022, 10:19
|
|
Senior Member
Enthusiast
|
|
Join Date: Mar 2005
Posts: 3,077
|
|
Quote:
Originally Posted by oxford1360
That looks like a Dunster House.
|
It is indeed! |
18th August 2022, 20:11
|
|
Senior Member
Enthusiast
|
|
Join Date: Mar 2005
Posts: 3,077
|
|
Time for an update?
Well, I guess it's time for an update.......
First up is a bit of corrective rework of something of a bit of a cock-up I made a while ago when I developed my brake system.  
I've never really been happy with the 'feel' of my brakes despite numerous bleed sessions. After a brief discussion with Robin he suggested I check the bore size of my master cylinder. The master cylinder I initially fitted has a bore diameter of 17.8mmm and the standard Sierra master cylinder has a diameter of 22mm. It doesn't seem much difference at first sight until you remember the volume of fluid displaced is proportional to the square of the radius. It immediately became clear that this was a big mistake so I embarked on changing the master cylinder to one for a Sierra.
 New Brake Master Cylinder New Brake Master Cylinder by Sabrebuilder, on Flickr
The next problem was to find a suitable push rod but ebay came to my rescue with this one the perfect length.
 New Brake Master Cylinder New Brake Master Cylinder by Sabrebuilder, on Flickr
The mushroom shaped end of the new pushrod was too large for the Sierra master cylinder so I had to reprofile it like this.
 New Brake Master Cylinder New Brake Master Cylinder by Sabrebuilder, on Flickr
I also made up this 10mm thick spacer. Two reasons, one was that the hole in my mounting plate was too small for the new master cylinder and I didn't fancy making it bigger. Secondly, the output ports are spaced 10mm nearer the bulkhead and i didn't fancy trying to shorten the brake lines and re-flaring the ends in situ. I made the spacer with a hole-saw, a hacksaw and a file. You can see how close one of the mounting screws is to the mounting screw for the Sierra master.
 New Brake Master Cylinder New Brake Master Cylinder by Sabrebuilder, on Flickr
New master cylinder being trial fitted to set the correct length of the pushrod.
 New Brake Master Cylinder New Brake Master Cylinder by Sabrebuilder, on Flickr
The next challenge was to find a Sierra reservoir which are like hens teeth. This one came all he way from Lithuania and was filthy dirty inside and out when it arrived. Lots of brake cleaner and it came up okay. Also, the fluid level switch was corroded inside but I took it apart and cleaned up the contacts and it now works fine.
 New Brake Master Cylinder New Brake Master Cylinder by Sabrebuilder, on Flickr
Now all plumbed in and system filled with fresh Dot 4.
 New Brake Master Cylinder New Brake Master Cylinder by Sabrebuilder, on Flickr
All finished and brakes bled and feeling much better.
 New Brake Master Cylinder New Brake Master Cylinder by Sabrebuilder, on Flickr
I'm now working on lining the interior with sound proofing before tackling the carpets.....
......peter
|
19th August 2022, 08:51
|
|
Member
|
|
Join Date: Jul 2014
Location: Ealing London
Posts: 54
|
|
Brakes
Your attention to details never ceases to amaze me. Every step you have taken in the build of this wonderful car has been brilliant. You sims to be fully conversant with woodwork too. Good luck with everything Peter.
|
2nd September 2022, 19:57
|
|
Senior Member
Enthusiast
|
|
Join Date: Mar 2005
Posts: 3,077
|
|
Quote:
Originally Posted by Amir Manzoori
Your attention to details never ceases to amaze me. Every step you have taken in the build of this wonderful car has been brilliant. You sims to be fully conversant with woodwork too. Good luck with everything Peter.
|
Thanks Amir, I always try to do the best job I can within my capabilities but I am just an enthusiastic amateur so I don't always get things right first time.
--------------------------------------------------------------
A few small progress updates interrupted by a weeks holiday. 
I've started on fitting the carpet underlay inside the car. I'm using 6mm thick self adhesive soundproofing. Easy to fit but a very time consuming process of cutting a paper pattern first to get the shape right.
 Interior fitting Interior fitting by Sabrebuilder, on Flickr
Also, I've now fixed the handbrake lever cover and cubby hole with 4 bolts and rivnuts into the top of the propshaft tunnel.
 Interior fitting Interior fitting by Sabrebuilder, on Flickr
In parallel, I have purchased my first tyre. After much pondering I've chosen a high profile 185/80R15 tyre to maximise the ground clearance and to get the right period look. I have bought just one tyre so far to allow me to check it fits the front and rear positions without fouling on any bodywork or chassis. They just clear the front valence on full lock.
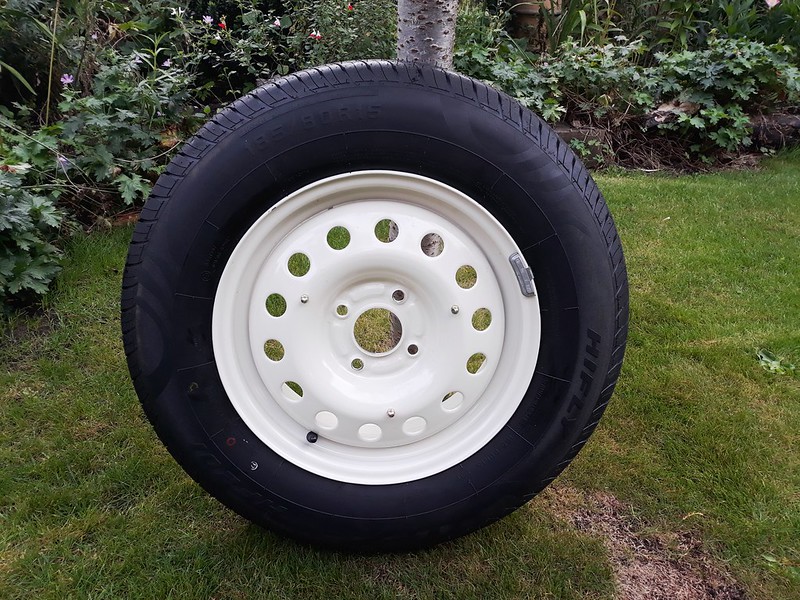 Tyres Tyres by Sabrebuilder, on Flickr
The Ford Focus wheels I bought years ago have a different hub offset than the standard Sierra wheels so I have had to fit these 20mm spacers. I chose concentric spacers with longer wheel studs. Bit of a faff to fit as you have to remove the brake calipers to get the brake discs off.
 Wheel spacers Wheel spacers by Sabrebuilder, on Flickr
Fitting the wheel spacers required longer studs which required the removal of the brake calipers and discs.
 Wheel spacer Wheel spacer by Sabrebuilder, on Flickr
The keen eyed might notice a new jack in the background. The latest addition to my tool collection. An electric jack. I was a bit sceptical but it works really well and takes the effort out of jacking up the car.
 Electric Jack Electric Jack by Sabrebuilder, on Flickr
And the final check was to make sure that this wheel and tyre combination fits in the spare wheel well in the boot. I was pleased to find it fitted perfectly suggesting this is indeed the intended tyre size when the car was designed.
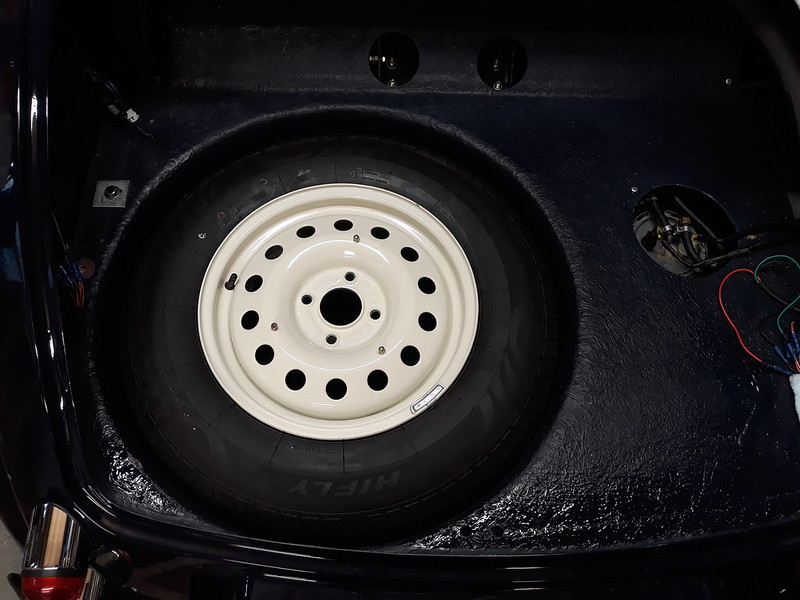 Tyres Tyres by Sabrebuilder, on Flickr
That's it for now and I hope to make a bit more progress before our next holiday!
....peter
|
25th September 2022, 19:17
|
|
Senior Member
Enthusiast
|
|
Join Date: Mar 2005
Posts: 3,077
|
|
Just back from holiday so a small update.......
Before we went on holiday, I managed to finish the fitting of the soundproofing carpet underlay.
But, before laying the underlay on the driver's side I decided to make a foot rest for my left foot when not on the clutch. It looks like mahogany but it is in fact moisture resistant MDF coated with a couple of coats of left over external varnish.
 Clutch Foot rest Clutch Foot rest by Sabrebuilder, on Flickr
So, the sound proofing underlay fitting could then continue.......
 Sound proofing Sound proofing by Sabrebuilder, on Flickr
Now finished and ready for the carpet fitting.
 Sound proofing Sound proofing by Sabrebuilder, on Flickr
That's all for now.....
....peter |
24th October 2022, 18:56
|
|
Senior Member
Enthusiast
|
|
Join Date: Mar 2005
Posts: 3,077
|
|
I can't believe it's a whole month since my last post but I finally got around to start fitting the carpet. This is something that I'm not very familiar with, so it's been a bit of 'learning on the job' and a bit of 'making it up' as I go along. My budget doesn't stretch to have the carpets professionally made so hopefully it won't look too amateurish.
First, I made a template of the passenger side floor from cardboard.
 Carpet fitting Carpet fitting by Sabrebuilder, on Flickr
I then transferred the template to the carpet. It was raining outside so I made a temporary table by placing a board across my car and workbench.
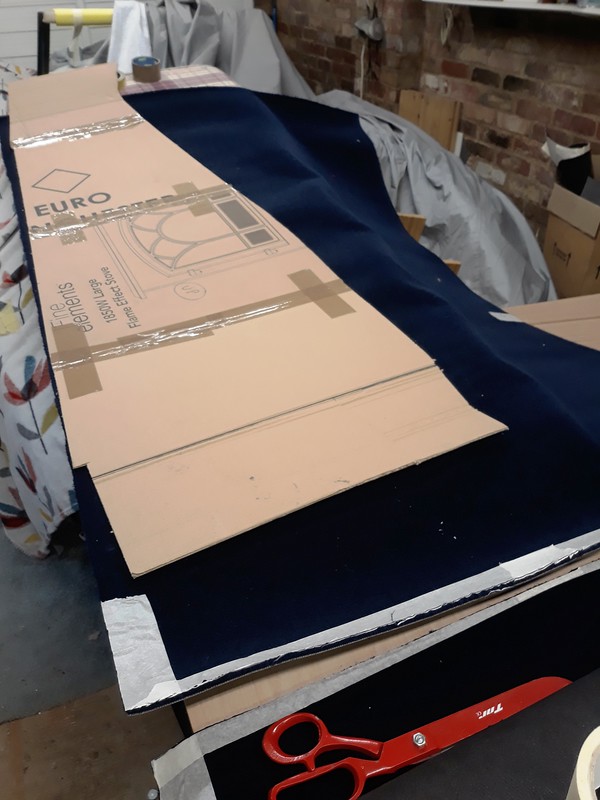 Carpet fitting Carpet fitting by Sabrebuilder, on Flickr
I then turned my attention to making a template for the propshaft tunnel but the shape of the tunnel meant that had to split this piece into two sections. The joint will be hidden by the seat when fitted.
 Carpet fitting Carpet fitting by Sabrebuilder, on Flickr
After fitting the first section I made another template making sure I marked the position of the holes for the seatbelt anchor.
 Carpet fitting Carpet fitting by Sabrebuilder, on Flickr
With the second section fitted, I temporarily replaced the handbrake cubby box.
 Carpet fitting Carpet fitting by Sabrebuilder, on Flickr
It's a slow process but getting there.... 
More templating to follow......
.....peter
|
|
Currently Active Users Viewing This Thread: 25 (0 members and 25 guests)
|
|
|
 Posting Rules
|
You may not post new threads
You may not post replies
You may not post attachments
You may not edit your posts
HTML code is Off
|
|
|
All times are GMT +0. The time now is 19:26.
|


 Linear Mode

