|
|
| Vintage and Classic Roadster Kit Car Builds For Vintage and Classic era kit cars. Post your build reports, problems and progress here |

18th November 2018, 06:14
|
 |
Senior Member
|
|
Join Date: Feb 2012
Location: Wembley, London
Posts: 5,058
|
|
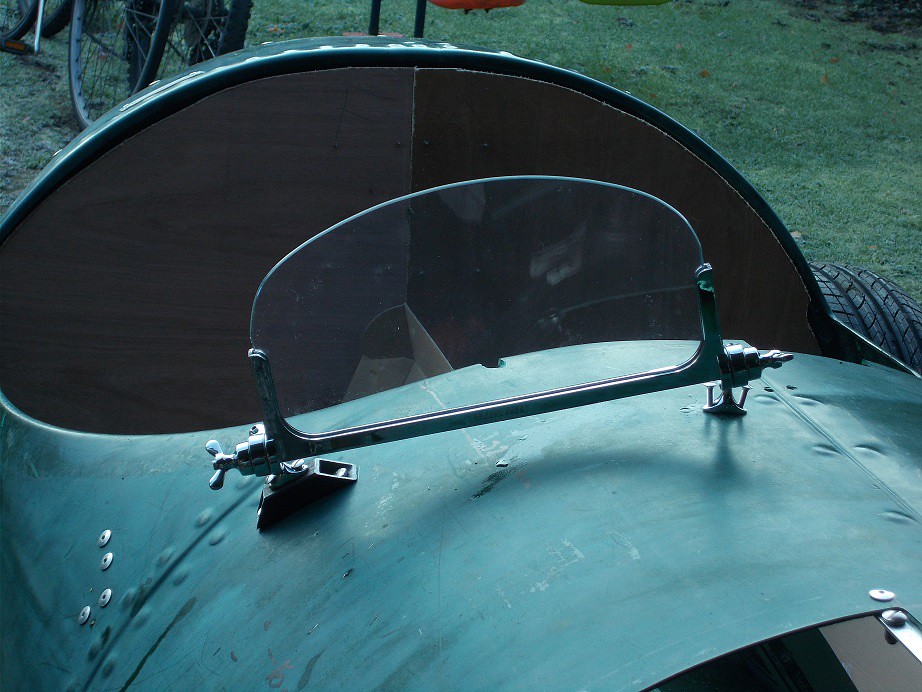
Mick – Lots of good progress. 
This is not a great photo, but one of my Brooklands screen brackets broke and it really is a poor design.

Good luck, Paul. 
|
18th November 2018, 10:41
|
|
Senior Member
|
|
Join Date: Nov 2012
Posts: 845
|
|
Quote:
Originally Posted by Paul L

Mick – Lots of good progress.
This is not a great photo, but one of my Brooklands screen brackets broke and it really is a poor design
|
Thanks Paul
I've imagined a scenario where the completed Monaco hits a speed bump or pot hole and I get the aeroscreen in the teeth. Not a happy prospect. I noticed at the foot of the instruction sheet (which one would have to be fairly stupid to need), that they're Made In China.
Nuff said.
Regards, Mick |
22nd November 2018, 05:04
|
|
Senior Member
|
|
Join Date: Nov 2012
Posts: 845
|
|
 And still they come........
A link posted on the Moss Owners' FB page took me to this.
A barn find in a barn! How cool is that?
Regards, Mick
|
22nd November 2018, 20:53
|
|
Senior Member
|
|
Join Date: Apr 2011
Posts: 282
|
|
A lot of unkind things said by ignorant people on that site. I did love the Brookland screens on top of the windscreen. Tint them for sun visors. Yours is comming on a treat. How come you have hot weather in November?
|
23rd November 2018, 06:03
|
|
Senior Member
|
|
Join Date: Nov 2012
Posts: 845
|
|
 Nibbling away......
This past week I've been chipping away at some of the minor purchasing and fabricating tasks. After reversing the top seatbelt mountings, I've been unhappy with my seat back, so decided to make a replacement. As the body is far from symmetrical, I made it in two halves to sit inside the rear body lip, and was pleased with the outcome. I next cut the two squab bottoms which again were asymmetrical. I then bought the 3" thick hard foam which is coming today.
My 2mm thick steel plate for the wing stay backing plates having arrived, I disced it into eight and drilled the 8mm fixing holes. Fortunately, I'd checked the hole spacings on the wing stay flanges, which clearly hadn't been drilled on a jig, so I numbered everything in pairs. I'll trial mount the wings and post a picture when weather allows.
Yesterday I bit the bullet and decided to trial mount the aeroscreens. As they're quite heavy and unwieldy, I cut a strip of ply to get the spacing of the mounts right without chucking one of the screens on the floor in a moment of inattention  . .

Once the bolts were nipped up I substituted the real thing.
Happy with this, I did the passenger side.

I then cut the backing plates for their mountings and quit while I was ahead. Once back in the warm, I bought a Spitfire gear stick gaiter. I used them on both my Marlin and A352 as they have a retro look.
That was it for the day.
Regards, Mick

|
23rd November 2018, 10:01
|
|
Senior Member
|
|
Join Date: Apr 2014
Location: Birmingham, UK
Posts: 545
|
|
Probably too late now but in the future - for brooklands aeroscreens try this guy http://johnkimble.co.uk/ - I got mine from him |
24th November 2018, 08:02
|
|
Senior Member
|
|
Join Date: Nov 2012
Posts: 845
|
|
 Winging it...
Yesterday I decided to make a start on the wings, once I'd drilled and trial fitted the backing plates for the aeroscreen supports. This didn't take long and the mountings are now very rigid. I'll cut the heads off the bolts at a suitable angle and Locktite them. Fingers crossed!
Car Photographer: John Kimble's website picture doesn't include the mounting plinths. Are they similar?
The rear nearside wheel was nearest to the bench, so I started there. Trying various combinations of wood blocks with the wing balanced on top, I hit on a visually satisfactory position. Substituting the first mounting bracket, stuck flush on the body with a loop of gaffa tape, enabled me to mark the necessary holes.

Bolting it in place with its backing plate inside, I re-balanced the wing, taking both side and down the garden views to ensure accurate positioning, and marked and drilled the fixing holes. It took about half a dozen small adjustments before I was happy with its alignment.

Offering up the second bracket I realised that it was overkill, as the first was more than capable of supporting the meagre weight, so decided to go down the Maggie Shapland route and have a locating bar at the very bottom, with the front end, which is only millimetres from the body, bolted thereto.

These will have to wait until after spraying, as they won't be easily removable. Pleased with progress, but with frozen feet, I called it a day.
This morning, browsing Kit Cars on Ebay, I came across this from our favourite comedian. You may recall that the guy who delivered my chassis was on his way to collect one he'd bought for £120......
Regards, Mick
Last edited by Mick O'Malley; 24th November 2018 at 08:20..
Reason: Typo.
|
|
Currently Active Users Viewing This Thread: 201 (0 members and 201 guests)
|
|
|
 Posting Rules
|
You may not post new threads
You may not post replies
You may not post attachments
You may not edit your posts
HTML code is Off
|
|
|
All times are GMT +0. The time now is 04:18.
|


 Hybrid Mode
