|
|
| Sammio Builds and discussions Sammio bodied car builds and specials |

16th April 2012, 19:39
|
|
Senior Member
|
|
Join Date: Mar 2012
Location: Attleborough Norwich
Posts: 162
|
|
 Basic Sammio
In reply to Paul D, I will be building a "down to earth Sammio", keeping the car to a budget build without spoiling the ship as they say. Have welded up the better chassis, primed and almost finished painting it (photos soon promise!!) for the princely sum of £18.00.
More from Mr. Scrimper soon! Hoping to get bulkhead repaired soon and get a frame to start drawing things together. Mind you still got all the bits and bobs like engine diff axles etc to sort. Mmmmmmmm.
Watch this space (or my original thread Another One on the go)
Last edited by The 1958 Rocker; 16th April 2012 at 19:40..
Reason: Spelling and grammar don't you know
|
17th April 2012, 16:15
|
 |
Senior Member
|
|
Join Date: May 2009
Location: POOLE , DORSET
Posts: 2,200
|
|
Quote:
Originally Posted by The 1958 Rocker

In reply to Paul D, I will be building a "down to earth Sammio", keeping the car to a budget build without spoiling the ship as they say. Have welded up the better chassis, primed and almost finished painting it (photos soon promise!!) for the princely sum of £18.00.
More from Mr. Scrimper soon! Hoping to get bulkhead repaired soon and get a frame to start drawing things together. Mind you still got all the bits and bobs like engine diff axles etc to sort. Mmmmmmmm.
Watch this space (or my original thread Another One on the go)
|
Nothing wrong with budget builds ......
Andyp , car is looking fantastic and maroon is one of my colour choices for this style of car.....top work
I am planning a budget build myself , hopefully..... |
18th April 2012, 11:14
|
|
Senior Member
|
|
Join Date: Sep 2011
Location: Margate, Kent
Posts: 133
|
|
Well I am working on a pretty tight budget myself (in the scheme of things)....just about in credit still, having got my wheels, steering wheel and just about every serviceable part renewed and re-bushed....I think it is owing me the price of the body and frame at the moment....I am expecting that the seats, trim and paint and tyres will be the big spend, but all in not much over £2.5k
|
18th April 2012, 11:25
|
 |
Senior Member
|
|
Join Date: Dec 2011
Posts: 656
|
|
Last night I feel the project turned the important corner from restoring a Vitesse into building a Sammio.
The Frame arrived safely from Dorset and with that resting in place, the real Spyder work starts (That is, if this blasted rain gives up for a moment 
I'm aiming for the floors, pans and frame to be fitted over the weekend with the remaining Hydraulics and wiring loom fitted soon after. I've still to go through the 'battle of the Frame' though  but looking at it now, things don't look 'too' much out of place.
More when I can get some photos up
 |
20th April 2012, 08:14
|
|
Senior Member
|
|
Join Date: Dec 2011
Posts: 656
|
|
OK, I must be being a bit thick here so bear with me... 
Once the frame is on, is there some mysterious 'chinese puzzle' method of getting the fuel tank to the back of its support beam? 
As far as I can see (And I've only had a quick go at it this morning), it can't go in from the front, the leaf spring stops it going in from the side and the only place I can get it to look anywhere near the right place is hanging on the front of that beam after being slid in from the side forward of the upright beam.
Come to that, would it be ok on the front of the beam as all it seems to do is move the filler about an inch further forward?
The frame has to come off again soon anyway so it can always be fitted whilst it's off but that precludes any future maintenance (Not that I've ever had to take a tank off before) |
20th April 2012, 08:27
|
 |
Senior Member
|
|
Join Date: Jul 2011
Location: Marmande 47200
Posts: 501
|
|
Hi Andy
I took the fuel tank challenge and failed, if you want it behind the beam then its fitted when the frames off, I fitted mine forward of the beam.
Theres no difference as you say just a slightly further forward fuel filler and maybe a more central weight distribution with a full tank, ( thats all thats stopped me moving the tank further back ( behind the cage) I was worried the weight over the tail might have an adverse effect on cornering, but dont really know..
Pops
|
20th April 2012, 08:28
|
 |
Senior Member
|
|
Join Date: Jan 2012
Location: Poole, Dorset
Posts: 615
|
|
From what I have seen (bear in mind I modified mine to put the tank behind the spring), the easiest way is with the frame off. Mount the tank, then put it back on. If you ever need to take the tank out then it will need the spring removed first as far as I can tell.
Like you, in all my years I have never have to remove a tank, but I did coat mine in 5 coats of chassis black and it will get a good smothering of waxoyl in due course, when I have completed the build!
|
20th April 2012, 08:32
|
|
Senior Member
|
|
Join Date: Jul 2011
Location: Marmande 47200
Posts: 501
|
|
Andy
Your exhausts, They look further back than mine, have you managed to clear the rear axle with the back of the boxes? and therefore gained some clearance.
Mine looked they would fit in the axle arch but no and therefore hang with about 4 inches of clearance, any chance of a photo so show how yours sit under the car.
cheers Pops
|
20th April 2012, 08:41
|
 |
Senior Member
|
|
Join Date: May 2011
Location: Somerset
Posts: 1,671
|
|
I double checked how i fitted mine (i can't believe that I'm starting to forget bits of the build already!) and mine is in front of that beam.
I tried to find a decent photo of how mine is all plumbed in, in case it's of use, and this is the nearest i could find:

note: this was REALLY early on in my build pre-inspection and before i changed to my new "shouty" exhaust  |
20th April 2012, 08:57
|
|
Senior Member
|
|
Join Date: Dec 2011
Posts: 656
|
|
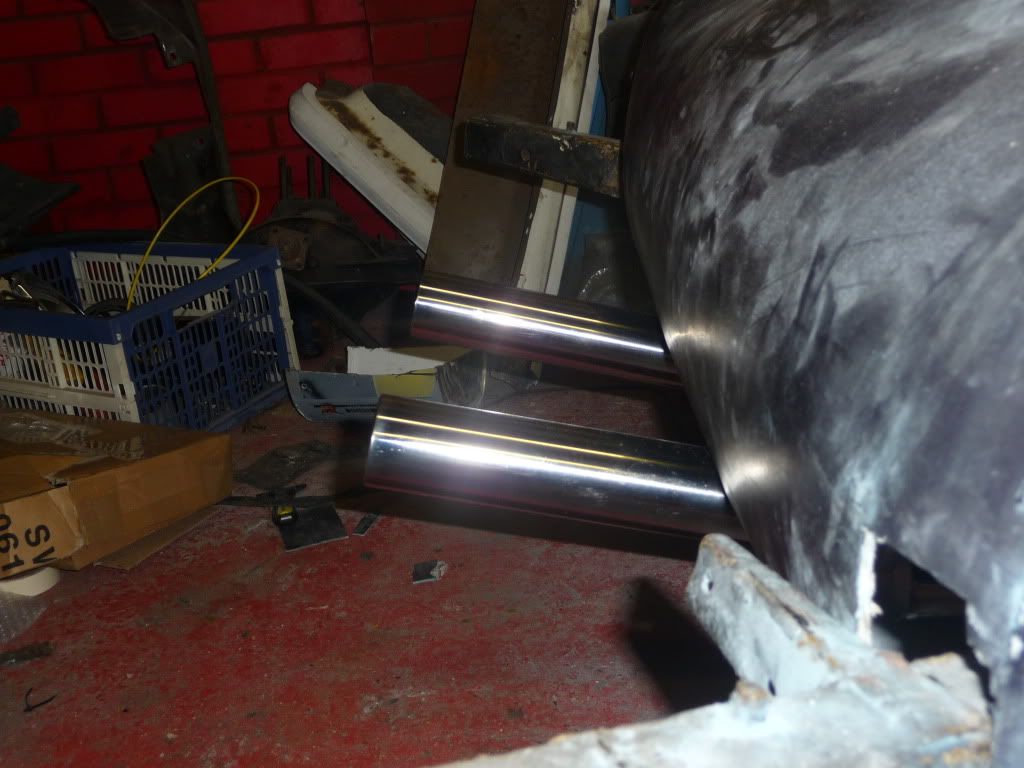
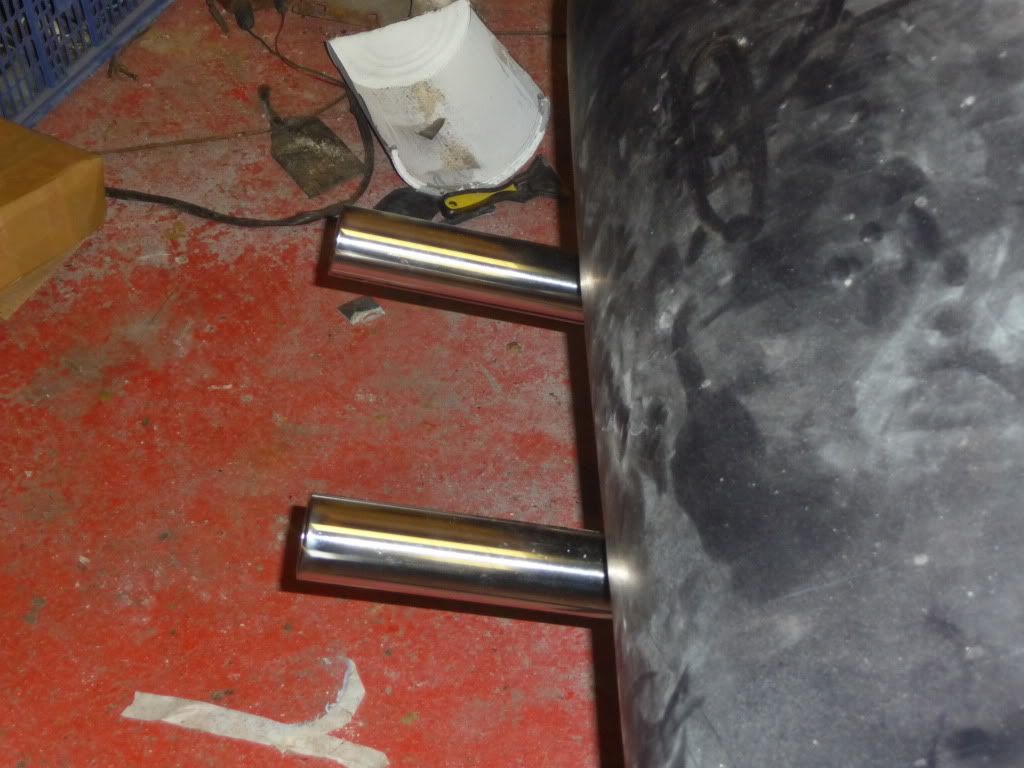
No problem Pops.
Maybe the box length is different but I've got loads of room around the axles:

And under the diff where the pipe bifurcates:

Of course, i don't know how much they will stick out from the body until it gets to that stage? |
20th April 2012, 09:16
|
|
Senior Member
|
|
Join Date: Jul 2011
Location: Marmande 47200
Posts: 501
|
|
Looks like I need to pull the straight section out from the down pipes that will give me the length to clear the axle, ( exhaust system looks the same both RIMMERS finest) but mine is a 4 cylinder. The stick out will be anything past the original exhaust hanger as that is where the body sits down in front of.
Cheers for the pics helps a lot..
Pops
|
20th April 2012, 11:06
|
|
Senior Member
|
|
Join Date: Jul 2011
Location: Marmande 47200
Posts: 501
|
|
Lengthening the main pipe has allowed me to clear the chassis and the boxes tuck up tight and look much better, however the result is a 7 inch exhaust pipe sticking out, not subtle....
 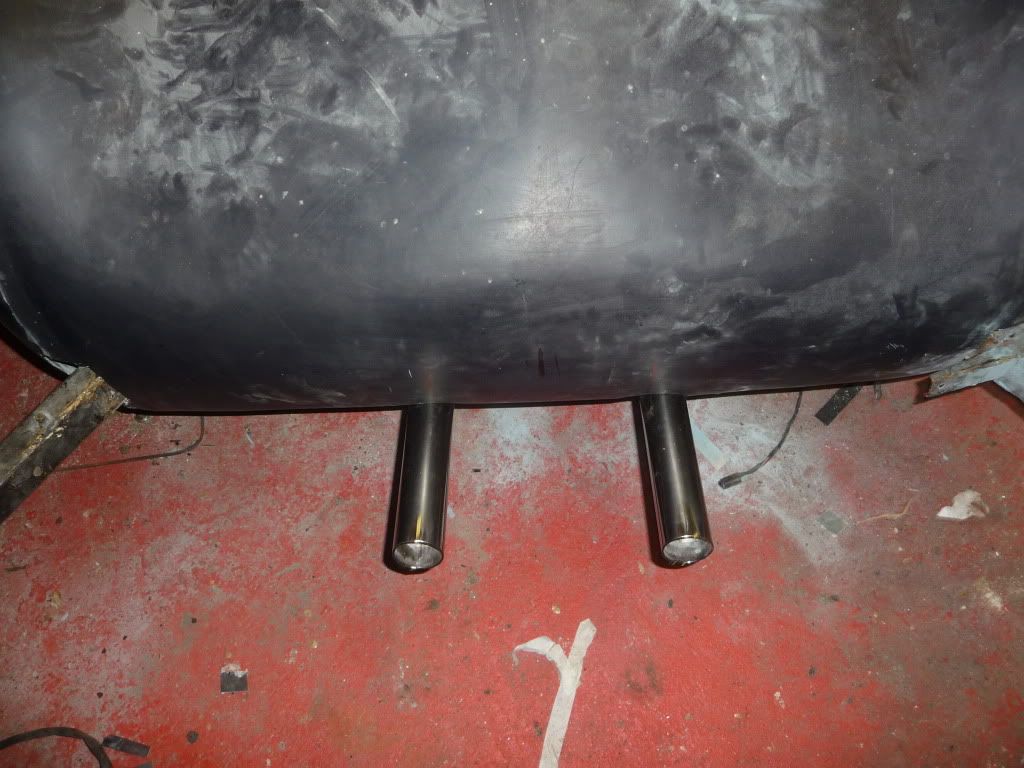
What do you think...? |
20th April 2012, 11:09
|
|
Senior Member
|
|
Join Date: Dec 2011
Posts: 656
|
|
It's possibly an inch or so more than my pipes extend but who said we had to be Subtle with these cars  |
20th April 2012, 12:44
|
|
Senior Member
|
|
Join Date: Sep 2011
Location: Margate, Kent
Posts: 133
|
|
I once had extended pipes like that on an earlier car.....pain in the arse kept cracking the manifold joints when I reversed into walls.
|
20th April 2012, 15:59
|
|
Senior Member
|
|
Join Date: Nov 2011
Posts: 3,558
|
|
At least you can used them as handles if the car ever breaks down. Simply grab them and wheel barrow the car down the road
;-)
|
20th April 2012, 19:03
|
|
Senior Member
|
|
Join Date: Jan 2012
Location: Poole, Dorset
Posts: 615
|
|
Quote:
Originally Posted by WorldClassAccident
At least you can used them as handles if the car ever breaks down. Simply grab them and wheel barrow the car down the road
;-)
|
that'll keep your hands warm as well  |
20th April 2012, 20:58
|
|
Senior Member
|
|
Join Date: Jun 2011
Location: birchington, kent
Posts: 1,769
|
|
What about a nice angled cut/slash...
|
21st April 2012, 12:03
|
 |
Senior Member
|
|
Join Date: Jul 2011
Posts: 5,328
|
|
Hmm, interesting choice. I'm more a straight pipe kind of guy myself rather than fish-tail finishers but I'd like to see how they look on the car.
|
|
Currently Active Users Viewing This Thread: 1 (0 members and 1 guests)
|
|
|
 Posting Rules
|
You may not post new threads
You may not post replies
You may not post attachments
You may not edit your posts
HTML code is Off
|
|
|
All times are GMT +0. The time now is 18:54.
|


 Linear Mode

