Are you madabout kit cars      
 "We've Got Kit Cars Covered" Information about Madabout-Kitcars.com Contact Madabout-Kitcars.com         Home of UK kit cars - madabout-kitcars.com Various kit car write ups All the latest kit car news Kit car related and general discussion

Search
Manufacturers
Kit Cars
Kit Car Data sheets
Picture Gallery
SVA Knowledgebase
Clubs & Communities
Build cost estimator
Kit cars for sale
Knowledge Base 
KitcarUSA.com
Classic-Kitcars.com
 

Go Back   Madabout Kitcars Forum > Mad Build Area > Sammio Builds and discussions

Sammio Builds and discussions Sammio bodied car builds and specials

Reply
 
Thread Tools Display Modes
  #1321  
Old 18th October 2014, 15:16
redratbike's Avatar
redratbike redratbike is offline
Senior Member
 
Join Date: Sep 2011
Posts: 1,446
redratbike is on a distinguished road
Default

Hope you have a happy outcome ....obviously it's luck who in the department deals with it looking at other peoples tales of dvla
Reply With Quote
  #1322  
Old 18th October 2014, 21:46
Paul L's Avatar
Paul L Paul L is offline
Senior Member
 
Join Date: Feb 2012
Location: Wembley, London
Posts: 5,056
Paul L is on a distinguished road
Default

Scottie & RedRatBike - Cheers chaps.

Well I've just finished my reply to the DVLA which I will stick in the post tomorrow.

I've decided to KISS and just request the V5C change is made while the car remains on SORN.

Cheers, Paul.
Reply With Quote
  #1323  
Old 19th October 2014, 16:04
Paul L's Avatar
Paul L Paul L is offline
Senior Member
 
Join Date: Feb 2012
Location: Wembley, London
Posts: 5,056
Paul L is on a distinguished road
Default

Warts and all...
I should have realised that this boot access panel was going to require some compromises.

After all, the two humps are not identical, nor are they equally spaced, and the rear body shell also has some contour "issues".

So is it any wonder that attempting to cut a "straight" line across this has proved to be a bit of a challenge?

At least I am prepared to confess my mistakes so that other builders may not blunder into things the way I do...

First job of the day was to fix some brackets around the driver's side hump to hold it in position.


You will notice the "spare" hole created when the first fixing screw sheared through the body shell.

I used a marker pen to extend the current cut in the hump so I could work out where it would connect with the outside edge.


Unfortunately, the answer was in a slightly different place to the passenger side.


It was at this point that I realised all the complications I mentioned at the start, and once again embraced my inner Hillbilly.

There is absolutely no point in worrying about the lack of perfect symmetry and so I have just got on with it.

I cut out a couple cardboard templates.


And pulled out some of my fibreglass off cuts.


A quick mark up and cut out later, I have two fibreglass filler pieces ready to go.


These sections will have two basic functions:
- Bracing / keeping the shape of the driver's side hump when the lid is cut out.
- They will also help me to add "face" panels to the cuts through the humps.

After a round of fibre glassing they were set into position.


If the slightly mis-shaped boot lid sounds like a compromise, wait until you see my next cock up.

I was looking at where I'd extended the cut along the bottom edge of the boot lid...


Initially I was thinking that it looked neat, until it dawned on me this was supposed to be inside the rain channel!


Yes, my foam has slipped a bit when I was making the channel and I've just separated the channel from the body shell.

I wasn't kidding when I used "warts and all" for today's title.

So I added some plastercine along the cut.


Then after adding quite a few layers of matting, I had re-joined the rain channel to the body shell.


Thankfully the rain channel on the top edge is in the right place.

So I just added an extra layer of matting across the body shell join while I was at it.


I left all that to set before turned the body shell back over and tucking it in for the night.

At which point I discovered the wind had blown some resin soaked newspaper onto the top of one of the humps and made a mess.

So overall, it really has been one of those weekends.

Still, at least I am still heading in the roughly the right direction and I will sort this boot lid out eventually.

So until next time, take care, Paul.
Reply With Quote
  #1324  
Old 19th October 2014, 16:52
Mister Towed's Avatar
Mister Towed Mister Towed is offline
Senior Member
 
Join Date: Jul 2011
Posts: 5,328
Mister Towed is on a distinguished road
Default

And I thought I'd strayed from Gary J's original philosophy of 'strip the donor, bond on the bodyshell, spray it a nice colour and drive away'...
Reply With Quote
  #1325  
Old 19th October 2014, 17:16
Scottie22 Scottie22 is offline
Senior Member
 
Join Date: May 2013
Posts: 2,161
Scottie22 is on a distinguished road
Default

I feel for you Paul, bet you wish you'd bought some ally strips now!

I thought my boot lid was bad enough, but like you say, you will get it sorted, its just time and effort.

Good luck with the fix.

Scottie
Reply With Quote
  #1326  
Old 20th October 2014, 16:46
Paul L's Avatar
Paul L Paul L is offline
Senior Member
 
Join Date: Feb 2012
Location: Wembley, London
Posts: 5,056
Paul L is on a distinguished road
Default

Mr T - It is actually much worse than that, as my "Plan A" didn't even involve paint!
I really expected to be driving around with just a shiny blue gel coat finish to begin with.

Scottie - I'll certainly be glad when this particular job is sorted out.

- - - - - - - - - - - - - - - - - - - - - - - - - - - - - - -

A glimmer of hope...
After a poor weekend & with the tail end of a hurricane due to arrive tomorrow, I wanted to do something constructive today.

So I started by marking up the rest of the boot lid.


I drew curves for the top corners, and although the photos do not show it very well, the driver's side...


... has a narrower gap between the outside edge of the hump and the inside edge of the wheel arch compared to the passenger side.


I also marked up some curves for the bottom corners.


I then cut a few dashes along the sides to make it easier to line things up when the body shell is upside down.


Then I drew the corresponding lines on the inside like so.


I also trimmed off the edges of the foam / rain channel on both ends.


One advantage of using the yoga mat instead of a roll of foam is that I can build corners as a single piece.


With two corners and the driver's hump channel in place, you can now get a much better idea of the boot lid shape.


With parcel tape added I was ready to start fibre glassing.


Unfortunately by the time I'd cut out some matting to use...


The wind had brought some black clouds over head.


After a couple of rain drops landed, I couldn't take the chance and covered up for a short weather delay.


Have I ever mentioned what a dumb idea building a car outside was?

Eventually I was able to get back outside and add some fibreglass.


But as soon as I had cleaned & packed away all the fibreglass stuff the rain returned with a vengeance.

I just about managed to get the covers back on, but looked like a drowned rat by the time I got inside.


So once the fibreglass has had a chance to set, I'll turn the body shell over to avoid rain collecting in the covers.

Until next time, take care, Paul.
Reply With Quote
  #1327  
Old 21st October 2014, 16:19
Paul L's Avatar
Paul L Paul L is offline
Senior Member
 
Join Date: Feb 2012
Location: Wembley, London
Posts: 5,056
Paul L is on a distinguished road
Default

Confessions of a Cordite Builder...
Getting soaked yesterday gave me a slight sense of humour failure, so I didn't mention yet another cock up.

I was very conscious of the weather turning against me, but this meant I forgot what I was actually doing.

In my desperation to get the body shell turned over it didn't occur to me that I'd only just finished laying on the matting.

I had tidied all my other stuff away, so in my head there was just the body shell left to "tidy".

I turned the body shell over & carried it across the drive, but, as soon as I put the shell down on its wooden blocks, disaster struck.

Yes, gravity took a complete section of freshly applied fibreglass matting and dropped it on to my driveway.

There was a lot of repeating the word "no" in disbelief at my own stupidity.

Followed by an uninterrupted stream of expletives as I carried the body shell back & flipped it over again.

As by now the rain was starting and, with my surgical gloves packed away, I had to use my bare hands to repair the damage as best I could.

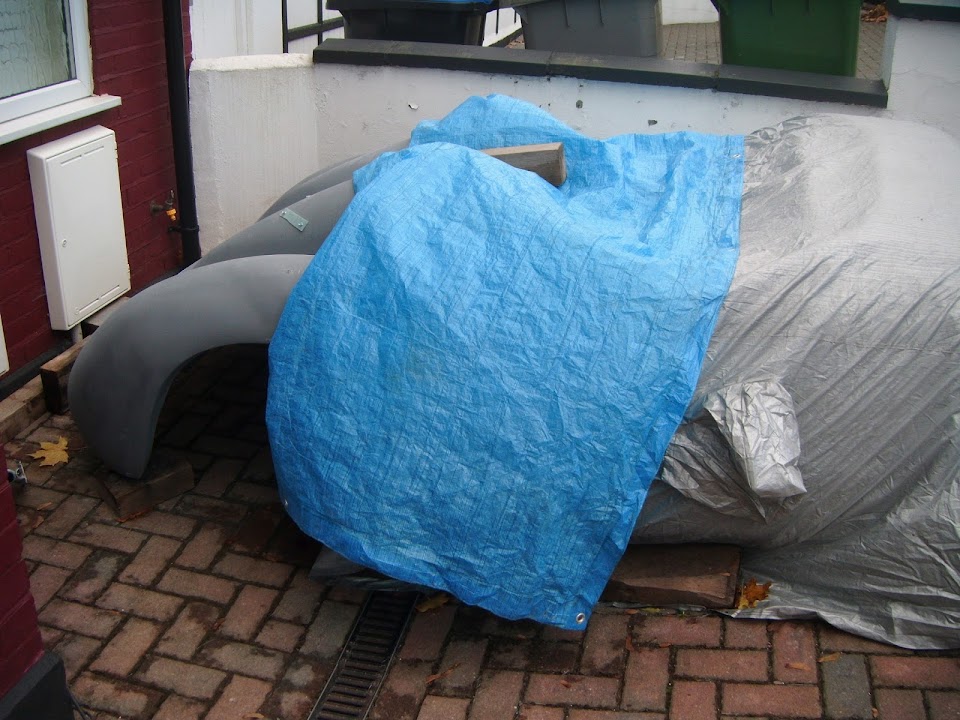
So by the time I finally got the covers on I was not in a good mood.

The good news is that by the late evening, my repair work had set well enough for it to stay in place.

So even though I looked a bit odd turning the body shell over in the dark last night, I was pleased I could do it without causing anymore damage.

- - - - - - - - - - - - - - - - - - - - - - - - - - - - - - -

I'd love to say that today was much better and passed without any problems, but I can't...

I started off by peeling back the covers so I could work on the "sunny side" of the boot lid.


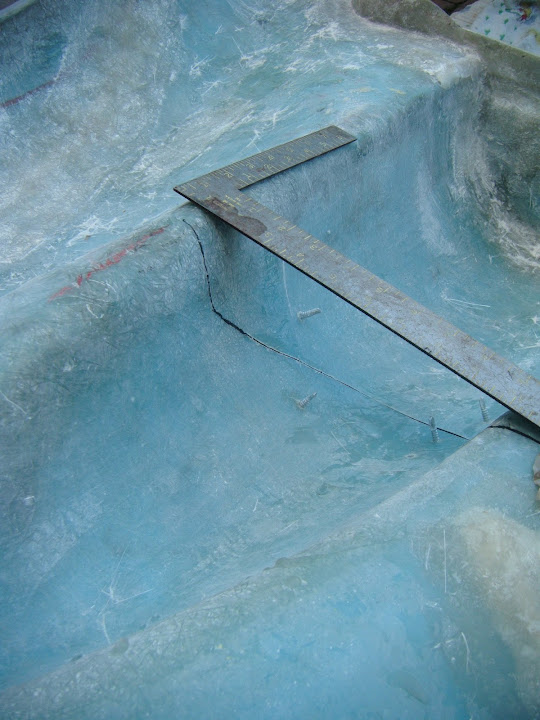
I wanted to cut the top corners, so I would know where to put the rain channel on the other side.

There wasn't enough room to use my jigsaw so I tried to drill some holes along the curve instead.

The passenger side wasn't great, but it wasn't too bad.
( As the eventual gap will be slightly larger to allow smoothing of all the edges. )


But the driver's side was a bit of a mess.


I could use the jigsaw for the bottom corners, and the driver's side was the best of a bad bunch.


Because I didn't notice some resin in the slit on the passenger side, which sent the jigsaw bouncing along the bodywork.


I should have taken the fact I only managed to get one good corner out of four as a sign not to do any more work on the car, but I didn't...

I turned the body shell over, although at the half way point the wind caught it and I nearly took off.

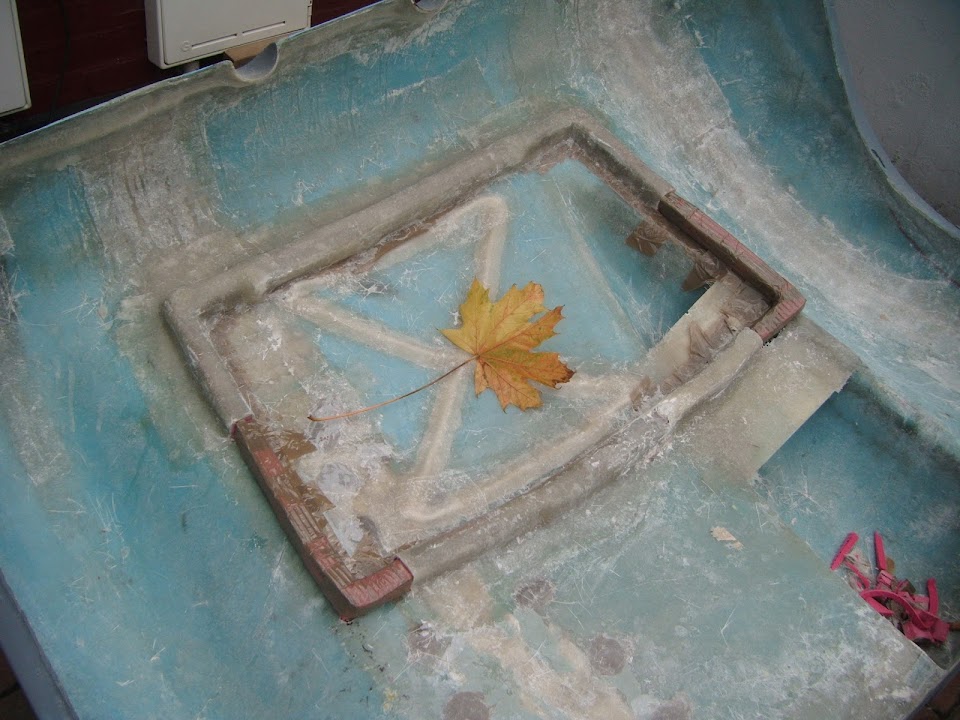
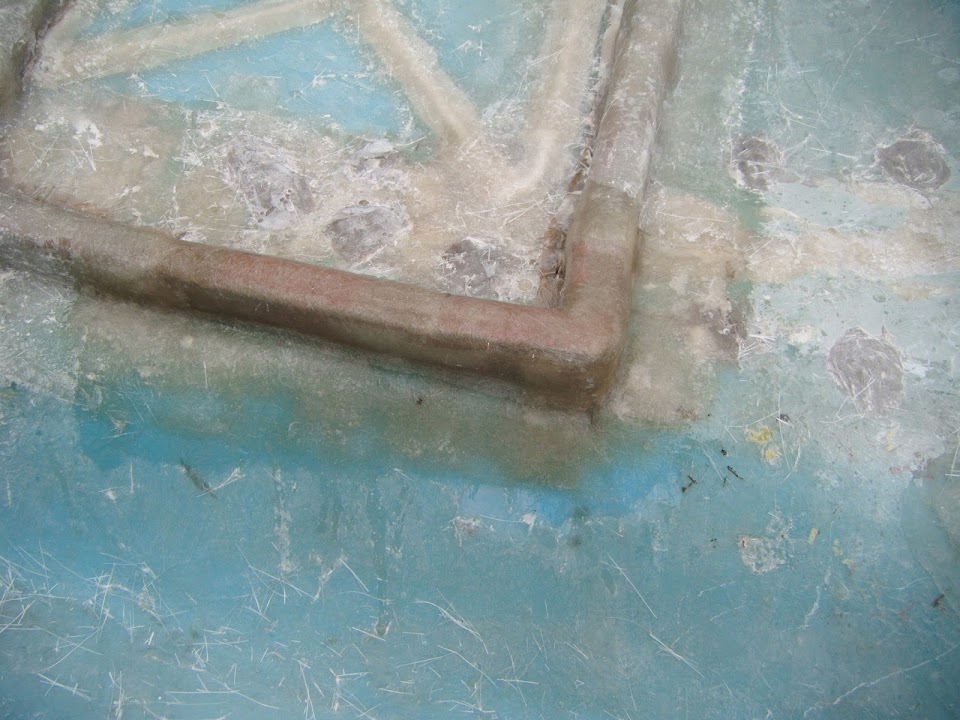
I cleaned up the rain channel work I did yesterday including the mess from replacing the matting near the driver's hump.
( At least it has firmly stuck in place. )


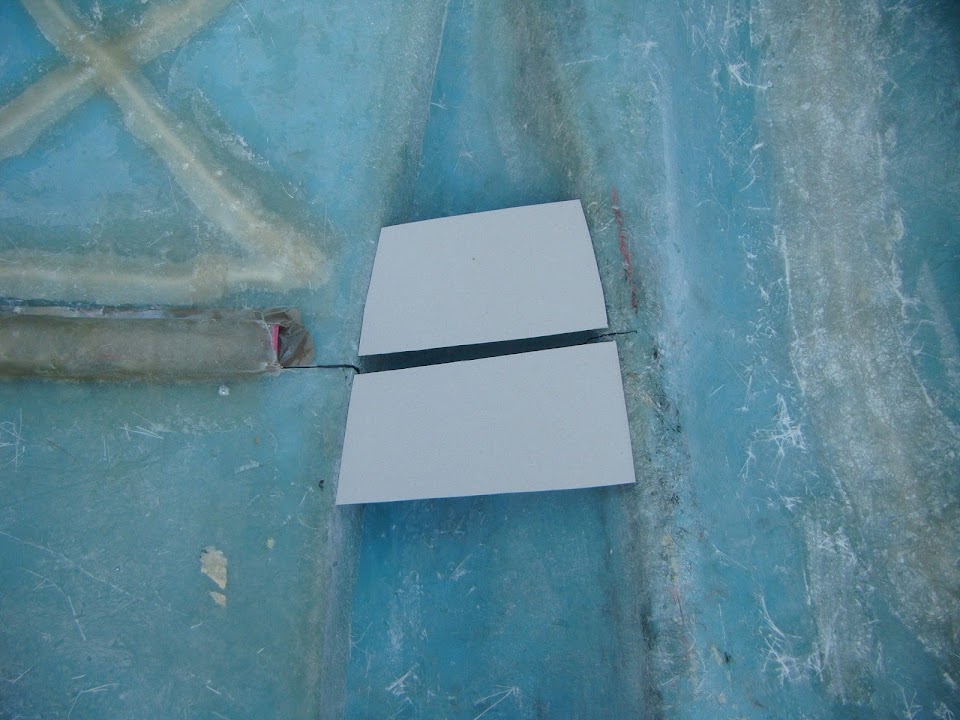
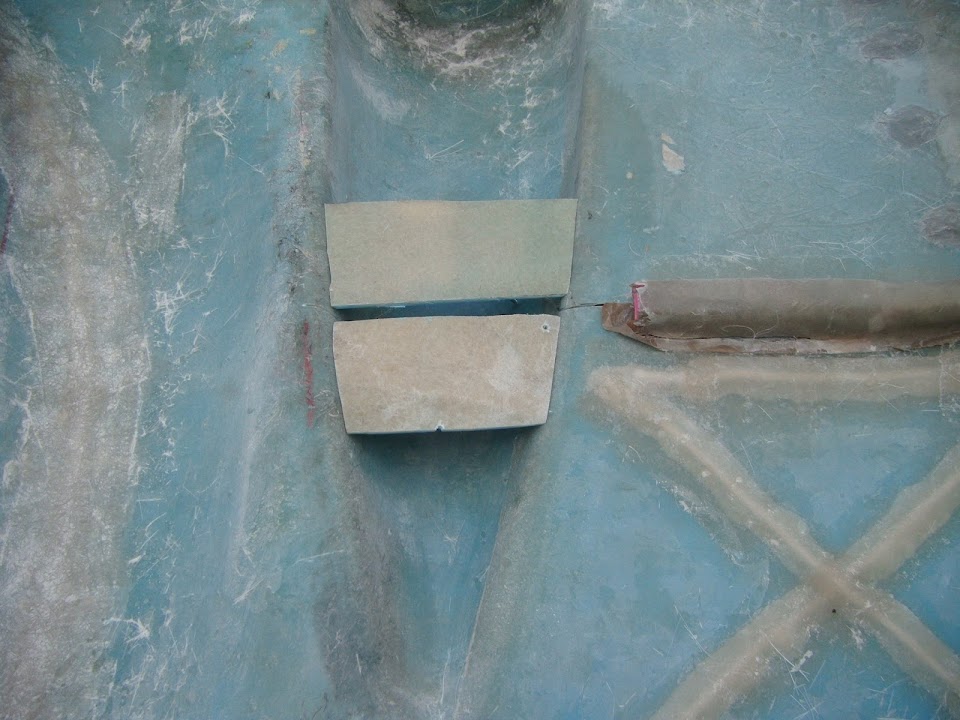
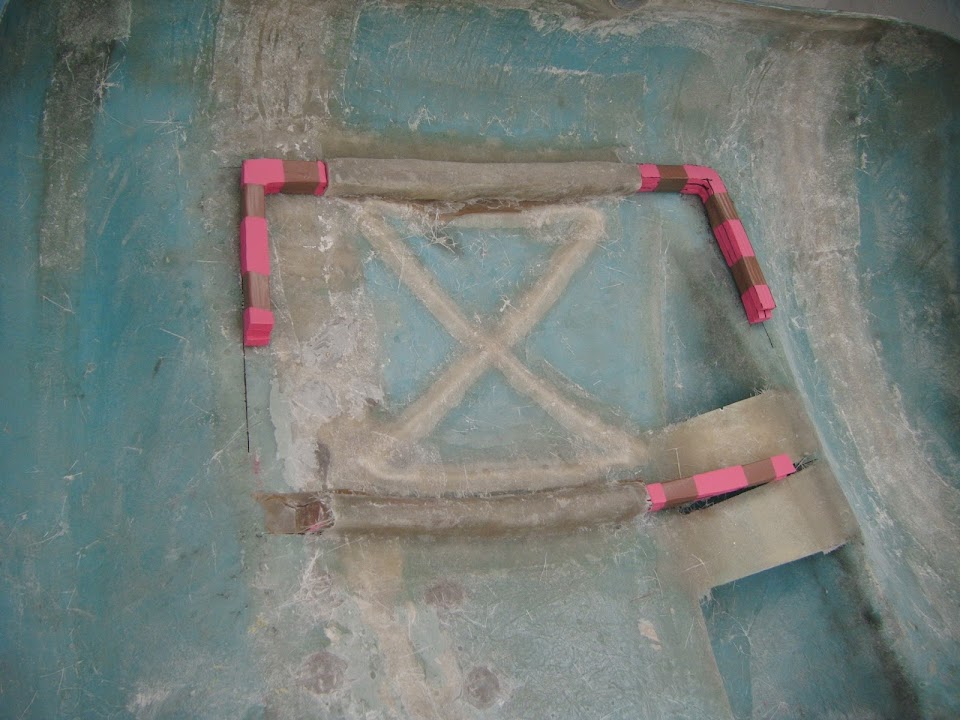
I cut out some more foam to finally join up all sides of the rain channel.


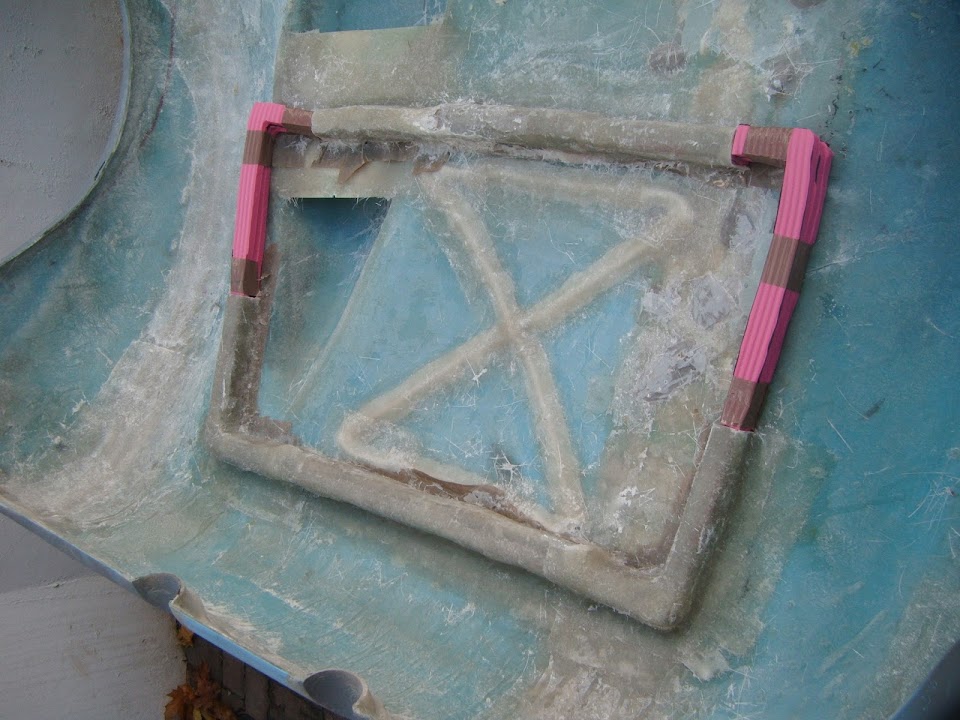
Then this was wrapped in parcel tape.


The wind was playing complete havoc with my attempts to work with strips of fibreglass matting.

A couple of gusts had me running into the road to catch bits that were completely blown away.

But the real problem with the wind, was that just as I had finished the fibreglass work it had blown a storm cloud overhead.

There was absolutely nothing I could do, one second it was dry, the next it was a complete deluge.

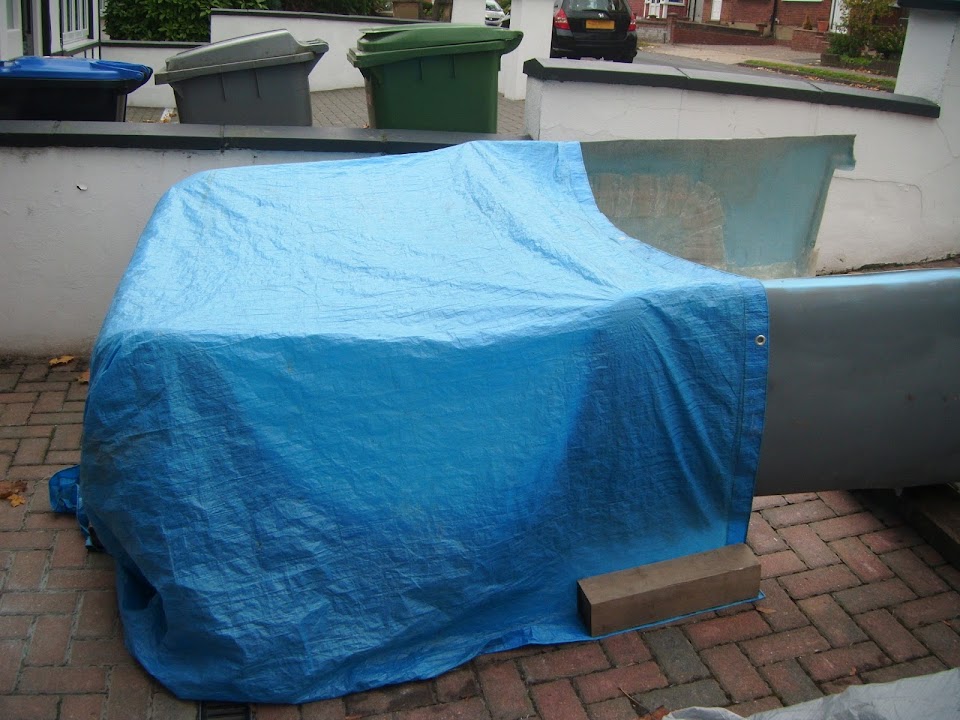
By the time I had dragged the tarpaulin over to cover my work it was too late, the damage was done.

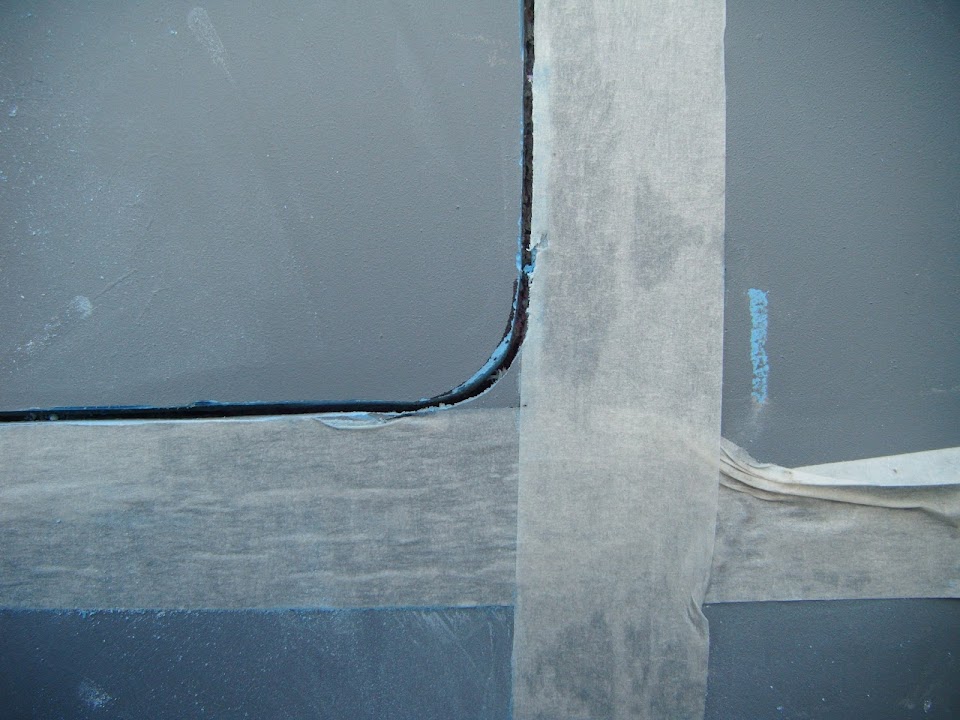
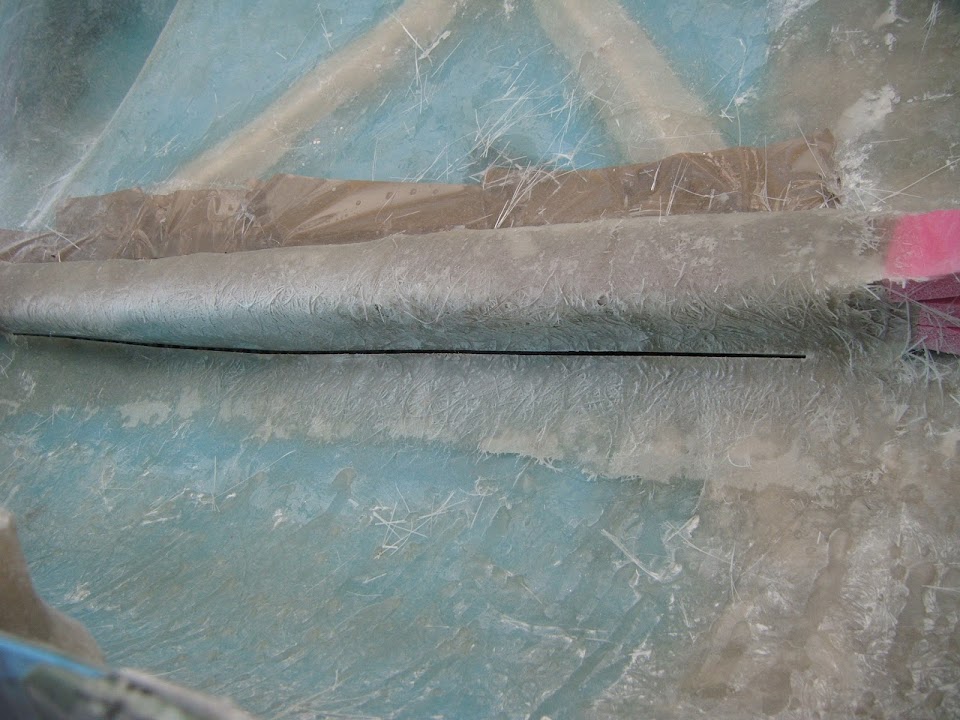
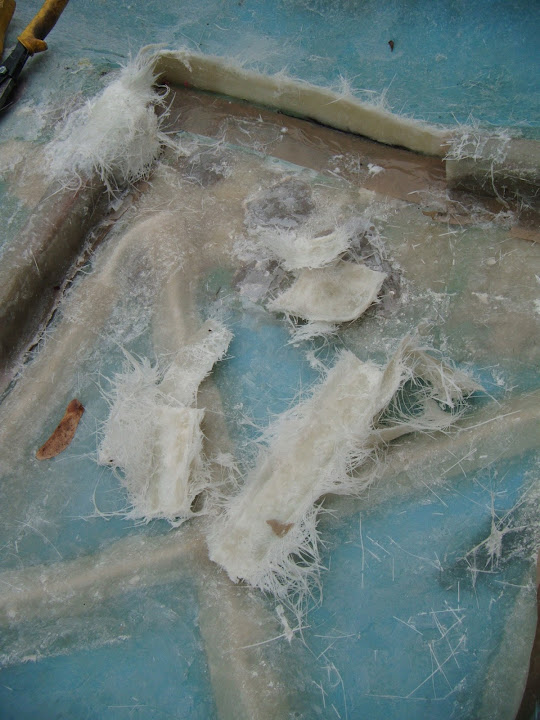
Despite trying to roller the water out, the new fibreglass sections I completed ended up looking like this.


Whilst I am no expert, I'm prepared to hazard a wild guess that this is not good news.

Everything is now covered up for the night, so I will see what it looks / feels like in the morning.

Worse case scenario is that I have to cut it all out and start again.

Perhaps I should just hibernate for the Winter and start again in the Spring.

Take care, Paul.

Last edited by Paul L; 22nd October 2014 at 07:21.. Reason: Typo
Reply With Quote
  #1328  
Old 21st October 2014, 16:33
Viatron Viatron is offline
Senior Member
 
Join Date: Apr 2012
Posts: 1,163
Viatron is on a distinguished road
Default

Paul has the water affected the cure or just made the surface look cack? if its the later I would just put another layer on top and get on with it :-) if its a soggy gloopy mess then cut it off, you have accomplished so much so far that to skimp now would be madness.
Keep your pecker up (and dry)
Mac
Reply With Quote
  #1329  
Old 21st October 2014, 18:44
Scottie22 Scottie22 is offline
Senior Member
 
Join Date: May 2013
Posts: 2,161
Scottie22 is on a distinguished road
Default

Thanks for sharing your woes with us Paul!

I know its wrong, but I could not help laughing! You made it sound so funny! I could imagine you fighting the wind and all the mess, and it all getting worse.

I have had similar experiences, like just when you think it can't get any worse, it does!

I would think Mac has good advice, what he said would be what I would suggest. I would guess the rain did not affect the cure.

Don't worry, you'll sort it!
Reply With Quote
  #1330  
Old 22nd October 2014, 07:21
Paul L's Avatar
Paul L Paul L is offline
Senior Member
 
Join Date: Feb 2012
Location: Wembley, London
Posts: 5,056
Paul L is on a distinguished road
Default

Mac – I’ll be able to check the fibreglass later on today.
With a bit of luck it will be set hard and just need a tidy up.
If not, then I will just bite the bullet and start again.

Scottie – For full comic effect, imagine my hands covering in fibreglass stands.
I had to use my elbow to ring the doorbell so my children could open the doors for me.
I got the worst of it off with kitchen roll, which promptly stuck to my hands instead.
So I was in the rain, with kitchen roll on my hands, trying to get the covers on.
Did I mention having a major sense of humour failure at the time?
Reply With Quote
  #1331  
Old 22nd October 2014, 09:06
davecymru's Avatar
davecymru davecymru is offline
Senior Member
 
Join Date: May 2011
Location: Somerset
Posts: 1,671
davecymru is on a distinguished road
Default

I feel for you matey! i do bits-n-bobs on mine in 1hr chunks in the evening after work, so i'm also sometimes not thinking straight and some of the... interesting ... things that i've done would fill a small book!

I have a LOT of respect for all of the effort you are putting in as personally i hate fibreglassing and that is why i'm just using single and double thicknesses to grab things in place and fill holes/seams and then skimming with bonding paste or filler to finish. And then i'm using the bonded and riveted alloy for the strength on my Miglia build as I still remember getting the good lady wife to cut hardened resin out of my hair when i was doing the Sammio
Reply With Quote
  #1332  
Old 22nd October 2014, 09:35
Mister Towed's Avatar
Mister Towed Mister Towed is offline
Senior Member
 
Join Date: Jul 2011
Posts: 5,328
Mister Towed is on a distinguished road
Default

Quote:
Originally Posted by davecymru View Post
I still remember getting the good lady wife to cut hardened resin out of my hair when i was doing the Sammio
Hair you say. Hmm...


Got to agree about the 'glassing - there must be a way of doing it without ending up looking like the curse of the mummy, but I never worked it out.
Reply With Quote
  #1333  
Old 22nd October 2014, 15:27
Paul L's Avatar
Paul L Paul L is offline
Senior Member
 
Join Date: Feb 2012
Location: Wembley, London
Posts: 5,056
Paul L is on a distinguished road
Default

Dave - Glad to hear I am not alone on the comedy car building stories.

Mr T - I live in hope of wearing a grin like yours when my car is finally on the road.
At which point I hope all the grief from building the bloody thing will simply melt away.

- - - - - - - - - - - - - - - - - - - - - - - - - - - - - - -

You couldn't make this up...
Unfortunately the heavy rain downpour did mess up the fibreglass curing process on the top layers.

I was able to pull sections away by hand (with a surgical glove on it).


Whilst it was clear that some lower layers had set...


I didn't want to take a chance and the took the whole lot out, which was a very messy job.


It reminded me of my granddad shearing sheep in places, as I ground the over lapping areas back to the good fibreglass below.

Eventually I was right back where I started yesterday.


In an effort to learn from my mistakes I made two changes:
- A slightly higher catalyst mix so the resin would go off faster.
- I only worked on one corner at a time, rather than do the whole lot in one go.

This turned out to be a very good move as I finished one side...


But no sooner had I started cutting the matting for the other corner, when it started to rain.

So much for the "dry all afternoon" weather forecast.

Thankfully there was no drama today & the first cover was on before the rain really got going.


I even managed to get the outer cover on and everything else moved into the porch before it was too late.

I really hoped the rain would quickly blow over, but it is still coming down as I type this.

So I may call it a day and try to finish the job tomorrow, weather permitting.

Until next time, take care, Paul.

PS
This Friday, the Euro Millions' jackpot is a mind blowing £150 million!
Although given my recent run of luck, I might be wasting my £2 on a ticket.
Reply With Quote
  #1334  
Old 23rd October 2014, 15:29
Paul L's Avatar
Paul L Paul L is offline
Senior Member
 
Join Date: Feb 2012
Location: Wembley, London
Posts: 5,056
Paul L is on a distinguished road
Default

Wednesday - Evening:
Drizzle prevented me making any more progress yesterday.
So when it eventually dried up I just removed the covers, turned the body shell the right way up & put the covers back on.
( As it simply collects rain water if I leave it upside down. )

Thursday:
Today I carried on where I left off when the rain started and got the other corner covered in fibreglass.


I also added some extra matting along various section of the rest of the rain channel.

So for the second, and hopefully the last, time, I can declare the basic rain channel complete.


Like yesterday, I used a slightly increased catalyst mix, so it didn't take long for this to set pretty solid.

At which point I tidied up the "inside" edge of the channel to ensure it wasn't stuck to the lid itself.


Then the body shell was carefully turned over and the temporary hump fixing brackets were removed.


My run of luck doesn't seem to have improved, as first my small blade broke.


Which meant I had to finish the cut in the hump with the broken end piece.

Then the cutting disc frayed, making a slightly wider cut until I finally noticed it.


But eventually all the cuts along the boot lid edges were extended until they joined up.


At which point the whole lid could be removed.
( Although this did required me to lie underneath the body shell and push up with my feet! )


All the moulding foam stayed in the channel.


But once I had picked all of that out I was left with this.


Clearly there is a ton of work to do before I can call this job finished.

But I started by making two cardboard templates for the "faces" of the cut humps on the body shell.


The boot lid itself also needs two faces.


Hopefully these "faces" will guide the rain into the channel, and keep it out of the boot area.

At this point, I got a bad feeling about the weather and I had stuff all over the place.


So I decided to call it a day, rather than risk getting caught out yet again.

After moving the body shell into position, I put the boot lid back on to check the fit.


Thankfully, both the lid and body shell have retained their shape.

- - - - - - - - - - - - - - - - - - - - - - - - - - - - - - -

DVLA - I just spoke to the person who I've been writing to at the DLVA.
As I wanted to check that my last letter had actually arrived in Swansea.
( I used their pre-paid envelope this time, but sent my main case by recorded delivery. )
By chance, he had just read the letter and my "Catch 22" situation.
He believes that the build needs to be 100% complete and vehicle taxed before the V5C can be changed.
I did mention all the other Sammios with V5Cs changed on unfinished projects that remained SORN until MOT day.
He doesn't believe these followed the rules and I can't use them as a precedent anyway.
( Each case is judged on its individual merits. )
The next step is that he will pass my case on to his supervisor, noting my comments, to see what they say.
So it is completely out of my hands now and I will just have to wait for the "verdict".

Until next time, take care, Paul.

Last edited by Paul L; 23rd October 2014 at 16:29.. Reason: Typo
Reply With Quote
  #1335  
Old 23rd October 2014, 16:41
Viatron Viatron is offline
Senior Member
 
Join Date: Apr 2012
Posts: 1,163
Viatron is on a distinguished road
Default

Reply With Quote
  #1336  
Old 23rd October 2014, 16:42
Scottie22 Scottie22 is offline
Senior Member
 
Join Date: May 2013
Posts: 2,161
Scottie22 is on a distinguished road
Default

Good job on that boot lid Paul. It has turned out well I think.
By the time you get the end bits in place the whole thing will be quite robust!
Reply With Quote
  #1337  
Old 23rd October 2014, 16:43
Scottie22 Scottie22 is offline
Senior Member
 
Join Date: May 2013
Posts: 2,161
Scottie22 is on a distinguished road
Default

That picture of Mac looks a bit like that bloke from Kazakstan!!
Reply With Quote
  #1338  
Old 23rd October 2014, 16:47
Viatron Viatron is offline
Senior Member
 
Join Date: Apr 2012
Posts: 1,163
Viatron is on a distinguished road
Default

Sorry that was actually a picture Paul sent me of him celebrating, this ones me:

Reply With Quote
  #1339  
Old 23rd October 2014, 18:06
Scottie22 Scottie22 is offline
Senior Member
 
Join Date: May 2013
Posts: 2,161
Scottie22 is on a distinguished road
Default

Bloody hell Mac! You need a haircut!!!
Reply With Quote
  #1340  
Old 23rd October 2014, 19:04
Paul L's Avatar
Paul L Paul L is offline
Senior Member
 
Join Date: Feb 2012
Location: Wembley, London
Posts: 5,056
Paul L is on a distinguished road
Default

Mac & Scottie - Thanks chaps.

I'm really pleased with the overall shape of the lid.

I know there is a lot of tidying up to do, but it should work.

Cheers, Paul.
Reply With Quote
Reply


Currently Active Users Viewing This Thread: 3 (0 members and 3 guests)
 

Posting Rules
You may not post new threads
You may not post replies
You may not post attachments
You may not edit your posts

BB code is On
Smilies are On
[IMG] code is On
HTML code is Off

Forum Jump


All times are GMT +0. The time now is 19:39.

copyright © madabout-kitcars.com 2000-2024
terms and conditions | privacy policy