|
|
| Vintage and Classic Roadster Kit Car Builds For Vintage and Classic era kit cars. Post your build reports, problems and progress here |

29th April 2021, 20:41
|
 |
Senior Member
Enthusiast
|
|
Join Date: Feb 2005
Location: Hampshire
Posts: 2,497
|
|
Those look nice
|
8th May 2021, 20:51
|
 |
Senior Member
Enthusiast
|
|
Join Date: Mar 2005
Posts: 3,079
|
|

Work continues on fitting the inner rear wheel arches.
On the nearside, I've fabricated a support for the rear of the inner wheel arch from 8mm mild steel bar. It's fixed to the rear tub floor with saddle clips and now needs painting. The saddle clips are fixed to the bar with a dab of J-B weld to stop any movement.
 Inner wheel arch stay nearside Inner wheel arch stay nearside by Sabrebuilder, on Flickr
I then moved on to cutting and fitting the offside wheel arch.
It is fixed in the same way as the nearside at the front.
 Inner wheel arch offide2 Inner wheel arch offide2 by Sabrebuilder, on Flickr
But, at the rear, I had to re-arrange one of the breather pipes to clear the inner wheel arch.
 Rerouted breather pipe Rerouted breather pipe by Sabrebuilder, on Flickr
And the stay fixing had to be bent forward as the fuel tank was in the way at the rear. It can just be seen here below the body tub seam.
 Inner wheel arch offside Inner wheel arch offside by Sabrebuilder, on Flickr
This shot is looking up behind the offside inner wheel arch, showing the fuel filler and breather pipes.
 Inner wheel arch offside stay Inner wheel arch offside stay by Sabrebuilder, on Flickr
I just need to now remove the stays for paint and final refit.
It's taken far too much time but I'm pleased with the final result.
Stay safe...........peter

|
15th May 2021, 18:58
|
|
Senior Member
Enthusiast
|
|
Join Date: Mar 2005
Posts: 3,079
|
|
This week I've been tackling various small jobs. Slowly working my way through my task list.
Firstly, I painted the inner rear wheel arch stays and refitted them. So that's the inner rear wheel arches completed and ticked off my list.
Whilst I have the car raised on axle stands at the rear with the rear wheels off there were a couple of other jobs I needed to do.
One was to do with the rear brakes.
I have had issues with a 'soft' brake pedal with a feeling of some air in the system. Despite numerous attempts at bleeding the brakes I couldn't get any improvement. I found one obscure reference on the internet suggesting that air can become trapped in the Sierra rear brake calipers. I removed each rear caliper and wound the piston back with a wind back tool. I then bled the rear brakes with the tool still in place to stop the piston moving out. After some aggressive pumping of the brake pedal I did get some air out of the offside caliper. The brake feel is now much better.
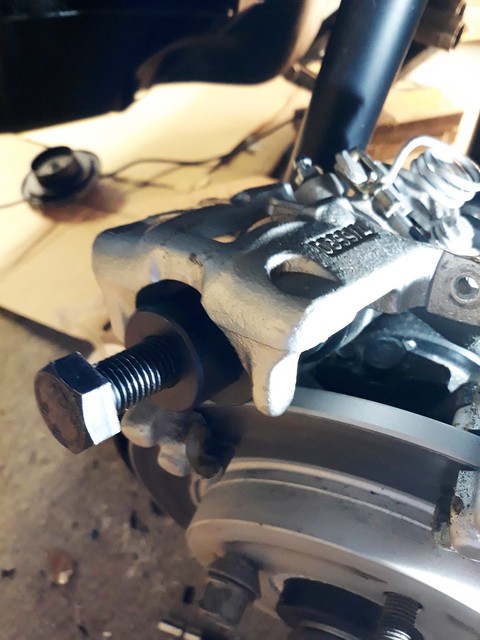 Brake wind back tool Brake wind back tool by Sabrebuilder, on Flickr
I was surprised that the brake fluid bled from the rear calipers was somewhat dirty and had some suspended sediment in it. Since the only brake component that isn't new or reconditioned is the rear proportioning valve, I presume this is where the dirt has come from?
 Old brake fluid Old brake fluid by Sabrebuilder, on Flickr
Another job was to remove the rear silencer and pipework.
 Rear silencer Rear silencer by Sabrebuilder, on Flickr
Since I first fitted this I've always had a small leak at the middle joint. I'd used some joining sleeves and exhaust clamps from Jetex that looked like these...
 Exhaust shortening Exhaust shortening by Sabrebuilder, on Flickr
Despite using exhaust sealing paste these didn't work very well at all and tightening the clamps didn't resolve the issue.
I've bought some of these which seem to be a much better design as the sleeve overlaps on the inside and the clamps are wider.
 Exhaust clamp Exhaust clamp by Sabrebuilder, on Flickr
They look a bit flimsy in the photo but I was pleased to find when they arrived that they are very substantial. I've not fitted them yet but hopeful they will make a much better joint and keep the IVA inspector happy.
There are a few other jobs I've started but will include those in next weeks update. Until then, stay safe.......
...........peter
|
23rd May 2021, 20:07
|
|
Senior Member
Enthusiast
|
|
Join Date: Mar 2005
Posts: 3,079
|
|
A few more jobs off my list this week........
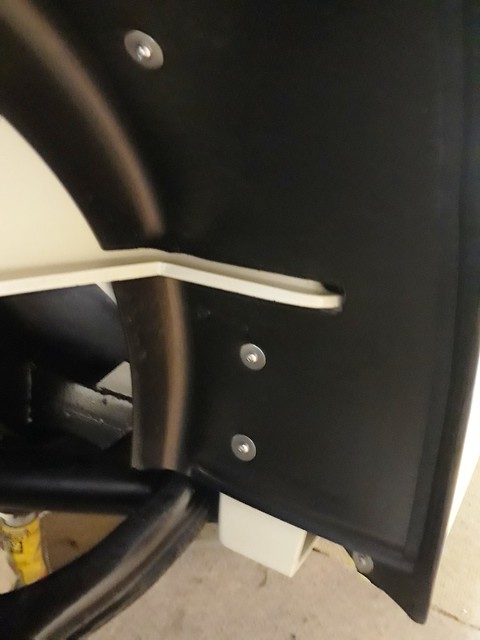
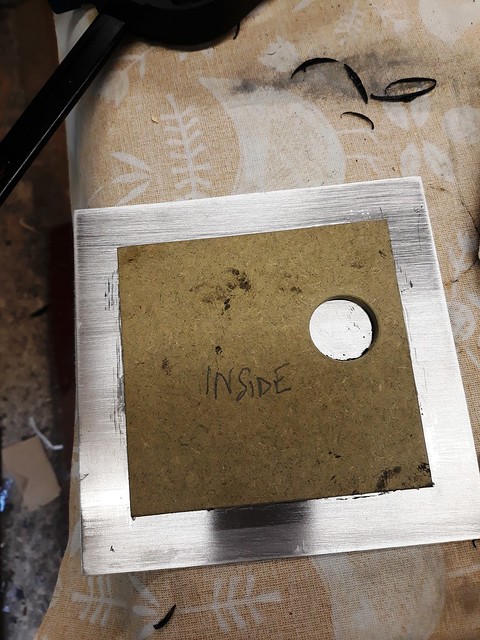
In no logical order I'll start with the speedo sensor access hatch.
I started by cutting a piece of damp resistant mdf. The round hole is to provide clearance for the sensor cable.
 Hatch Hatch by Sabrebuilder, on Flickr
I then PU glued it to a piece of thin ali.
 Hatch2 Hatch2 by Sabrebuilder, on Flickr
And I painted the inside to prevent moisture ingress. It was fitted with 4 self tappers and a very thin beed of RTV silicone sealer to allow removal, if necessary.
 Painted hatch Painted hatch by Sabrebuilder, on Flickr
Another thing that needed to be addressed was that I had already fitted the window switch cables in conduit and attached them to the gearbox tunnel and I was concerned that I would end up with an unsightly bulge in the carpet.
 Window switch cables Window switch cables by Sabrebuilder, on Flickr
I was not happy about this so I stripped out the conduits shown above. And then to reduce the thickness to a minimum, I turned the cables into a kind of 'ribbon cable' by sticking them to PVC insulation tape.
 Window cables Window cables by Sabrebuilder, on Flickr
I then ran the cables in some flat PVC sleeving and glued them to the transmission tunnel with contact adhesive.
 Window switch cables Window switch cables by Sabrebuilder, on Flickr
There are a few more wiring jobs that I need to do and a general tidy up before I refit the dashboard but I'll come back to those in future updates.
Another small job I've completed this week is fitting the front bumpers which was very straightforward.
First the bumper support bars are fitted after trimming the grommets to size.
 Bumper bar and grommets Bumper bar and grommets by Sabrebuilder, on Flickr
The bumpers are then fitted with 16mm of washers per the RMC manual.
 Front Bumper Front Bumper by Sabrebuilder, on Flickr
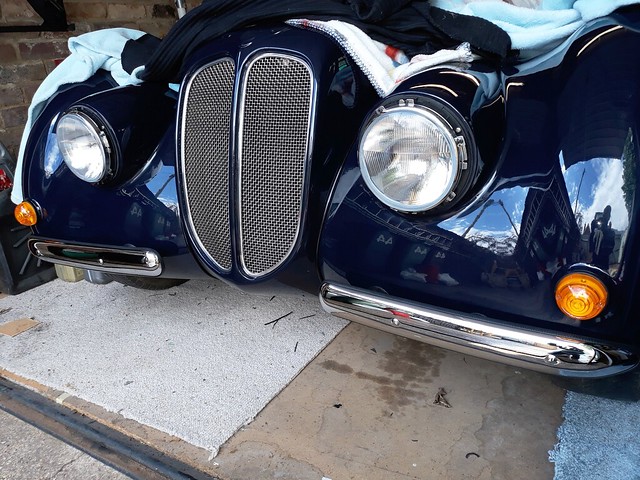 Front Bumpers Front Bumpers by Sabrebuilder, on Flickr
So that's another couple of jobs ticked off my list.........
Stay safe, Peter
Last edited by peterux; 24th May 2021 at 07:29..
Reason: correction
|
4th June 2021, 18:29
|
|
Senior Member
Enthusiast
|
|
Join Date: Mar 2005
Posts: 3,079
|
|
Not much to report over the last couple of weeks due to other priorities.
But, I've now re-fitted the rear silencer box with the new connectors. A much better fit than the previous ones and now hopefully gas tight. I just need to tidy up with a bit a paint on the exposed pipes.
 New exhaust connectors New exhaust connectors by Sabrebuilder, on Flickr
I've also fitted an additional 2 way fuse box. One new fuse for the auxiliary power socket and one for the positive feed to the wiper switch which wasn't fused by the original main fuse box. The new fuse box is under the dash, just to the right of the steering column.
 Aux fuse box Aux fuse box by Sabrebuilder, on Flickr
That's all for now, stay safe.........
,,,,,,,,,,,peter |
4th June 2021, 18:59
|
|
Senior Member
|
|
Join Date: Jun 2015
Posts: 1,401
|
|
Progress is progress nonetheless. Keep at it!
|
13th June 2021, 21:11
|
|
Senior Member
Enthusiast
|
|
Join Date: Mar 2005
Posts: 3,079
|
|
Quote:
Originally Posted by molleur

Progress is progress nonetheless. Keep at it!
|
Thanks, indeed it is. 
I'm gradually nibbling my way through my list of jobs.......
This week I fitted the windscreen. I used Sikaflex 255FC Adhesive. Bit of a messy job but I got there in the end.
 Windscreen Fitted Windscreen Fitted by Sabrebuilder, on Flickr
The all important marking for the IVA test.
 Windscreen approval mark Windscreen approval mark by Sabrebuilder, on Flickr
A few days later I fitted the 'plastic chrome' trim surround. A very time consuming job to get the mitres and lengths correct.
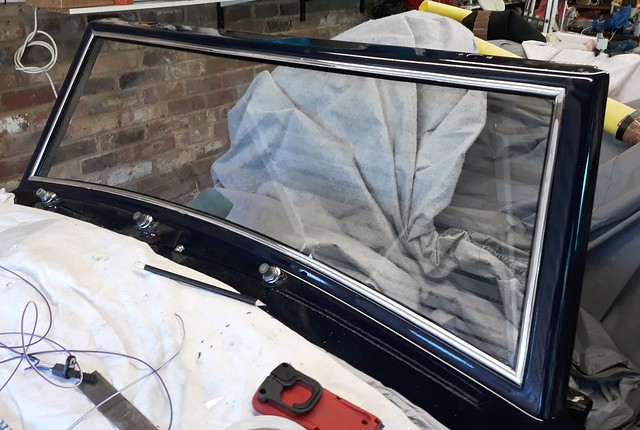 Windscreen surround Windscreen surround by Sabrebuilder, on Flickr
I've also fitted the Interior Light door switches. It's practically impossible to get to the rear of the switches due to the 'A' pillar support structure so I soldered on the wires. The wire loops are to allow movement of the plunger.
 Interior Light Door switches Interior Light Door switches by Sabrebuilder, on Flickr
And here's one fitted....
 Interior Light Door switches Interior Light Door switches by Sabrebuilder, on Flickr
The lens on my phone camera has made the length of the plunger look much longer than it really is. The plungers will be trimmed to size once the doors are fitted.
So that's another two jobs done!
Stay safe.........Peter
|
13th June 2021, 23:21
|
|
Senior Member
|
|
Join Date: Jun 2015
Posts: 1,401
|
|
a bit like eating the elephant. One bite at a time.
Looking good, especially the plastic chrome trim. Well done.
|
14th June 2021, 09:10
|
|
Senior Member
|
|
Join Date: Nov 2017
Posts: 109
|
|
Quote:
Originally Posted by molleur
Looking good, especially the plastic chrome trim. Well done.
|
Agreed! That screen looks ace  I bet that feels like a pretty big milestone. |
19th June 2021, 20:11
|
|
Senior Member
Enthusiast
|
|
Join Date: Mar 2005
Posts: 3,079
|
|
Quote:
Originally Posted by kon
Agreed! That screen looks ace I bet that feels like a pretty big milestone. |
Thanks Jack and Kon. Some steps make a dramatic impact but others like this week when I have been doing some more mundane but equally important tasks.
I've been doing some more wiring before refitting the dashboard surround. Hopefully this will be the end of the wiring which can take a surprisingly long time for very little to show.
I been running in some extra cables like a supply to the boot for a boot light, some speaker cables and an aerial cable to the boot. The aerial will be fitted after the IVA test.
I've also been connecting up the interior light cables and running supply and illumination cables for the heater control. Plus a lot tidying up to make all the cables secure and IVA compliant.
All the unused wires to the ECU have been terminated in insulated closed end connectors and then encased in some conduit.
 Unused ECU cables Unused ECU cables by Sabrebuilder, on Flickr
And then tied up under the dash.
 Under dash wiring (passenger side) Under dash wiring (passenger side) by Sabrebuilder, on Flickr
This required the 'head in the footwell' pose 
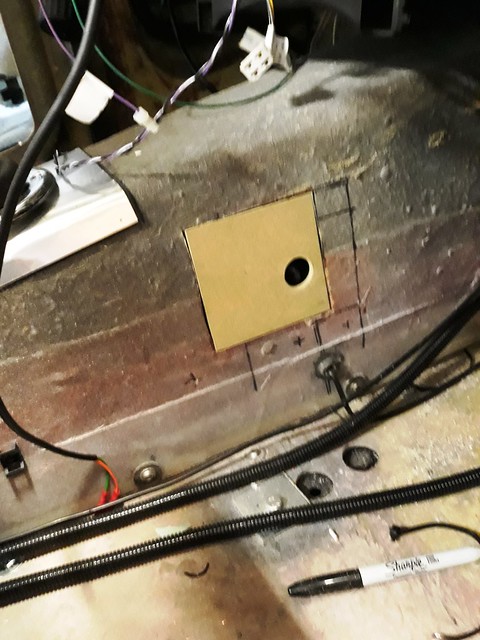
Then taking a break from wiring, I made up a mounting panel for the intermittent wiper control unit. This will be later fixed at a convenient point along the lower edge of the dashboard surround.
 Wiper delay panel Wiper delay panel by Sabrebuilder, on Flickr
So a few more nibbles out of the elephant and edging slowly towards the finish line 
Stay safe.............peter
|
19th June 2021, 21:08
|
|
Senior Member
|
|
Join Date: Jun 2015
Posts: 1,401
|
|
Your little wiper delay panel turn out nicely!
Another small bite.
|
14th July 2021, 08:33
|
 |
Senior Member
Enthusiast
|
|
Join Date: Sep 2004
Posts: 1,895
|
|
That must be the most complicated door of any kit car! And the fibreglass mouldings are amazing. I wonder if they were made from a mould taken from a "real" steel door? If not they must have taken many many many hours to design and make.
Looking forward to seeing the end result!
Cheers Robin
|
15th July 2021, 19:49
|
|
Senior Member
Enthusiast
|
|
Join Date: Mar 2005
Posts: 3,079
|
|
Quote:
Originally Posted by MartinClan
That must be the most complicated door of any kit car! And the fibreglass mouldings are amazing. I wonder if they were made from a mould taken from a "real" steel door? If not they must have taken many many many hours to design and make.
Looking forward to seeing the end result!
Cheers Robin
|
Yes, it surely is. It doesn't look exactly like any Sierra doors I've seen on line but I'm guessing that this must have been the starting point. Perhaps they modified a steel door and then took a mould?
As you say, the amount of work creating all the drawings, jigs, tooling and moulds for the Sabre must have been a huge project. John Barlow (the designer) must have envisaged selling a much higher number of kits than the 150 that were made. Even the door cards are a custom moulded GRP part. |
25th July 2021, 19:51
|
|
Senior Member
Enthusiast
|
|
Join Date: Mar 2005
Posts: 3,079
|
|
Not a huge amount of progress since my last update but I have now fitted the grab handle to the drivers door.
The grab handles are screwed to a threaded plate that sits behind the door's inner skin. But the grab handles and securing plates were missing from my car, presumably lost somewhere along the way?
As the grab handle support plates were missing , I made some up from 4x35mm bar simply because this is what I had in my stash. The outer two holes are threaded to take 5mm fixing screws and the two inner holes are to fix the plate to the door inner door skin.
 Grab handle and support bar Grab handle and support bar by Sabrebuilder, on Flickr
You then fix the door trim panel in place and drill the holes through the trim panel and inner door skin to get the holes aligned.
The support plate is then pop rivetted to the inside of the inner door panel. The pop rivets are just to hold the plate in place until the fixing screws are done up. A very neat solution.
 Grab handle fixing Grab handle fixing by Sabrebuilder, on Flickr
The keen eyed might notice that the self tapping screws I used to fix the inner handle have now been replaced with M4 nuts and bolts. The original builder had used self tappers but the RMC build manual says to use nuts and bolts and who am I to argue with John Barlow!
I've started fitting the locks to the passenger door now, so no updates for a while...
Until then, stay safe,
Peter
|
31st July 2021, 21:09
|
|
Senior Member
Enthusiast
|
|
Join Date: Mar 2005
Posts: 3,079
|
|
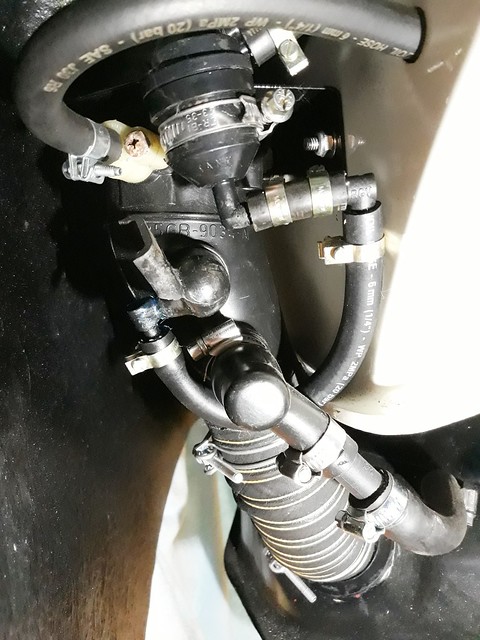
Taking a break from working on the door locks and latches I decided to refit the dashboard surround which I haven't done since recovering it.
I then discovered that the heater demist pipes fouled against the body tub just below the windscreen. A quick check in the build manual confirmed that these should have been fixed at 45 degrees.
I had to remove them and refit correctly like this...
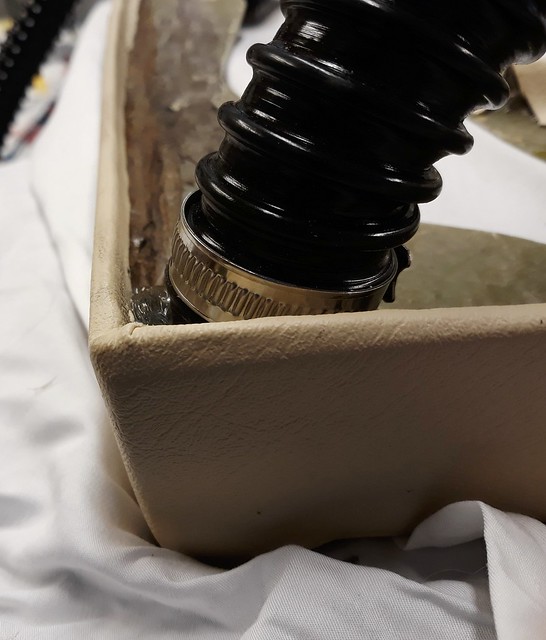 Demister vent connection hose Demister vent connection hose by Sabrebuilder, on Flickr
Then I was able to refit the surround and dashboard....
 Dashboard and surround Dashboard and surround by Sabrebuilder, on Flickr
And just for future reference this is the surround's centre mounting fixing.
 Dashboard surround support fixing Dashboard surround support fixing by Sabrebuilder, on Flickr
Once the steering column controls wiring is securred I can then test it all again 
Until then, stay safe.........
Peter |
23rd August 2021, 08:43
|
|
Senior Member
Enthusiast
|
|
Join Date: Mar 2005
Posts: 3,079
|
|
Not much progress in August due to grandchildren school holidays, days out and a short holiday.
But I did have some garage time yesterday and fitted and tested the windscreen wipers. The dashboard and steering column switches are all back in so I was able to give the engine a good run and I was pleased to find it started first try.
When I first installed the wiper system I had no windscreen so was not able to fit and test the arms and blades.
I started with the usual safe test with drinking straws to check the sweep angles looked ok.
(You will have to click on the picture to see the video clip)
 Windscreen wipers 2 Windscreen wipers 2 by Sabrebuilder, on Flickr
That looked okay so I proceeded to fit the arms and blades. The arms need to be shortened and the crank angle tweaked to get the blades close to the windscreen lower edge. I started with the far left wiper arm and worked my way across.
 Wndscreen wipers 1 Wndscreen wipers 1 by Sabrebuilder, on Flickr
Despite all the rain yesterday I was testing inside with a bottle spray so the real test will be in the real rain :-)
Progress will be slow over the next few weeks so that's all for now,
stay safe,
Peter
|
20th November 2021, 09:39
|
|
Senior Member
Enthusiast
|
|
Join Date: Feb 2005
Location: Hampshire
Posts: 2,497
|
|
Looks good, like the precision / detail on stuff like this.
|
12th December 2021, 10:42
|
|
Member
|
|
Join Date: Jul 2014
Location: Ealing London
Posts: 54
|
|
Your achievement
Enjoying myself everytime I read about your procedure, reasoning and achievment and wish I was 20 years younger.
Wishing you all the very best with your project, it is wonderful.
Also take this opportunity to wish you your family and all your followers a happy Chrismas and a prosperous 2022 and may we soon get rid of this wretched Virus.
|
22nd December 2021, 19:07
|
|
Senior Member
Enthusiast
|
|
Join Date: Mar 2005
Posts: 3,079
|
|
Quote:
Originally Posted by Amir Manzoori
Enjoying myself everytime I read about your procedure, reasoning and achievment and wish I was 20 years younger.
Wishing you all the very best with your project, it is wonderful.
Also take this opportunity to wish you your family and all your followers a happy Chrismas and a prosperous 2022 and may we soon get rid of this wretched Virus.
|
Hi Amir,
thank you for your feedback and I'm glad you enjoy reading my updates.
May I also wish you a Merry Christmas and a Happy and safe New Year.
Let's hope we all get back to some kind of normal in 2022!
cheers, Peter
Not a lot happening in my garage at the moment but I do have one more update for this year.............(to follow....) |
22nd December 2021, 20:08
|
|
Senior Member
Enthusiast
|
|
Join Date: Mar 2005
Posts: 3,079
|
|
One more update....
Not a lot happening in my garage at the moment but with six grandchildren I've been kept busy helping Santa getting ready for Christmas. 
But I have just time for one more update...
Call it a bumper Christmas edition , if you like......
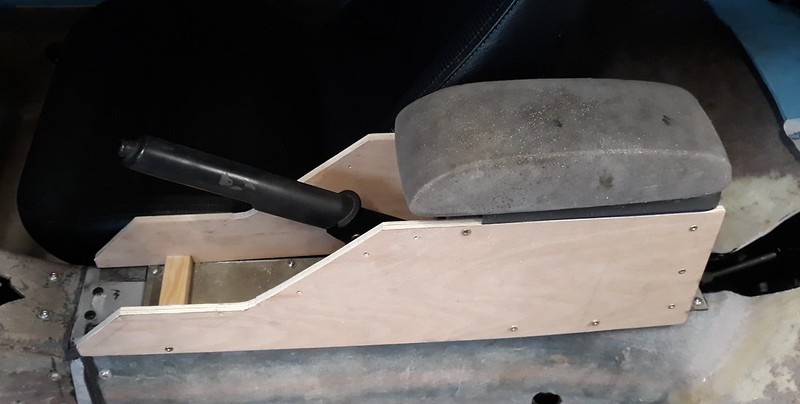
Way back in the first Covid lockdown back in May 2020 (remember that?) I worked on the centre consul but I never got around to putting the pictures on here. I started with this from a Ford Sierra that I picked up from ebay for a few pounds.
 Centre Consul/Armrest Centre Consul/Armrest by Sabrebuilder, on Flickr
It didn't really fit the Sabre but it had a useful armrest and cubby hole/storage compartment. So, I cut two pieces of plywood and balanced the armrest on top to see if it looked okay.
 Centre Consul/Armrest Centre Consul/Armrest by Sabrebuilder, on Flickr
Happy that it looked okay. I carefully cut the plastic storage compartment from the old Sierra part and fitted it between the two plywood sides.
 Centre Consul/Armrest Centre Consul/Armrest by Sabrebuilder, on Flickr
Trying it out with the armrest which is hinged to the cubby hole.
 Centre Consul/Armrest Centre Consul/Armrest by Sabrebuilder, on Flickr
I then cut two more sides to double the thickness of the sides and curved the top edges.
I then made up a piece of plywood with a slot for the handbrake and an aluminium plate to take the window switches.
 Centre Consul/Armrest Centre Consul/Armrest by Sabrebuilder, on Flickr
I then filled the screw holes and smoothed all over. Followed by a coat of quick drying clear varnish.
 Centre Consul/Armrest Centre Consul/Armrest by Sabrebuilder, on Flickr
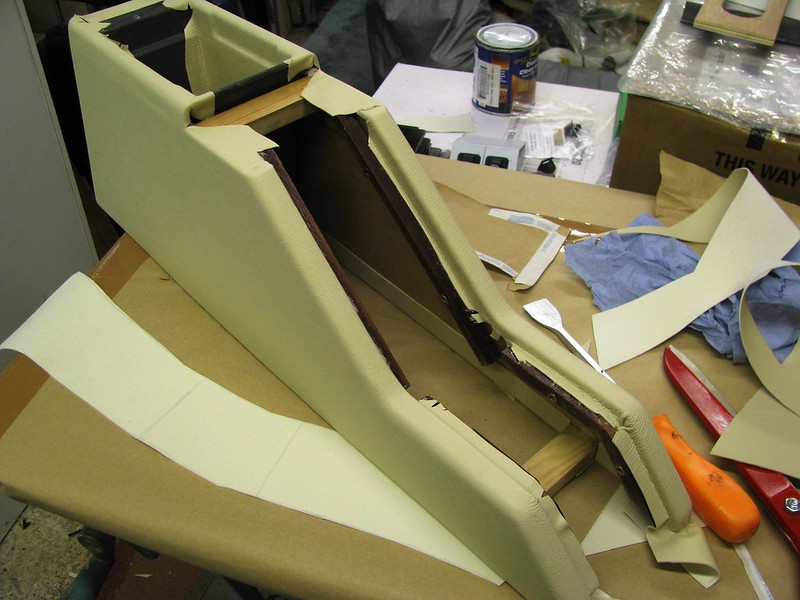
To cover it in vinyl, I started by making a brown paper template. I was keen to cover it in one piece without a join.
 Centre Consul/Armrest Centre Consul/Armrest by Sabrebuilder, on Flickr
The shape of the brown paper template was then transferred to the back of a piece of cream vinyl.
 Centre Consul/Armrest Centre Consul/Armrest by Sabrebuilder, on Flickr
The vinyl was then cut to shape.
 Centre Consul/Armrest Centre Consul/Armrest by Sabrebuilder, on Flickr
I then started gluing with contact adhesive from the back face.
 Centre Consul/Armrest Centre Consul/Armrest by Sabrebuilder, on Flickr
This is the adhesive I used from Woolies.
 Centre Consul/Armrest Centre Consul/Armrest by Sabrebuilder, on Flickr
This is part way through the trimming and gluing.
 Centre Consul/Armrest Centre Consul/Armrest by Sabrebuilder, on Flickr
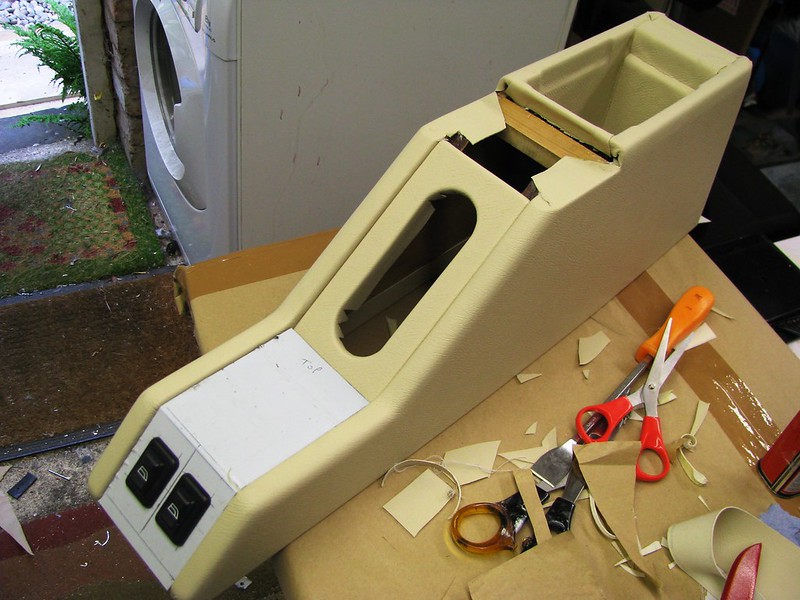
Looking good......
 Centre Consul/Armrest Centre Consul/Armrest by Sabrebuilder, on Flickr
Lining the storage box was very tricky with glue getting everywhere.
 Centre Consul/Armrest Centre Consul/Armrest by Sabrebuilder, on Flickr
I then covered the handbrake gaiter cover.
 Centre Consul/Armrest Centre Consul/Armrest by Sabrebuilder, on Flickr
 Centre Consul/Armrest Centre Consul/Armrest by Sabrebuilder, on Flickr
I then covered the switch plate and fitted the switches.
 Centre Consul/Armrest Centre Consul/Armrest by Sabrebuilder, on Flickr
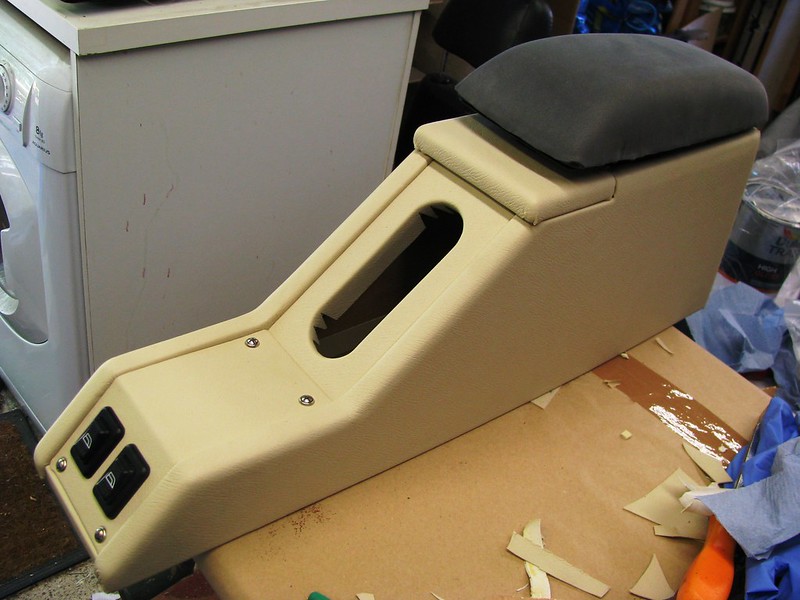
I then re-covered the armrest with some closed cell foam.
 Centre Consul/Armrest Centre Consul/Armrest by Sabrebuilder, on Flickr
 Centre Consul/Armrest Centre Consul/Armrest by Sabrebuilder, on Flickr
Progress so far. I need to cover the armrest in vinyl and make a gaiter for the handbrake.
Something for another day when the weather is a little warmer.
 Centre Consul/Armrest Centre Consul/Armrest by Sabrebuilder, on Flickr
Well that's all folks for 2021 
|
|
Currently Active Users Viewing This Thread: 2345 (0 members and 2345 guests)
|
|
|
 Posting Rules
|
You may not post new threads
You may not post replies
You may not post attachments
You may not edit your posts
HTML code is Off
|
|
|
All times are GMT +0. The time now is 08:27.
|


 Hybrid Mode
