|
|
| Sammio Builds and discussions Sammio bodied car builds and specials |

18th January 2015, 14:57
|
 |
Senior Member
|
|
Join Date: Feb 2012
Location: Wembley, London
Posts: 5,056
|
|

Another Bonus Day:
Well I can hardly complain if the weather hasn't been as bad as Friday's initial forecast. 
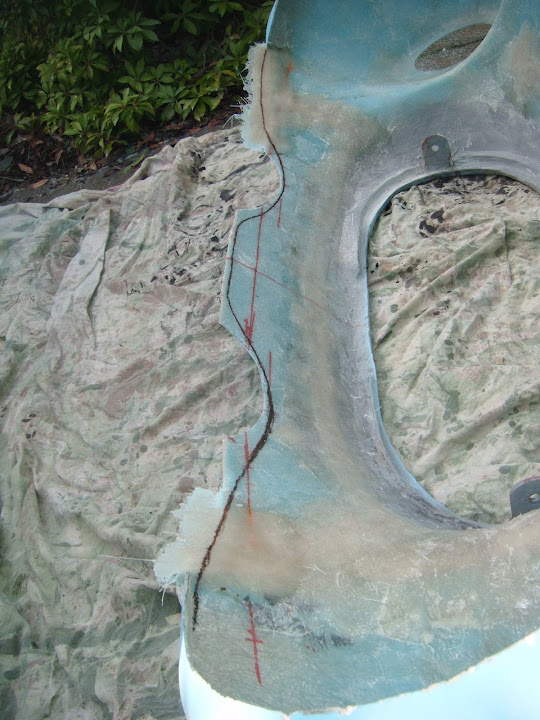
So once the morning's rain has passed, I re-drew my cutting line on the lower valance.
Although it was still too early to start using my jigsaw.
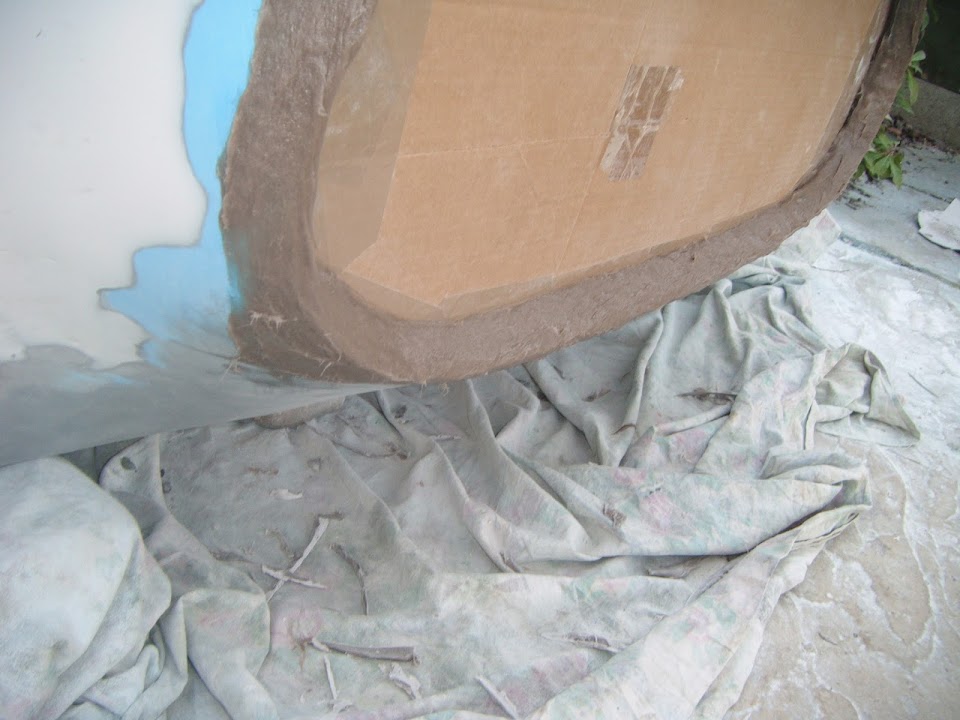
So instead, I propped the bonnet up & mixed up some fibreglass filler.
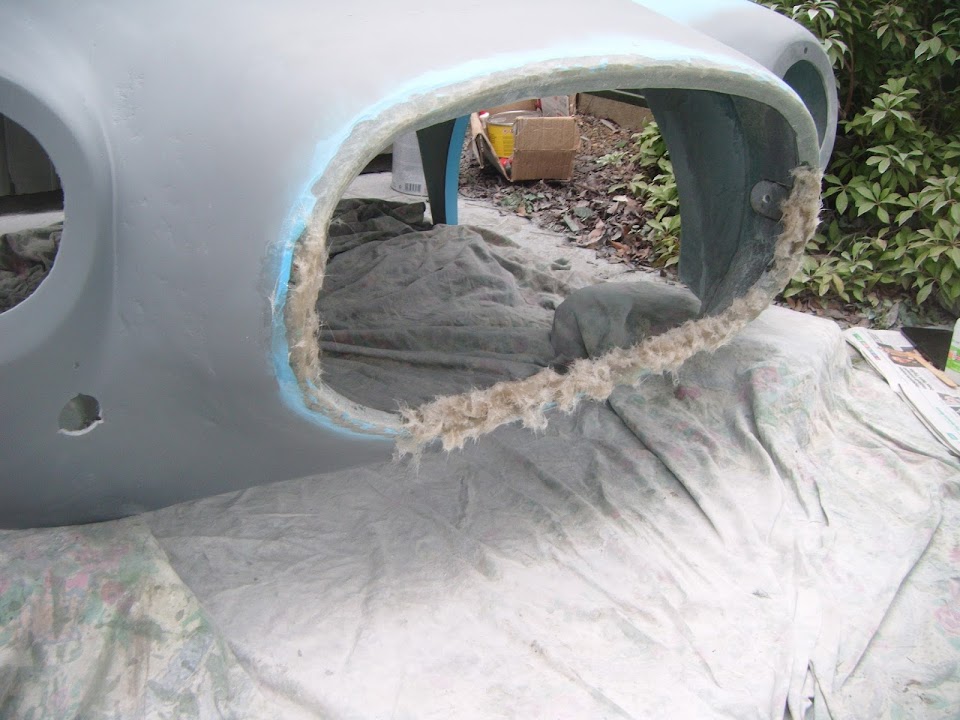
I built up the back of the bonnet nose where it joined the headlight area.


I also covered the screw holes and join on the lower valance.

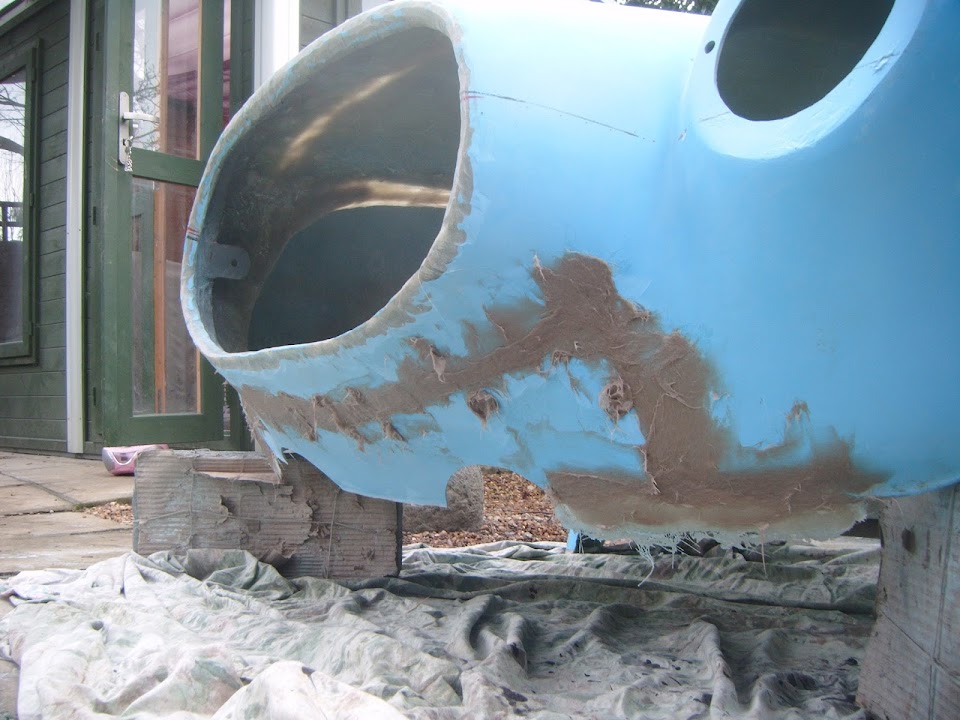
The last bit of filler was used to improve the transition in the middle of the bonnet join.

I know this looks like a lot of filler, but it isn't very deep and there is a solid base of fibreglass underneath.
I left the filler to set for a while and got on with some other domestic chores.
- - - - - - - - - - - - - - - - - - - - - - - - - - - - - - - -
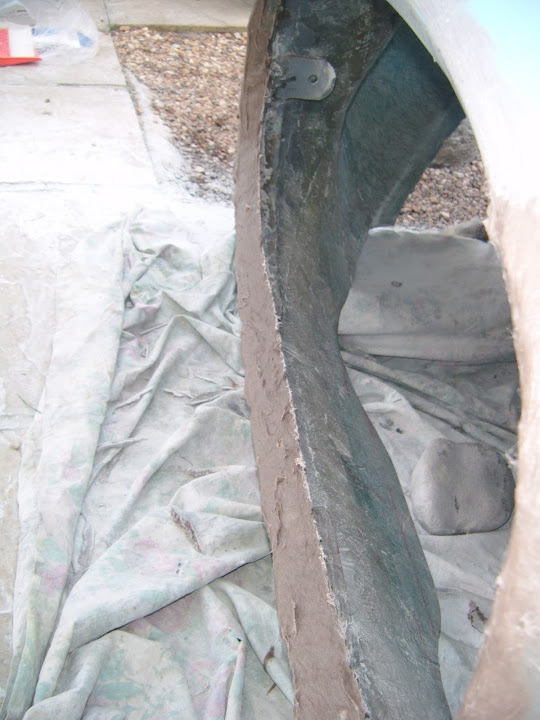
By the time I returned to the bonnet, it was OK to "fire up the jigsaw" & cut the lower valance.
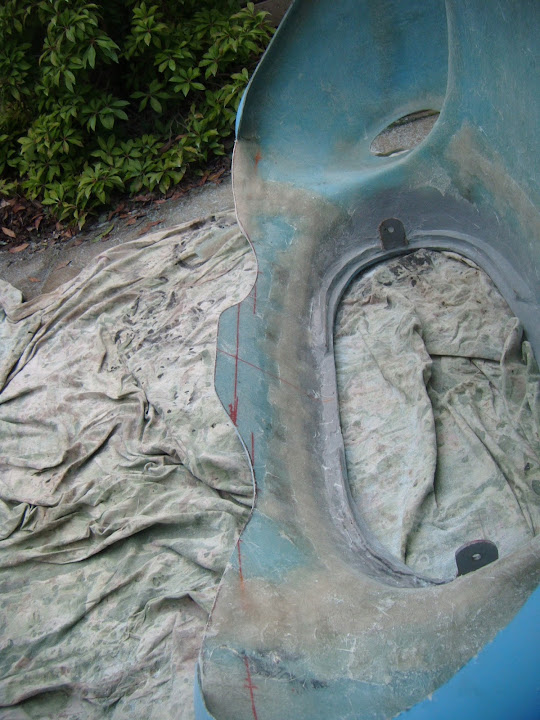
I just put a bit of hardboard underneath to make it easier to see the wavy line.
While I had the noisy toys out, I did a bit of fine tuning to the edges of the grille with my angle grinder.
(As one of the next jobs is to ensure I have an even flat surface for the grille to rest against. )

But by now, the filler was hard enough for me to start sanding it down.
I really must stop leaving excess filler in place, as it is hard work removing it. 
Still, it is great to finally see the basic shapes I am trying to achieve slowly coming together.
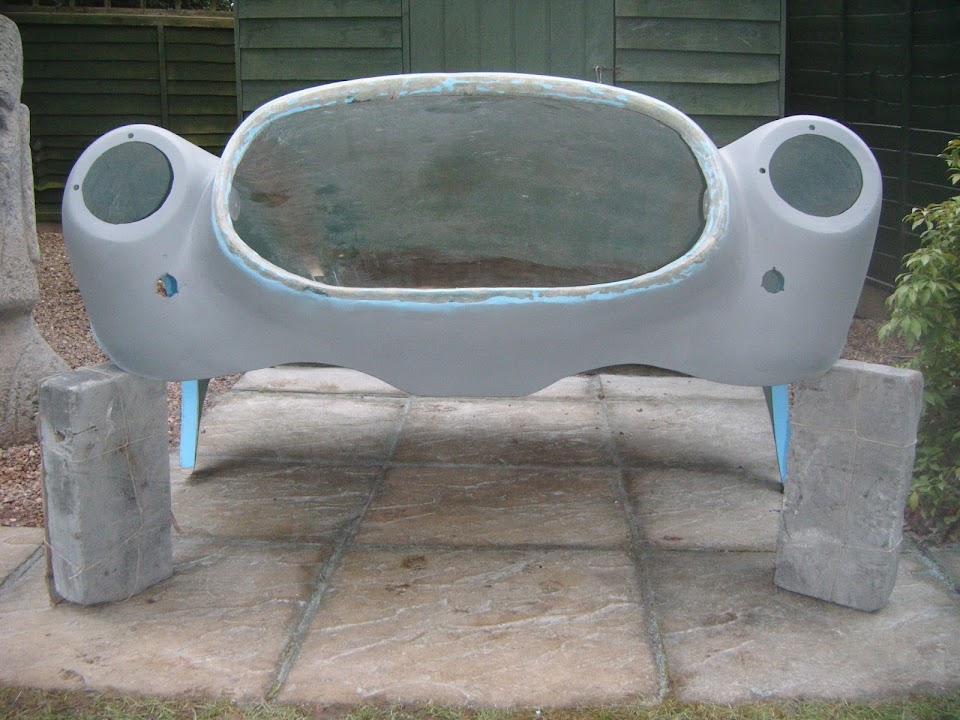
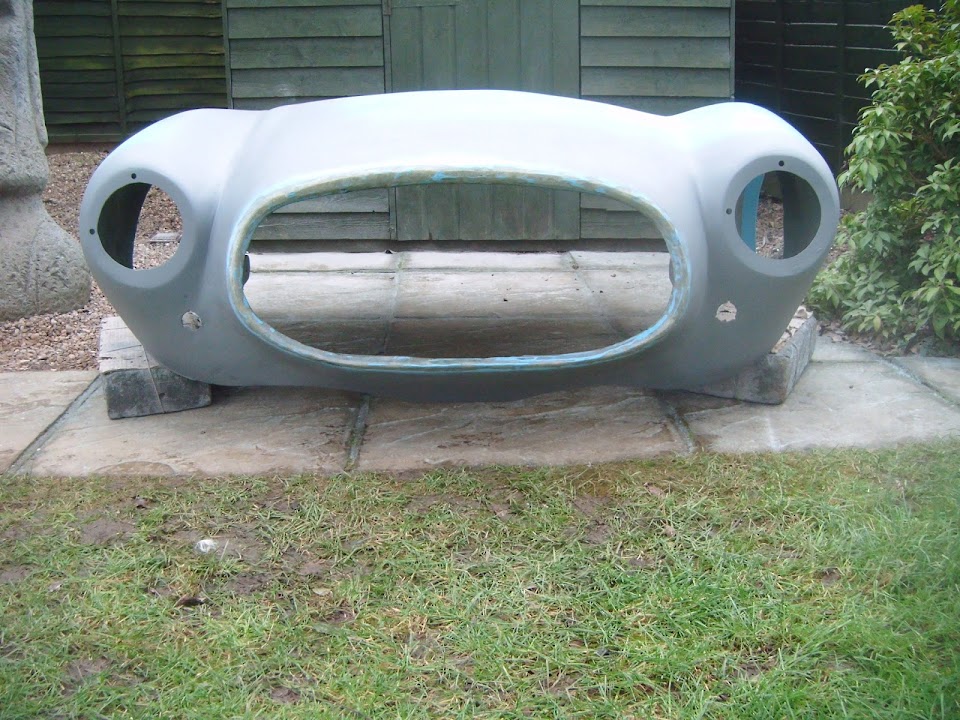
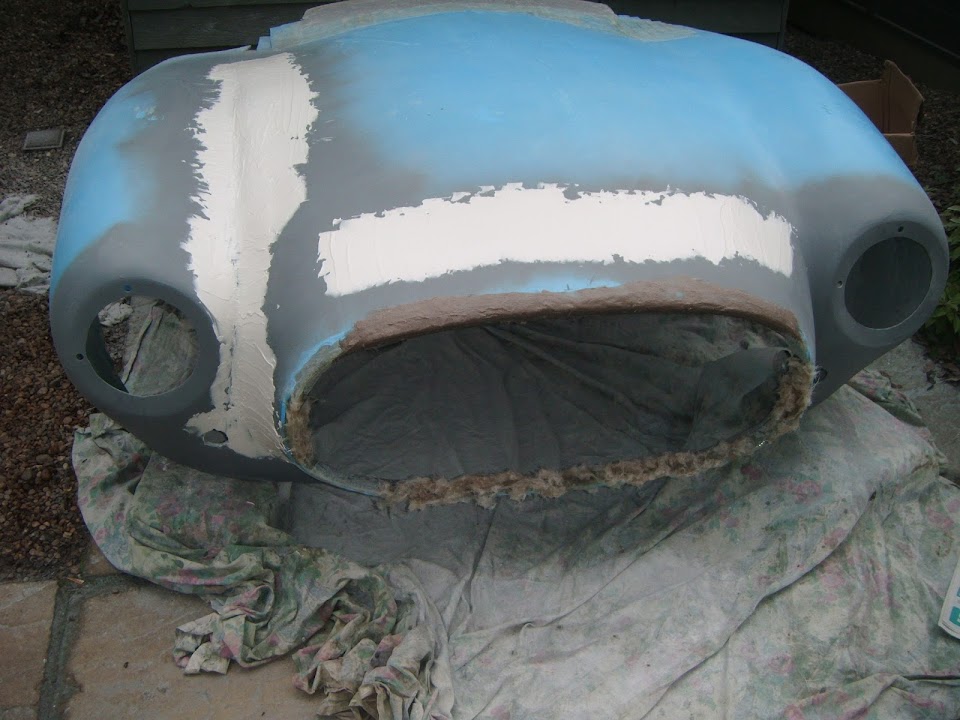
Lower valance - Before:
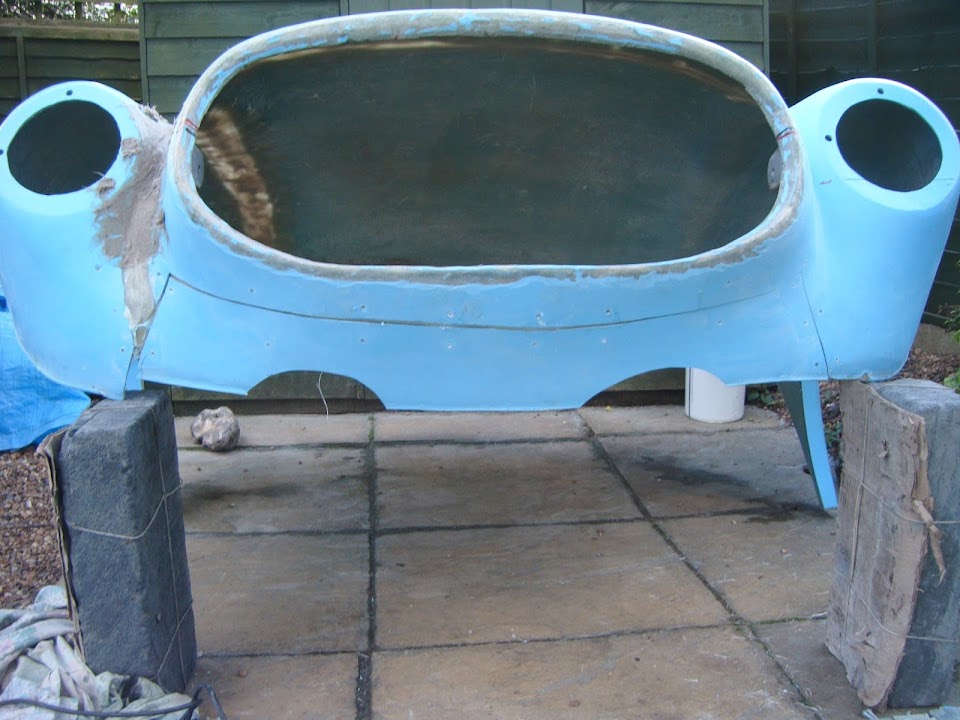
After:
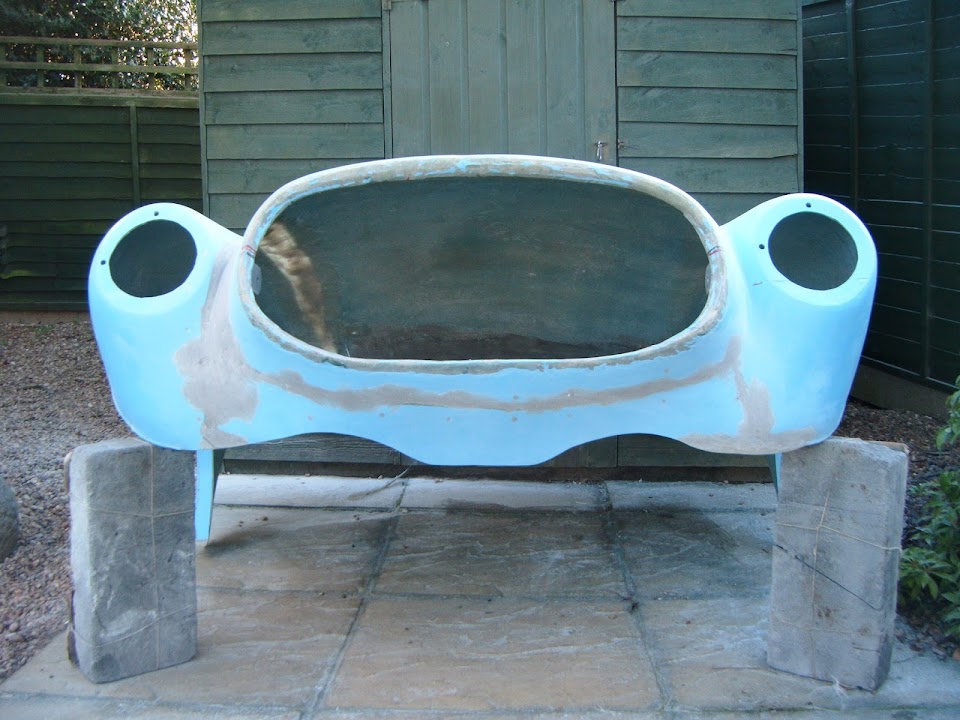
Bonnet - Before:

After:
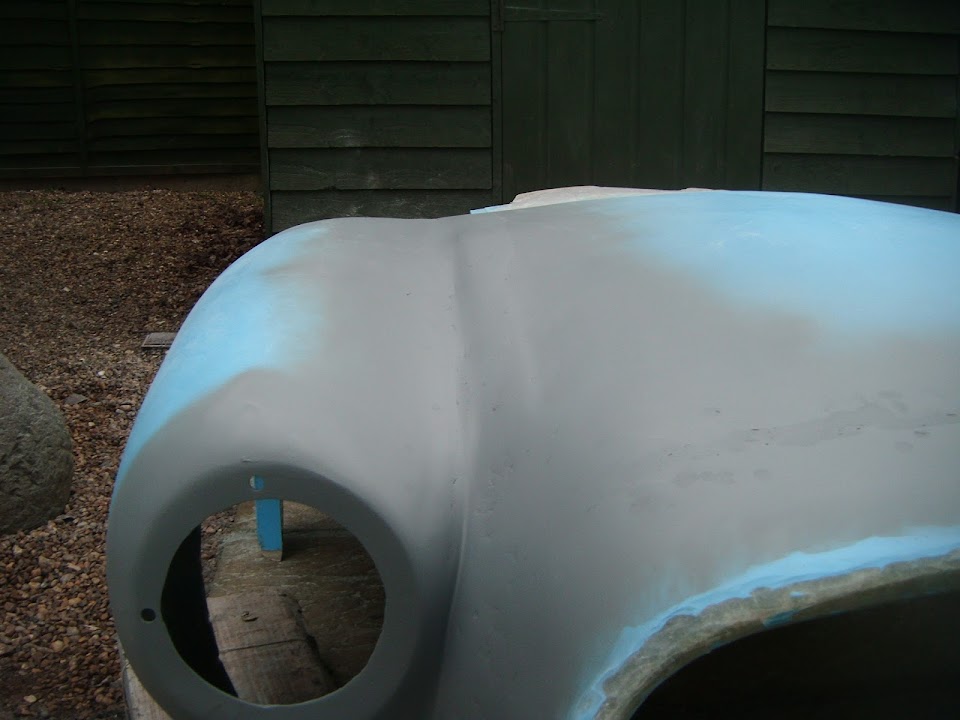
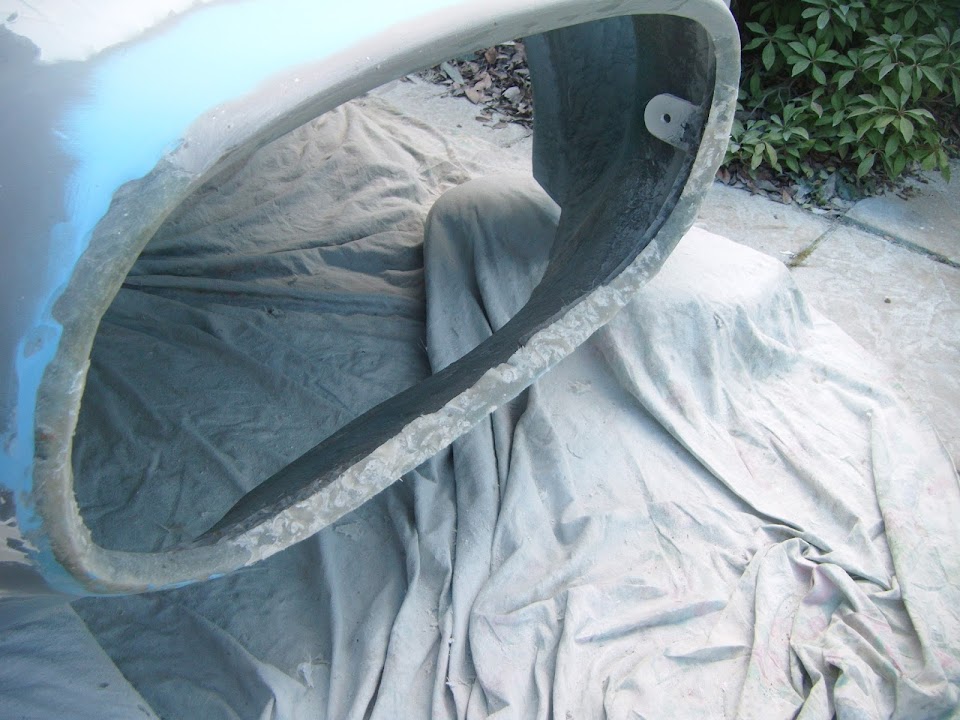
And finally, here is a comparison of the headlight/nose gap.
Passenger side:

Driver's side:
I am sure this will all look a bit better after a skim with normal body filler & a coat of etch primer. 
Until next time, take care, Paul. 
Last edited by Paul L; 18th January 2015 at 15:00..
Reason: Typo
|
18th January 2015, 17:33
|
|
Senior Member
|
|
Join Date: Mar 2012
Posts: 1,152
|
|
Great to see it coming together and starting to be smooth.
|
18th January 2015, 18:42
|
 |
Senior Member
|
|
Join Date: Dec 2013
Posts: 839
|
|
Looking good Paul you are getting closer to bonding the body on, is this the last of the major body cut and shut needed to bring the body in line.
|
18th January 2015, 19:51
|
|
Senior Member
|
|
Join Date: Apr 2014
Posts: 198
|
|
Excellent work, most inspiring. Ed.
|
19th January 2015, 09:36
|
 |
Senior Member
|
|
Join Date: May 2011
Location: Somerset
Posts: 1,671
|
|
Really nice look you've ended up with!
You're getting really close to having all that bodywork 'done' now!
|
19th January 2015, 10:40
|
|
Senior Member
|
|
Join Date: Feb 2012
Location: Wembley, London
Posts: 5,056
|
|
Oxford & Ed - Cheers chaps. 
I am always very nervous when the Dr Frankenstein butchery begins.
But at least these days I have a fighting chance of repairing the damage.
( Provided I don't mind a hint of Hillbilly in the finished article.  )
- - - - - - - - - - - - - - - - - - - - - - - - - - - - - - - -
Swifty & Dave - Thankfully, this is definitely the last of the major cut & shut work.
Although the minor alterations "To Do" list may still take some time.
- Join the bottom rear sections of the bonnet to the sides of the body shell.
- Re-shape the front wheel arches across both the bonnet and the body shell.
- Reshape the bonnet hose external opening edge / internal grille lip.
- Finish the re-profiling of the rear edge of the bonnet to match the bulkhead.
- Drill holes for the front indicators & petrol filler cap (so I can re-enforce the edges underneath).
- Finish sorting out the boot access panel.
- Finish off the cockpit sides (although I may do this after the body shell is bonded on).
Plus the "Go Kart" needs a bit of final prep. before the body shell can go on.
Having said all that, I now know for certain that I can finish this build, it is just a question of when.
- - - - - - - - - - - - - - - - - - - - - - - - - - - - - - - -
Monday:
It is fair to say I've thrown a lot of hours at the bonnet recently.
- The good news is that is just what was needed to make some decent, morale boosting, progress.
- The bad news is that I am now behind in a few non car related areas, so will need to catch up with those.
So there will be no car work today, but I do have a small update...
DVLA:
I waited until today's post arrived and as there was still no revised V5C I finally gave Swansea a ring.
I spoke to the nice man who has been guiding me through this process and there was a slight problem.
- The good news is that the error on my first revised V5C (that I returned) has been fixed.
- The bad news is that the system was not set to automatically send me the corrected version.
This was manually fixed while I was on the phone, so the wheels are in motion.
So if all goes well I should have my new V5C by the end of next week.
Then I can finally reveal what my car will be called.
Cheers, Paul.

|
19th January 2015, 16:22
|
|
Senior Member
|
|
Join Date: May 2013
Posts: 2,161
|
|
[IMG]  [/IMG] |
20th January 2015, 15:17
|
|
Senior Member
|
|
Join Date: Feb 2012
Location: Wembley, London
Posts: 5,056
|
|
Scottie - Matching helicopters... spooky!
Although I when I saw the Chinook I thought an organisation based near you, rather than one in Swansea.
- - - - - - - - - - - - - - - - - - - - - - - - - - - - - - - -
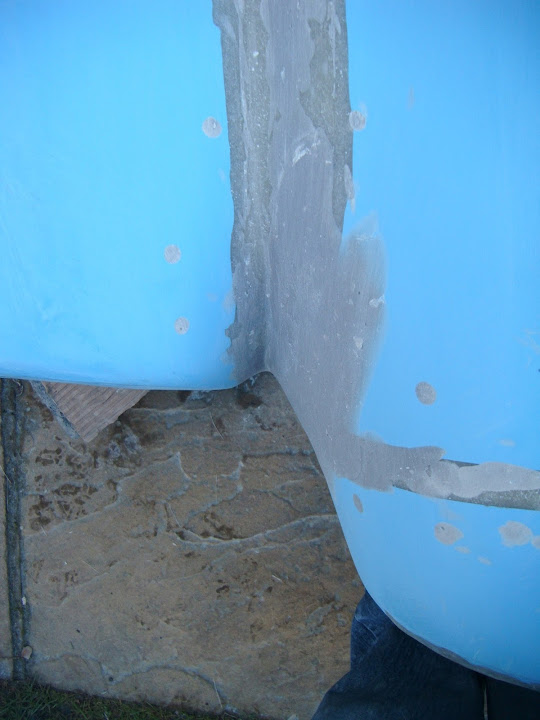
Brain Freeze - Part 1:
The sub-zero start to the day meant it was just too cold to work with resin, or filler.
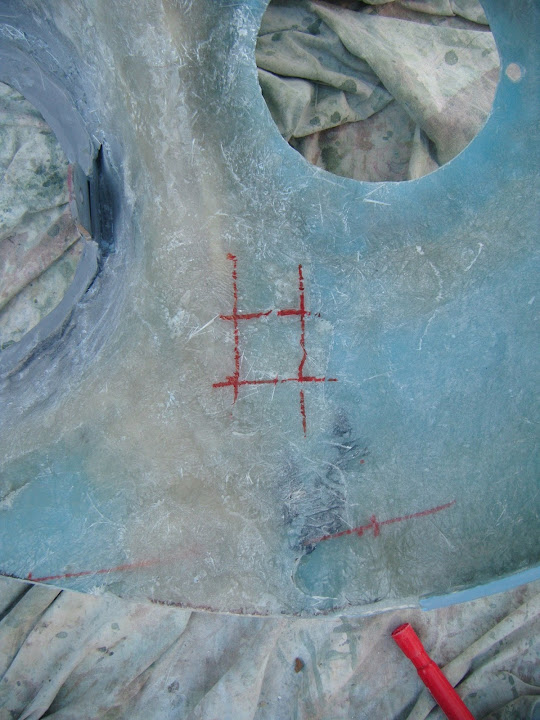
So I started by marking the lower valance for a further trim.

As the more I looked at the previous photos, the more this line didn't look quite right.
Next I went back to this photo of #274, which was a Pilot/Spyder body with a Navigator/Cordite bonnet.

Then I quickly found my front indicators surrounds using my new storage box filing system.
Although I couldn't find a really suitable surface directly under the headlight.

So I opted for an alternative position, between the headlight and the bonnet nose.

Then I marked up some masking tape before drilling a small pilot hole.

Then I was able to use my cheap (& useless on metal) hole saw set.
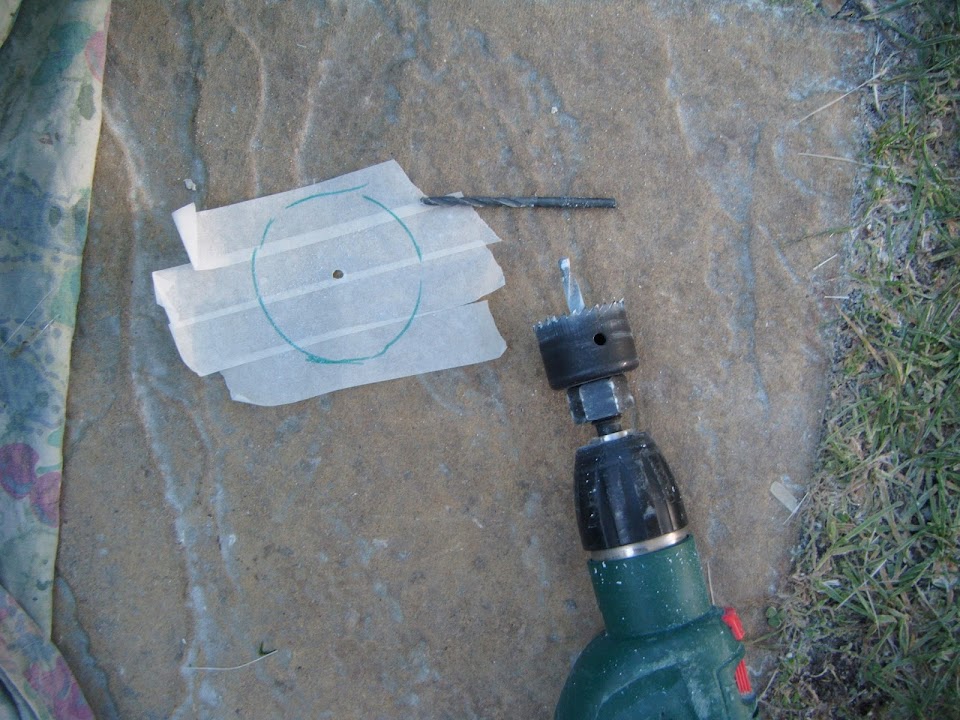
Which gave me my first hole.

There are some small bolts on my indicators, one of which hold an earth wire in place.

So I had to file three small notches around the edge of the hole.
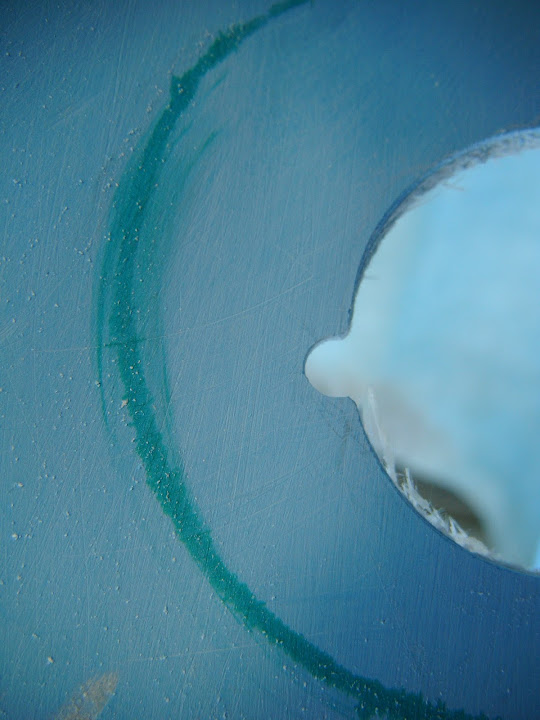
This allowed the indicator to sit nicely and it is pretty close to the body work on one side.

Although this leaves a small gap to be filled on the other side.

Not that it is much help, but here is the "side on" view with the bonnet upside down.
So far, so good, but the real challenge came when I tried to find a matching position for the other indicator.
The harsh reality is that no two parts of the bonnet/wing are exactly the same on either side, so nothing lines up. 
So in the absence of a laser guide (which I am now quite jealous of) I tried a mixture of things.


By the time I reached this point I was seriously cold and decided to come in and check the last photo on my computer screen.
Unfortunately it was clear that this was still not a good match and needed further adjustment.
I then got a call that my daughter was not well (nothing serious) and needed to be picked up from school.
The best thing about working in the garden is I can just leave everything where it is and go.
Although I did have to change out of my working clothes before I left.
This was at 11.15am & I still had to scrape the ice off my car windows and the car thermometer read zero degrees.
So I dread to think was it was when I starting work. 
Once my daughter was taken care of and fast asleep, I headed back outside to finish things off as quickly as I could.
End of Part 1...
|
20th January 2015, 15:20
|
|
Senior Member
|
|
Join Date: Feb 2012
Location: Wembley, London
Posts: 5,056
|
|
Brain Freeze - Part 2:
Thankfully being in the warmth for a bit seemed to de-ice my brain and I had an idea.
Rather than try to line things up on the outside, I took my measurements from the inside.

Quite by chance, my set square covered the hole, so I could mark a matching "square" on the other side.
A quick check with a straight edge gave me the confidence that I was pretty close.

So I drilled a pilot hole from the inside and marked up the outside edge.
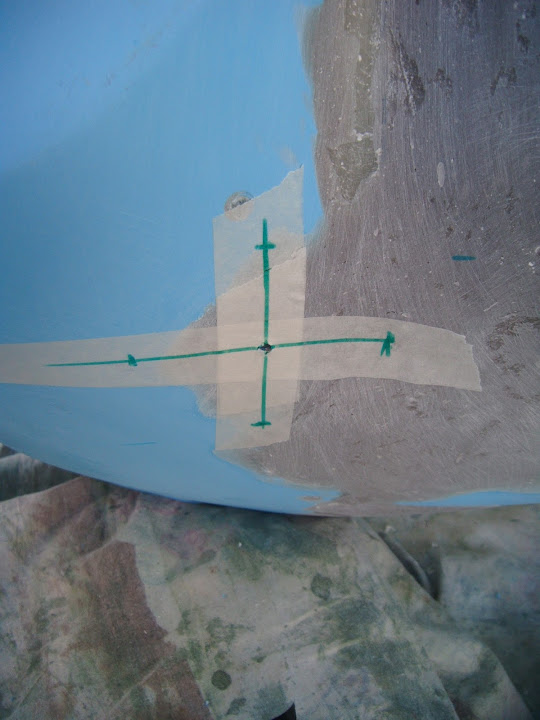
This allowed me to have a final check with the indicator lens taped into position before I drilled the bigger main hole.

After filing the same three notches as before I could fit the indicator and have another look.

In the context of this build, I am calling that good enough for me.
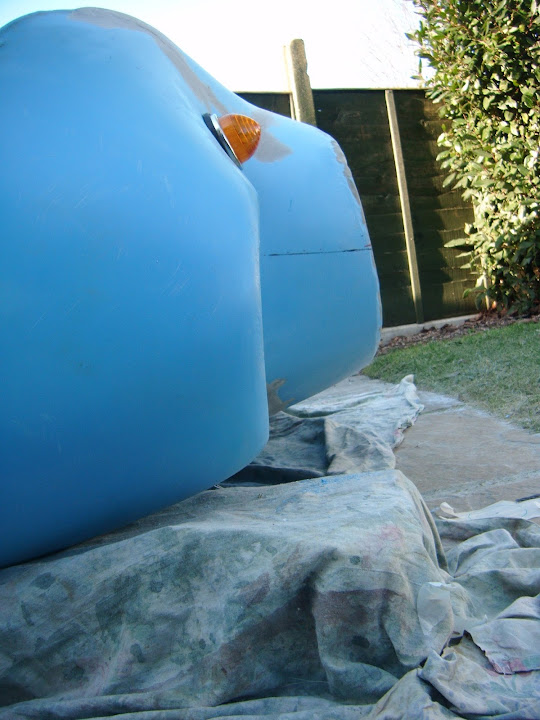
Then, because I already had the storage box with all my lights out, I just couldn't resist it...
Hopefully the body coloured headlight rims will look a bit better than the tape currently holding the lights in place.
( I've also got a pair of stone guard grilles for the headlights too. )
When I was tidying up the mess I'd made, I compared the two indicator "holes".

So I will only need to re-force the side that was spared the "cut & shut" butchery.
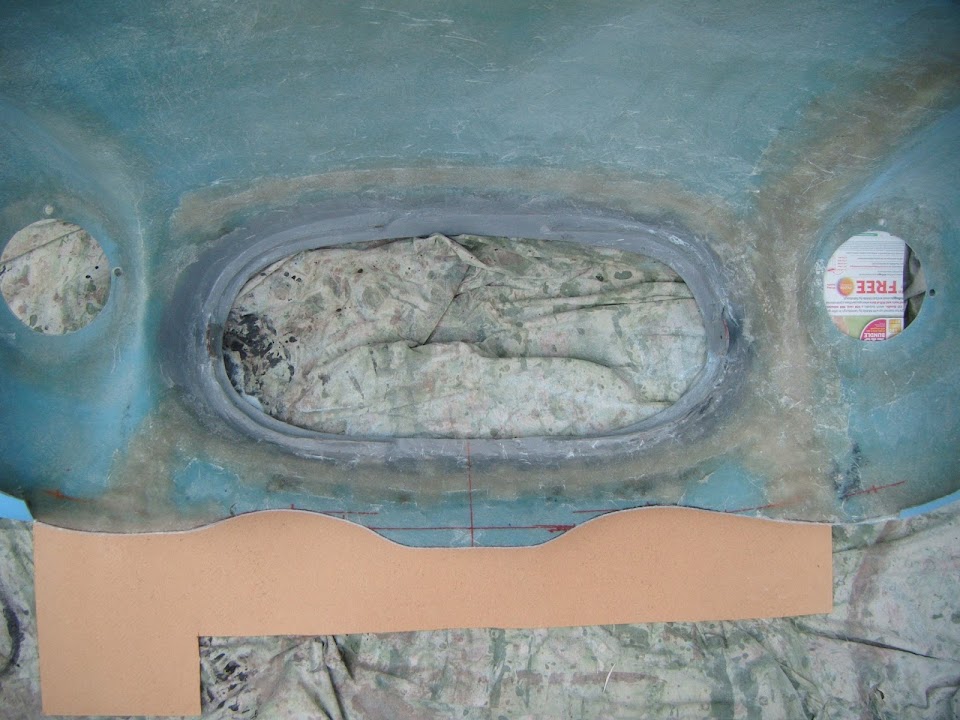
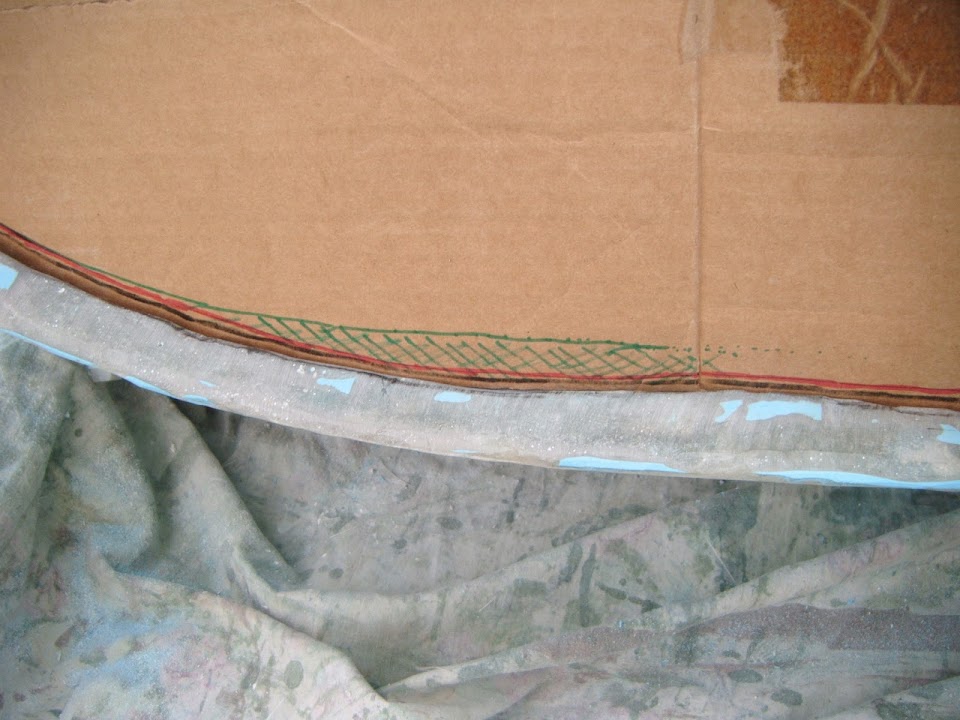
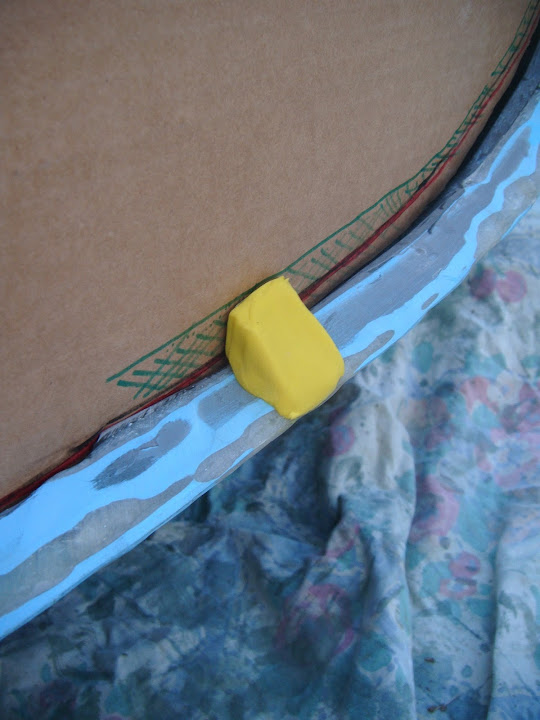
Next I added a rough guide line for the extra depth required on the internal lip to my cardboard template.
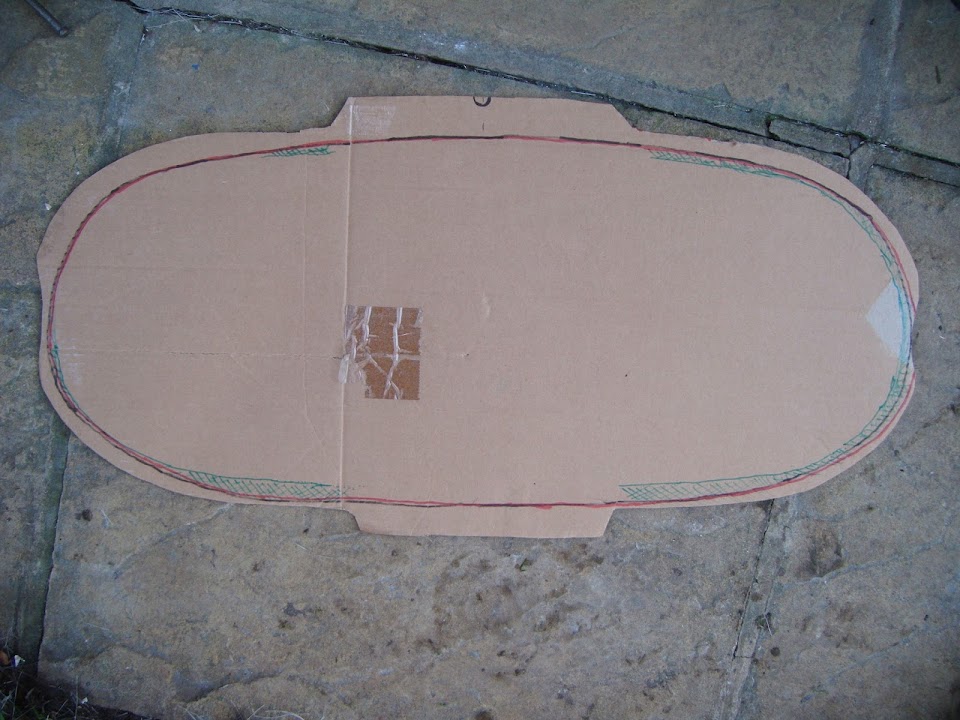
It is along the bottom edge that requires the most work & this corresponds with this view.
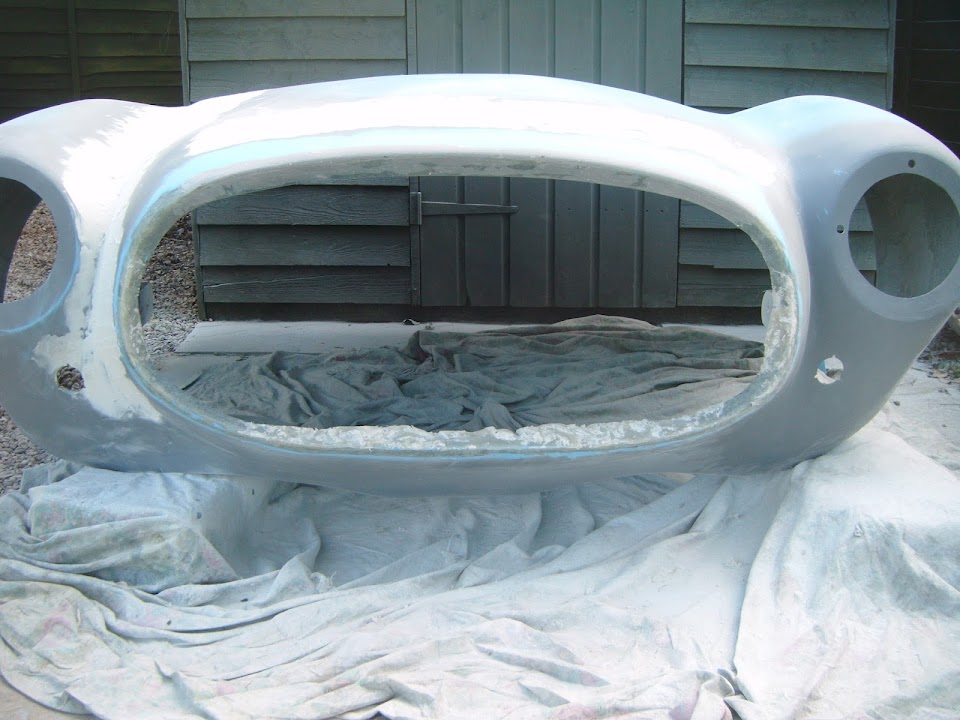
The last thing I wanted to do was give the join along the main bonnet section a light dusting of etch primer.
( Although I got a bit carried away and covered the "nose job" area while I was at it. )

Hopefully this will give me a better view of the bonnet angles to guide me during the next round of filler.
Although the wet paint / reflections in the photo make it look like I've built a corrugated bonnet!
Anyway, that's all for now, take care, Paul.
|
21st January 2015, 13:33
|
|
Senior Member
|
|
Join Date: Feb 2012
Location: Wembley, London
Posts: 5,056
|
|
Flying Visit...
Only had a few minutes to play outside, which was just as well as it was bitterly cold.
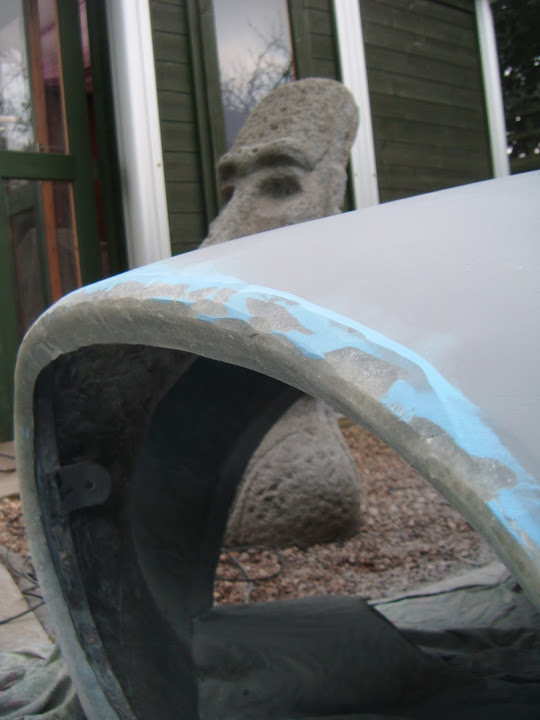
One thing I must get around to doing is removing these flash lines on both sides of the lower valance.

Although I might leave that work until after I have sorting out the wheel arch profiles.
I decided to quickly spray some (warmed up) etch primer over the rest of the repair areas.
As I figured it would help me see how much "normal" body filler work was required.
This time I left the paint to dry for a while before I took the photos.
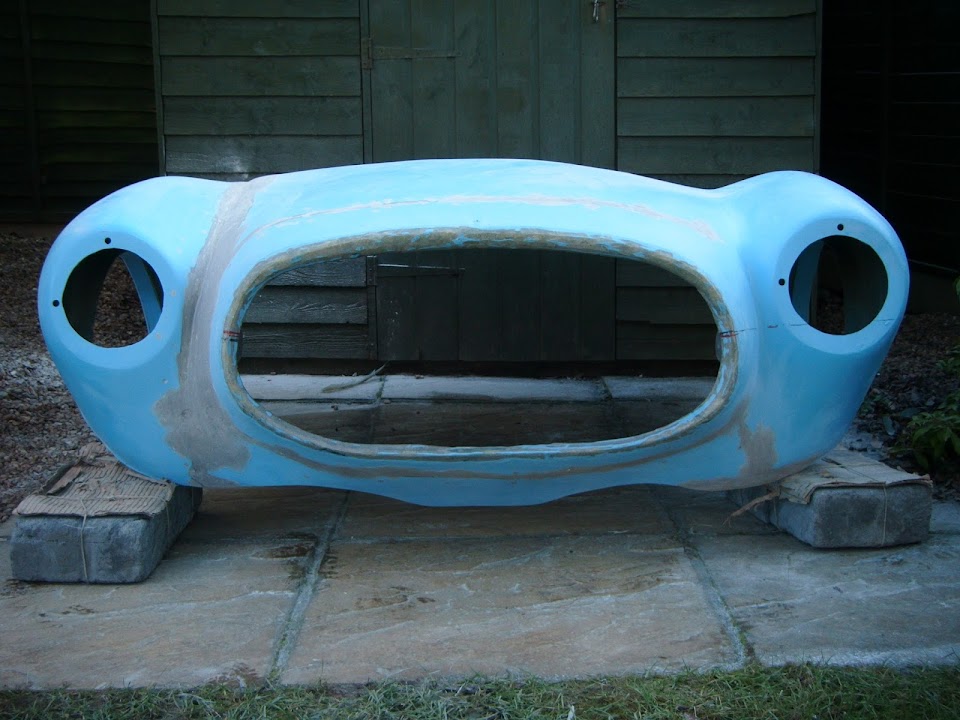
I think the lower valance looks a bit better following the light trim I gave it yesterday.
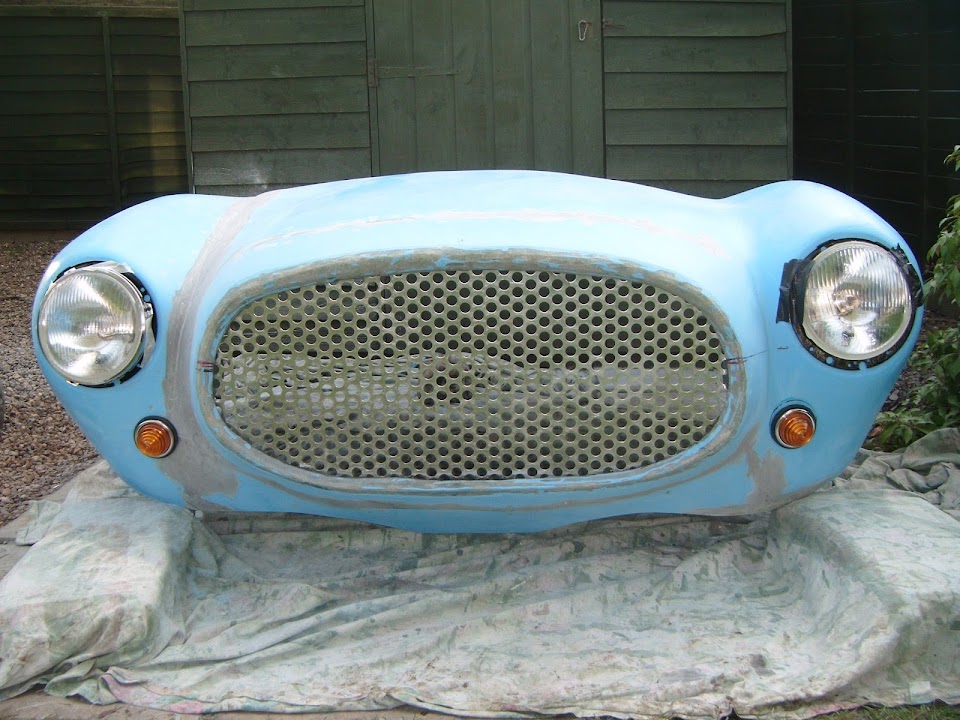
The bonnet nose definitely looks miles better than before.
Part of the main bonnet join still needs a bit of gentle re-shaping to the right of the dip, but isn't too bad.
Overall, I think the healing power of paint has made me feel a lot better about this work.
Right, I've got to go, take care, Paul.
|
21st January 2015, 18:55
|
|
Senior Member
|
|
Join Date: Dec 2013
Posts: 839
|
|
The bonnet now looks symmetrical Paul, well done.
|
21st January 2015, 21:45
|
|
Senior Member
|
|
Join Date: Jul 2011
Posts: 490
|
|
Wow and I thought cosmetic surgery was complicated..
Fantastic work considering the conditions..
I'm not going anywhere near mine 'till late Spring!
|
22nd January 2015, 09:26
|
|
Senior Member
|
|
Join Date: May 2013
Posts: 2,161
|
|
Paul when I first saw where you had put the indicators I was horrified! Then I realised the shell was upside down!
Talk about feel an idiot!
Good job mate, that looks well balanced.
Your work-load has really put myself and others in the shade, and you don't even have a tent!!
|
22nd January 2015, 11:56
|
 |
Senior Member
|
|
Join Date: Dec 2011
Location: Devon
Posts: 550
|
|
Scottie you are not the only one to think at first glance, that the indicators were on top of the bonnet! doh!
|
22nd January 2015, 13:39
|
|
Senior Member
|
|
Join Date: Feb 2012
Location: Wembley, London
Posts: 5,056
|
|
Swifty, Nike55, Scottie & Froggyman - Thanks gents.
It is nice to get some positive feedback from other people looking at this with "fresh" eyes.
( Although some of those eyes are clearly fresher than others. )
As I have slowly been driving myself crazy checking & re-checking the alignment.
Deep down, I know that all the minor differences will not stand out when "on the road".
Which means it is time to "keep moving forward" and tackle something else.
- - - - - - - - - - - - - - - - - - - - - - - - - - - - - - - -
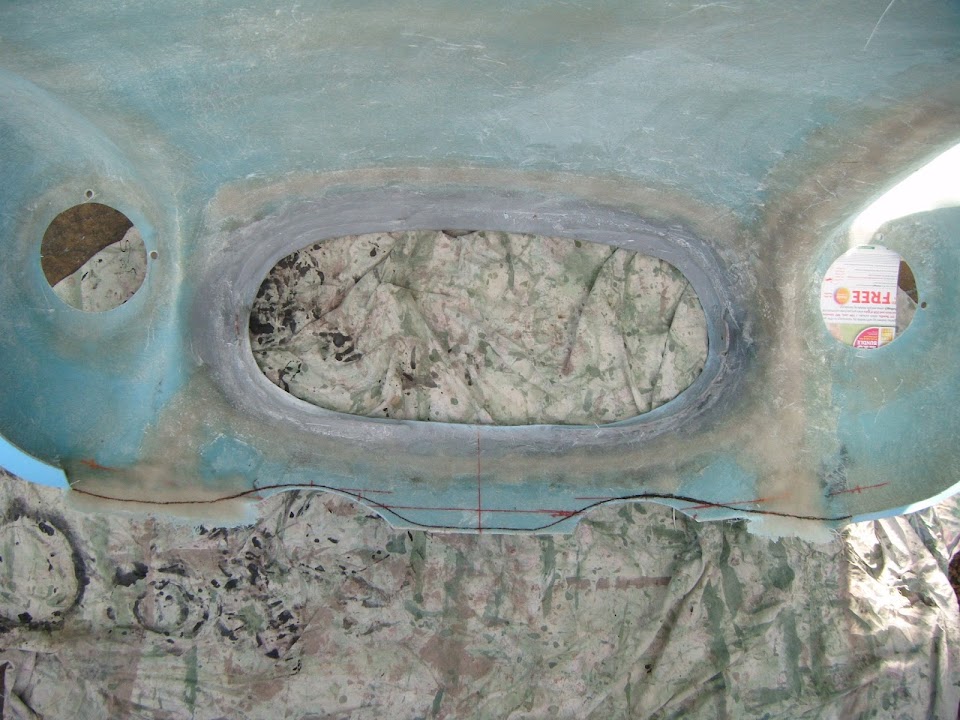
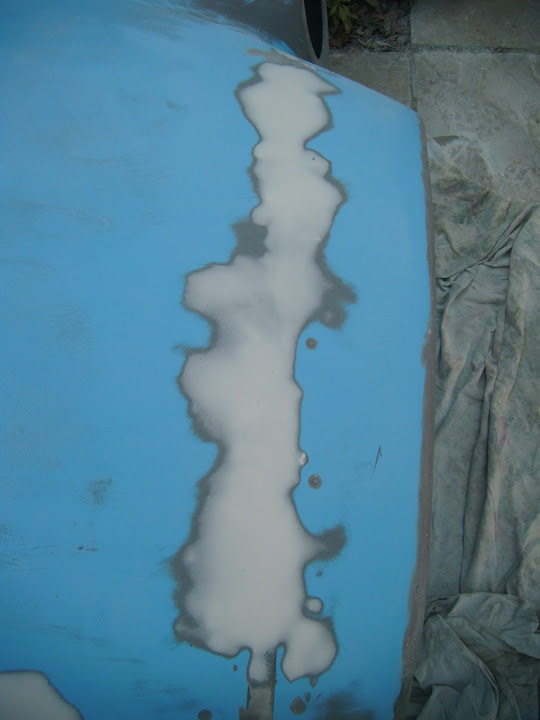
Making A Mess:
There were a few areas of the bonnet nose that I need to work on:
- The face of the top edge is "blunt" by comparison to the bottom edge.

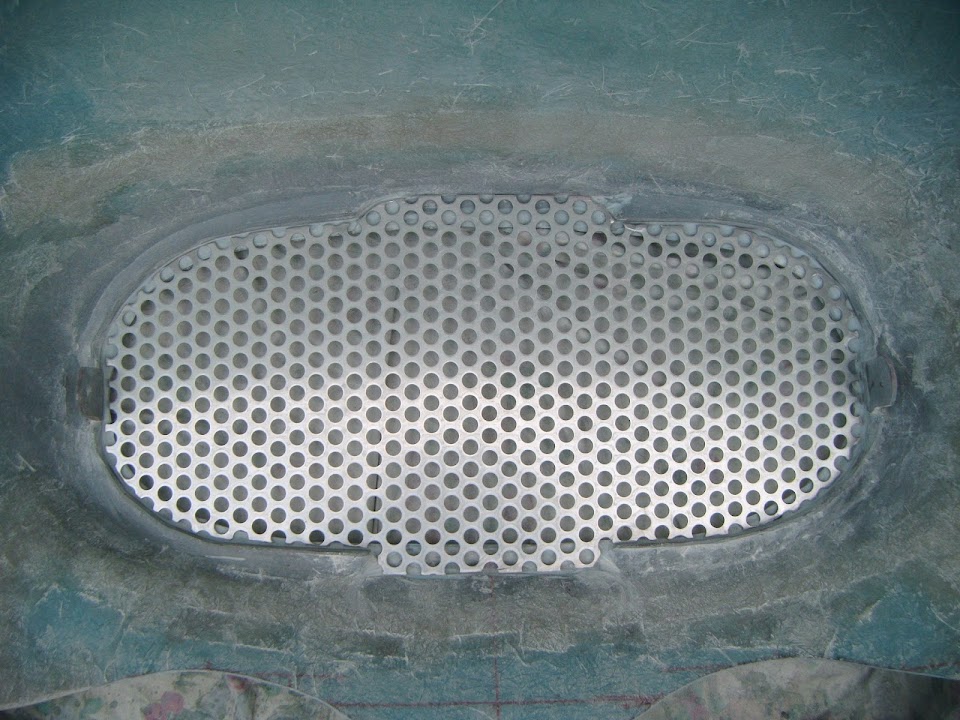
- The internal lip that the grille rests against needed building up in some areas.
- The vertical face of that internal lip also needs to skimmed flat/even all the way around.

I did make an attempt to even out the internal face and the grille fit did improve a bit.
But I realised that I should really build up the edge first & then even it out after.
I also decided to build the lip up to a slightly lower height.

Next I took my angle grinder to the top edge to soften that up a bit.
Leaving the nose looking like this before the filler work started.

Then I mixed up some "home brew" fibreglass filler.
Although stopping to take this photo meant I almost forgot to add the catalyst.
But thankfully the ghost of Mister Towed reminded me to add it.
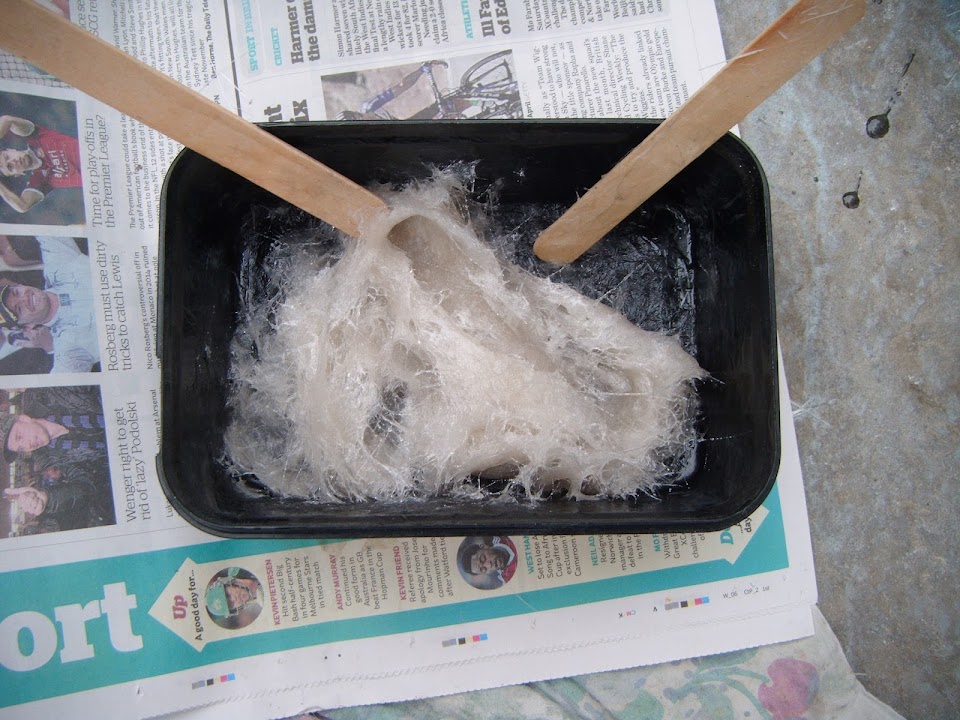
Which I used to start building up the lip where it needed it the most.
When sanded down, this will leave a good "rough" surface for the regular fibreglass filler to stick to.
Normal body filler was next, as I skimmed the "nose job" area.

I also covered the main bonnet join.

And the gap between the headlight and bonnet nose.

Whilst this looks like a lot of filler, it is a very thin skim in most places.
There was just enough normal fibreglass filler left in the tin to start work on the top edge.
( I do have another tin in the shed, but didn't want to mix the batches up. )


So by the time I left my morning's work to set, the bonnet looked a real mess.
But as the saying goes, you can't make an omelette without breaking eggs.
End of Part 1...
|
22nd January 2015, 13:40
|
|
Senior Member
|
|
Join Date: Feb 2012
Location: Wembley, London
Posts: 5,056
|
|
The Tidy Up Starts:
Unfortunately, I started sanding the normal body filler before it was set hard enough & a small chunk came off.

Although, thankfully, this was not covering the repaired area and would have been sanded off the bonnet anyway.
Either way, I will leave all this filler to keep setting and will not start sanding it down until tomorrow at the earliest.
There were no problems with the fibreglass filler and that shaped up nicely.


Similarly, the "home brew" was also set, so that got a quick trim with the angle grinder.
I think it will look pretty good when the next round of normal fibreglass filler is applied around the edge.
But all of that will have to wait for another day.
Cheers, Paul.
|
23rd January 2015, 09:59
|
|
Senior Member
|
|
Join Date: Feb 2012
Location: Wembley, London
Posts: 5,056
|
|
Zip-a-dee-doo-dah, zip-a-dee-ay.
My, oh my, what a wonderful day.
Don't worry, the cold weather hasn't finally driven me mad.
No, as despite being very cold from working outside this morning, I now have a warm glow on the inside.
You see, as I was taking a cup of coffee upstairs to upload this morning's photos, I checked for any post.
There was a brown envelope from Swansea that rapidly turned me into a small child at Christmas.
It was opened as I repeatedly chanted "Please let it be right" and I can now officially declare...
I have in my hand a piece of paper.
Which means it is finally time to reveal the Model name I have chosen for my V5C.
I didn't not want to use 'Sammio Cordite', as the original kit was such a stinking pile of  .
( No offence intended to Sammio Spyders, Ribble Navigator MkIIs, Miglia Speedsters, etc. which were miles better all round. )
But I really liked the idea of using an alternative British WWII aircraft name to replace the original Spitfire. 
Unfortunately, the obvious choice of Hurricane was already used by another car, a kit car & a motorcycle.
However, I found something else, and thought its connection with water seemed appropriate for my outdoor build.
So it gives me great pleasure to introduce to you the world's first Triumph Swordfish.
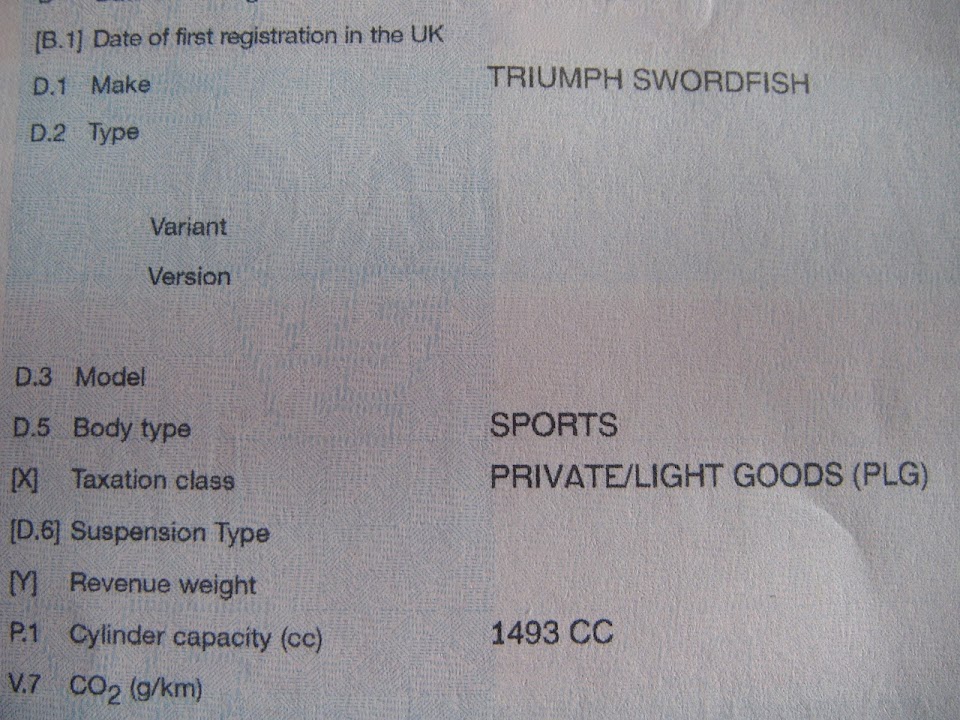
Now I must admit to making a complete hash of the application process by asking all the wrong questions.
So finally seeing this revised Model name in black & white on my V5C is a huge relief. 
As an added bonus, there was no requirement for an inspection, which saved me hiring a trailer.
Whilst I remain a long way from getting this car on the road, this is still a high point of the build for me. 
A special word of thanks to blooka & cbjroms for their help "behind the scenes".
Similarly, if I can help anyone else through this process, feel free to PM me.
Foot Note:
I originally wanted Swordfish 1500 as my Model name to tie in with my donor Spitfire 1500.
Whilst there would have been space for this in the Model line of the V5C, there wasn't in the Make line.
( There appears to be a limit of 20 characters in that "box". )
Anyway, I have to go back outside shortly to continue today's work & will post a normal update later on.
In the meantime...
Zip-a-dee-doo-dah, zip-a-dee-ay.
My, oh my, what a wonderful day.
|
23rd January 2015, 10:07
|
|
Senior Member
|
|
Join Date: Mar 2012
Posts: 1,152
|
|
Nice name. Well done, Paul. I have been mulling WWII aircraft names for the similar reasons (despite mine being Herald-based!).
I did look at synonyms for "Herald" and suggestions include "publicize", "ballyhoo" and "tout"........................
|
23rd January 2015, 10:24
|
|
Senior Member
|
|
Join Date: May 2011
Location: Somerset
Posts: 1,671
|
|
WHOO HOO!!!
Nice choice of a unique name for a unique vehicle |
23rd January 2015, 14:09
|
|
Senior Member
|
|
Join Date: Feb 2012
Location: Wembley, London
Posts: 5,056
|
|
Oxford & Dave - Cheers guys.
I am actually going to send the nice man in the DVLA a thank you card this weekend.
As I am so pleased to have reached this key point of the build.
- - - - - - - - - - - - - - - - - - - - - - - - - - - - - - - -
Anti-Climax:
To be honest, after this morning's post, my normal update may appear quite dull by comparison.
It was another ridiculously cold start to the day, which meant that the first job was more sanding.
Thankfully after a night in the Summer House the normal body filler was set solid.
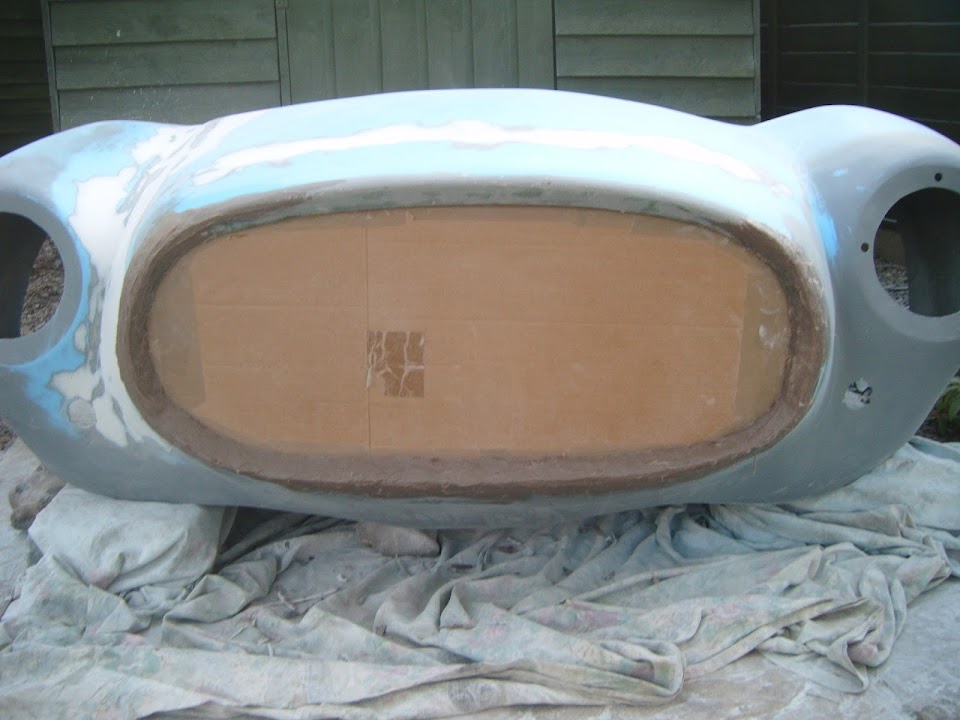
So the "nose job" repair area now looks like this.
Here is the area between the headlight & nose.
And finally the main bonnet join.

I need to do a bit more work on this join, but I am not going to attempt to mirror the other side.
As long as I can create a smooth flow across the bonnet I will live with the symmetry "quirks".
Whilst the sanding was hard work, at least it was helping to keep me warm.
When I removed my jacket steam was rising from me like I was a thoroughbred seaside donkey.
- - - - - - - - - - - - - - - - - - - - - - - - - - - - - - - -
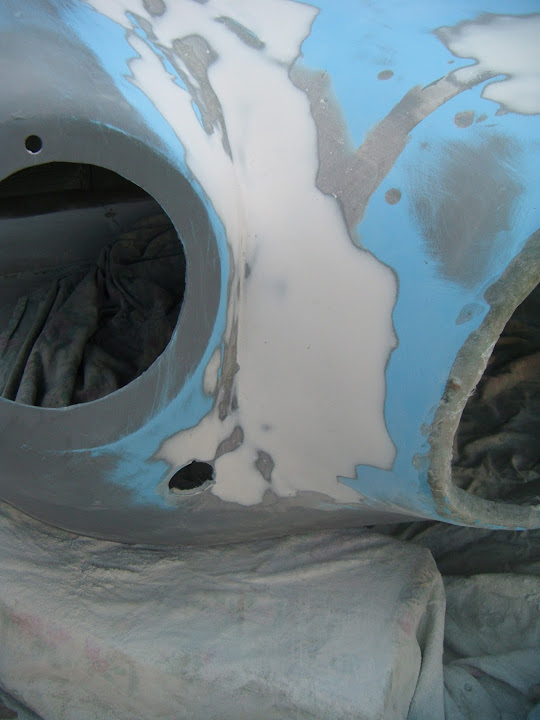
Yesterday I was mainly thinking about the angles around the edge of the nose opening.
However, as I looked back on the photos, I realised the "height" of those angles mattered too.
As it would be nice to get a vaguely even depth all around the inside when viewed from the front.
So using the size of the top edge as my guide, I marked up the "home brew" filler in a few places for a further trim.

- - - - - - - - - - - - - - - - - - - - - - - - - - - - - - - -
But before I started to trim this from the top, I had another look at tidying up the inside "vertical" face.
I found it very hard to grind this down to a flat and even surface all the way around.
However, it occurred to be that it would be a lot easier to build up the surface instead.
So I taped my cardboard grille template to the grille itself.

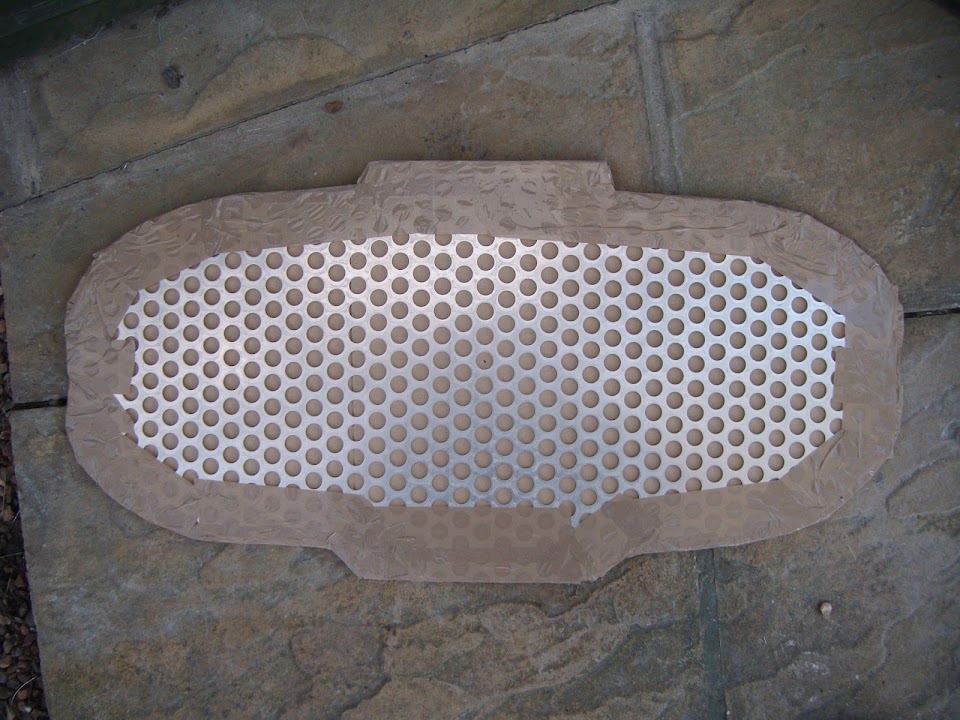
Before mixing up some fibreglass filler and spreading it around the whole inner lip.
I pushed the cardboard/grille combo firmly into place to, hopefully, create a flat/even edge.
Then added a few rocks to hold it in position.

By this point I was so cold I was happy to come back indoors while I left that to set.
As you will have read above, that was when I found out my V5C had arrived.
- - - - - - - - - - - - - - - - - - - - - - - - - - - - - - - -
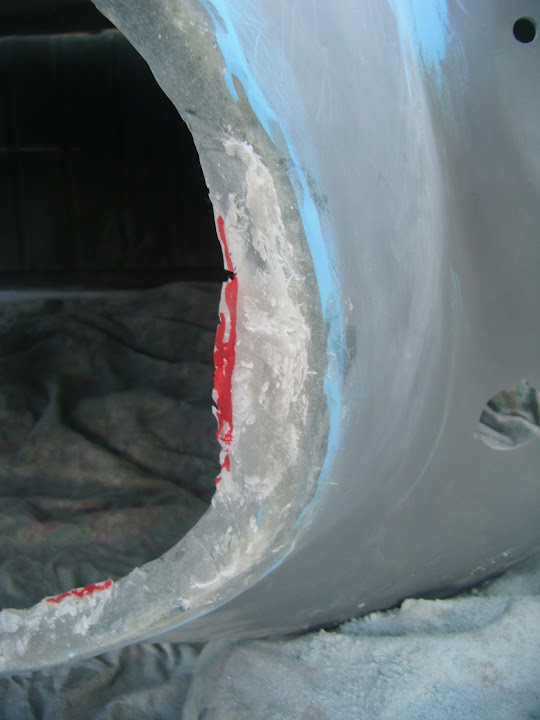
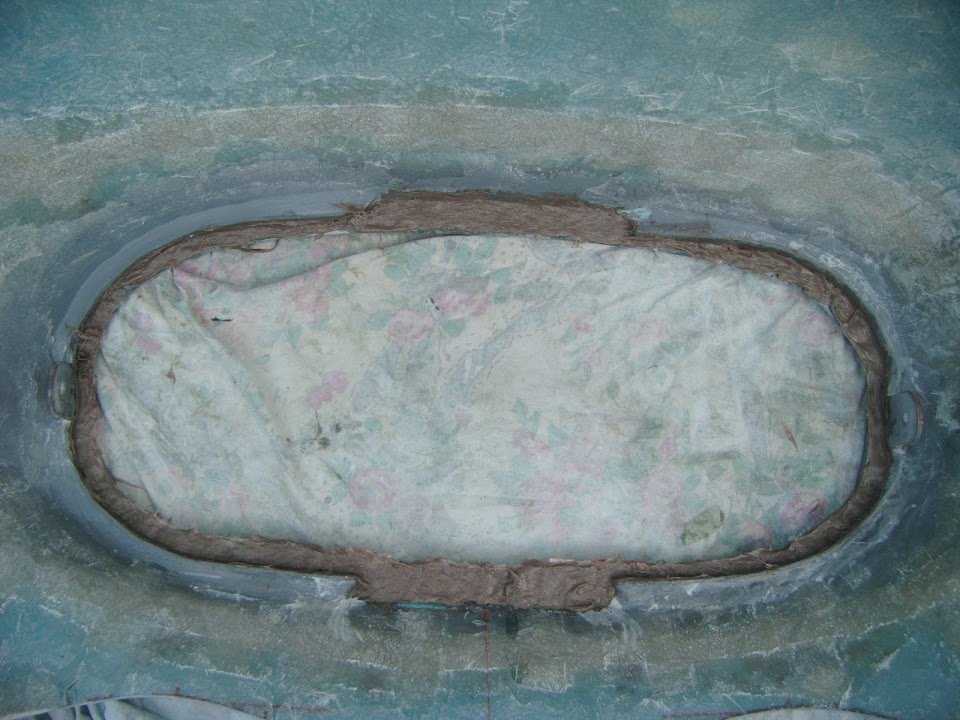
Whilst I added extra hardener due to the cold, I don't think I added enough.
So it was a while before I could use a Stanley knife to trim off the filler squeezed out by the grille.
( I did this on both sides. )
Then I could carefully remove the grille and trim down the previously marked "home brew".

I may have added too much hardener in the next batch of fibreglass filler, making it a race against time to apply it.
At least I got the remaining parts of the nose opening covered, I also pushed the grille back in place to give me a nice edge.
Note:
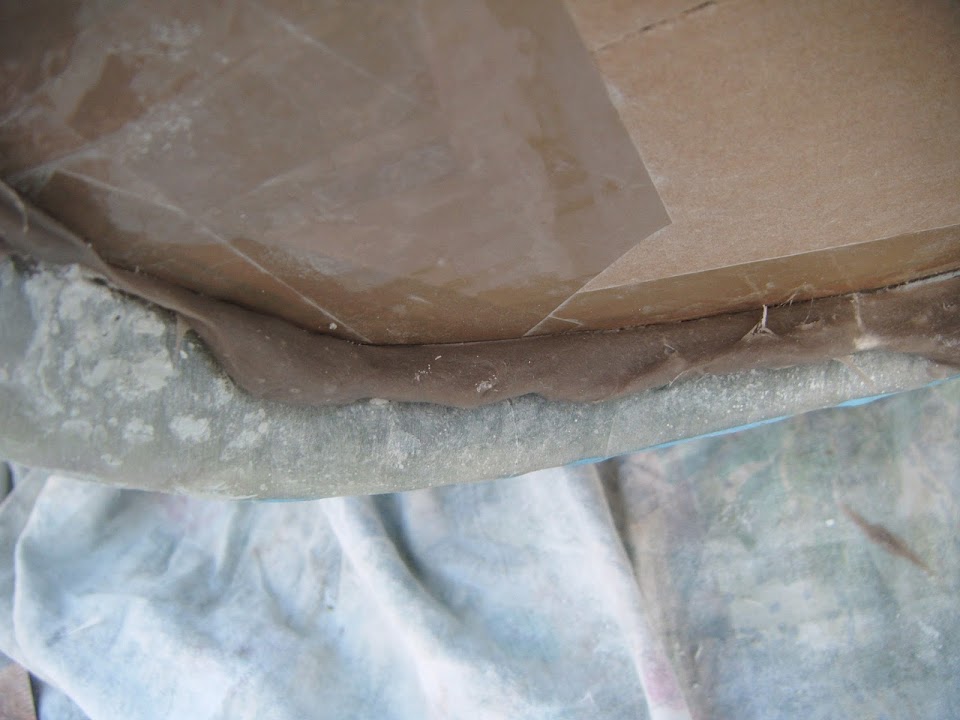
The end of the grille came away from the middle of the far edge when I took the photo.
I left that for a while before removing the grille again.
Note:
There is already a big improvement in the vertical face of the internal edge.
And obviously the whole thing will look better once I have sanded everything down.
But at this point I called it a day and tucked the bonnet away for the night to give the filler more time to set.
So until next time, take care, Paul.
|
|
Currently Active Users Viewing This Thread: 3 (0 members and 3 guests)
|
|
|
| Thread Tools |
|
|
| Display Modes |
 Linear Mode Linear Mode
|
 Posting Rules
|
You may not post new threads
You may not post replies
You may not post attachments
You may not edit your posts
HTML code is Off
|
|
|
All times are GMT +0. The time now is 20:28.
|


