|
|
| General Build Chat Area for general build chat, questions, tips, tricks and progress |

31st May 2019, 12:45
|
|
Member
|
|
Join Date: Feb 2019
Location: Essex
Posts: 61
|
|
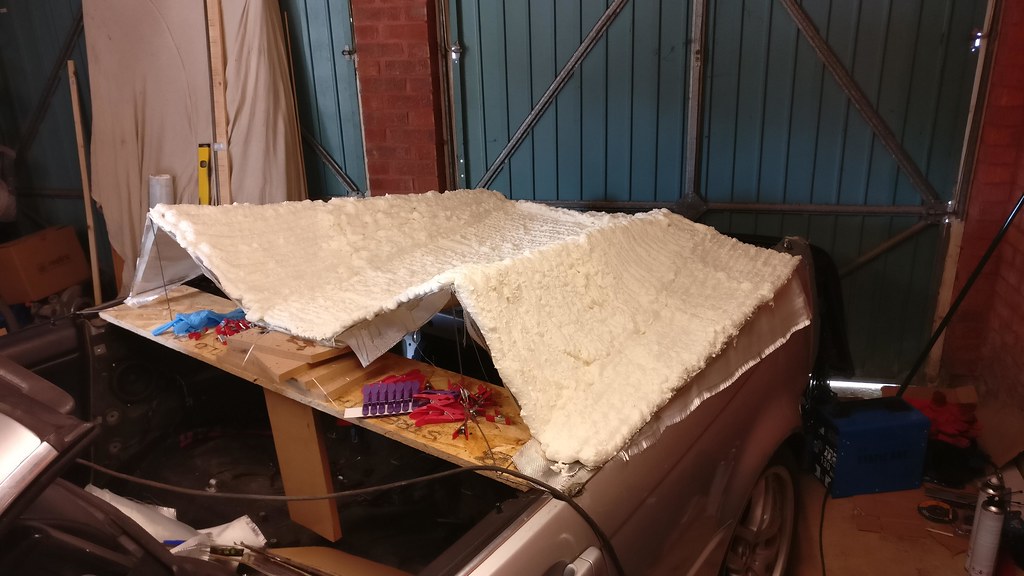
Fibreglass
Will I got some Woven Roving Fibreglass to start covering my wire frame, this will have a small amount of resin painted on it to create the base over the wire frame that I can build on with foam and filler.
Here is an image of the fibreglass just laying on the frame, it gives an idea of the shape of the car.

Last edited by Bellicose; 8th June 2019 at 22:22..
|
31st May 2019, 12:50
|
|
Member
|
|
Join Date: Feb 2019
Location: Essex
Posts: 61
|
|
More Welding and back on to foam work!
Well after a few weeks of not having the space to carry on with the project I have now been able to get some decent work done!
I mirrored the wire frame onto the passenger side and then started to clamp strips of fibreglass material to the wire frame. Once it was all clamped in place I covered the fibreglass in resin. Now this was done to give me a base to put the expanding foam on. It worked well, and meant I had a decent start with the foam and also pointed out a few problems with my design/framework.


As you can see, the "tunnels" behind the headrests are WAY too pronounced and it's starting to look like the Bat Mobile! Not what I'm trying to achieve!
But that's fine, I can build up the foam to lessen the effect of the tunnels. Funny how in framework it looks fine, but soon as there's a solid mass to look at the appearance changes completely.
So onto the foam!


Last edited by Bellicose; 8th June 2019 at 22:22..
|
1st June 2019, 10:55
|
|
Member
|
|
Join Date: Feb 2019
Location: Essex
Posts: 61
|
|
This morning has been all about the sanding and shaping. Using the air sanders I've been cutting back the foam and bringing the shape out that I want for the car.
Here is the first side profile view

It's getting there and needs a lot of work but you can see where it's trying to go now and the proportions.
I'm stopping for now though as I need to start working on the boot and working out exactly how it's going to look and work. I'm keeping the existing boot hinges and lock system in place so working round those. |
7th June 2019, 07:46
|
 |
Senior Member
|
|
Join Date: Feb 2012
Location: Wembley, London
Posts: 5,058
|
|
Bellicose – Looks like you are making good progress. 
Are you going to use the foam as a 'buck' to make the final body in fibreglass?
Good luck, Paul. 
|
7th June 2019, 07:49
|
|
Member
|
|
Join Date: Feb 2019
Location: Essex
Posts: 61
|
|
Quote:
Originally Posted by Paul L

Bellicose – Looks like you are making good progress.
Are you going to use the foam as a 'buck' to make the final body in fibreglass?
Good luck, Paul.
|
Hey Paul, yes. Everything you see at the moment is purely to take moulds from. Once that's done everything will be stripped off the car and the fibreglass panels will be attached to make the new body. |
7th June 2019, 18:53
|
 |
Senior Member
Big Cheese
|
|
Join Date: Sep 2002
Posts: 1,080
|
|
following with interest  |
8th June 2019, 17:00
|
|
Member
|
|
Join Date: Feb 2019
Location: Essex
Posts: 61
|
|
Today I've spent some time adjusting the side design and adding some details.
It's all photoshop and going to change a lot once on the car but it's showing the shape come to life more and more.
 |
9th June 2019, 13:12
|
|
Senior Member
|
|
Join Date: Apr 2014
Location: Birmingham, UK
Posts: 545
|
|
interesting!
|
11th February 2020, 10:16
|
|
Member
|
|
Join Date: Feb 2019
Location: Essex
Posts: 61
|
|
Been a long time since I did my last update.
Not a great deal has happened to be honest, life and the wife have scuppered my plans to work every weekend on the car.
This is how the car looks as of today, you have to use a bit of imagination with the cutting discs for lights and a spirit level for a spoiler lol
The shape is getting there and looking more and more how I want it to. Changed my mind on the rear lights (again!) and going for round LED lights.
I don't think i'm too far off taking my first mould and can then cut out the boot and start on that side of things.

 |
11th February 2020, 10:39
|
|
Senior Member
|
|
Join Date: Oct 2013
Location: norfolk
Posts: 695
|
|
Interesting work you're doing there. Do the panels unbolt from the donor, so that once the buck is made (and mould lifted from that) the GRP will just bolt on, replacing the originals? Bonding on to existing panels is IMHO to be avoided if possible.
|
11th February 2020, 11:15
|
|
Member
|
|
Join Date: Feb 2019
Location: Essex
Posts: 61
|
|
Quote:
Originally Posted by Mitchelkitman
Interesting work you're doing there. Do the panels unbolt from the donor, so that once the buck is made (and mould lifted from that) the GRP will just bolt on, replacing the originals? Bonding on to existing panels is IMHO to be avoided if possible.
|
It will be a little of both.
The whole front will be able to bolt on to existing bolt holes.
The rear will have a metal frame created that will bolt onto exiting bolt holes in the rear, the rear body will then bolt to this framework and be bonded in small areas where any other attachment would be difficult. |
11th February 2020, 11:23
|
|
Senior Member
|
|
Join Date: Oct 2013
Location: norfolk
Posts: 695
|
|
Your method of using framework and woven roving appears good, and it's great to see 'out of the box' thinking. Did you consider using foam panels to get to the shape? the foam spray is very expensive (I know from experience  ), and the foam sheet is so light it can self-support. Foam panels (sold as builder's insulation) isn't too expensive, and can be glued on with your foam after the paper and/or foil sheet is removed (that process is very smelly for some reason!) |
11th February 2020, 11:27
|
|
Member
|
|
Join Date: Feb 2019
Location: Essex
Posts: 61
|
|
Quote:
Originally Posted by Mitchelkitman
Your method of using framework and woven roving appears good, and it's great to see 'out of the box' thinking. Did you consider using foam panels to get to the shape? the foam spray is very expensive (I know from experience ), and the foam sheet is so light it can self-support. Foam panels (sold as builder's insulation) isn't too expensive, and can be glued on with your foam after the paper and/or foil sheet is removed (that process is very smelly for some reason!) |
I did but I like the easy of foam, both the application and shaping is great and takes very little time, also if you make a mistake you can fix it quickly.
Cost wise I've used £70 in foam so far, I buy in bulk on ebay. I think it will be around £100 total for the whole car which isn't too much at all. |
11th February 2020, 11:51
|
|
Senior Member
|
|
Join Date: Oct 2013
Location: norfolk
Posts: 695
|
|
Quote:
Originally Posted by Bellicose
I did but I like the easy of foam, both the application and shaping is great and takes very little time, also if you make a mistake you can fix it quickly.
Cost wise I've used £70 in foam so far, I buy in bulk on ebay. I think it will be around £100 total for the whole car which isn't too much at all.
|
Fair comment. How are you planning on getting a smooth finish to mould off? |
11th February 2020, 11:54
|
|
Member
|
|
Join Date: Feb 2019
Location: Essex
Posts: 61
|
|
Quote:
Originally Posted by Mitchelkitman
Fair comment. How are you planning on getting a smooth finish to mould off?
|
Buckets of bodyfiller! Then primer, then a top coat.
Again, Ebay bulk buying works out really cheap. £100 for 20 litres which is enough for the whole car. |
|
Currently Active Users Viewing This Thread: 1 (0 members and 1 guests)
|
|
|
 Posting Rules
|
You may not post new threads
You may not post replies
You may not post attachments
You may not edit your posts
HTML code is Off
|
|
|
All times are GMT +0. The time now is 04:27.
|


 Linear Mode

